Mastering Image Optimization in WordPress

When building and maintaining WordPress websites, it’s important to find ways to improve site performance and decrease page load times. This helps reduce bounce rates and increase rankings on search engines.
There are several ways of achieving performance through a WordPress site’s theme and plugin code – for example, minifying JavaScript, CSS and images. There’s also server based configuration options – for example, enabling caching, or using a WordPress Plugin to help cache static content.
However, we can’t control the content – specifically images – that clients will add to their WordPress web site. Images may be uploaded in their original form, leading to site performance issues and increasing page load times.
In this article we will explore different ways of optimizing JPEG and PNG images, which are uploaded by clients and site owners into WordPress.
Key Takeaways
- Prioritize Predefined Image Sizes: Utilize WordPress’ built-in settings to define thumbnail, medium, and large sizes for images to optimize performance and ensure images are appropriately sized for different contexts within your theme.
- Implement Additional Image Sizes: Use `add_image_size()` for custom image dimensions in your theme, allowing for greater flexibility and optimization across various post types and page layouts.
- Optimize Image Compression: Employ both lossy and lossless compression techniques to reduce image file sizes significantly, balancing quality and performance, with tools like TinyPNG for automated compression.
- Adjust JPEG Quality Settings: Modify the default JPEG image quality via your theme’s `functions.php` to manage file size reduction directly within WordPress, optimizing storage and load times.
- Leverage CDN Services: Integrate a Content Delivery Network (CDN) like Photon or MaxCDN to distribute and cache images geographically, speeding up image delivery based on the user’s location and further enhancing site performance.
Theme Image Sizes
When a WordPress user uploads an image, WordPress provides two functions which we can use to create copies of the original image, at specific dimensions. This is useful where we want to output an image at a specific size within our theme.
Thumbnail, Medium and Large Sizes
Within the WordPress Administration, under Settings > Media, there are three predefined image sizes: thumbnail, medium and large. Each can have their own dimensions set.
Because WordPress will always resize images to these sizes (resulting in 4 images being stored – the original, thumbnail, medium and large sizes), it’s worth setting these first and using them within your WordPress Theme where possible.
To use a predefined image size in your WordPress Theme, use:
while ( have_posts() ) {
    the_post();
    the_post_thumbnail( 'thumbnail' ); // Or 'medium', or 'large'
}
set_post_thumbnail_size()
If you need additional image sizes, we can use set_post_thumbnail_size():
Set the default Featured Image (formerly Post Thumbnail) dimensions.
This allows us to define the width and height of Featured Images for Posts, Pages and Custom Post Types, which we output in our theme using the_post_thumbnail().
To define the Featured Image size, add the following code to your theme’s functions.php file. This would set Featured Images to be 500px width x 500px height:
add_theme_support( 'post-thumbnails' );
set_post_thumbnail_size( 500, 500, true );
To output a Post’s Featured Image at the specified dimensions, use the_post_thumbnail() within the WordPress Loop:
while ( have_posts() ) {
    the_post();
    the_post_thumbnail();
}
add_image_size()
Whilst set_post_thumbnail_size() is useful, we can only call it once to define one set of image dimensions, alongside WordPress thumbnail, medium and large sizes. We’re stuck if we then want to output additional sizes – for example, a 500px x 500px image for our Posts, and a 400px x 400px image for our Pages.
Thankfully, WordPress also provides the add_image_size() function:
Registers a new image size. This means WordPress will create a copy of the image with the specified dimensions when a new image is uploaded.
We can call this function within our theme’s functions.php file as many times as we need, in order to register as many image sizes as our theme requires. Let’s register two image sizes, for Posts and Pages respectively:
add_image_size( 'post', 500, 500, true );
add_image_size( 'page', 400, 400, true );
We can now specify which image size we want to output by modifying our the_post_thumbnail() calls:
while ( have_posts() ) {
    the_post();
    the_post_thumbnail( 'post' ); // Or 'page'
}
Results
Using our test JPEG and PNG images, we can see the file size reduction and performance gains:
JPEG Image
| Original Dimensions – File Size: 504KB |
 |
|
|
| 500px x 500px – File Size: 29KB |
 |
|
|
| 400px x 400px – File Size: 21KB |
 |
PNG Image
| Original Dimensions – File Size: 697KB |
 |
|
|
| 500px x 500px – File Size: 354KB |
 |
|
|
| 400px x 400px – File Size: 236KB |
 |
Image Compression
Image compression aims to reduce image file sizes further by removing redundant data, with little or no sacrifice to image quality.
There are two main methods for image compression: lossy and lossless.
Lossy Image Compression
Lossy compression uses inexact approximations, discarding partial amounts of image data, to produce an image that will have a lower file size, whilst maintaining the original image as best as possible.
Metadata (such as EXIF information, telling us about the camera make, model and location) can be discarded with no effect on image quality.
The disadvantage is that image quality may suffer, so it’s important to find the right balance between fast image loading times and image quality.
Lossy compression is typically used on JPEG images and photographs, where there is a lot of data within the image file to render the image output.
Using our test images and tinypng.com, we can see the effects of lossy compression on our JPEG and PNG images:
JPEG Image
| Original Dimensions – Original File Size: 504KB, Lossy Compressed File Size: 367KB, Saving: 27% |
 |
|
|
| 500px x 500px – Original File Size: 29KB, Lossy Compressed File Size: 17.1KB, Saving: 41% |
 |
|
|
| 400px x 400px – Original File Size: 21KB, Lossy Compressed File Size: 12.5KB, Saving: 39% |
 |
PNG Image
| Original Dimensions – Original File Size: 697KB, Lossy Compressed File Size: 229.6KB, Saving: 67% |
 |
|
|
| 500px x 500px – Original File Size: 354KB, Lossy Compressed File Size: 94.3KB, Saving: 73% |
 |
|
|
| 400px x 400px – Original File Size: 236KB, Lossy Compressed File Size: 64.6KB, Saving: 73% |
 |
Lossless Image Compression
Lossless compression allows partial discarding and compression of image data, with no loss of image quality. Images that are ‘losslessly’ compressed will render the same as the original image.
The disadvantage is that it doesn’t usually provide any file size improvement on more complex images, such as photographs. For that reason, it’s best used on PNG and GIF images.
Image Compression: WordPress Solutions
WordPress provides two ways of adjusting image quality, using lossy compression. We can use both by adding the following code to our theme’s functions.php file:
add_filter( 'jpeg_quality', 'custom_image_quality' );
add_filter( 'wp_editor_set_quality', 'custom_image_quality' );
function custom_image_quality( $quality ) {
    return 60;
}
jpeg_quality defines the quality of JPEG images uploaded to WordPress, or edited within WordPress’ Image Editor.
wp_editor_set_quality defines the quality of (in this case) any image edited within WordPress’ Image Editor. For JPEG images, because we’ve specified the jpeg_quality filter, this will override this filter.
Uploading our test images to WordPress with these changes produces the following results:
JPEG Image
| Original Dimensions – Original File Size: 504KB, 60% Quality File Size: 504KB, Saving: 0% |
 |
|
|
| 500px x 500px – Original File Size: 29KB, 60% Quality File Size: 14KB, Saving: 51% |
 |
|
|
| 400px x 400px – Original File Size: 21KB, 60% Quality File Size: 10KB, Saving: 52% |
 |
PNG Image
| Original | 500px x 500px | 400px x 400px | |
|---|---|---|---|
| File Size | 697KB | 354KB | 236KB |
| 60% Quality File Size | 697KB | 354KB | 236KB |
| Saving | 0% | 0% | 0% |
You’ll notice that our uploaded PNG images are not changed – this is because the jpeg_quality filter only affects JPEG images, and the wp_editor_set_quality is only used if we edit an image through the Media Library.
Furthermore, our original images aren’t changed – this is because WordPress only applies the quality filters to resized images.
Image Compression: Plugin Solutions
Whilst we’ve explored how image compression works, and used an online tool to run some tests, we’d ideally want our images to be automatically compressed in WordPress. This means we’re not relying on clients (or ourselves) to remember to use a third party tool before uploading images into WordPress, and we’re simplifying the process.
There are a few WordPress Plugins which provide automatic image compression:
EWWW Image Optimizer
EWWW Image Optimizer provides lossless compression, using a variety of JPEG, PNG and GIF compression libraries/services. It requires exec() access, which some shared hosts may not have – however they do provide an EWWW Image Optimizer Cloud, which is a paid for service that processes images on their servers.
Again, for lossy compression, you’ll need to pay for an API key, with rates starting at $1 for 1,000 images.
To setup EWWW Image Optimizer, navigate to Plugins > Add new in your WordPress Administration interface, and search for “EWWW Image Optimizer”:

Click the Install Now button, and activate the plugin once installed.
By default, the plugin will provide lossless compression on our images, with no further configuration required. Let’s create a new Post, and set our Featured Image to our test image to get some results:
JPEG Image
| Original Dimensions – Original File Size: 504KB, Lossy Compressed File Size: 503KB, Saving: 0.2% |
 |
|
|
| 500px x 500px – Original File Size: 29KB, Lossy Compressed File Size: 28KB, Saving: 3.5% |
 |
|
|
| 400px x 400px – Original File Size: 21KB, Lossy Compressed File Size: 20KB, Saving: 4.8% |
 |
PNG Image
| Original Dimensions – Original File Size: 697KB, Lossy Compressed File Size: 669KB, Saving: 4% |
 |
|
|
| 500px x 500px – Original File Size: 354KB, Lossy Compressed File Size: 300KB, Saving: 15.3% |
 |
|
|
| 400px x 400px – Original File Size: 236KB, Lossy Compressed File Size: 200KB, Saving: 15.3% |
 |
We’re able to get better performance when ‘losslessly’ compressing PNG images over JPEG images, which is to be expected. However, these images are still quite large, so let’s try another plugin that provides lossy compression instead.
Compress JPEG & PNG Images
As well as providing a web based image compression service, TinyPNG also provide a WordPress Plugin to automatically provide lossy compression to JPEG and PNG images.
The first 500 image compressions per month are free. After that, it costs $0.009 per image compression.
To setup the TinyPNG plugin, navigate to Plugins > Add new in your WordPress Administration interface, and search for “Compress JPEG & PNG Images”:

Click the Install Now button, and activate the plugin once installed.
Next, obtain an API key by visiting https://tinypng.com/developers and entering your name and email address:

You’ll receive an email with a link to obtain your API key. Click the link, and make a note of your API key:

In the WordPress Plugin, navigate to Settings > Media, and insert your TinyPNG API key. You can also choose which image sizes to compress – each image size counts as a compression out of the 500 free allocated compressions per month, so let’s just select the original image, Page and Post sizes for our tests:

Let’s create a new post, and set our ‘Featured Image’ to our test image to get some results:
JPEG Image
| Original Dimensions – Original File Size: 504KB, Lossy Compressed File Size: 367KB, Saving: 27.2% |
 |
|
|
| 500px x 500px – Original File Size: 29KB, Lossy Compressed File Size: 19KB, Saving: 34.5% |
 |
|
|
| 400px x 400px – Original File Size: 21KB, Lossy Compressed File Size: 13KB, Saving: 38.1% |
 |
PNG Image
| Original Dimensions – Original File Size: 697KB, Lossy Compressed File Size: 230KB, Saving: 67% |
 |
|
|
| 500px x 500px – Original File Size: 354KB, Lossy Compressed File Size: 94KB, Saving: 73% |
 |
|
|
| 400px x 400px – Original File Size: 236KB, Lossy Compressed File Size: 65KB, Saving: 73% |
 |
From one image alone, using specific image sizes and a compression plugin, we can reduce a 504KB JPEG image down to 13KB – a 491KB saving, or around a 1 second faster over a 2 Mbps connection. For a 697KB PNG, we can reduce this down to 65KB – a 632KB saving, or around 1.2 seconds faster over a 2 Mbps connection.
Now that we’ve optimized the images we want to deliver on our WordPress web site, let’s see how we can optimize the delivery of those images, based on the visitor’s location and other factors.
Content Delivery Networks (CDN)
A content delivery network is a large number of servers, typically distributed in multiple data centers across the world. They’re designed to serve static content, such as text, images, CSS and Javascript, as well as larger file downloads.
CDNs may also utilise caching and minification, to ensure that the delivered content is as optimized as possible.
Due to the geographic locations of CDNs, most will detect the visitor’s country, and attempt to deliver text, images, CSS and Javascript from the nearest available data center. This helps reduce response times and page load times, as well as reducing server bandwidth and load on your server.
Let’s look at two available CDN solutions for WordPress.
Photon
Photon is described as:
… an image acceleration and editing service for sites hosted on WordPress.com or on Jetpack-connected WordPress sites. That means less load on your host and faster images for your readers
It automatically grabs JPEG, PNG and GIF images, serving resized versions to meet the requirements of the browser. This is useful if we’re viewing a WordPress web site on a mobile device that has 500px x 500px images, but we only need a 250px x 250px version.
To setup Photon, we need to install and activate Jetpack. Navigate to Plugins > Add new in your WordPress Administration interface, and search for “Jetpack”:

Click the Install Now button, and activate the plugin once installed.
Next, click on Jetpack in the WordPress Administration menu, and then click on Connect to WordPress.com. You’ll then be asked to login to your WordPress.com account (don’t worry if you don’t have one – you can sign up for a free account at this point):
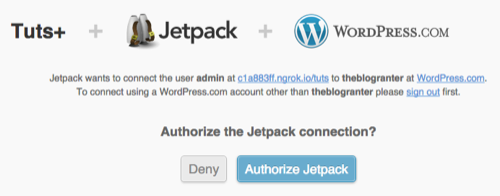
If everything is successful, you’ll be redirected back to your WordPress Administration interface, where you’ll see several modules, including Photon, available. Let’s go ahead and activate Photon by clicking the Activate button:

Photon is now activated, and images will be served from their CDN.
Let’s view our existing Post and Page, which contained our TinyPNG optimized Featured Images. You’ll notice the images are now served from i2.wp.com – this is Photon’s CDN. We can get the image source and adjust the resize parameters to get the original, 500px and 400px versions, to test the optimized file sizes:
JPEG Image
| Original Dimensions – Original File Size: 504KB, Lossy Compressed File Size: 318KB, Saving: 37% |
 |
|
|
| 500px x 500px – Original File Size: 29KB, Lossy Compressed File Size: 14KB, Saving: 51.7% |
 |
|
|
| 400px x 400px – Original File Size: 21KB, Lossy Compressed File Size: 10KB, Saving: 52.4% |
 |
PNG Image
| Original Dimensions – Original File Size: 697KB, Lossy Compressed File Size: 239KB, Saving: 65.7% |
 |
|
|
| 500px x 500px – Original File Size: 354KB, Lossy Compressed File Size: 101KB, Saving: 71.5% |
 |
|
|
| 400px x 400px – Original File Size: 236KB, Lossy Compressed File Size: 69KB, Saving: 70.8% |
 |
We’re still able to achieve similar file size savings to TinyPNG, with our JPEG image performing better on Photon, and our PNG image performing better using TinyPNG.
Third Party CDNs
If you’d prefer not to install Jetpack, and utilise the other functionality that comes with it (36 modules and counting!), you can use a third party CDN, such as MaxCDN.
The advantage of this approach is that you’re not just limited to optimizing image delivery; you can specify that CSS, JavaScript files and other static file types be served by the CDN. We can also keep an image optimization plugin, such as TinyPNG, on our WordPress installation, ensuring that our images are optimized before being stored on the CDN. If you’re on a site that has more CSS and Javascript content vs. images, then this may be a better solution.
To setup MaxCDN, head over to their web site, and click the Get a Free Test Account button.
Follow the on-screen instructions to complete your personal details. You’ll then receive an email allowing you to create your MaxCDN account and get started.
Once you’ve signed up, you’ll need to create a zone. A zone is essentially a web site.
To create a zone, click the Zones option in the main menu, followed by Create Pull Zone

Enter the name for your pull zone (typically your web site name), it’s URL and an optional label:

Next, we need to configure our WordPress installation to use MaxCDN. We’ll use W3 Total Cache, which is a WordPress Plugin that comes with MaxCDN support.
To setup W3 Total Cache, navigate to Plugins > Add new in your WordPress Administration interface, and search for “W3 Total Cache”:

Click the Install Now button, and activate the plugin once installed.
Once activated, navigate to Performance > CDN in the WordPress Administration menu, and scroll down to the Configuration panel.

Click the Authorize button, copy the authorization key, and paste it into the Authorization key field of the plugin:

If everything worked, a Key is valid notice should display on screen. Click the Save all settings button to complete configuration.
Reload one of your existing Pages or Posts, and you should see the CSS, JS and images are being served from the CDN.
Conclusion
In this article, we’ve reviewed a number of image optimization and CDN plugins for WordPress. Photon CDN, which is part of the Jetpack Plugin, provides the single, most effective solution to delivering optimized images, scaled for all resolutions and served from a CDN – and best of all, it’s free.
For those who already have a CDN in place, or would prefer not to use one, or use Jetpack, TinyPNG’s WordPress Plugin resulted in a slight improvement in image optimization over Photon for PNG images, and can be useful in conjunction with a third party CDN providers.
Frequently Asked Questions about Mastering Image Optimization in WordPress
What are the benefits of image optimization in WordPress?
Image optimization in WordPress is crucial for several reasons. Firstly, it improves the loading speed of your website. Large, unoptimized images can slow down your site, negatively impacting the user experience and your SEO ranking. Secondly, optimized images use less storage space, which can be beneficial if you’re on a limited hosting plan. Lastly, optimized images look professional and appealing, which can enhance your site’s overall aesthetics and user engagement.
How does image optimization affect SEO?
Image optimization plays a significant role in SEO. Search engines like Google consider website loading speed as a ranking factor. Optimized images load faster, improving your site’s speed, and thus, its SEO ranking. Additionally, properly optimized images with correct alt tags can help your site appear in image search results, driving more traffic to your site.
What are the best WordPress plugins for image optimization?
There are several excellent WordPress plugins for image optimization. Some of the most popular ones include EWWW Image Optimizer, Smush, and ShortPixel. These plugins automatically compress and optimize your images as you upload them, saving you time and effort.
How do I optimize images without losing quality?
You can optimize images without losing quality by using lossless compression, which reduces file size without degrading the image quality. Many WordPress image optimization plugins offer this feature. Additionally, choosing the right image format (JPEG, PNG, GIF, etc.) based on your needs can also help maintain image quality.
What is the ideal image size for WordPress?
The ideal image size for WordPress largely depends on your theme. However, a general rule of thumb is to keep your image width between 1200 and 1600 pixels for full-width images. For smaller images, a width of 600-800 pixels is usually sufficient.
How do I add alt tags to images in WordPress?
You can add alt tags to images in WordPress by going to your Media Library, selecting the image, and filling in the ‘Alt Text’ field. Alt tags are important for SEO and accessibility, as they describe the image content to search engines and visually impaired users.
Can I bulk optimize images in WordPress?
Yes, many WordPress image optimization plugins allow you to bulk optimize images. This feature can be incredibly useful if you have a large number of images to optimize.
How do I optimize images for mobile devices?
To optimize images for mobile devices, you can use responsive images, which adjust to fit different screen sizes. WordPress automatically creates several sizes of each image you upload, and serves the most appropriate size to each device.
What is the difference between lossy and lossless compression?
Lossy compression reduces file size by removing some image data, which can lead to a loss in image quality. On the other hand, lossless compression reduces file size without removing any data, preserving the original image quality.
How often should I optimize images in WordPress?
Ideally, you should optimize images as you upload them to your WordPress site. This ensures that your site remains fast and efficient, providing the best user experience possible.
Tim is a WordPress Developer who builds WordPress web sites, themes and plugins. He runs n7 Studios, providing WordPress development, consultancy & training, and WP Zinc, providing free and premium WordPress Plugins.