Saving Files for the Web
Photoshop files themselves can’t be embedded into a web page. You will need to export your file and save it in a web-friendly format. There are three formats for web graphics: GIFs, JPEGs, and PNGs.
GIF
The GIF format (pronounced “jiff” or “giff” depending on which side of the tracks you grew up) can have a maximum of 256 colors. GIF files support transparency and animation, and work best with graphics that have large areas of the same color, as shown in the logo below.
JPEG
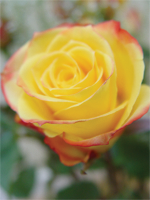
The JPEG format (pronounced “jay-peg”), works best with photographic images or images that have more than 256 colors and gradients, such as the flower on the opposite page. Images saved in JPEG format are compressed, which means that image information will actually be lost, causing the image to degrade in quality.
PNG

The PNG format (pronounced “ping”) is similar to the GIF format in that it supports transparency and works best with solid-color images like the logo shown to the right, but it’s superior to the GIF format as it has the ability to support true levels of transparency for colored areas. Transparent PNGs are currently not in widespread use on the Web because older versions of Microsoft Internet Explorer do not support them; however, they’re often used in Macromedia Flash movies. PNGs can produce a better quality image at a smaller file size than can GIFs. Photoshop allows you to save an image as a PNG-8 file (which works the same way as a GIF would with 256 colors) or a PNG-24 file (which allows for millions of colors as well as variable transparency).
Double-clicking Power
As if keyboard shortcuts weren’t quick enough, Windows users have even more ways to open and save files, such as: holding down Ctrl and double-clicking the work area to create new documents double-clicking the work area to pull up the Open dialog box to open files holding down Alt and double-clicking the work area to open existing files as new documents holding down Ctrl-Shift and double-clicking the work area to save documents holding down Shift and double-clicking the work area to access Adobe Bridge — Adobe’s “control center” and file browser The work area is the gray area behind the document windows. If your shortcuts aren’t working, check that you are clicking on an empty spot on the work area, and not in one of the document windows or Photoshop tools! Alas, Photoshop on a Mac does not have a work area, so Mac users won’t get to enjoy the goodness of double-click shortcuts.
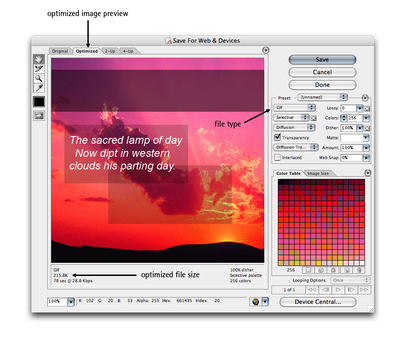
To save for the Web in Photoshop, select File > Save for Web & Devices… or press Ctrl-Alt-Shift-S(Command-Option-Shift-S on a Mac). This will bring up the Save For Web dialog box shown overleaf, which will show you a preview of the image that will be exported, with its optimized size in the bottom left-hand corner. You can adjust the settings for the image using the options in the pane on the right. Choose whether you want to save the file as a GIF,JPEG, PNG-8, or PNG-24, and have a play with the other settings, keeping an eye on the optimized file size. Try to strike a balance between the quality and file size of the image. When you’re happy with your result, click Save and give your image a filename.
If you tried the above exercise, you’re probably quite pleased with yourself for saving an image of reasonable quality at a file size significantly smaller than the original. You managed this by altering the settings in the right-hand pane, but what do these settings actually do?
GIF/PNG-8
- colors – Adjusting this setting reduces the number of colors used in the image. This will usually make the biggest difference in the final image.
- dither amount and type (No Dither, Diffusion, Pattern, Noise) – This setting has nothing to do with being nervous or agitated (although it’s quite possible that you may have been a few moments ago!). Dither refers to a compression technique in which the pattern of dots is varied to give the illusion of a color gradient. Changing the dither will result in a more noticeable degradation for images that involve a large number of colors blended together.
- transparency – If you want transparent areas in your graphic, check this box. We’ll look more closely at transparency in Chapter 2.
- matte color – For transparent images, the matte color is used to help blend the edges of your image into the background of the web page. For non-transparent images, the matte color defines the background color of the image. Using matte color with transparent images is covered in more detail in Chapter 2.
JPEG
- quality – Changing the value in the Quality drop-down box alters the level of compression for the image. Reducing the quality may result in blurring or pixelation, but too high a setting will produce a large file that will take users too long to download. A good approach is to decrease the quality value gradually until you notice the degradation of your image becoming unacceptable. A reasonable compromise will be somewhere around this point.
Saving Files for the Web in Fireworks
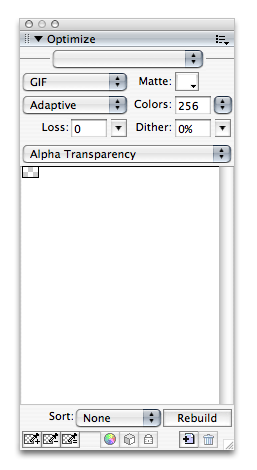
You can optimize images for the Web in Fireworks using the Optimize palette, shown at right. Set the file type and options in the Optimize palette in advance, and when you’re ready to export your web image, select File > Export or press Ctrl-Shift-R (Command-Shift-R on a Mac). Fireworks will save the image based on the settings that you’ve defined.
Why Two Tools?
Considering that it’s possible to save files for the Web in Photoshop, it’s perfectly reasonable for you to wonder why you would need Fireworks. While it’s true that both programs can perform many of the same tasks, there are certain things that Fireworks can do that Photoshop can’t. Fireworks also makes web-specific tasks easier, and since it’s a smaller program that doesn’t contain the full suite of Photoshop effects, it loads more quickly than Photoshop. As you work through this book you’ll come to learn which tool is more suitable for particular tasks.
Photoshop Layers
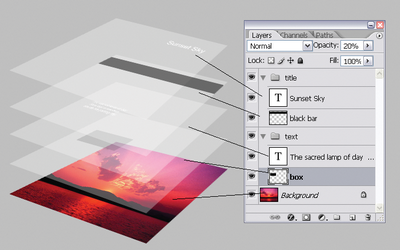
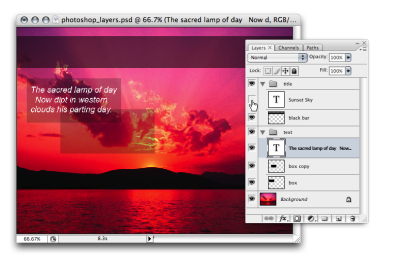
Layers are a powerful feature of Photoshop that allow you to work on one part of an image without disturbing the rest of it. While the concept of layers may seem intimidating at first, once you get the hang of using layers you’ll wonder how you ever survived without them! The examples on the next page show how the layers in the Photoshop document to the right stack together.
The transparent parts of any layer, shown by the checkered grid, allow the layers beneath that layer to show through.
You can show and hide each layer in an image by clicking on its corresponding eye icon in the Layers palette, as shown at the bottom of the following page.
To organize your layers, you can arrange them into layer groups by going to Layer > New > Group…. Each layer group displays in the same way as any ungrouped layers on the Layers palette. A layer group is signified by a folder icon. You can collapse or expand layer groups by clicking on the triangle to the left of the folder icon, and nest layer groups within each other by dragging one folder icon into another.
Go to page: 1 | 2 | 3 | 4 | 5 | 6
And if you enjoyed reading this post, you’ll love Learnable; the place to learn fresh skills and techniques from the masters. Members get instant access to all of SitePoint’s ebooks and interactive online course Foundations of Photoshop.
Comments on this article are closed. Have a question about Photoshop? Why not ask it on our forums?
 Corrie Haffly
Corrie is the lead designer and developer for PixelMill. This would-be triathlete has a mathematics degree but wishes she had double-majored in computer science and art instead. Maybe next time...


