Enabling AJAX File Uploads in Your WordPress Plugin

Providing upload functionality in our plugin is always tricky business. We need to be able to provide a good user experience (UX) for uploading, while also keeping an eye on the security concerns that come with it. If it’s not done properly, we could potentially put the site at risk for any security vulnerabilities that arise.
Instead of building the whole solution from scratch, we can leverage the WordPress core code to our advantage to speed up the development, specifically utilising async-upload.php file that’s located in the wp-admin directory.
Using the async-upload.php file has several advantages. Firstly, since it’s used by WordPress core itself for async uploading in the media library, we can be assured that the code is up to standard. Plus, all the validation and privilege checking has been done so we don’t need to do that ourselves.
Key Takeaways
- Utilize the existing `async-upload.php` file from WordPress core to ensure standard code quality and simplify the AJAX file upload process in your plugin.
- Ensure proper security measures by setting the file input name to `async-upload`, using the correct nonce value, and specifying the action key as `upload-attachment` in your AJAX request.
- Create a user-friendly frontend submission form using a shortcode to allow registered users to submit images, enhancing the plugin’s functionality with AJAX for seamless file uploading.
- Enqueue necessary scripts and localize script data to handle AJAX file uploads efficiently, including specifying URLs for AJAX handling and nonce generation.
- Implement additional user role capabilities, such as allowing subscribers to upload files, to ensure the plugin functions correctly across different user levels.
- Extend the plugin’s functionality with error handling, image preview displays, and progress indicators during file uploads to improve user experience and feedback.
Requirements
There are several rules that need to be followed if we’re to utilise this script. Here’s a breakdown to each of them.
- The
fileinput that is used must has its name attribute set toasync-upload
This is due to the fact that once the validation is passed inside the async-upload.php file, wp_ajax_upload_attachment which then further calls the media_handle_upload function that uses async-upload as the first arguments. Using any other value will not work.
- The nonce that we sent alongside the AJAX request must use the default
_wpnoncekey with the value generated from thewp_create_nonce('media-form')function
This is due to the validation in the form of check_ajax_referer that is happening inside the wp_ajax_upload_attachment function.
- The data sent via the AJAX request also needs to have a key called
actionwith a value ofupload-attachment
This is validated inside the async-upload.php file which will only trigger the wp_ajax_upload_attachment function when the value is set correctly.
About the Plugin
To better illustrate the idea of building custom AJAX file upload functionality into a plugin, we will create a simple plugin to test it out.
For the purpose of this tutorial, we’re going to create a plugin that allows registered users to submit an image for some sort of contest. We will have a frontend submission form, which means that the upload form will be displayed on a certain page where the user can directly upload the image. This is a perfect candidate to implement AJAX uploading functionality.
Since we’re trying to keep things simple, let’s define some guidelines of what this plugin will and will not do, for the sake of the length of this tutorial.
The plugin will be able to:
- Allow the admin to attach the form to any page via a shortcode.
- Show the registered users a submission form with AJAX upload functionality.
- Send an email to notify the site admin upon submission.
For the scope of this tutorial, the plugin will not:
- Store any submissions into the database.
- View the submissions in the backend.
- Allow anonymous users to upload the files.
Bootstrapping the Plugin
Head to the wp-content/plugins folder and create a new folder where all of our plugin codes will reside. I will use the name sitepoint-upload for the rest of this tutorial, with prefix of su_ to all functions and hooks callbacks.
Next, create the main plugin file, with the same name as the folder, to make things easier. Inside the plugin folder, we will also have a js folder which contains an empty script.js file for now.
Here’s an updated directory structure for our plugin.
wp-content/
|-- plugins/
|-- sitepoint-upload/
|-- js/
| |-- script.js
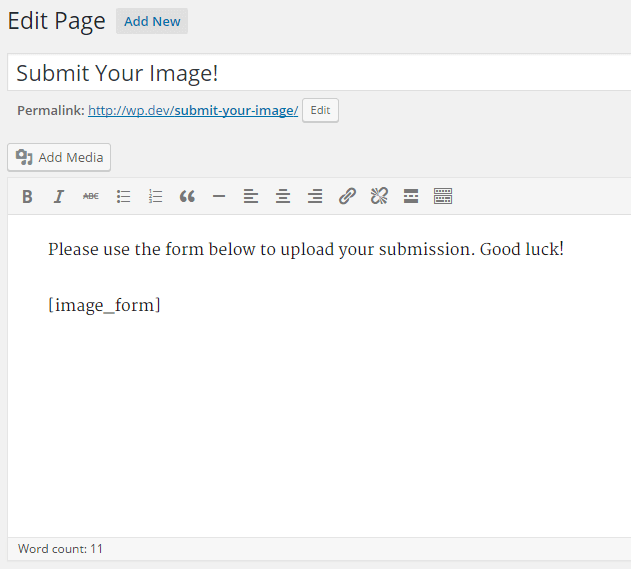
|--sitepoint-upload.phpLet’s put in a simple plugin header into the plugin main file, sitepoint-upload.php, then go ahead to the plugins page to activate it. Here’s example of mine:
<?php
/*
Plugin Name: Simple Uploader
Plugin URI: https://www.sitepoint.com
Description: Simple plugin to demonstrate AJAX upload with WordPress
Version: 0.1.0
Author: Firdaus Zahari
Author URI: https://www.sitepoint.com/author/fzahari/
*/
Enqueue the Script
We then can enqueue the empty script.js to the frontend, which will be used to handle our AJAX uploading functionality, as well as enhancing the submission form.
function su_load_scripts() {
    wp_enqueue_script('image-form-js', plugin_dir_url( __FILE__ ) . 'js/script.js', array('jquery'), '0.1.0', true);
}
add_action('wp_enqueue_scripts', 'su_load_scripts');
We’re also going to localize some data which will be used inside script.js using the function wp_localize_script. We need three things, a correct URL to both admin-ajax.php since we’re going to submit the form via AJAX as well, and also the URL to the async-upload.php file. The third item we need to localize is the nonce, which will be generated using the wp_create_nonce function.
The updated callback function for our wp_enqueue_scripts hook looks like the this:
function su_load_scripts() {
    wp_enqueue_script('image-form-js', plugin_dir_url( __FILE__ ) . 'js/script.js', array('jquery'), '0.1.0', true);
    $data = array(
                'upload_url' => admin_url('async-upload.php'),
                'ajax_url'   => admin_url('admin-ajax.php'),
                'nonce'      => wp_create_nonce('media-form')
            );
    wp_localize_script( 'image-form-js', 'su_config', $data );
}
add_action('wp_enqueue_scripts', 'su_load_scripts');
Register the Shortcode for a Submission Form
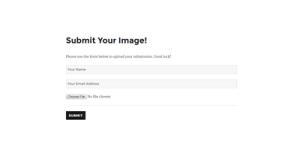
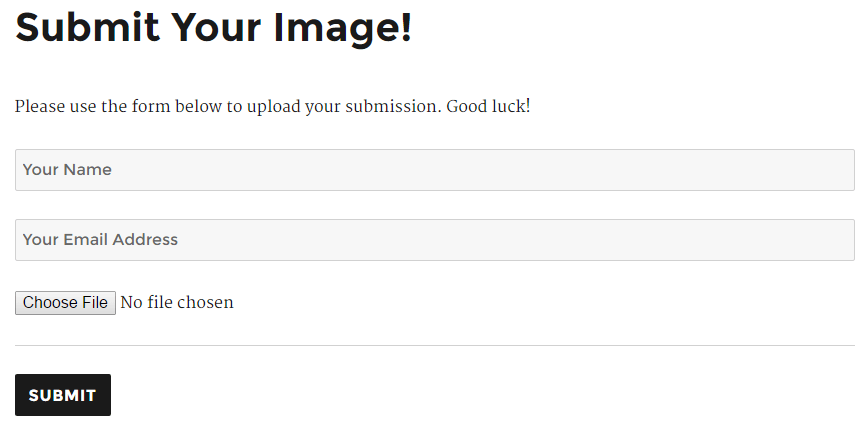
We will then need to register the shortcode for our submission form, so that we can easily put it in any pages we want instead of writing the same markup over and over again. Our form will have:
- A text input field for user’s name
- Another email input field for user’s email address
- The
async-uploadfile input for AJAX uploading - A bunch of placeholder
divthat will be used for email preview, error messages and other items.
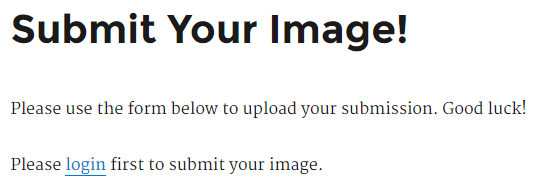
We will also be disabling the submission form entirely if the user is not currently logged in, and display a login link instead.
function su_image_form_html(){
    ob_start();
    ?>
        <?php if ( is_user_logged_in() ): ?>
            <p class="form-notice"></p>
            <form action="" method="post" class="image-form">
                <?php wp_nonce_field('image-submission'); ?>
                <p><input type="text" name="user_name" placeholder="Your Name" required></p>
                <p><input type="email" name="user_email" placeholder="Your Email Address" required></p>
                <p class="image-notice"></p>
                <p><input type="file" name="async-upload" class="image-file" accept="image/*" required></p>
                <input type="hidden" name="image_id">
                <input type="hidden" name="action" value="image_submission">
                <div class="image-preview"></div>
                <hr>
                <p><input type="submit" value="Submit"></p>
            </form>
        <?php else: ?>
            <p>Please <a href="<?php echo esc_url( wp_login_url( get_permalink() ) ); ?>">login</a> first to submit your image.</p>
        <?php endif; ?>
    <?php
    $output = ob_get_clean();
    return $output;
}
add_shortcode('image_form', 'su_image_form_html');
A few explanations about the shortcode callback function above:
- The shortcode we register is
image_form. - We’re using output buffering so that we can be more flexible with what we expose inside the shortcode callback function.
- We’re also restricting file selection for images only via the
acceptattribute on the file input. Note that this doesn’t replace the actual file validation. (More info) - For the login URL, we supply the current page permalink into the
wp_login_urlso that the user will be redirected back to our submission page upon successful login.
Add upload_files Capability to the Specific User Roles
To make sure our plugin is functioning properly, we need to alter the capability of role of subscriber because by default, users with the role subscriber don’t have the capability to upload files.
function su_allow_subscriber_to_uploads() {
    $subscriber = get_role('subscriber');
    if ( ! $subscriber->has_cap('upload_files') ) {
        $subscriber->add_cap('upload_files');
    }
}
add_action('admin_init', 'su_allow_subscriber_to_uploads');
Note, the subscriber role will only be modified if it still doesn’t have upload_files capability.
Now that we’re finished with our plugin basics, let’s create a new page that will display our submission form.
This is how the form looks on the frontend, on a default WordPress installation with twentysixteen theme active.
If we’re logged out of the site, the notice will be shown instead.
Looks like our plugin comes together nicely!
Implementing the AJAX Upload
Now that our base plugin has been configured correctly, we can focus on the core functionality that we need to do, the AJAX upload.
Let’s open up our script.js file that is located inside the js folder to proceed. We will first wrap the whole code within immediately-invoked function expression (IIFE).
Next, we will cache a few selectors to speed up our code. This includes the references to the image preview div, the input file, as well as the div used to display the upload notice.
(function($) {
    $(document).ready(function() {
        var $formNotice = $('.form-notice');
        var $imgForm    = $('.image-form');
        var $imgNotice  = $imgForm.find('.image-notice');
        var $imgPreview = $imgForm.find('.image-preview');
        var $imgFile    = $imgForm.find('.image-file');
        var $imgId      = $imgForm.find('[name="image_id"]');
    });
})(jQuery);
The cached selectors will be useful to us in the long run. As mentioned before, there are few rules that need to be followed in order for the validation in the async-upload.php file to pass. To do that, we will make a POST request via AJAX to the async-upload.php file with the correct key or value pairs as specified. This can be done using the FormData API.
We will first hook on the change event on the file input, and if the input is changed, only then we will trigger the AJAX upload.
$imgFile.on('change', function(e) {
e.preventDefault();
var formData = new FormData();
formData.append('action', 'upload-attachment');
formData.append('async-upload', $imgFile[0].files[0]);
formData.append('name', $imgFile[0].files[0].name);
formData.append('_wpnonce', su_config.nonce);
$.ajax({
url: su_config.upload_url,
data: formData,
processData: false,
contentType: false,
dataType: 'json',
type: 'POST',
success: function(resp) {
console.log(resp);
}
});
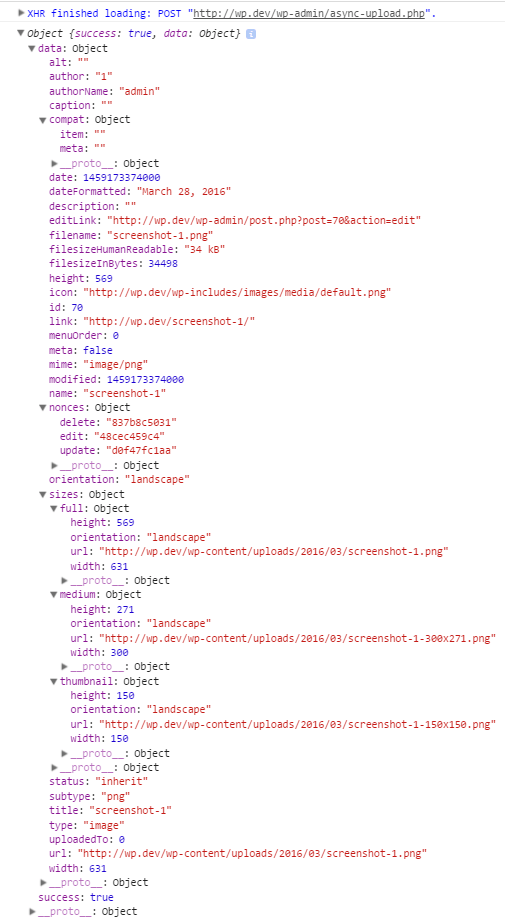
});For now, let’s leave the code as above, and test the upload functionality to make sure we’re on the right track. Using the developer console (depending on what browser is used), check the console tab for the output. A sample of response given by async-upload.php file upon successful upload as follows:
We can also check for the file existence by going directly to the wp-content/uploads directory. Now that we see that the uploading functionality is working well, let’s work on a few improvements to our upload script. Here are some improvements that I can think of:
- Show a progress bar or text during the upload process.
- Show the uploaded image preview on successful upload.
- Display error if the upload failed.
- Provide a way for user to upload a new image to replace the current one.
Let’s see how to do this one by one.
Show a Progress Bar or Text During the Upload Process
This is actually a simple one. We only need to define a callback for the beforeSend of jQuery AJAX. Somewhere in the code for the AJAX upload, put the code block as follows:
beforeSend: function() {
    $imgFile.hide();
    $imgNotice.html('Uploading…').show();
},
We use the empty div with the class image-notice defined previously to show the progress text to the user. We’re also hiding the file input during the upload process.
For the supported browsers, we can even show the upload percentage. What we can do is to override the original jQuery xhr object with our own. Add this to the $.ajax configuration:
xhr: function() {
    var myXhr = $.ajaxSettings.xhr();
    if ( myXhr.upload ) {
        myXhr.upload.addEventListener( 'progress', function(e) {
            if ( e.lengthComputable ) {
                var perc = ( e.loaded / e.total ) * 100;
                perc = perc.toFixed(2);
                $imgNotice.html('Uploading…(' + perc + '%)');
            }
        }, false );
    }
    return myXhr;
}
What this code does for supported browsers, is simply appending the upload percentage after the Uploading text, which is a rather nice enhancement. For unsupported browsers, nothing will happen which is a nice graceful degradation.
Show the Uploaded Image Preview on Successful Upload or Display Error When the Upload Failed
Depending on the response we get from the async-upload.php script, we will show a different message to the user. If the success key is set to true, we can then show the uploaded image to the user, and hide the file input. If the upload fails, we will replace the text inside the div with image-notice previously.
success: function(resp) {
    if ( resp.success ) {
        $imgNotice.html('Successfully uploaded.');
        var img = $('<img>', {
            src: resp.data.url
        });
        $imgId.val( resp.data.id );
        $imgPreview.html( img ).show();
    } else {
        $imgNotice.html('Fail to upload image. Please try again.');
        $imgFile.show();
        $imgId.val('');
    }
}
$imgId is a hidden input that we’re using to reference the uploaded image ID. We’re going to use this value later for the form submission, so don’t worry about it yet.
Provide a Way for User to Upload a New Image to Replace the Current One
What we’re going to do is to provide a link as a method for the user to replace the currently uploaded image with a new one. We will change the notice shown when the upload succeeds from:
$imgNotice.html('Successfully uploaded.');to
$imgNotice.html('Successfully uploaded. <a href="#" class="btn-change-image">Change?</a>');Now that we have an anchor with a class of btn-change-image, we will use that to our advantage. We can then add a click event listener on that anchor, when it’s clicked, it will remove the current image preview. We will also hide the notice message, as well as display the file input again with its value which has been reset.
$imgForm.on( 'click', '.btn-change-image', function(e) {
    e.preventDefault();
    $imgNotice.empty().hide();
    $imgFile.val('').show();
    $imgId.val('');
    $imgPreview.empty().hide();
});
We also need to reset the file input value when it’s clicked, so that the change event can be triggered again.
$imgFile.on('click', function() {
    $(this).val('');
    $imgId.val('');
});
Before we proceed to the next section, let’s run through the uploading functionality once again and see if everything works as intended.
Completing the Plugin
We’re going to handle the form submission via AJAX, so we’re binding an event listener to the submit event of that form.
$imgForm.on('submit', function(e) {
    e.preventDefault();
    var data = $(this).serialize();
    $.post( su_config.ajax_url, data, function(resp) {
        if ( resp.success ) {
            $formNotice.css('color', 'green');
            $imgForm[0].reset();
            $imgNotice.empty().hide();
            $imgPreview.empty().hide();
            $imgId.val('');
            $imgFile.val('').show();
        } else {
            $formNotice.css('color', 'red');
        }
        $formNotice.html( resp.data.msg );
    });
});
Based on the above code, we’re going to process the submission on the backend using the built-in WordPress AJAX action. Upon successful submission, we’re going to reset the form, remove the image preview, as well as set the form notice text to green.
For a failed submission, we simply set the form notice text colour to red. This will allow the user to review the form data, before retrying again.
Now, open up the plugin main file again to add the AJAX callback. Since we’re setting the action value to image_submission, we will need to add a valid callback to the wp_ajax_image_submission action.
add_action('wp_ajax_image_submission', 'su_image_submission_cb');In the callback function, there are a few things that need to be done first. We need to check for a valid AJAX nonce, as well as validating the user inputs. For the scope of this tutorial, we’re going to simply email the site admin for any new submission.
Here’s the full code for the AJAX callback function:
function su_image_submission_cb() {
    check_ajax_referer('image-submission');
    $user_name  = filter_var( $_POST['user_name'],FILTER_SANITIZE_STRING );
    $user_email = filter_var( $_POST['user_email'], FILTER_VALIDATE_EMAIL );
    $image_id   = filter_var( $_POST['image_id'], FILTER_VALIDATE_INT );
    if ( ! ( $user_name && $user_email && $image_id ) ) {
        wp_send_json_error( array('msg' => 'Validation failed. Please try again later.') );
    }
    $to      = get_option('admin_email');
    $subject = 'New image submission!';
    $message = sprintf(
                    'New image submission from %s (%s). Link: %s',
                    $user_name,
                    $user_email,
                    wp_get_attachment_url( $image_id )
                );
    $result = wp_mail( $to, $subject, $message );
    if ( $result ) {
        wp_send_json_error( array('msg' => 'Email failed to send. Please try again later.') );
    } else {
        wp_send_json_success( array('msg' => 'Your submission successfully sent.') );
    }
}
For our purpose, a simple check_ajax_referer check and native filter_var PHP function is suffice for our use case. We’re also going to utilise the wp_send_json_error and wp_send_json_success function to send back the response.
With that, our plugin is finished and fully functional. To verify, try completing the form properly and see if the email is received with the link to the uploaded image.
Further Improvements
Since the objective of this tutorial is to demonstrate how to do AJAX uploading via the internal async-upload.php file, we’re definitely cutting things short in a few places. Here are some suggestions that can improve our simple plugin overall.
- Adding more fields to the form to capture any additional value for submission.
- Enqueue a separate CSS file to better style the form, notice and upload progress.
- Save the submitted data into the database, so that we can review it back again.
- Doing more validation to the upload process so that it can be more secure.
The full source code of the plugin is available on GitHub.
Conclusion
As a conclusion, implementing AJAX upload in a plugin can be sped up if we know where to look. By using the async-upload.php file, we can reduce the development time to implement the feature, as well as gaining some confidence since the same file is used by WordPress core to process the user upload in the administration dashboard.
Frequently Asked Questions (FAQs) about Enabling AJAX File Uploads in Your WordPress Plugin
What is AJAX and why is it important in file uploads for WordPress plugins?
AJAX stands for Asynchronous JavaScript and XML. It is a set of web development techniques that allows a web page to communicate with a server without reloading the page. This is crucial in file uploads for WordPress plugins because it provides a smoother user experience. Instead of having to wait for the page to reload after uploading a file, AJAX allows the file to be uploaded in the background, enabling users to continue interacting with the page.
How can I enable AJAX file uploads in my WordPress plugin?
Enabling AJAX file uploads in your WordPress plugin involves a few steps. First, you need to create a form in your plugin for file uploads. Then, you need to write a JavaScript function that will handle the file upload using AJAX. This function should be triggered when the form is submitted. Finally, you need to write a PHP function that will process the file upload on the server side. This function should be hooked to the ‘wp_ajax_’ action in WordPress.
What are the best WordPress plugins for AJAX file uploads?
There are several WordPress plugins that support AJAX file uploads. Some of the most popular ones include WP File Upload, Gravity Forms, and Contact Form 7. These plugins provide easy-to-use interfaces for file uploads and include features like multiple file uploads, progress bars, and file type restrictions.
Why is my AJAX file upload not working in WordPress?
There could be several reasons why your AJAX file upload is not working in WordPress. One common issue is a JavaScript error, which can be caused by a conflict with another plugin or a mistake in your code. Another possible issue is a server-side error, which can be caused by incorrect file permissions or a problem with your PHP code. To troubleshoot the issue, you should check the JavaScript console for errors and enable WP_DEBUG in WordPress to see any PHP errors.
How can I secure my AJAX file uploads in WordPress?
Securing your AJAX file uploads in WordPress is crucial to prevent unauthorized access and file uploads. You can secure your file uploads by checking the user’s permissions before processing the upload, validating the file type and size, and using nonces to verify the request’s authenticity. Additionally, you should always sanitize the uploaded file’s name to prevent any potential security issues.
Can I use AJAX file uploads in WordPress without a plugin?
Yes, you can enable AJAX file uploads in WordPress without using a plugin. This involves writing custom JavaScript and PHP code to handle the file upload process. While this requires more technical knowledge, it gives you more control over the file upload process and can be a good option if you have specific requirements that are not met by existing plugins.
How can I show a progress bar for AJAX file uploads in WordPress?
Showing a progress bar for AJAX file uploads in WordPress can enhance the user experience by providing visual feedback on the upload progress. This can be achieved by using the ‘progress’ event in the XMLHttpRequest object in your JavaScript code. The ‘progress’ event is triggered periodically during the file upload, and you can use it to update a progress bar element on your page.
How can I handle multiple file uploads with AJAX in WordPress?
Handling multiple file uploads with AJAX in WordPress involves modifying your form to allow multiple files, updating your JavaScript code to loop through each file and send it to the server, and updating your PHP code to process each file individually. This can be a bit more complex than handling a single file upload, but it provides a better user experience for uploading multiple files.
Can I restrict the file types allowed for AJAX file uploads in WordPress?
Yes, you can restrict the file types allowed for AJAX file uploads in WordPress. This can be done by checking the file type in your PHP code before processing the upload. You can get the file type from the $_FILES array in PHP and compare it to a list of allowed file types.
How can I handle errors in AJAX file uploads in WordPress?
Handling errors in AJAX file uploads in WordPress involves checking for errors in your JavaScript and PHP code and providing appropriate feedback to the user. In your JavaScript code, you can use the ‘error’ event in the XMLHttpRequest object to handle any errors that occur during the file upload. In your PHP code, you can check the $_FILES array for any upload errors and return an appropriate error message.
Firdaus Zahari is a web developer who comes all the way from Malaysia. His passion revolves around (but is not limited to) WordPress and front-end development.

Published in
·Content management·Design·Design & UX·Photography & Imagery·Resources·Software·UI Design·September 25, 2015