
Vi/Vim is one of the most popular editors in the programming community. Vim has been around for decades, and offers many advantages and efficiencies, provided you are willing to learn it. Today, I hope to help you on the path of learning Vim. We will explore the basics of Vim in this tutorial, and there will be another one for using Vim in Ruby on Rails development which will be published soon.
A Brief History of Vi and Vim
Before the appearance of the UNIX, the text editor “ed” appeared, written by Ken Thompson in 1971. ed is regarded as one of the oldest text editors ever, as well as the first to implement the concept of Regular Expressions.
After a short period, the “ex” text editor appeared. ex is short for “EXtend”, as it adds some features to ed and to make it simpler.
Vi appeared in 1976, written by Bill Joy which for the BSD operating system. Licensed, of course, under the license with the same name as the operating system (the BSD license).
Vi is regarded as an addition to ex which had only 2 of vi‘s current modes. We will explore the concept of modes and how to use them, in this tutorial.
After a few years, other editions began to appear, the most famous one bding Vim which is short for “Vi Improved”.
In 1991 Bram Moolenaar started to work on Vim. The goal was to build an Amiga compatible text editor to edit source code. Vim is licensed under GPL as an open source program. Vim only worked in the shell until 1996,when the first GUI interface made it’s debut. At this time, Vim bac was at version 4.
Here are a few of my favorite Vim features:
- Vim has been ported to a much wider range of OS’s than vi.
- Vim includes support (syntax highlighting, code folding, etc) for several popular programming languages (C/C++, Python, Perl, shell, etc).
- Vim integrates with cscope.
- Vim can be used to edit files using network protocols like SSH and HTTP.
- Vim includes multilevel undo/redo.
- Vim allows the screen to be split for editing multiple files.
- Vim can edit files inside a compressed archive (gzip, zip, tar, etc).
- Vim includes a built in diff for comparing files (vimdiff).
- Vim includes support for plugins, and finer control over config and startup files.
- Vim can be scripted with vimscript, or with an external scripting language (e.g. python, perl, shell).
Installing Vim
On Ubuntu
If you’re using a GNOME-based desktop, such as Unity, you can use vim-gnome which is a GUI version of Vim. To install, type in a terminal
sudo apt-get install vim-gnomeIf you’re running another desktop environment, such as XFCE, LXDE, or KDE, you can use vim-gtk which doesn’t depend on as many extra library files as vim-gnome. To install, type in a terminal:
sudo apt-get install vim-gtkNOTE: As of Ubuntu 6.10 (Edgy Eft), the default Vim install is a cut-down version called “vim-tiny”. In order to get the full version complete with the online help documentation, and many of the advanced functions such as code folding; you will need to install “vim”:
sudo apt-get install vimOn MacOSX
In Mac OS X, the package managers are Homebrew and MacPorts. There is a project called MacVim which is a GUI interface for Vim. To install it using Homebrew, just type:
brew install macvim --override-system-vimThis will create vim, vimdiff, etc. symlinks to mvim in /usr/local/bin/vim. You need to make sure /usr/local/bin is before /usr/bin in your PATH. MacVim come with built-in support for Ruby, which will be useful when integrating some plugins, like Command-T.
On Windows
- Download Vim: Go to Vim Download page and click on “PC: MS-DOS and MS-Windows”. Click on the
gvim72.exe, which is a Self-installing executable, or downloadgvim72.exedirectly. - Installing: After downloading click on
gVim72.exe, which will install gVim on your Windows as shown below.
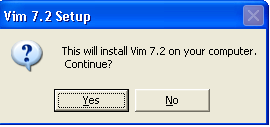 Vim Installation Confirmation
 Vim 7.2 License Agreement
 Vim Installation Option. (Make sure to select “Full” from the drop-down list)
 Vim Installation location ( directory should end with vim )
 gVim Installation Progress and Completion
Beginning Vim
Here is a common scenario when people try to use Vim for the first time:
- Start Vim and try to type ‘test’
- Alarmingly, only the letter ‘t’ is printed!
- Try to close vim, but they can’t figure out how.
- Force quit or kill the process.
- Forget about Vim and never try to use it again.
Unbeknowst to many beginners, there are plenty of useful resources to learn the basics of Vim. There’s the well known vimtutor (which you can use by typing vimtutor in the terminal and it will introduce you to the basics in less than 30 minutes) or the awesome game Vim Adeventures. Why not to give them a try before hitting vim from the terminal or starting the GUI version of Vim?
Yes, Vim is not straightforward at the start, but once you learn the basics, it’s easier to continue grasping more of it. Many people say that Vim has a formidable learning curve, which I consider the price for the efficiency in manipulating text that comes after with practice.
Vim is like a game: You start playing it while knowing just the basics, then you learn more and more. After some time, you start composing or chaining commands effectively, you build muscle memory, and then you’re on the downhill slope. Speaking of muscle memory, it is recommended to keep a cheat sheet like this one handy while you use Vim.
You can start Vim by typing vi or vim in the terminal, or vim in graphical mode by typing gvim on Linux or macvim on the Mac. Doing so should bring up a blank screen, with details about Vim. However, most attempts to type text will fail! You are in the wrong mode! This brings us to the most confusing feature for beginners: modes.
Vim Modes
Vim assumes that users edit text more often than they type it. Hence, it has a mode for inserting text and several modes for editing text. The behavior of Vim depends on which mode is current:
Command mode is the default mode of Vim. It provides a library of keyboard-based commands to edit text. Pressing the escape key switches back to this mode.
Insert mode allows for the insertion of text. This is the functionality most users associate with text editors. Pressing the
ikey in command mode switches to insert mode.Visual mode provides functionality for text selection. Pressing the
vkey in command mode switches to visual mode.
Vim Commands
Vi’s design is very similar to that of the Unix operating system. That is, functionality is provided through a library of simple commands that can be combined into more complex commands.
For example, the w command moves the cursor to the beginning of the next word. The d command is the deletion command. Thus, dw deletes the next word; d2w deletes the next two words. This is how composing actions based on commands works.
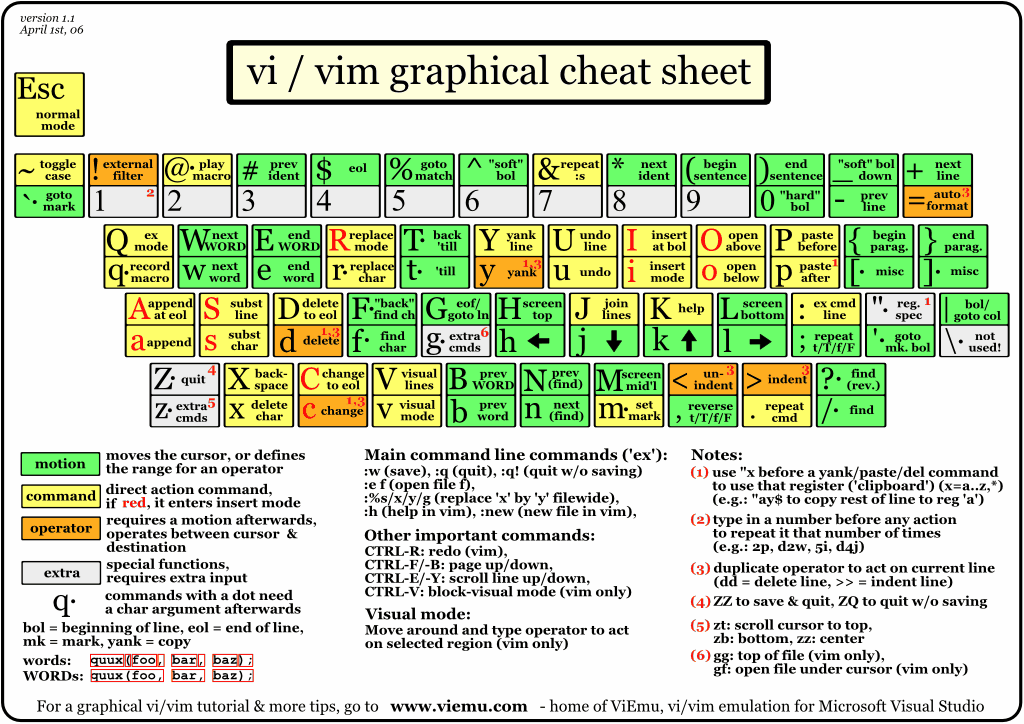
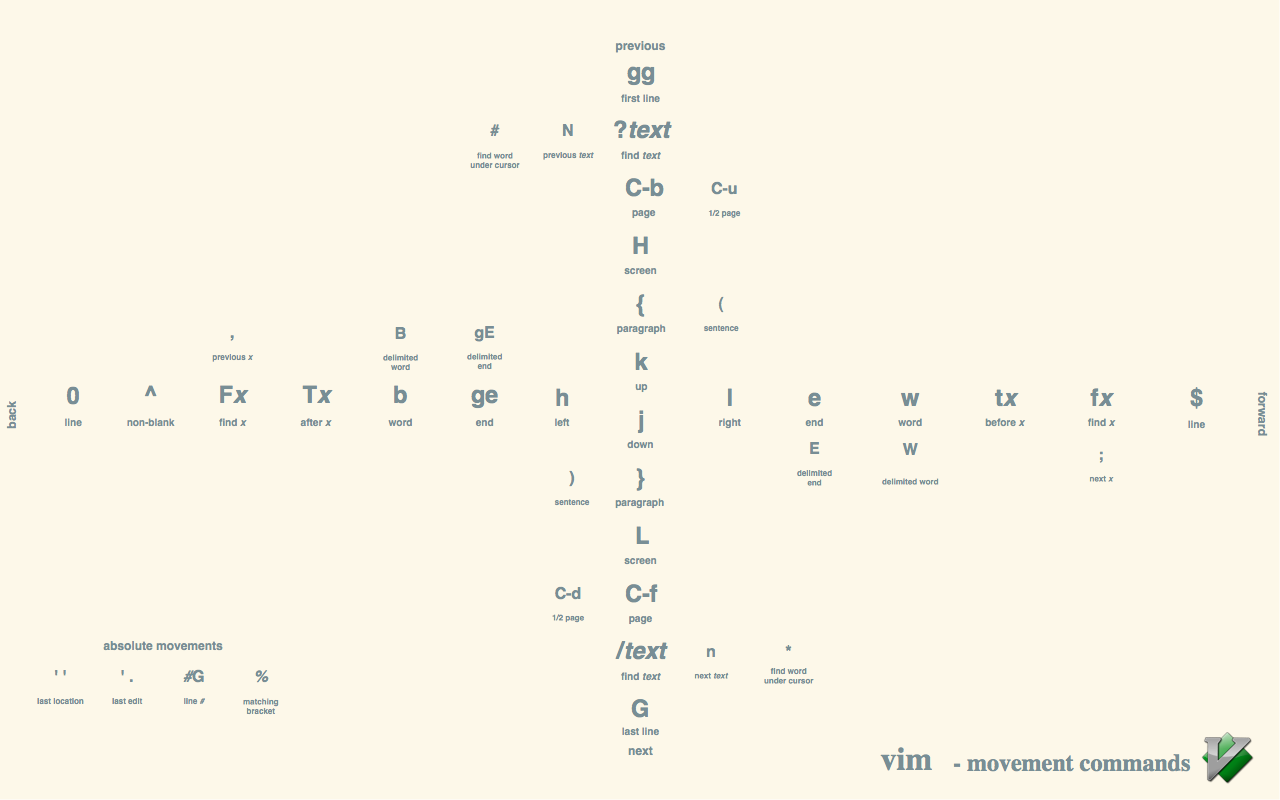
Here is a very clever cheat sheet that will introduce you to the basic Vim movement commands. Have a look at it and practice each command. Also, here is another very useful cheat sheet for a reference while using/learning Vim.
As a beginner, you should be able to (all of these are in command mode):
- Switch between command mode and insert mode.
- To switch from command mode to insert mode and insert text at the current cursor position, press
i. - To switch from command mode to insert mode and insert text at the beginning of the line, press
I. - To switch from command mode to insert mode and insert text at the end of the line, press
A. - To switch from insert mode back to command mode use
Esc.
- To switch from command mode to insert mode and insert text at the current cursor position, press
- Opening new lines
- To open a new line after the current one and begin inserting text (switching to insert mode) use
o. - To open a new line before the current one and begin inserting text (switching to insert mode) use
O.
- To open a new line after the current one and begin inserting text (switching to insert mode) use
- Navigating in the source using
hjkl- Navigate up a line, press
k. - Navigate down a line, press
j. - Navigate left a character, press
h. - Navigate right a character, press
l.
- Navigate up a line, press
- Save
- To save current edits use
:w(short for write).
- To save current edits use
- Exit
- To exit, type
:q(short for quit). - To save and exit, type
:wq. - To force exit without saving, type
:q!. - To force save and exit, type
:wq!.
- To exit, type
- Undo
- To undo last edit use
u.
- To undo last edit use
- Redo
- To redo use
CTRL + r.
- To redo use
- Copy and paste
- To select a block of a text,
Ctrl + vto switch to the visual mode, then select a block using the directional keys (hjkl). - To copy the selected block,
yy(yank line). - To paste the selected block,
p(paste). - To paste before cursor,
P.
- To select a block of a text,
- Tab complete
- To use tab completion,
CTRL + p.
- To use tab completion,
- Move to beginning and end of a file
- To move to the beginning of the line,
0. - To move to the end of the line,
$.
- To move to the beginning of the line,
- Substitute/Replace
- To substitute the character under the cursor, type
rfollowed by the character you will substitute. - To switch to replace mode use
Shift + rand start typing.
- To substitute the character under the cursor, type
- Combine operators (like delete) with motions (like end of word)
- As mentioned, Vim commands are composable. So you can combine operations like delete/change/copy with motions like beginning/end of word/line.
- To delete to the end of the word, type
dw. - To delete to the end of the line, type
d$. - To delete the text within quotes, double quotes, parentheses, brackets use
di',di",di(,di{, respectively. - To copy to the end of the word, type
yw
- You can type a number before the command to execute it multiple times
- To delete 4 lines, type
4dd.
- To delete 4 lines, type
- Repeat last command by typing
.. - Jump to specific position in a file.
- To jump to the beginning of a file use
gg. - To jump to the end of a file use
G. - To jump to the specific line in a file use
8gg(8 is the line number).
- To jump to the beginning of a file use
- Search forward and backward.
- Match parentheses and brackets.
- To match the current parentheses or bracket use
%.
- To match the current parentheses or bracket use
- Split horizontally and vertically.
- To split the screen horizontally use
:sp. - To split the screen vertically use
:vs.
- To split the screen horizontally use
- Switch between splits.
- To switch to the next split screen use
CTRL + ww.
- To switch to the next split screen use
- Jump forward and backward.
- To jump forward a page use
CTRL + f. - To jump backward a page use
CTRL + b.
- To jump forward a page use
- Modify your environment via dotfiles.
- You can do that after reading this tutorial :) An easy way to edit your
.vimrcfile is:e $MYVIMRC.
- You can do that after reading this tutorial :) An easy way to edit your
- Execute a shell command.
- To execute a shell command simply type
:shfollowed by the command.
- To execute a shell command simply type
For more commands, check this awesome tutorial.
Vim Recording
Vim has a great feature called Vim Macros. It enables you to record any actions you do and replay them.
To start recording a macro, simply type q followed by any letter. The letter you type after q is where the macro is assigned.
Imagine that you want to add some words in specific positions on various lines, like so:
They smart
He smart
They smart
He smart
They smart
He smart
You want this to be converted to:
They are smart
He is smart
They are smart
He is smart
They are smart
He is smart- Start recording by pressing
qand any letter (let’s pickw). - From the beginning of the line, move to the space after “They”, enter insert mode (
i), and type “are”. - Hit
Escto go back to command mode and type^to go to the beginning of the line. - Press
jto go to the next line. - Move to the space after the word “He”, enter insert mode, then type “is” and return to command mode.
- Go to the beginning of the next line.
- Press
qto finish recording.
Now you can type 2@w to repeat the macro for the rest of the lines.
Productivity Tips
Copy to the System Clipboard
To enable copying to the system clipboard using CTRL + c, just add the following line to your ~/.vimrc (or _vimrc on Windows) file:
" Enable copying to clipboard using `CTRL + c`
map <C-c> y:e ~/clipsongzboard<CR>P:w !pbcopy<CR><CR>:bdelete!<CR>
Using the Arrow Keys
In Vim, you can use arrow keys in both command and insert mode, but this is bad practice. You should use hjkl for navigation to build your muscle memory. Similarly, don’t use the Home or End buttons, just stick with the $ and ^ to move to the end and beginning of a line, respectively.
You can unmap the arrow keys to avoid temptation. Just add the following lines to your vimrc file:
noremap <Up> <nop>
noremap <Down> <nop>
noremap <Left> <nop>
noremap <Right> <nop>
Remap CapsLock to Control
After using Vim for a bit, you may find that it’s painful to use the Control key. The Control key is located in a really bad place on the keyboard, so many Vim users remap the Control key to CapsLock.
Here is how to do it on Mac, Linux, and Windows.
Changing Case and Repeating a Command
Vim provides three awesome commands for text manipulations. I often find experienced Vim users that don’t know about them, which is really strange. The three commands are:
~ (tilde)– toggle the casing of a letter/selection (upper-case/down-case).. (dot)– repeat the last set of commands (use in a combination with search, such as*, and jumps).* (star)– to search and highlight for the word under the cursor.
Setting Up Vim
When Vim starts up, it loads a file called .vimrc (_vimrc on Windows), which holds the configuration settings. It is found in your home dirctory, specified by $HOME (Windows) or ~ (Unix).
Type :help vimrc in Vim to see some documentation about it. In this tutorial, we will edit the vimrc file to add some plugins and customizations.
Bare Minimum .vimrc
It is recommended to start customizatoin with a bare minimum .vimrc file. Yes, there are many popular developers who share their dotfiles (configuration files), but they built it along their way, depending on their usage and needs. So, why just copy it entirely??? I think every user should start with a bare minimum .vimrc file and configure it according to his/her needs.
Here is a good starting point for your .vimrc:
set nocompatible                " choose no compatibility with legacy vi
syntax enable
set encoding=utf-8
set showcmd                     " display incomplete commands
filetype plugin indent on       " load file type plugins + indentation

"" Whitespace
set nowrap                      " don't wrap lines
set tabstop=2 shiftwidth=2      " a tab is two spaces (or set this to 4)
set expandtab                   " use spaces, not tabs (optional)
set backspace=indent,eol,start  " backspace through everything in insert mode

"" Searching
set hlsearch                    " highlight matches
set incsearch                   " incremental searching
set ignorecase                  " searches are case insensitive...
set smartcase                   " ... unless they contain at least one capital letter
Recovering from Errors
Errors in your vimrc file may prevent Vim from starting successfully. A reliable way to handle this case is to rename your vimrc file, start vim, and edit the renamed file. Alternatively, you could start Vim with a command like this (or use “GVim/MacVim” if that is how you run Vim):
vim -N -u NONE -U NONE
The -N starts in “not compatible” mode (that is, with extra Vim features). The NONE argument (must be uppercase) skips initializations and does not read vimrc (-u), and does not read any gvimrc file (-U).
Using the Vundle Plugin Manager
Vim has a plugin system which can be used to add more functionality. These plugins are implemented as simple configuration files, located in subdirectories inside the $HOME/.vim directory. If you are using a lot of plugins, managing them can be a hassle, so a plugin manager can help take care of them effectively.
There are a few plugin managers for Vim, like Vundle and Pathogen, which make it super easy to add, install, update, search, or remove any plugin. Here, we will be exploring how to use Vundle.
Vundle is a short for Vim Bundle. To install it, you need to have Git first. Here is a guide on how to install git. Once git is installed, you can install Vundle following the steps below.
1- In your terminal type:
$ git clone https://github.com/gmarik/Vundle.vim.git ~/.vim/bundle/Vundle.vimThis command will clone the Vundle plugin into the correct location.
2- Open up your vimrc file by typing :e $MYVIMRC in vim.
3- Including Vundle in your vimrc
Put this at the top of your .vimrc to use Vundle.
set nocompatible              " be iMproved, required
filetype off                  " required

" set the runtime path to include Vundle and initialize
set rtp+=~/.vim/bundle/Vundle.vim
call vundle#begin()
" alternatively, pass a path where Vundle should install plugins
"call vundle#begin('~/some/path/here')

" let Vundle manage Vundle, required
Plugin 'gmarik/Vundle.vim'

" The following are examples of different formats supported.
" Keep Plugin commands between vundle#begin/end.

" All of your Plugins must be added before the following line
call vundle#end()            " required
filetype plugin indent on    " required
4- Add the plugins:
Now you can add any plugin you want just by adding the word Plugin and the URL for it or its Git repository (it doesn’t matter if the repository is on Github, another server, or even on your machine, just add the path to it.)
As an example, to add the vim-fugitive plugin, place the following line inside the call vundle#begin() and call vundle#end() block.
Plugin 'tpope/vim-fugitive.git'NOTE: We didn’t add the full git URL (which is ‘git@github.com:tpope/vim-fugitive.git’) because Vundle will automatically do that for us if the repository is hosted on Github. If it’s not on Github, add the full path.
5- Installing the plugins
To install the plugin, launch vim and run :PluginInstall or from the command line just type:
$ vim +PluginInstall +qall6- Searching for plugins
One of the most useful functions of Vundle is the ability to find and install more plugins.
To list every plugin that Vundle can find on the Vim Scripts site use:
:PluginsOr
:PluginSearch!The “!” at the end of the command refreshes the local list from the Vim Scripts site.
If we want to search for a specific plugin, use:
:PluginSearch! plugin_query7- Deleting plugins
To delete a specific plugin, you need to list the plugins first by using the command :PluginList, then move to the plugin line and hit D to mark it for deletion. Then, run the command :PluginInstall.
NOTE: After doing so, the plugin is the
vimrcfile, and you can reinstall it by typing:PluginInstall.
Their is an easier way to delete a plugin, simply delete it from the vimrc file and issue the command :PluginClean, which deletes any plugin that is not in your vimrc file.
" Removing Plugins:
Plugin 'MarkdownFootnotes'

. . .
Continue? [Y/n]:
You can type "Y" to remove all unreferenced plugins.
Vim Themes/Color Schemes
You can add as many Vim color schemes into your Vim as you like. There are plenty of color schemes out there, varying from bright ones to dark ones. Here is a link to the most popular schemes. Let’s explore how to add these schemes to Vim.
Each color scheme comes in a file with a .vim extension. All you need to do is download the file to the colors subdirectory, found inside the ~/.vim directory. Then, from your vimrc file, change the line colorscheme badwolf to the name of your selected color scheme. Alternatively, you can use this awesome color scheme scroller plugin.
Color Scheme Scroller Plugin
It can be difficult to test color schemes when changing them manually in the vimrc file. Imagine that you have a list of 15 color schemes and you need to select a good one that matches your mood. That will be painful!
Here is the advantage of the color scheme scroller plugin, which allows you to scroll through the schemes using your arrow keys and preview themes quickly and easily.
Just put the following line into the vundle block in your vimrc file:
Plugin 'https://github.com/vim-scripts/ScrollColors'And follow it up with :PluginInstall, which will install the plugin.
After a Vim restart, type :SCROLL and use your arrow keys to quickly preview the color schemes. Neat, eh?
This plugin only allows you to view the themes in the currently opened Vim session. If you restart Vim, the color scheme change will not take effect, so you need to add your selected color scheme to your vimrc manually, as mentioned above.
Vim Replacement Icons
The defualt Vim icon is a bit old, here is a list of some alternatives:
- https://dribbble.com/shots/337065-MacVim-Icon-Updated
- http://niw.at/articles/2008/10/11/vim-app-silver-square-icon/en
- http://www.imeos.com/blog/2013/01/04/macvim-replacement-icon/
- http://wolfrosch.com/works/goodies/vim
- https://github.com/jasonlong/vim-replacement-icon
- http://brettterpstra.com/2011/04/23/bored-with-your-macvim-icon-me-too/
Learning Resources
- http://vim-adventures.com/
- http://robots.thoughtbot.com/vimulator
- http://www.viemu.com/vi-vim-cheat-sheet.gif
- http://blog.sanctum.geek.nz/vim-anti-patterns/
- http://www.moolenaar.net/habits.html
- http://vimcasts.org/
Summary
After reading this tutorial, you know the basics of Vim and how to customize it to add any plugins that suit you. In the next part, we will explore how to customize Vim for Rails development, specifically. When we’re done, Vim will be transformed into a full featured RoR text edior.
Frequently Asked Questions (FAQs) about Getting Started with Vim
How can I install Vim on my Mac?
Installing Vim on your Mac is a straightforward process. You can use the built-in terminal application to install Vim. First, open the terminal and type in the command “brew install vim”. This command uses Homebrew, a package manager for macOS, to install Vim. If you don’t have Homebrew installed, you can install it by typing “/bin/bash -c “$(curl -fsSL https://raw.githubusercontent.com/Homebrew/install/HEAD/install.sh)”” in your terminal. Once Vim is installed, you can start it by typing “vim” in the terminal.
How can I open a file in Vim?
To open a file in Vim, you need to use the command “vim filename”. Replace “filename” with the name of the file you want to open. If the file is in a different directory, you need to specify the full path to the file. For example, if you have a file named “example.txt” in your Documents folder, you would use the command “vim ~/Documents/example.txt”.
How can I save and exit a file in Vim?
To save a file in Vim, you need to be in command mode. You can enter command mode by pressing the “Esc” key. Once in command mode, type “:w” and press “Enter”. This will save the file. To exit Vim, you can use the command “:q”. If you want to save and exit at the same time, you can use the command “:wq”.
How can I undo and redo changes in Vim?
In Vim, you can undo changes by pressing “u” in command mode. To redo changes, you can use the command “Ctrl + r”. Remember, you need to be in command mode to use these commands. You can enter command mode by pressing the “Esc” key.
How can I search for a specific word in Vim?
To search for a specific word in Vim, you need to be in command mode. Once in command mode, type “/word” and press “Enter”. Replace “word” with the word you want to search for. Vim will highlight all instances of the word in the file. You can navigate through the instances using the “n” and “N” keys.
How can I copy and paste text in Vim?
In Vim, you can copy text by using the “y” command, which stands for “yank”. To paste the copied text, you can use the “p” command. Remember, these commands need to be used in command mode.
How can I delete text in Vim?
To delete text in Vim, you can use the “d” command in command mode. For example, to delete a line, you can use the command “dd”. To delete a word, you can use the command “dw”.
How can I replace text in Vim?
To replace text in Vim, you can use the “r” command in command mode. For example, to replace a character, you can use the command “r” followed by the new character. To replace a word, you can use the command “cw” followed by the new word.
How can I navigate through a file in Vim?
In Vim, you can navigate through a file using the arrow keys or the “h”, “j”, “k”, and “l” keys. The “h” key moves the cursor to the left, the “j” key moves the cursor down, the “k” key moves the cursor up, and the “l” key moves the cursor to the right.
How can I customize Vim to suit my preferences?
Vim is highly customizable. You can customize it by editing the .vimrc file, which is located in your home directory. In this file, you can change the color scheme, set the tab width, enable line numbers, and much more. To open the .vimrc file, you can use the command “vim ~/.vimrc”.
 Islam Wazery
Islam is a freelance web developer with experience spanning the full stack of application development. He is a co-founder of Whitespace which is a web development agency. Besides for that he spends his time working on open source projects that he find intriguing or writing tutorials. He was an ex-Google Summer of Code student in 2012 and a mentor for 2 projects in 2013 for KDE. You can find him on Twitter @wazery_ or check his Linkedin profile linkedin.com/in/wazery.


