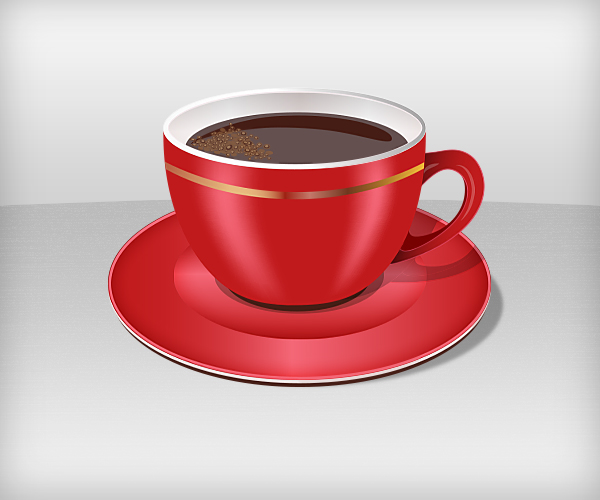
You’d be surprised how often designers are asked to implement everyday objects and items into their designs. These images can often have strong symbolism which can elicit a strong, visceral response from the viewer…especially when it has to do with tasty food and beverages.
In this tutorial, I’ll walk you through the process of creating a vectorized coffee cup in Illustrator. We’ll use different shape tools, the pen tool, the gradient tool, the mesh tool, and the symbol sprayer tool to achieve the final result. Hopefully, you will learn few handy tips along the way. Let’s get started!
Step 1
Create a new document in Illustrator with a 600px width and a 450px height.

Step 2
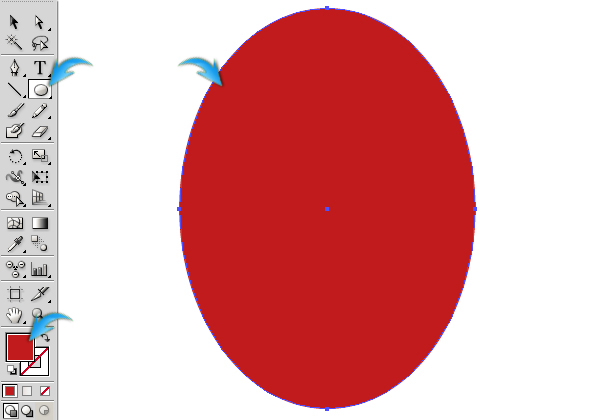
First of all, we’ll draw the basic cup shape. Pick #C11B1D as your fill color and set your stroke to “none.” Select the ellipse tool to draw an elongated ellipse like the one shown below.
Step 3
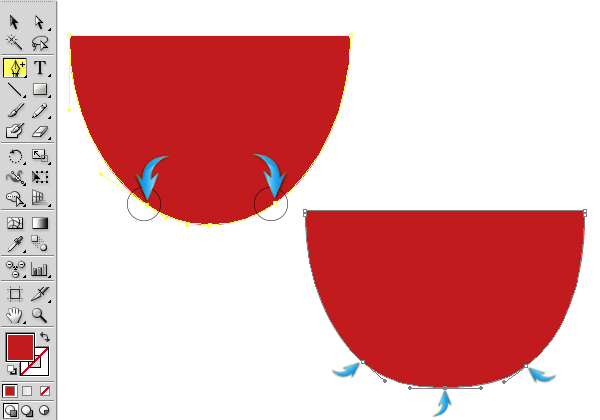
Draw a rectangle on a new layer above the ellipse layer covering half of the ellipse. You can use any color for the rectangle, it doesn’t matter. Now, select both the ellipse and rectangle layers by pressing the ring-shaped target on the right side of respective layers and select the “Minus Front” shape mode in the pathfinder window. To open the pathfinder window, go to “Window” > “Pathfinder.”

Step 4
Select the “Add anchor point tool” to add two anchor points at the base of the cup. Now double-click on the base anchor points one by one with the help of the “Direct selection tool” (“A”) to give it the shape shown below. Label this layer as “Cup”.
Step 5
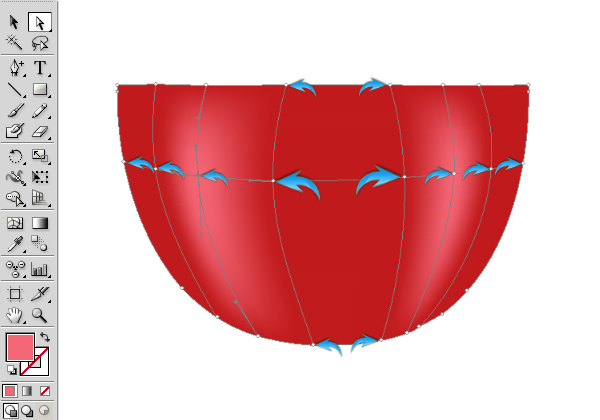
Duplicate the cup layer, slightly decrease its size using the selection tool (“V”). Now, select the mesh tool (“U”) and apply it to the duplicated cup on the spots shown below. You will get path network by doing so. Click on anchor point 2 with the mesh tool and change the fill color to #F46777. This will highlight the second path. Click on the fifth anchor point using the mesh tool and change the fill color again to #F46777 to create a second highlight on the other side of the cup.

To adjust the highlights, we need to make these mesh paths a bit curvy. Adjust each anchor point using the direct selection tool (“A”) to make slightly curved paths.
Step 6
Next, we’ll make the top portion of the cup. Draw an ellipse over the cup using a pure white fill color and #F4F4F4 as your color stroke (1pt stroke width).

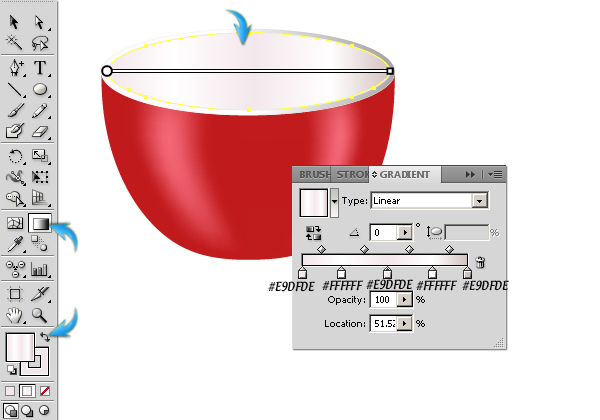
Step 7
Duplicate the top ellipse and apply the following gradient to it. Once you are done, reduce the opacity of ellipse with the gradient to 40%.

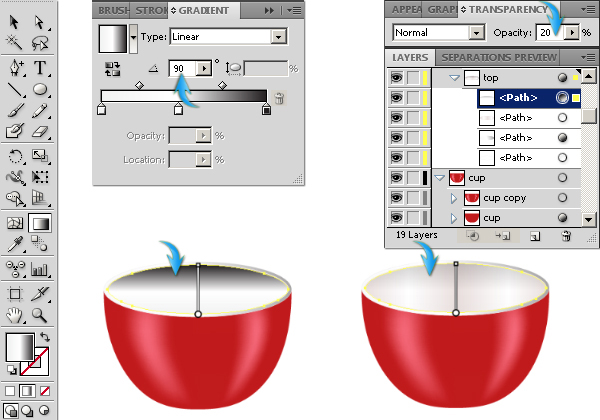
Step 8
Duplicate the top ellipse layer, and decrease its size slightly using the selection tool (“V”). Now, apply the following gradient on it using #F4F4F4 as your color stroke. Once again, use a 1pt stroke width.
Duplicate this new ellipse layer and apply the following gradient to it. After that, reduce its opacity to 20%.
Step 9
Next, we’ll make the coffee inside of the cup. Draw an ellipse using #64504F as your fill color above the rest of the layers.
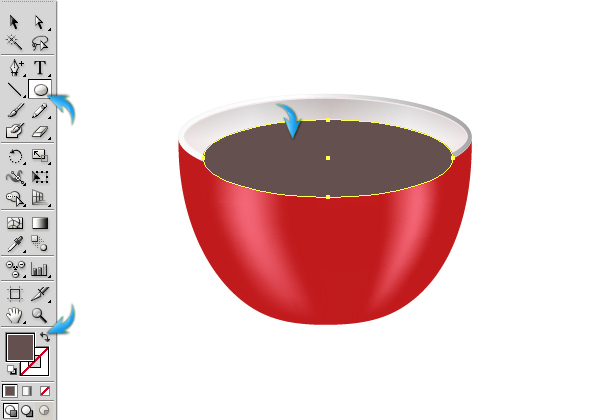
Step 10
In order to confine the coffee to the cup, duplicate the smaller ellipse layer formed in step 8. Now, select both the coffee and the ellipse layers and hit “intersect” in the pathfinder window to get the result shown below.

Step 11
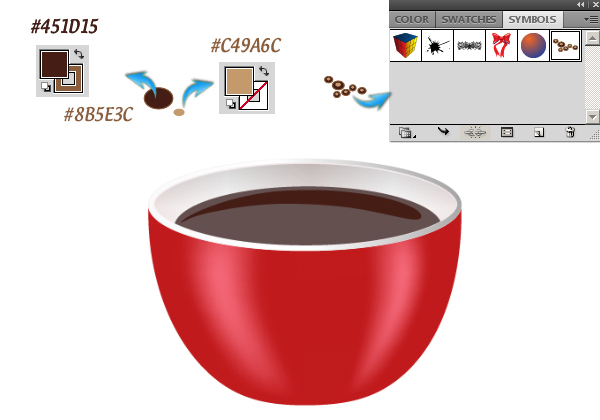
Draw the shape shown below using the pen tool with #451D15 as your fill color.

Step 12
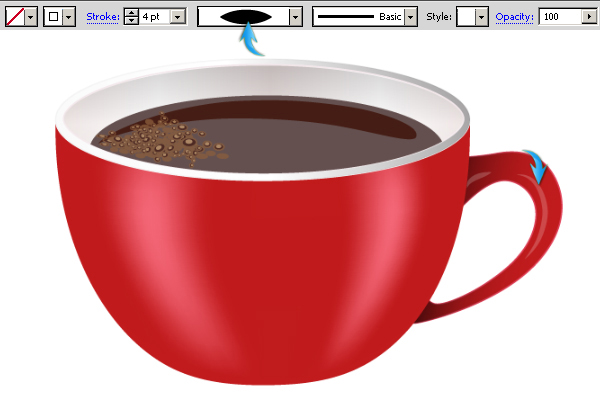
Next, we’ll make few bubbles over the coffee. Draw a bubble using following two ellipses. Duplicate it few times, resize and rotate each duplicate slightly. Once you are done, select the group of bubbles and drag them to the “Symbols” window.
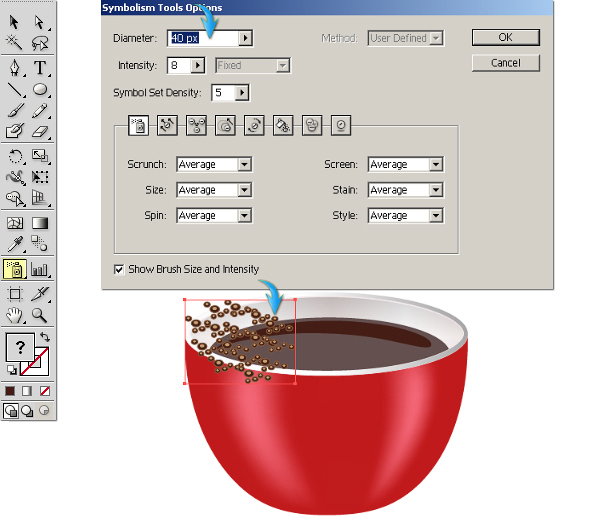
Step 13
To add bubbles, create a new layer on top of the rest and select the “symbol sprayer tool” (Shift+ “S). Double-click its icon to open the “symbolism tools options” and use the following settings. Then, press “OK” and apply the tool on one side of the coffee cup.
Step 14
To adjust the bubbles, select them and decrease their size using selection tool (“V”). After that, apply the symbol scruncher tool, symbol sizer tool, and symbol spinner tool randomly over the bubbles to give them a varied look. Experiment with these tools to get the desired bubbles within your coffee.
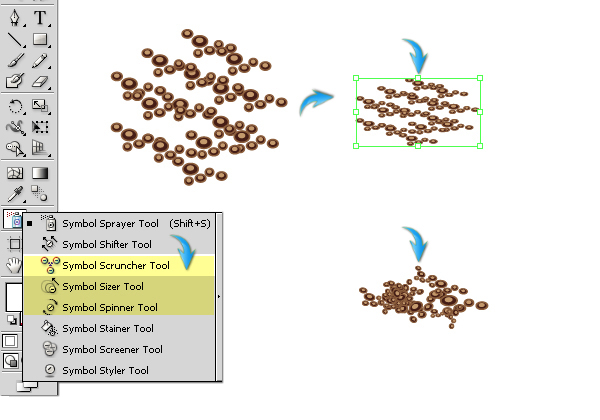
Step 15
Once you are done, duplicate the bubbles layer, drag it below the original layer and go to “Object” > “Expand.” Expand both the object and fill. Expand it five to six times and then change the fill color of this modified layer to #754C29. Drag it towards the right a bit. This will serve as the base for the bubbles. Reduce the opacity of bubbles layers to 75% to blend them nicely.

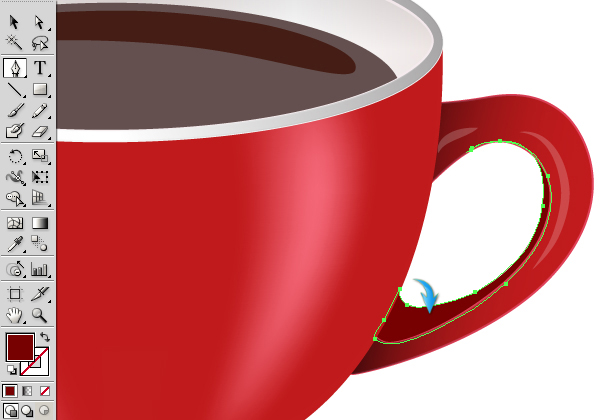
Step 16
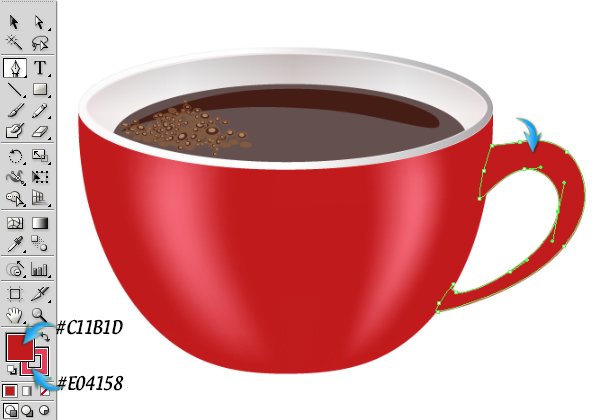
Next, we’ll make the handle of the cup. Draw the following shape using pen tool, with #C11B1D as your fill color and #E04158 as your stroke color. Use a 1pt stroke width.
Step 17
Duplicate the handle and apply the following black-to-transparent gradient to it. Change the blending mode of gradient layer to “Multiply” and reduce its opacity to 75%.

Step 18
Draw the strokes shown below over the handle using the pen tool.
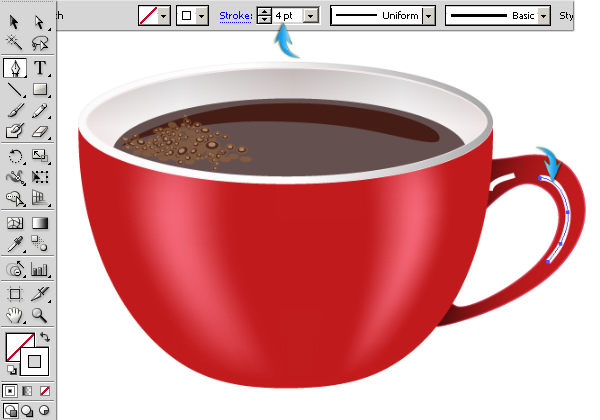
Change the strokes width profile from uniform to “width profile 1” and reduce their opacity to 20%.
Step 19
Draw the shape shown below using #770101 as your fill color to complete the cup handle.
Step 20
Next, we’ll make the saucer. Draw an ellipse below the rest of the layers. Apply the following gradient to it.

Now, select the ellipse and go to “Effect” > “Stylize” > “Inner Glow” and apply the following settings.
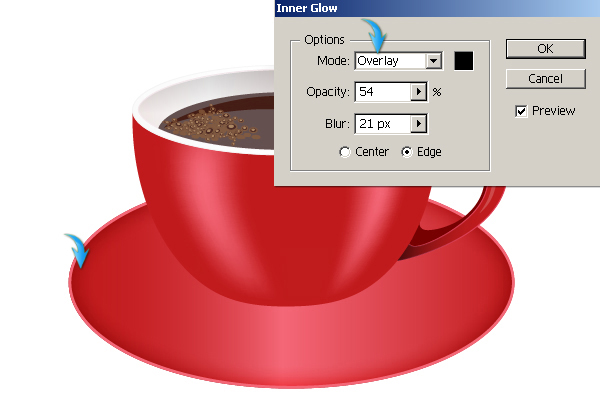
Make another smaller ellipse. Apply the same inner glow settings and gradient on it that we applied to the saucer. However, change the angle for the gradient from 0 to -90⁰, as shown below.
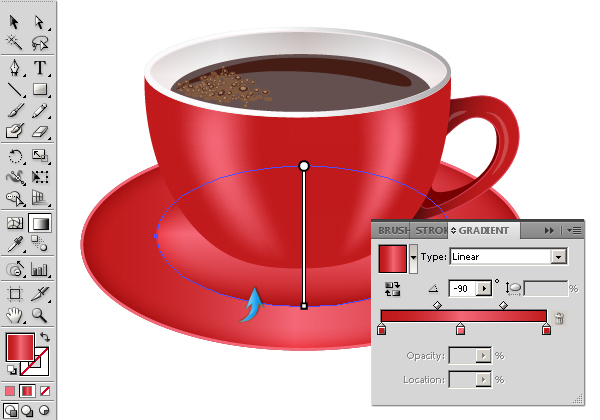
Step 21
Make another smaller ellipse above the saucer and below the cup layers using #451D15 as your fill color. Duplicate this ellipse, increase its size and drag it towards the right a bit. Reduce its opacity to 40% to make a small shadow for the cup.

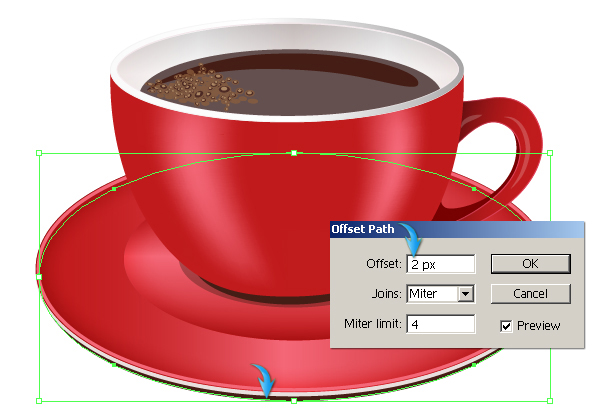
Step 22
Now, select the saucer layer and go to “Object” >“Path” > “Offset Path.” Use a 2px value for the offset. Change the fill color of this new path to #E9DFDE and drag it downward as shown below.

Step 23
Select this new path, and go to “Object” > “Path” > “Offset Path.” Use a 2px value for the offset and change its fill color to #451D15. Drag this path downward to complete the saucer.
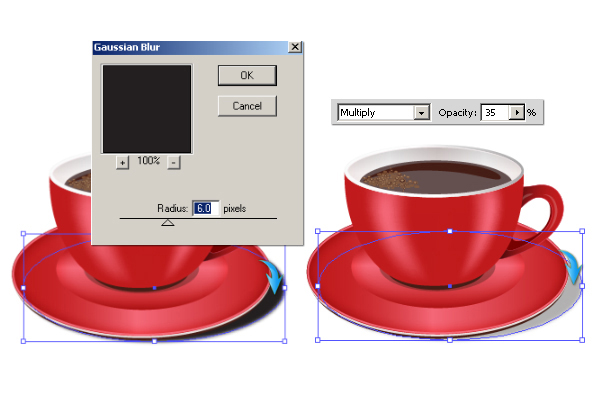
Step 24
To make shadow for the saucer, draw an ellipse using a pure black fill color and go to “Effect” > “Blur” > “Gaussian Blur.” Use a 6px value here. Change its blending mode to “Multiply” and reduce its opacity to 35%.
Step 25

To design the shadow of the cup, duplicate the cup layer and the two layers that comprise the cup handle. Bring these layers together, select them, and merge them. Label this newly-combined layer as “cup shadow”, change its fill color to black, and place it just above the saucer. Decrease its size and rotate it towards right using selection tool (“V”). Now, duplicate the saucer layer and place it just above this new “cup shadow” layer. Select both layers and hit “Crop” in the pathfinder window. Now, change its blending mode to “Multiply” and set its opacity to 25%.
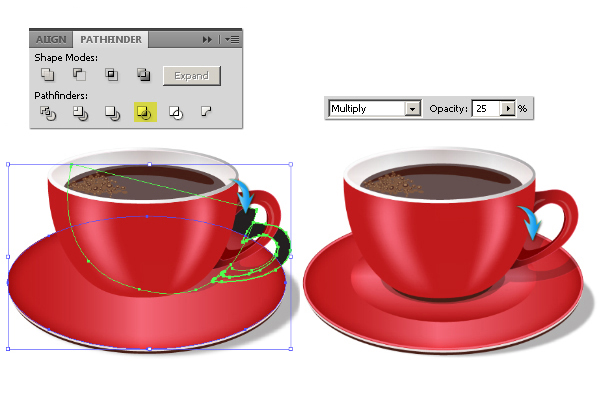
Step 26
Draw a thin rectangle and apply the “Earthtone 31” gradient to it. You can find this gradient by selecting “Swatch Libraries Menu” > “Gradients” > “Earthtones.” Now, select the rectangle and go to “Effect” > “Warp” > “Arc.” Use the following settings here. The resulting arc’s ends need some correction. First, select the arc and go to “Object” > “Expand Appearance,” and then adjust the anchor points at the ends with the help of the direct selection tool (“A”).


That’s it guys. I hope you enjoyed the tutorial and learned something useful. Enjoy your coffee!
 Anum Khan
Anum is Web and Graphic designer. Addicted to Photoshop and crazy for pixel perfection. She is also an active blogger, sharing her passions, skills and creative details on her blog Websoulz. She loves to connect with the community, sharing the latest design gossips and rolling her eyes on boring trends.


