Exorcise Your Newbie Demons by Contributing to Exercism


Key Takeaways
- Exercism is an inclusive platform that encourages contributions from developers of all skill levels, especially those new to programming, to improve their coding skills through practical problems and peer reviews.
- The platform supports over 50 programming languages, allowing contributors to work on exercises in languages they are familiar with, or to explore new ones.
- Contributing to Exercism can involve various tasks such as translating existing exercises into different languages, writing test suites, configuring exercises, and more.
- The process of contributing is well-supported by the Exercism community, with maintainers ready to assist contributors in getting their patches accepted.
- Exercism uses a unique meta-game approach where contributors not only solve coding problems but also enhance the platform by adding new problems or improving existing ones.
- Celebrating contributions is integral to the Exercism community, recognizing the collaborative effort in enhancing coding education and open-source development.

If you want to contribute code to open source, the level of skill you need is good enough.
Not “brilliant”. Not “fluent” or “proficient”. Oh, certainly, sometimes you’ll need those. Some projects, though, could use your help even if your skill level falls closer to “barely coherent” than “competent”.
One such project is Exercism whose purpose is to help people improve their programming skills in many different languages.
The most obvious way that it does this is by giving people practice problems.
A slightly less obvious way is by encouraging peer code review. People not only get to struggle with a problem on their own, they also have conversations. They give and receive feedback. They opine. They discover code smells and point out stylistic issues. You can learn a lot from getting feedback, and even more from giving it.
Over 15,000 people have used Exercism like this.
There is another, less obvious, way that Exercism helps people improve their programming skills. It’s a sort of meta-game. Instead of writing code and submitting it to Exercism for feedback, you can write code and submit it to GitHub for feedback. It’s the same sort of process—discuss, opine, learn. In one case you’re solving practice problems. In the other, you’re adding practice problems, or improving them, or helping build the site itself.
Exercism explicitly welcomes contributions from people who are new to programming. It makes an effort to define issues that would make a good first patch. Whether that is your first patch to the project, or first patch to open source, the maintainers and contributors want you to be successful. If you get stuck along the way, they will help unstick you so you can get your patch accepted. I should know, I created the project in the first place.
Over 650 people have played this meta-game, contributing to Exercism’s various code bases.
The project itself is big and unwieldy; it consists of over 50 repositories. It’s got website code, API code, and command-line code. It has tools and services, metadata and exercises.
Despite this, Exercism has something that most projects don’t: 40+ bite-sized, stand-alone repositories in 40+ different languages. One for each language track.
Haskell folks don’t need to know anything about C#. Scala folks don’t need to know anything about Erlang. And you can help improve the Ruby track knowing just a bit of Ruby.
Introducing The xruby Repository
The xruby repository contains all of Exercism’s Ruby exercises. It’s a great place to submit your first open source contribution for several reasons.
First, the Ruby exercises have few dependencies. If you have Ruby installed on your machine it’s going to be easy to get everything set up.
Second, the repository has one job: to define good practice problems. A good practice problem is small, focused, and not particularly complicated. It’s a bit of a puzzle, but no more than that.
Third, each problem is independent of the others. When you’re working on one exercise, you can ignore everything else in the repository.
Lastly, the track maintainers are there to point the way or hold your hand if you need it.
Whether you have trouble with programming fundamentals, or you can’t figure out the Ruby, or you just plain got yourself up git creek—not to worry. If you can get even part of the way there, someone will help you get your code merged into the code base.
There are many ways to contribute to the Ruby track. This article will focus on one of them: porting an exercise to Ruby.
Translating an Existing Exercise into Ruby
It’s easier to translate an exercise than to invent it.
On Exercism, the same problem is usually implemented in several languages. These languages have different conventions and different strengths. As a result, their implementations explore different aspects of the problem. Yet the underlying problem is unchanged. Once it has been described and defined, you can borrow ideas. You don’t have to worry about figuring out which tests to write—you can focus on turning those ideas into Ruby code.
Porting an exercise to the Ruby track boils down to the following steps:
- Finding an exercise to translate.
- Dibsing the exercise, meaning, calling “dibs” on it to say you’re working on it.
- Writing the test suite and reference solution.
- Configuring the exercise.
- Submitting your implementation.
- Discussing and iterating.
- Celebrating.
Finding an Exercise to Translate
Figuring out which exercises to port used to be a painful slog. You had to eyeball each language track and try to find an exercise that you didn’t recognize. Now there’s an API endpoint that will tell you exactly what you need.
http://x.exercism.io/v3/tracks/ruby/todo
This reports which exercises have been defined without being ported to Ruby yet1. It lists the existing implementations, making it easy to find test cases you can write.
The bad news is that you’re stuck parsing JSON with your eyes. There’s no page that turns this data into a nice, friendly page of HTML.
Sorry.
That said, you can probably find a browser plugin that will format the JSON for you. Failing that, try jsonlint. Copy and paste the payload from the API into the form. Then click “validate JSON”, which pretty-prints it as a side-effect2.
Understanding the JSON Payload
The payload looks like this:
{
  track_id: "ruby",
  todos: [...]
}
The todos section is an array of JSON objects. Each entry has information about an exercise that is available for translation. This means that at least one other language track has implemented it, and the Ruby track has not. Here’s the todo entry for the Pangram exercise:
{
  slug: "pangram",
  readme: "https://github.com/exercism/x-common/blob/master/pangram.md",
  data: "https://github.com/exercism/x-common/blob/master/pangram.json",
  implementations: [...]
}
The slug contains a URL-friendly identifier for the problem. This is used all over the place: directory names, hash keys, file names.
The readme is the URL to the language-independent problem description. It’s written in GitHub-flavored Markdown, which lets us turn it into HTML on the website while still keeping it readable in plain text. Notice that the base name of the file is the problem slug. Like all the other language-independent problem data, the README lives in a separate repository called x-common.
If you’re in luck, the data will be a URL. If so, someone compiled a canonical set of test inputs and expectations. That makes a great guide to the problem. If data is null you’re going to have to look at the implementations array to find inspiration.
Each element in the implementations array links to one of the existing implementations in another language. Notice that the directory name for the exercise is the problem slug.
Pangram currently has seven implementations. The JSON output for a single implementation contains the ID of the language track and a URL to the files defining the exercise in that language. At a minimum, there will be a test suite and a reference solution. Sometimes you’ll have to hunt through subdirectories to find these.
{
  track_id: "elm",
  url: "https://github.com/exercism/xelm/tree/master/exercises/pangram"
}
Take a moment to read through some READMEs, and maybe browse some implementations. Find an exercise that appeals to you.
Dibsing the Exercise
Once you’ve found an exercise that you want to translate, make sure nobody is already working on it. If they are, there will be an open issue or pull request for it.
Search for the problem slug (e.g. pangram) in the Ruby track repository.
The search results default to “code”, which is not what you want. On the left-hand side of the page choose the menu option “Issues”. This will include both issues and pull requests.
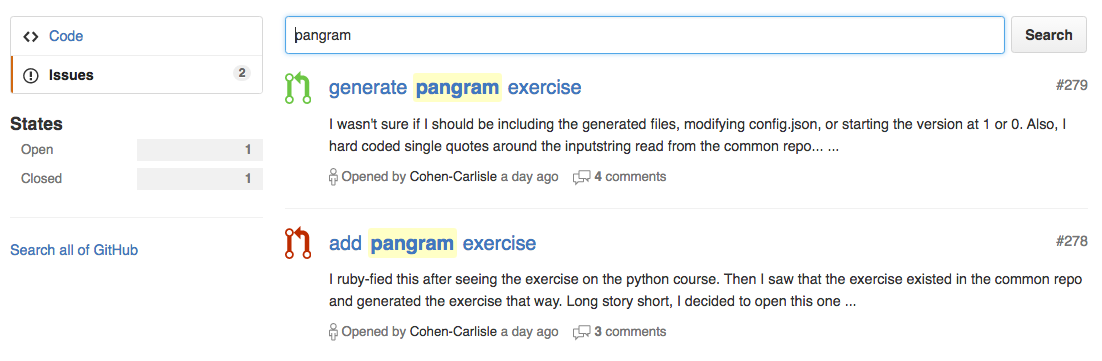
If nothing comes up, then you’re good to go.
If there are issues or pull requests, then you’ll need to take a closer look. Someone might be working on it, or the work might be abandoned. Or the issues could be unrelated. If in doubt, ask!
There might also be a merged pull request (as is the case with pangram), which probably means that there’s nothing for you to do. Usually we deploy daily, but sometimes things get busy, so implemented exercises might take a day or two to make it to the site. Once they make it to the site, they’ll disappear from the “todo” endpoint.
For the sake of this article, let’s say you decide to work on bracket-push. You’ll want to dibs it so nobody else starts working on it, too.
There are two ways to dibs an exercise:
- Open an issue.
- (preferred) Open a work-in-progress pull request.
(Option 1) Opening an Issue to Dibs an Exercise
This is the simplest approach. The downside is that you’ll end up with both an issue and a pull request. That’s a bit of extra noise, but it’s not a problem. If the other way seems too intimidating, then don’t worry—just open an issue.
The subject line of your issue should include the problem slug, to make it easy to scan in search results.
Add 'bracket-push' exercise
In the body of the issue claim it for yourself.
(Option 2) Opening a “Work in Progress” Pull Request
This option takes a few more steps, but you’d have to do most of them later anyway. First fork the xruby repository so you have your own copy. Then clone your fork.
Go to the code you just cloned and create a new branch. Name it for the exercise.
$ git checkout -b bracket-push
Next, create an empty commit. Usually, git won’t let you commit without actually doing work, but it will if you insist:
$ git commit --allow-empty -m "[WIP] add bracket-push"
Push the new branch with the empty commit up to your fork on GitHub:
$ git push origin bracket-push
Visit your fork on GitHub and click the big green button that says “Compare and Pull Request” which appears for recently created branches.
Add a comment in the body of the form to say you’ll be working on it, then click “Create Pull Request” to submit the form.
Now as long as people remember to check the open issues and pull requests, nobody will do duplicate work.
Writing the Test Suite & Reference Solution
If you haven’t ever written any tests before, then this will be a nice, bite-sized adventure. If you’ve written tests, but never in Minitest, then you’re in for a treat. Minitest is small, simple, and delightfully straight-forward3.
- Inside the
exercisesdirectory, create a directory for the new implementation. Name it after the problem slug (e.g.bracket-push). - Create an empty test file, and name it with the slug with underscores instead of hyphens (e.g.
bracket_push_test.rb).
gem 'minitest', '>= 5.0.0'
require 'minitest/autorun'
require_relative 'bracket_push'

class BracketPushTest < Minitest::Test

end
The first line guards against unsupported versions of Minitest.
The autorun line is how Minitest gets Ruby to actually fire up the test suite when you run the file.
Then we include the actual solution, which doesn’t exist yet. The filename is the problem slug, with underscores instead of hyphens. Notice that we expect it to be in the same directory as the test file. A loose convention in Ruby is to have separate lib and test directories, but that would be overkill here.
Finally, we define the test suite itself. Notice the name of the class starts with the CamelCase version of the problem slug (BracketPushTest).
Run the test suite:
$ ruby bracket_push_test.rb
It will complain because the solution file is missing. Create an empty bracket_push.rb file and run the test again. It should stop complaining.
Inside the BracketPushTest class, you’re going to add as many tests as you need. This is what a test looks like:
def test_count
  assert_equal 1, Stuff.new.count
end
Notice the method name. It starts with test. If you don’t start it with test, Minitest won’t know it’s supposed to be a test, and it won’t get run.
The assert_equal method is what causes a test to pass or fail. It takes two arguments: the expected value and the actual value. The expected value is usually hard-coded, and the actual value is a call to the code you’re testing.
There are other ways to write assertions and, during the code review, we might suggest some of them. For now unless you already know of something better, use assert_equal.
That’s all you need to write the tests. If there is a JSON file with canonical data, then use that for inspiration. Otherwise, look to the implementations in the other language tracks.
Add one test at a time. Flesh out the reference solution as you go.
You’ll be making some decisions about design. Don’t worry too much about getting it right up front. Once you have a working solution, you can tweak it. And you’ll be getting feedback on the design in a bit.
Configuring the Exercise
A few things are necessary to turn the completed test suite and solution into a proper exercise.
- Add a test version.
- Rename the reference solution file.
- Skip all but the first test.
- Add the exercise to the track configuration file.
- Verify the track.
Adding a Test Version
We update the tests from time to time. This has the regrettable side-effect of causing earlier solutions to look invalid. They passed when they got submitted, but peer reviewers can’t know that. People sometimes complain that an old solution “doesn’t pass the tests”. True, but irrelevant. They should review the code that is there.
Adding a version to the test suite avoids this confusion. When someone creates a solution, they’ll add a version that matches the test suite, and reviewers will see that the author solved an earlier version of the exercise.
This test should be last, and it will look like this:
def test_bookkeeping
  assert_equal 1, BracketPush::VERSION
end
Add the VERSION constant to the reference solution to match.
Renaming the Reference Solution File
We use the reference solution to test the test suite—to make sure that it’s solvable. It should not get delivered as part of the exercise when people fetch it.
We use a simple convention for this: the API knows not to deliver files that have example in the name.
Rename the solution file to example.rb.
Skipping All But the First Test
When the user starts solving an exercise, they have no code. Seeing all the failures for all the tests all at once can be overwhelming and confusing. To make matters worse4, the tests run in random order. This means that the first failing test is unlikely to be the first test in the file.
They should see one relevant failure, not umpteen confusing failures. We simulate Test-Driven Development by skipping all the tests except the first one.
def test_bookkeeping
  skip
  assert_equal 1, BracketPush::VERSION
end
People can remove the “skip” from the next test, then make it pass. Wash, rinse, repeat.
Updating the Configuration
The config.json file at the root of the repository ultimately decides what “next” means when someone asks for the next exercise.
Add the slug of the exercise to the problems array. The problems are ordered roughly by how difficult they are to solve: easier problems are early in the list, harder problems are farther towards the end. This is not an exact science, and it’s hard to say where it should go. Unless you have a better idea, stick it anywhere in the second half.
Verifying the Track
At this point, there’s a good chance that everything is wired up correctly. It is a bit fiddly, though, so in case it’s not, we’ve got scripts to help out.
First fetch configlet, which is a tool that we’ve written to verify that you’ve configured your exercise correctly.
You can download it by running the following command from the root of the xruby repository:
$ bin/fetch-configlet
You only need to do this once.
To verify the track, run the command bin/configlet . (notice the dot). If it says “ok”, you’re good.
Then run bundle install, which will install the necessary dependencies for the local status check:
$ bin/local_status_check
This verifies some style stuff, some boilerplate, and runs the tests for each of the exercises, including the one you just added.
Travis CI will run all of these things when you submit the pull request. You don’t technically have to run them. It’s just quicker to catch things before they get pushed.
Finally, make sure you’ve committed everything, and push it up to your fork of the project on GitHub.
Submitting Your Implementation
Everything should now be ready for review.
There are a couple of steps to making the pull request ready for other contributors.
The first step is to make sure that the commit history is tidy and up-to-date. No matter how many commits you’ve made, this is one change. At least from the perspective of the rest of the project. To clean everything up, rebase onto the upstream master and squash your commits.
Check out the Exercism Contributing Guide. The Git Basics section talks about how to rebase and squash. Make sure that the commit message contains the slug of the problem in it, e.g. Implement bracket-push exercise.
The next step depends on whether you have an open issue or a [WIP] pull request.
If you have an open issue check out a branch with your changes, push it to GitHub, and submit a pull request. Add the phrase Closes #XYZ where XYZ is the number of the issue that you opened. This will close the issue when the pull request gets merged.
If you have a [WIP] pull request you can add code to it by pushing more commits to your branch. If you change the history (by rebasing or squashing) then you’ll need to use the --force flag when you push. This will overwrite your branch with the new history, updating your pull request.
$ git push --force origin bracket-push
Then manually edit the pull request on the site to remove the [WIP] prefix from the title.
Finally, add a comment to your pull request to say you’re ready for review. This will notify the maintainers, so they’ll know to look at it.
Discussing & Iterating
The Ruby track maintainers are responsive, and you can expect to hear back within 24 hours. If you don’t hear anything within 3 days, go ahead and add a comment to the thread. It’s not impolite—sometimes things get lost in the shuffle, and commenting will bring it to the attention of the maintainers again.
You’ll likely get some feedback and pointers. Make the changes, commit, squash, and push --force back up to your branch.
Keep doing this until your patch gets merged.
Celebrating
Contributing to open source is a big deal.
It’s so much more than just writing a few lines of code. There are tools and dependencies. People and expectations. It takes a dose of courage to dive into it all.
You don’t have to know everything before getting started. Sometimes it helps to have someone hold your hand along the way.
[1] At the moment, there are 66 Ruby exercises, and according to http://x.exercism.io/v3/tracks/ruby/todo, there are 38 exercises that could be added.
[2] It will probably come out as “invalid” because the keys in the JSON aren’t double-quoted. That’s not actually a problem, so you can safely ignore it.
[3] If you don’t want to just jump right into Minitest without some preparation, try out the Intro to TDD tutorial from Jumpstart Lab, which uses Minitest to explain the basic concepts of Test-Driven Development.
[4] This is usually a good thing; it ensures that your tests are independent of each other. You can call the i_suck_and_my_tests_are_order_dependent! method at the top of your test suite, but this runs them in alphabetical order, not in the order that they’re defined, so it won’t work to simulate TDD.
Frequently Asked Questions (FAQs) about Exercism
What is Exercism and how does it work?
Exercism is an open-source, online platform designed to help people improve their coding skills through practice and mentorship. It offers coding exercises in over 50 programming languages, including Python, JavaScript, Ruby, and more. Users can solve these exercises locally on their computer and then submit them to the Exercism website. Once submitted, a team of volunteer mentors will review your solution and provide feedback, helping you to improve your coding skills and knowledge.
How can I start using Exercism?
To start using Exercism, you need to create an account on their website. After signing up, you can choose the programming language you want to practice. Then, you need to install the Exercism CLI (Command Line Interface) on your computer. This tool allows you to fetch and submit exercises directly from your command line. Once everything is set up, you can start solving exercises and receiving feedback from mentors.
Is Exercism suitable for beginners?
Yes, Exercism is suitable for beginners. It offers exercises for various skill levels, from beginner to advanced. For beginners, it’s a great way to learn a new programming language and get hands-on experience. The feedback from mentors is particularly helpful for beginners as it provides guidance and helps to understand the best practices in coding.
What programming languages does Exercism support?
Exercism supports over 50 programming languages. This includes popular languages like Python, JavaScript, Ruby, Java, C++, and many more. Each language has its own track, which consists of a series of exercises. You can choose to follow one or more tracks based on your interests and goals.
How does the mentorship on Exercism work?
The mentorship on Exercism is provided by a team of volunteers. When you submit a solution to an exercise, a mentor will review your code and provide feedback. They may suggest improvements, explain concepts, or answer your questions. This feedback is a valuable resource for learning and improving your coding skills.
Is Exercism free to use?
Yes, Exercism is free to use. It’s an open-source project, which means that all the content is freely available and the platform is maintained by volunteers. However, they do offer a paid option called Exercism Pro, which provides additional features like priority mentoring and access to exclusive content.
Can I contribute to Exercism?
Yes, as an open-source project, Exercism welcomes contributions from the community. There are many ways to contribute, such as solving exercises, providing mentorship, improving the website, and more. Contributing to Exercism is a great way to improve your skills and give back to the community.
What is Exercism Pro and what does it offer?
Exercism Pro is a paid version of Exercism. It offers several additional features, including priority mentoring, access to exclusive content, and the ability to support the platform. The funds from Exercism Pro are used to maintain and improve the platform.
How can I install the Exercism CLI?
The Exercism CLI can be installed on Windows, macOS, and Linux. The installation instructions vary depending on your operating system and are provided on the Exercism website. Once installed, you can use the CLI to fetch and submit exercises.
Can I use Exercism to prepare for coding interviews?
Yes, Exercism can be a useful tool for preparing for coding interviews. The exercises on Exercism cover a wide range of topics and difficulty levels, which can help you to practice and improve your problem-solving skills. The feedback from mentors can also provide valuable insights and help you to write cleaner, more efficient code.
Katrina is a developer working primarily in Ruby and Go, and formerly of Splice, Turing School of Software and Design and Bengler. She is the creator of exercism.io, an open source application that developers use to level up their programming skills. She is the co-author of 99 Bottles of OOP.

