3 Film Techniques That Make Your Still Images Stunning

Key Takeaways
- Meaningful color usage in your photos can evoke emotional responses and create a relationship between the viewer and the image. The amount and vibrancy of color used, along with how it is edited in post-production, can significantly impact the image’s overall feel.
- Dynamic angles can make a significant impact on your photos, causing viewers to engage more with the image. Experimenting with different angles can add depth to the image and make it more visually interesting.
- Powerful contrast in your photos, whether it be in color or light, can transform your image from simple to captivating. A good use of contrast separates the subject from both the foreground and background, adding depth and engagement to the image.
- Breaking down cinematic elements into fundamental techniques can enhance your photography skills and help define your style. By studying and deconstructing scenes from films, photographers can apply these techniques to their own work for more stunning results.
We’ve already highlighted some ways that designers can learn from the movies they watch, but what about photographers? “Motion pictures” have obvious parallels to photography, and image professionals could learn a thing or two from what appears on the big screen.
Careful study of your favorite films can yield surprising results for those who aspire to hone their photography prowess. Fortunately, you don’t need a degree in film to take a few cues. Breaking down specific scenes that tickle your fancy and even grabbing still frames is great practice when trying to see what makes a film have great cinematography.
For those who aren’t aware, cinematography essentially is comprised of several fundamental elements. These include effective lightening techniques, color, focus (or deliberate lack thereof), shot composition, and of course camera movements, just to name a few. I won’t rely on any specific film terminology, but I will be giving basic guidance on how film techniques can be adapted to make you a better photographer. You might notice that a few of these techniques can be applied to web design and illustration as well.
Meaningful Color
Color plays a vital role in any aesthetic application, and film is no exception. The introduction of motion and dynamism does not replace or supersede careful, deliberate color choices, the concept is no different when applied to photography. The amount of color (or lack thereof) and the vibrancy in a photo provokes an emotional response and a relationship between the viewer and what they are viewing. The amount of color used and how it is edited in post-production can affect the meaning and feeling of the image. A good example that translates well from film to photography is Tarsem Singh’s The Fall (2006).
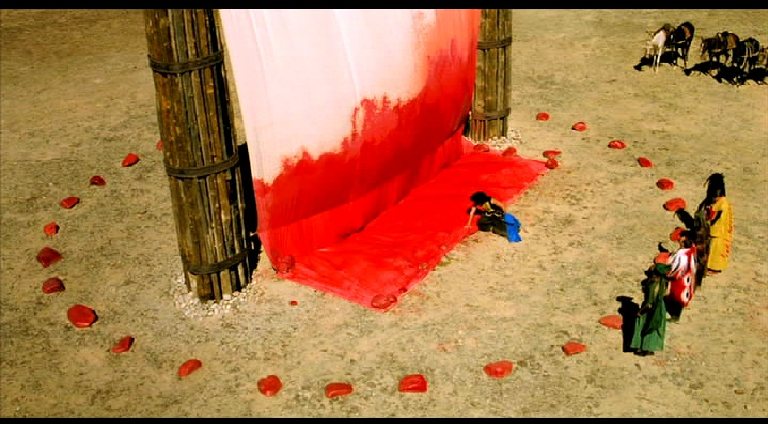
Without a doubt, the film is cinematically beautiful and features an engaging storyline that merges dark themes with childlike wonder. This is expressed perfectly with the use of locations, costumes, and other visuals. This particular scene (above) is just one of several shots that feature an enormous emphasis on color.
At this point in the story, the protagonist reveals his alter ego, the “Red Bandit,” who found his counterpart — “Blue Bandit” — murdered by the villainous “Odious.” He then proceeds to make a blood oath and vows to destroy Odious. The red (representative of the blood of Blue Bandit) stands out against the large landscape backdrop and is further emphasized by how it contrasts and bleeds onto the white canvas. The color red may be used several times in the film, but it isn’t the only color present. The costumes of the Red Bandit’s companions are all in colors that stand out vividly against backgrounds.
When you’re photographing in color, try to use adequate light to bring your colors out. Prominent colors are eye-catching and can highlight various facets of your photo, even if you are using darker colors. If your colors aren’t as bright as you would like, you can always correct this during post-production, but be careful not to push colors too far, or the process can can lead to ugly results.
Dynamic Angles
The difference between a photograph shot head-on and a photo taken from, let’s say, a canted angle can make a tremendous impact for such a small aesthetic choice. A viewer might do a double-take or view your photo longer if you avoid typical, standard positions. Your subject or subjects can also help you decide whether or not a dynamic angle should or shouldn’t be used to enhance the image. There are hundreds of shots in the Lord of the Rings trilogy that are composed of dynamic angles, so let’s take a look at one of the scenes from Lord of the Rings: The Two Towers (2002) directed by Peter Jackson.
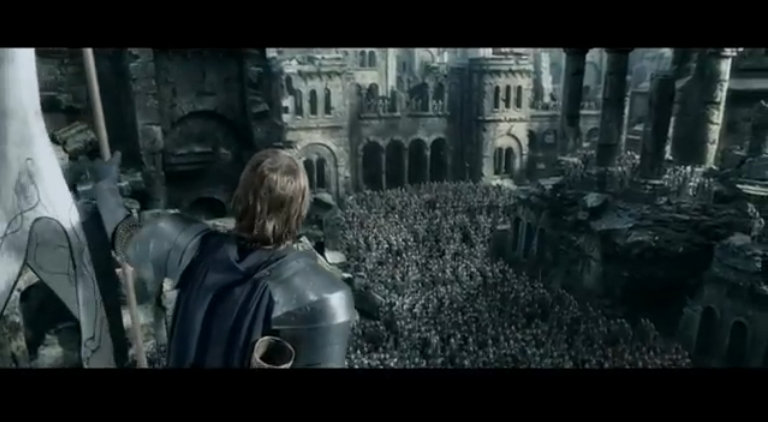
Most of you are probably already familiar with the ubiquitous Tolkien storyline, as well as the tremendous complexity and effort that went into creating all three films. Standard shots filmed on a flat plane with no skewing or canting would not have been enough to capture this epic trilogy.
The scene featured above can be found on the extended edition, as it was cut from the original theatrical release. Here we have Boromir (Sean Bean) fresh from the victory at Osgiliath speaking atop of a structure. The scene is essentially a victory speech laden with emotional words, and it’s only fitting that the angle of the camera is positioned in a manner that not only gives you a view of Boromir, but also a wide shot of his victorious army. The shot is expansive and it adds dynamism and depth to an emotional scene.
If you are in a position (literally) to shoot photographs with more dynamic angles, try it out, and consider taking a lesson from Peter Jackson’s book by adding depth of field to your image. Landscapes and architecture photographs can reap especially strong benefits if what you are capturing is already visually stunning. More abstract, artistic portraits can also be elevated with some non-traditional angles. If the space you are working in happens to be too cramped to allow experimentation, try lowering or elevating your viewing angle to compensate.
Powerful Contrast
Whether your work features vibrant colors or no color at all, your photos should boast some strong contrast. Contrasts can function as differences of light or color, but either technique accomplishes the same distinction of features within your imagery. Using contrasting lighting and/or color can transform your photo from flat and simple into a deep, engaging, captivating visual. At its most basic, a good use of contrast separates the subject from both the foreground and background. Director Park Chan-wook’s Old Boy (2003) is a great film to examine when it comes to contrast.
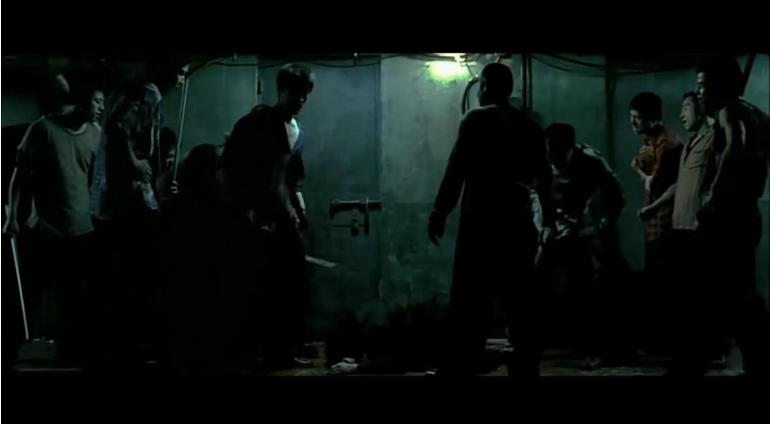
A South Korean mystery thriller involving dark themes, it is only appropriate that Old Boy features stark colors and prominent contrast that gives the film a gritty and raw quality. Although some scenes at times appear almost too dark, it never hinders the film’s aesthetics.
One of the most noteworthy scenes in the film, the corridor scene (which took seventeen takes in three days to perfect) is composed of one single unedited shot. In this scene, the main character Oh Dae-su (Choi Min-suk) faces an angry mob of thugs with only a hammer as lone weapon. The only lighting comes from the lights on the wall, which keeps most of the hallway cast in shadow. Despite the deliberately low lighting, each actor is discernible from the other actors and the background.
It should be noted that at the beginning of the brawl, everything appears dark and heavy, but as Oh Dae-su steadily makes his way down the hallway while taking on the hired gangsters, additional light gradually begins to make the scenery stand out more. This is symbolic of Oh Dae-su’s impending victory and discovery of why he was imprisoned. The lighting and the shot composition give the scene a 2D look — much like a graphic novel — and the fact that the scene is being shot with a laterally-moving dolly suggests the influence of fighting video games, which are enormously popular in Korea.
Remember that you can use both contrast of light and contrast of color within your own images. Experiment with various lighting levels, and don’t be afraid to reposition your subject or camera to explore different lighting. Changing your photo’s exposure or ISO settings can also help draw out more contrast in your images. Using contrast colors and lighting can easily change the mood of your final image.
Conclusion
When you begin breaking down cinematic elements into fundamental techniques, you can see how easily and readily they can be applied to other mediums, including photography and illustration. Next time you watch a film that speaks to you, try going back and examining stills of those favorite scenes. Deconstruct the shot, ponder what makes that scene so great, and then try applying it to your own image work. You might just find that those techniques are enhancing your skills and helping you define your own style.
Frequently Asked Questions on Film Techniques for Stunning Still Images
What are some common film techniques used in creating stunning still images?
There are several film techniques that can be used to create stunning still images. These include the use of depth of field, which involves adjusting the camera’s focus to highlight certain elements while blurring others. Another technique is the rule of thirds, where the image is divided into nine equal parts and the subject is placed at the intersection of these lines to create balance and interest. Lighting is also crucial in creating mood and atmosphere. Lastly, color grading can be used to enhance the visual appeal of the image.
How can I use depth of field to improve my still images?
Depth of field is a powerful tool in photography and film. By adjusting the focus of your camera, you can highlight certain elements in your image while blurring others. This can help to draw the viewer’s attention to the most important parts of the image. To achieve a shallow depth of field, use a large aperture (small f-number). For a deep depth of field, use a small aperture (large f-number).
What is the rule of thirds and how can it enhance my still images?
The rule of thirds is a compositional technique in photography and film. It involves dividing the image into nine equal parts by two equally-spaced horizontal lines and two equally-spaced vertical lines. The subject of the image is then placed at the intersection of these lines. This technique can help to create balance and interest in your image, making it more visually appealing to viewers.
How can lighting affect the mood of my still images?
Lighting plays a crucial role in setting the mood and atmosphere of a still image. Soft, diffused light can create a calm and serene mood, while harsh, direct light can create a dramatic and intense mood. The direction of the light can also affect the mood. For example, backlighting can create a dreamy, ethereal mood, while sidelighting can create a sense of depth and three-dimensionality.
What is color grading and how can it enhance my still images?
Color grading is the process of altering and enhancing the color of a still image or motion picture. It can be used to create a certain mood, evoke specific emotions, or simply enhance the visual appeal of the image. For example, warm colors can create a sense of warmth and happiness, while cool colors can create a sense of calm and tranquility.
How can I use movement to create dynamic still images?
Movement can be used to create a sense of dynamism and energy in still images. This can be achieved through techniques such as panning, where the camera is moved horizontally to follow a moving subject, or zooming, where the camera’s lens is adjusted to change the focal length. These techniques can help to create a sense of motion and speed, making the image more engaging and exciting for viewers.
What are some tips for composing a still image?
When composing a still image, it’s important to consider elements such as balance, symmetry, and leading lines. Balance involves arranging the elements in the image in a way that feels visually balanced, while symmetry involves creating a mirror image along a central axis. Leading lines are lines that lead the viewer’s eye towards the main subject of the image. These compositional techniques can help to create a visually appealing and engaging image.
How can I use framing to improve my still images?
Framing is a technique that involves using elements within the image to frame the main subject. This can help to draw the viewer’s attention to the subject and create a sense of depth and context. Framing can be achieved using a variety of elements, such as buildings, trees, or even other people.
What is the importance of perspective in still images?
Perspective is a powerful tool in photography and film that can be used to create a sense of depth and three-dimensionality. By changing the camera’s position or angle, you can alter the perspective of the image, making the subject appear larger or smaller, closer or further away. This can help to create a more engaging and dynamic image.
How can I use texture to enhance my still images?
Texture can add a sense of depth and detail to your still images. By focusing on the texture of a subject, such as the rough bark of a tree or the smooth surface of a lake, you can create a more engaging and visually interesting image. To highlight texture, consider using side lighting, which can create shadows and highlights that emphasize the texture.
Gabrielle is a creative type who specializes in graphic design, animation and photography.