Web APIs and the IoT in Unity

Key Takeaways
- Unity, a widely used games engine, can be paired with the Internet of Things (IoT) to create games that adapt to real-world conditions such as weather and light.
- Real-world weather data can be incorporated into Unity scenes using a weather API like OpenWeatherMap. This allows the virtual world’s skybox to change texture depending on real-world weather conditions.
- IoT devices like Spark Core can be used to bring microcontroller data into Unity. For example, a light sensor connected to a Spark Core can control the level of light in a Unity scene.
- Unity scenes can be enriched by data from web APIs and IoT devices, opening up a range of possibilities for connecting different APIs and data sets to Unity objects.
- Unity can be used for IoT applications, real-time applications, and the creation of digital twins, which are virtual representations of physical objects or systems.
For me, the Internet of Things is most exciting when you look at just how far reaching the capabilities are. There is so much technology out there, with new devices emerging all the time, that can benefit from connectivity to the web. Over the next few months at SitePoint, I’ll be looking at the various possibilities that the Internet of Things can bring, reviewing a different platform or device in each article. In the previous article, we looked at how to pull in data from the Jawbone Up.
This time around, we’ll be bringing IoT data into Unity, a widely used games engine that is used to build everything from iOS and Android games to console and Facebook games. It is also emerging as an engine that’ll be used on the Oculus Rift, Gear VR and more, so it’s a fun one to try pairing with the IoT. Imagine a game that adapts to real world conditions like weather and light, if it suddenly goes dark in your room, the game world suddenly goes dark too!
To start with, we’re going to connect up a Unity scene to a weather API, allowing us to use real-world weather data in our virtual world. Then we’ll connect up a Spark Core to use its light sensor data.
In this article, we’re assuming that you know all about setting up a scene in Unity, with a skybox, terrain and lighting. We’ll be building from a scene that has all of this ready and set up. My code samples will be in C# but it is possible to do the same sorts of things in UnityScript if you’d prefer.
Download the Demo Code
Working demo code for those who’d like to see this in action is available here.
Connecting Up to the Weather
Our first example of bringing in real world data will be setting up a skybox to change texture depending on the weather. Our sky is going to change to reflect the weather in our real world city! We’ll use OpenWeatherMap to pull in the latest weather data into Unity.
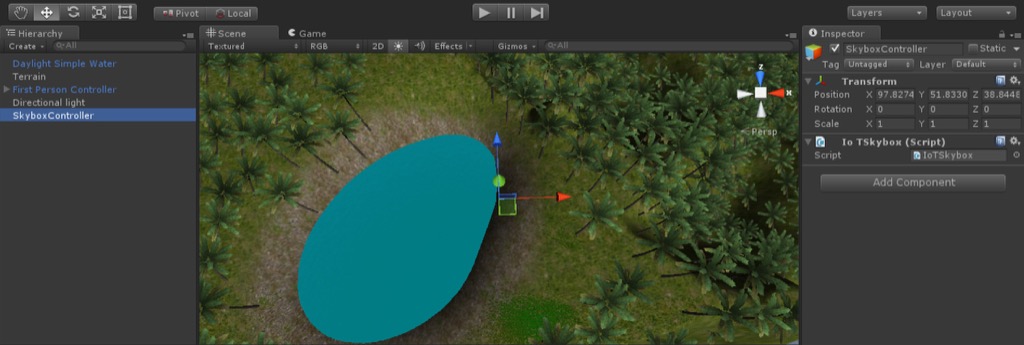
In order to control our scene’s Skybox, we’ll attach a script called IoTSkybox to an Empty Game Object called “SkyboxController”:
Our Skybox Code
In IoTSkybox.c, we include the following code:
using UnityEngine;
using System.Collections;
public class IoTSkybox : MonoBehaviour {
public Material clearSky;
public Material cloudySky;
IEnumerator AdjustSkyToWeather() {
while (true) {
string weatherUrl = "http://api.openweathermap.org/data/2.5/weather?zip=2000,au";
WWW weatherWWW = new WWW (weatherUrl);
yield return weatherWWW;
JSONObject tempData = new JSONObject (weatherWWW.text);
JSONObject weatherDetails = tempData["weather"];
string WeatherType = weatherDetails[0]["main"].str;
if (WeatherType == "Clear") {
RenderSettings.skybox = clearSky;
} else if (WeatherType == "Clouds" || WeatherType == "Rain") {
RenderSettings.skybox = cloudySky;
}
yield return new WaitForSeconds(60);
}
}
void Start () {
StartCoroutine (AdjustSkyToWeather());
}
}
The JSONObject Class
One of the first things we’ll need to do for this code to work, is to add the JSONObject class. To do this, go to the Asset Store in Unity, search for “JSON Object” and you’ll see it available to import into your project:
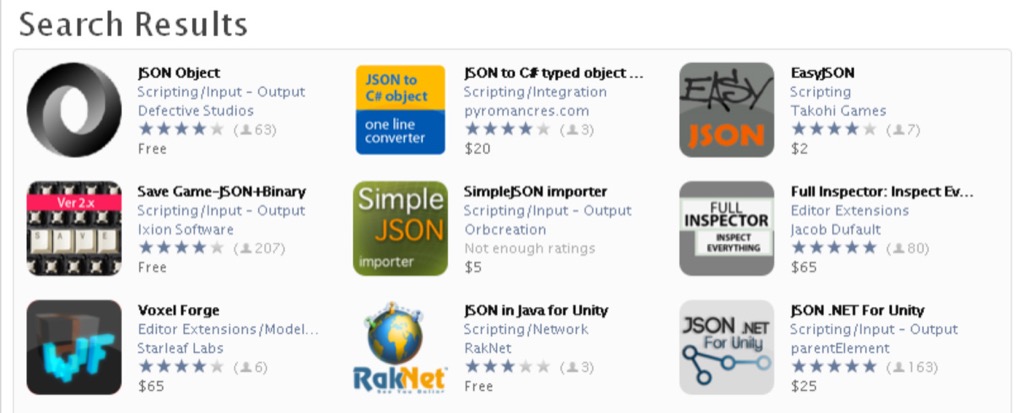
Install it into your project and you’ll have access to the `JSONObject` class in your code. We should have everything we need for the code above to work, so it’s about time we cover what’s actually happening in that code.
The code explained
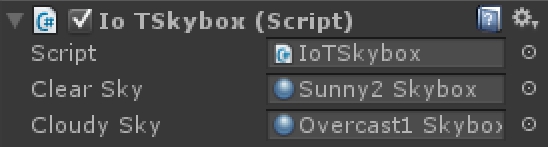
We register two public variables for us to define – clearSky and cloudySky.
public Material clearSky;
public Material cloudySky;
These are the two skybox materials we’ll be able to switch between depending on our weather data. We can then set which materials we want to use in the settings for our SkyboxController:
Next we’ll be using a Coroutine and IEnumerator. To start with, jump down to the Start() function:
void Start () {
StartCoroutine (AdjustSkyToWeather());
}
Here we are starting our Coroutine. A Coroutine allows us to pause the function’s execution whenever we need to. We do that using a yield statement inside the Coroutine. We’ll be using it to wait for our web API response and to wait before regularly repeating our web call.
We define the IEnumerator function further up in our code, it starts with this line:
IEnumerator AdjustSkyToWeather()Within it, we surround its contents with a while (true) statement, this will allow it to loop when the very last yield is returned.
The main bit where we’re performing our web call is the following group of code:
string weatherUrl = "http://api.openweathermap.org/data/2.5/weather?zip=2000,au";
WWW weatherWWW = new WWW (weatherUrl);
yield return weatherWWW;
That makes a web call to http://api.openweathermap.org/data/2.5/weather?zip=2000,au, which you can adjust to include whichever postcode and country code you’d like (I’ve got 2000 for Sydney and au for Australia).
We then set up a WWW object with that URL and then set up a yield which will return true once it has retrieved the contents at that address. Until then, it pauses this function.
This call returns JSON like so:
{
"coord": {
"lon": 151.2,
"lat": -33.86
},
"sys": {
"message": 0.0609,
"country": "AU",
"sunrise": 1430339337,
"sunset": 1430378154
},
"weather": [
{
"id": 801,
"main": "Clouds",
"description": "few clouds",
"icon": "02d"
}
],
"base": "stations",
"main": {
"temp": 291.487,
"temp_min": 291.487,
"temp_max": 291.487,
"pressure": 1038.32,
"sea_level": 1044.67,
"grnd_level": 1038.32,
"humidity": 89
},
"wind": {
"speed": 3.26,
"deg": 133.502
},
"clouds": {
"all": 24
},
"dt": 1430354026,
"id": 0,
"name": "Millers Point",
"cod": 200
}
That function returns a JSON string which we can read using weatherWWW.text. We create a JSONObject (remember the class we installed from the Unity Store?) from this text:
JSONObject tempData = new JSONObject (weatherWWW.text);We then create one more JSONObject to store the JSON data that is nested within the weather key value. It returns an array, so we focus on the first element in the array and grab the string value of main, storing it in WeatherType:
JSONObject weatherDetails = tempData["weather"];
string WeatherType = weatherDetails[0]["main"].str;
Then, if the weather type it returns is “Clear”, we set the skybox to use our clearSky material. If it is “Clouds” or “Rain”, then we use the cloudySky material:
if (WeatherType == "Clear") {
RenderSettings.skybox = clearSky;
} else if (WeatherType == "Clouds" || WeatherType == "Rain") {
RenderSettings.skybox = cloudySky;
}
Finally, we set our final yield to wait for 60 seconds, then return true. This will repeat our while statement every 60 seconds, checking the weather every minute.
yield return new WaitForSeconds(60);Our results
If we run our Unity scene whilst there are clear skies in the town we’ve chosen (in my case Sydney), it looks like so:

If it is rainy or cloudy, it looks like so:

Bringing in Sensors with Spark Core
We can expand this idea further into the world of the Internet of Things by bringing in a microcontroller like a Spark Core or an Arduino. In this article, I’ll be using a Spark Core as it’s quite easy to get going and has its own cloud API that makes this really simple. If you have a different device, the same technique will be possible, you’ll just need to direct it to a web service showing that device’s levels.
I won’t go over all the details of how to use a Spark Core and get it set up, if you are new to Spark Core, the team at Spark have a quick overview here – http://docs.spark.io.
I’ve set up my Spark Core with a light sensor like so:
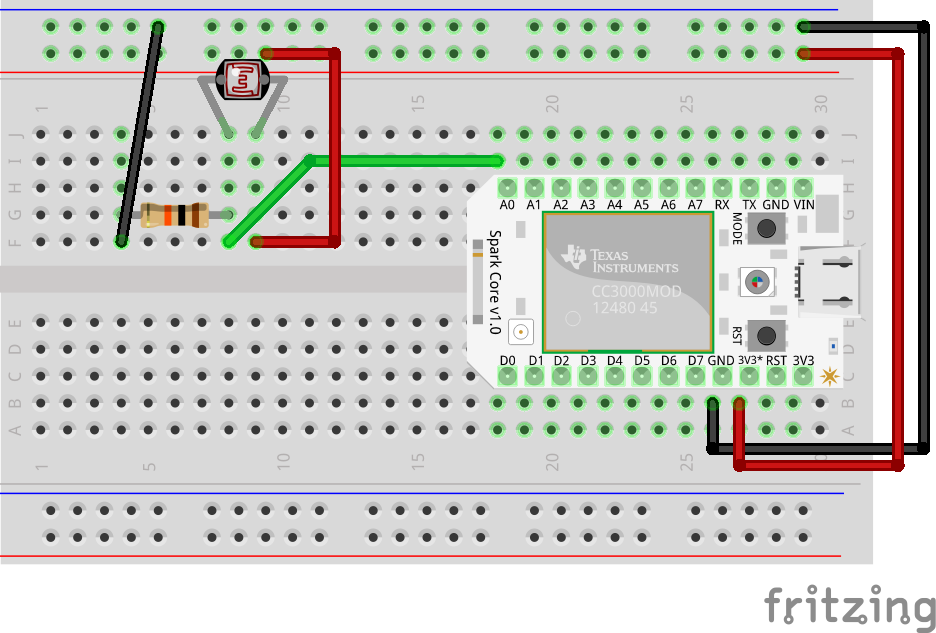
We can connect up the data from this Spark Core set up to our Unity scene.
Connecting our light levels to our Unity world
Let’s bring our Spark Core data into the scene. We are going to control the level of light from our artificial sun using the level of light around our Spark Core!
We start by adding a new script named IoTLight.c to our Directional Light object in the scene. In this script, we’ll add the following:
using UnityEngine;
using System.Collections;
public class IoTLight : MonoBehaviour {
public string token = "42fu524tdfey45bd2c650ce12f45dfg3453s124g";
public string deviceId = "j23tsd8j3ns893k2g3932n3u";
public Light sceneLight;
IEnumerator AdjustLightWithSensor() {
while (true) {
string lightUrl = "https://api.spark.io/v1/devices/" + deviceId + "/light?access_token=" + token;
WWW lightWWW = new WWW (lightUrl);
yield return lightWWW;
JSONObject lightData = new JSONObject (lightWWW.text);
float light = lightData ["result"].n;
sceneLight.intensity = light / 255;
yield return new WaitForSeconds (10);
}
}
void Start () {
sceneLight = GetComponent<Light>();
StartCoroutine (AdjustLightWithSensor());
}
}
The code explained
The code above is structured in the same way as our previous example, however we connect to the Spark Core API and change the settings of our Light object instead.
I’ll explain the main points of difference. In our Start() function, we point our script to our Directional Light using the code:
sceneLight = GetComponent<Light>();This will allow us to reference our Unity world’s sun.
Then, within our Coroutine, our WWW call is made to the Spark Core API using the device ID and your access token. You can get both of these from [build.spark.io](https://build.spark.io) (the same URL you can go to in order to put code on your Spark Core). We define these at the start of our IoTLight code.
string lightUrl = "https://api.spark.io/v1/devices/" + deviceId + "/light?access_token=" + token;
WWW lightWWW = new WWW (lightUrl);
yield return lightWWW;
The JSON object this will return will look like so:
{
"cmd": "VarReturn",
"name": "light",
"result": 20,
"coreInfo": {
"last_app": "",
"last_heard": "2015-04-30T05:05:15.039Z",
"connected": true,
"last_handshake_at": "2015-04-30T04:06:06.250Z",
"deviceID": "j23tsd8j3ns893k2g3932n3u"
}
}
We read in the data and turn it into a JSONObject and get a numerical value for the light value itself (this value will be from 0 – 255), which is in the result part of our JSON. We then set our light intensity. The light intensity needs to be from 0 to 1, so we divide our light value by 255.
JSONObject lightData = new JSONObject (lightWWW.text);
float light = lightData ["result"].n;
sceneLight.intensity = light / 255;
Our Spark Core code
This time around as we are working with our own hardware (the Spark Core) rather than a third party API, we’ll need to set up the code for that too. Head to build.spark.io and create a new App. I named mine “Light Reader”:
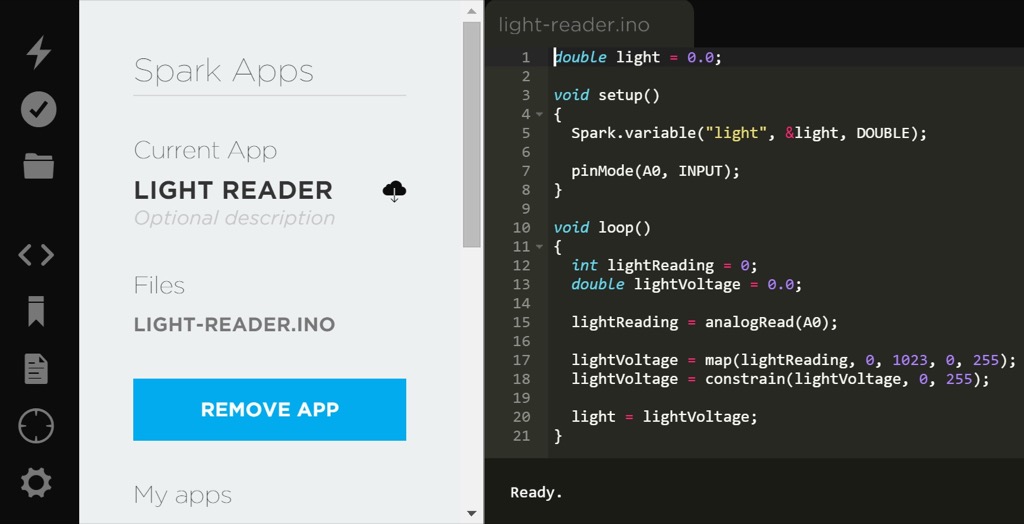
The code for our Spark Core sets up a light variable which is accessible to API calls via "light". We connect up the A0 pin on the Spark Core to read in the analog values from the light sensor on loop, mapping them to a value between 0 and 255:
double light = 0.0;
void setup()
{
Spark.variable("light", &light, DOUBLE);
pinMode(A0, INPUT);
}
void loop()
{
int lightReading = 0;
double lightVoltage = 0.0;
lightReading = analogRead(A0);
lightVoltage = map(lightReading, 0, 1023, 0, 255);
lightVoltage = constrain(lightVoltage, 0, 255);
light = lightVoltage;
}
Our world lighting in action
Things should be looking good by this point! If we’ve got our Spark Core set up and running alongside our Unity scene then we should see the light level from our sun match the light level around our Spark Core.
When our light sensor sees lots of light, our world is lit up nice and bright:

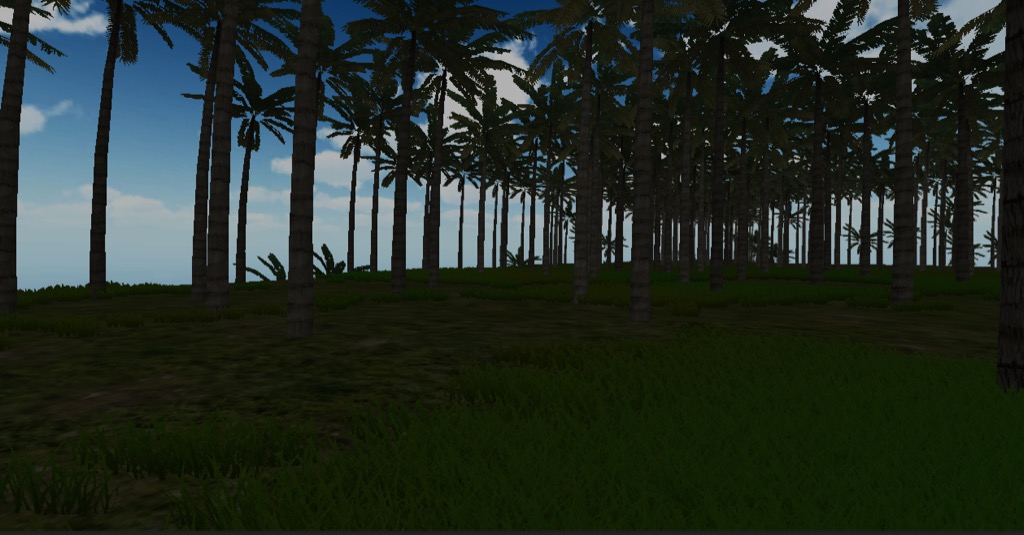
When the light sensor sees less light, our world is darkened too:
Try some variations!
Here’s a bit of bonus code for those who are super keen. If you connect up a temperature sensor to your Spark Core, you could change the tint of the sky using something like this:
IEnumerator AdjustSkyToTemp() {
while (true) {
string tempUrl = "https://api.spark.io/v1/devices/" + deviceId + "/temperature?access_token=" + token;
WWW tempWWW = new WWW (tempUrl);
yield return tempWWW;
JSONObject tempData = new JSONObject (tempWWW.text);
temp = tempData["result"].n;
Color skyColor = new Color(0.0F, 0.0F, 0.0F, 0.3F);
if (temp >= 25) {
skyColor = new Color(0.0F, 0.3F, 0.1F, 0.3F);
} else if (temp < 25) {
skyColor = new Color(0.5F, 0.5F, 0.5F, 0.3F);
}
RenderSettings.skybox.SetColor("_Tint", skyColor);
yield return new WaitForSeconds(10);
}
}
Conclusion
Bringing data from web APIs and IoT devices like the Spark Core can bring a whole new interesting element to your Unity scenes! Using this basic concept, you can connect a whole range of different APIs and data sets to your Unity objects. Experiment! Have fun with it!
Frequently Asked Questions (FAQs) about Web APIs and IoT in Unity
How can I connect IoT devices to Unity?
Connecting IoT devices to Unity involves using a Web API. This is a set of rules and protocols for building and interacting with software applications. In Unity, you can use the UnityWebRequest class to send HTTP requests to a server and receive responses. This class supports GET, POST, PUT, DELETE, and other types of HTTP requests. You can use it to send data to an IoT device or receive data from it. The data can be in various formats, including JSON, XML, and others.
What is a digital twin in Unity?
A digital twin in Unity is a virtual representation of a physical object or system. It uses real-time data from IoT devices to replicate the state, behavior, and functions of the object or system in the virtual world. This allows you to monitor, analyze, and simulate the object or system without interacting with it directly. Unity provides various tools and features for creating and managing digital twins, such as the Unity IoT Digital Twin solution.
How can I use Azure Digital Twins with Unity?
Azure Digital Twins is a service from Microsoft that allows you to create and manage digital twins of physical environments. You can use it with Unity to create immersive and interactive 3D experiences. To connect Azure Digital Twins with Unity, you need to use the Azure Digital Twins SDK. This SDK provides APIs for interacting with the Azure Digital Twins service. You can use these APIs to send data to and receive data from the service.
Can I use real-time data in Unity?
Yes, you can use real-time data in Unity. This involves using a Web API to send and receive data in real-time. You can use the UnityWebRequest class to send HTTP requests to a server and receive responses. The server can be an IoT device, a cloud service, or any other system that supports HTTP. The data can be in various formats, including JSON, XML, and others.
What is the Powerfleet Unity IoT platform?
The Powerfleet Unity IoT platform is a solution from Powerfleet that brings people, assets, and data together to transform business operations. It provides various features for managing and analyzing IoT data, such as real-time tracking, predictive analytics, and others. You can use it with Unity to create immersive and interactive 3D experiences. However, you need to use a Web API to connect the Powerfleet Unity IoT platform with Unity.
How can I use IoT data in Unity?
You can use IoT data in Unity by using a Web API. This involves sending HTTP requests to an IoT device or a cloud service and receiving responses. The responses can contain various types of data, such as sensor readings, device status, and others. You can use this data to control game objects, create digital twins, and perform other tasks in Unity.
Can I use Unity for IoT applications?
Yes, you can use Unity for IoT applications. Unity provides various tools and features for creating and managing IoT applications, such as the Unity IoT Digital Twin solution. You can use these tools and features to connect IoT devices to Unity, use IoT data in Unity, and perform other tasks.
How can I use Web APIs in Unity?
You can use Web APIs in Unity by using the UnityWebRequest class. This class allows you to send HTTP requests to a server and receive responses. The server can be a Web API, an IoT device, a cloud service, or any other system that supports HTTP. The data can be in various formats, including JSON, XML, and others.
What is the UnityWebRequest class in Unity?
The UnityWebRequest class in Unity is a class that allows you to send HTTP requests to a server and receive responses. It supports GET, POST, PUT, DELETE, and other types of HTTP requests. You can use it to send data to a server or receive data from it. The data can be in various formats, including JSON, XML, and others.
Can I use Unity for real-time applications?
Yes, you can use Unity for real-time applications. Unity provides various tools and features for creating and managing real-time applications, such as the UnityWebRequest class. You can use these tools and features to send and receive data in real-time, control game objects in real-time, and perform other tasks.
PatCat is the founder of Dev Diner, a site that explores developing for emerging tech such as virtual and augmented reality, the Internet of Things, artificial intelligence and wearables. He is a SitePoint contributing editor for emerging tech, an instructor at SitePoint Premium and O'Reilly, a Meta Pioneer and freelance developer who loves every opportunity to tinker with something new in a tech demo.


Published in
·automation·CMS & Frameworks·Frameworks·Laravel·Miscellaneous·Patterns & Practices·PHP·October 26, 2015