With recent WordPress updates, its APIs have changed. Some functions and classes have been added, others have been deprecated.
In this article, I will discuss the Theme Customizer Media Controls. In the previous versions, these controls were available, but only in the WP_Customize_Upload_Control class. Now we find a new class to manage media called WP_Customize_Media_Control.
First, I’ll cover how to use this new class to manage media controls in the Theme Customizer. Then we will cover a concrete example of a class that extends WP_Customize_Media_Control to allow the control of cropped images.
The New Base Class to Manage a Media Control
Why Introduce a New Class?
Before version 4.3, WordPress provided us WP_Customize_Upload_Control, a class to manage the upload of a media file in the Theme Customizer. However, this class didn’t save the ID of the uploaded media but only its URL. As the ID is a more common way to retrieve information about a media file, the decision was taken to provide a new class, WP_Customize_Media_Control.
If you have the habit of using WP_Customize_Upload_Control, you can still use it without any problems, as it now extends the WP_Customize_Media_Control class so compatibility is ensured. However, it surely is a better idea to update your code and use WP_Customize_Media_Control.
How To Use this Media Control
This new Media Control can be used in the same way as its predecessor, except for the saved value. As it is not a URL anymore, it can’t be sanitized in the same way.
To see how to use this control we will review a concrete example. We will see how to let the user choose an audio file that visitors will be able to listen to on all pages. You can write the code in your theme’s functions.php file or in a new plugin. Both are acceptable and the two options each have their own advantages.
Note that, as the Theme Customizer API is not the main focus of this article, I won’t describe here all the available options for the functions we’ll call.
Basic Usage
First, we begin with a function that WordPress will call when the user wants to display the Theme Customizer. This function will add our custom elements to this customizer. To inform WordPress that we want it to call our function at the right moment we use the customize_register action.
function add_my_media_controls($wp_customize) {
}
add_action('customize_register', 'add_my_media_controls');
The parameter, here named $wp_customize, is an object representing the Theme Customizer. It contains all the needed methods to add to our settings.
As none of the default sections are really a good place to add our custom sound, we will add our own, simply named “Sound”.
$wp_customize->add_section('sound', array(
    'title' => 'Sound',
    'description' => 'Add a sound to your website',
    'capability' => 'edit_theme_options'
));
As expected, this method creates a new section, named “Sound”. When the user opens it, they will see the description at the top. Thanks to the third option, only users who can already edit theme options will be able to see this section. Finally, note the first parameter before the array of options: it defines the ID of the section, which must be reused when we want to add a control in this section.
If you open the Theme Customizer now, you won’t see this section. It’s normal: WordPress doesn’t display empty sections so, to see it, we have to fill it with at least one control.
The Theme Customizer API splits a control into two parts: the UI control which allows the user to choose or type the right data, and the setting which retrieves the current value and saves the new one. See the setting as the interface between the UI control and the database.
Before creating a control we need to create the setting.
$wp_customize->add_setting('music', array(
    'type' => 'theme_mod',
    'capability' => 'edit_theme_options',
    'sanitize_callback' => 'absint'
));
We indicate “music” as the ID for our setting. It is a theme modification, as indicated in the first option. The capability option is the same as for the add_section() method. Finally we indicate absint() as the sanitize callback function. This WordPress function is a shortcut for abs(intval()) and is here to ensure that the value is a positive integer. As we saw above, WP_Customize_Media_Control will store an ID so it is exactly the function we want for sanitizing the value.
We’re now ready to add our UI control which can be seen by the user.
$wp_customize->add_control(new WP_Customize_Media_Control($wp_customize, 'music', array(
    'section' => 'sound',
    'label' => 'Music',
    'mime_type' => 'audio'
)));
To be built, the WP_Customize_Media_Control object needs three parameters: the current Theme Customizer instance, the ID of the corresponding setting (which we just created above) and an array of options.
The section option is here to indicate the section in which we want to place our control. We use here the section we created especially for this use. Then we indicate the label of the field. You can put here any value you want.
Finally, here we will provide the user a way to select a media file. As we want them to be able to only select audio files, we indicate audio as the wanted MIME type. That way, WordPress won’t allow the selection of other types of files.
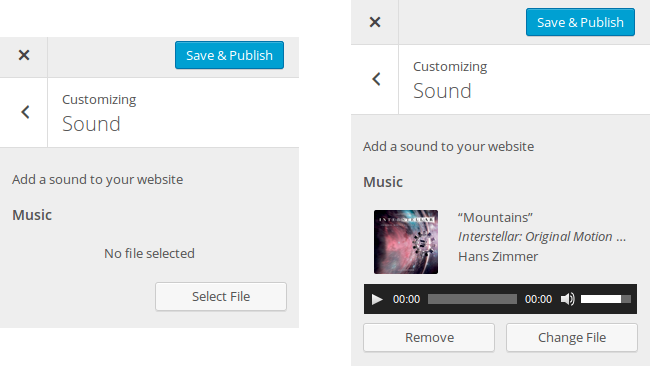
And that’s all for the creation of our control. Now you can open the Theme Customizer: you should see our section and our control.
More Options
Note that the array of options we provided as the third parameter of the WP_Customize_Media_Control constructor can accept more options.
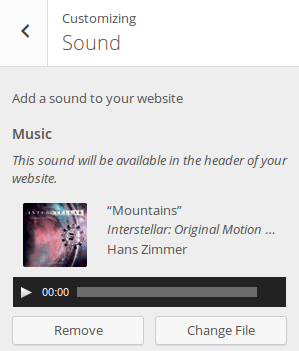
In addition to its label, you can display more information about your control thanks to a description. By giving a non empty string to the option description you can in fact display a description right below the label, for example, describe where will it be displayed.
You can set its priority thanks to the option priority. This number defines the order in which the object must be displayed. By default, the priority is set to 10 and objects are displayed in the order that they are created. But you can change that. For example, if you create two objects, you can set the priority of the first one to 10 and the priority of the second one to 0: that way, the second object will be displayed first. This option can be useful if your plugin or theme provides several controls that must be displayed in a given order.
Retrieving the Saved Setting
To retrieve the setting saved by the user we will create a new function, named echo_theme_sound(). This function will be called in the place you want in the theme, to display an audio tag corresponding to the selected media.
First, remember that our setting is a theme modification so, to retrieve its value, we must use the function get_theme_mod().
function echo_theme_sound() {
    $id = get_theme_mod('music');
}
If the user already made a choice, this variable will contain the ID of the selected media. In other words, to check if a choice has been made, we just need to check if this ID is different than zero.
if ($id != 0) {
    // Display the tag
}
To build an audio tag we will use wp_audio_shortcode() which excepts for one parameter: an array of options which will be in fact the attributes of the tag.
This array must contain an option named src which is the URL of the audio file. To retrieve this URL we can use wp_get_attachment_url() with the previously retrieved ID. If you want to play with the other attributes, you can, but it’s not mandatory. See the WordPress Codex for more information about the available attributes.
We are now ready to display our audio tag. I chose here to encapsulate it into a div, but you can choose another tag, and another style. You can even, for example, define two parameters $before and $after for your echo_theme_sound() function to let the user provide the text to display before and after the audio tag.
$attr = array(
    'src' => wp_get_attachment_url($id)
);

echo '<div style="margin-top: 30px;">' . wp_audio_shortcode($attr) . '</div>';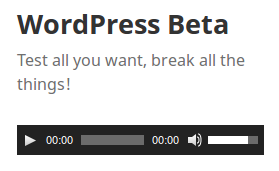
Now, just call the echo_theme_sound() function wherever you want, and enjoy the result! Note that, once you have used this function in one of your theme’s files you will be able to see the changes you do in the Theme Customizer directly after you have made them, without the need to refresh the page.
Managing Cropped Images
The WP_Customize_Media_Control can be extended to add more features. If you need a concrete example of what features could be added that way, you will find one in WordPress Core itself with the WP_Customize_Cropped_Image_Control class.
As you may guess it by reading its name, this class is useful when you want to provide your users a way to select and crop an image before using it.
Here we will use it to add a little header image to the current default WordPress theme (Twenty Fifteen). I chose to display this image on the top of the header, right above the website’s title but, once again, you’re free to place it wherever you want: the goal of this article is just to see concrete examples of the new API.
First, we create our setting. As we’ll store a media ID, this setting is essentially the same as for the audio tag previously added.
$wp_customize->add_setting('little_header', array(
    'type' => 'theme_mod',
    'capability' => 'edit_theme_options',
    'sanitize_callback' => 'absint'
));
Then, the interesting part: the control itself. As WP_Customize_Media_Control’s one, the WP_Customize_Cropped_Image_Control’s constructor excepts for three parameters which are exactly the same: the Theme Customizer instance, the setting’s ID and an array of options.
$wp_customize->add_control(new WP_Customize_Cropped_Image_Control($wp_customize, 'little_header', array(
    'section' => 'header_image',
    'label' => 'Little Header',
    'width' => 355,
    'height' => 200
)));
Here, I didn’t create a new section: we reused the one already used by WordPress to provide the control allowing the user to choose a background image header. The label option is an already known one, and you’ll be more interested by the two other options: width and height.
These options are here to control the size of the final image. The user selects the image they want and, then, a graphic tool allows them to crop this image where they want. WordPress will crop the image following this choice and resize the cropped image to the size you chose with these options.
When the user crops the image, the constraint of the image ratio is here and they can’t select a part of the image with another ratio. But this can be changed.
In fact, this class provides two more options: flex_width and flex_height. By default these two options are set to false and the aspect ratio given by the dimensions you indicated is a constraint: the user must select an area with the same ratio.
However, if you set one of these options to true, then this constraint will be removed and the user will be able to choose a part of the image with any ratio. Note that WordPress will still resize the result to the size you asked so a deformation can then happen.
When using flex_width and flex_height, the ratio is important. In fact, at the beginning, WordPress proposes to the user a default cropped zone. This zone corresponds to the maximum available area in the image with the asked ratio (for example the biggest possible square into a rectangle). This gives us what we will call here the default width and height.
If flex_width is set to false, then the user won’t be able to select an area larger than the default width. This constraint is canceled if you set this option to true. The same can be said for flex_height.
Finally, if flex_width and flex_height are set to false (their default values) and if the user selects an image in the exact size you indicated in the width and height options, then the crop step will be skipped.
Note that cropping an image won’t alter the original: a new child media is created, with the cropped image, and the original file remains the same. That way, your users won’t have to upload the same image multiple times if they need to use it in several places.
The way to retrieve the cropped image is similar to the one we used to retrieve our sound in the previous part: we get the image ID with get_theme_mod() and its URL with wp_get_attachment_url(). Then we display it in the way we want. Here I chose the simplest way, by echoing an image.
function echo_little_header() {
    $id = get_theme_mod('little_header');

    if ($id != 0) {
        $url = wp_get_attachment_url($id);

        echo '<div style="margin-bottom: 30px;">';
        echo '<img src="' . $url . '" alt="" />';
        echo '</div>';
    }
}
In Conclusion
With these new controls the Theme Customizer becomes more and more interesting, as it allows developers to do more things, easier. Now, if you need a media control in this customizer, you can add your own and retrieve the most useful value: the media ID.
The base class we saw in this article can be extended if you need more specific controls. This is done in several places in WordPress core: the Cropped Images control extends WP_Customize_Media_Control and this class is itself extended by the control used by the new Site Icon API. These are just examples of what you can do with this API.
You can play with the Theme Customizer with a theme or a plugin. However, as it is more practical for me to provide you a little plugin, you can find one by following this link. It combines the examples seen in this article.
Frequently Asked Questions (FAQs) about Using the WordPress Customizer Media Controls
How can I add a new media control in WordPress Customizer?
Adding a new media control in WordPress Customizer is a straightforward process. First, you need to open your theme’s functions.php file and add a new function that will customize the WordPress Customizer. Inside this function, you can use the $wp_customize object to add a new control. For a media control, you can use the WP_Customize_Media_Control class. You need to specify the settings, section, and label for your control. Once you’ve added the code, you can save your functions.php file and the new media control will appear in the WordPress Customizer.
What are the default button labels in WordPress Customizer Media Control?
The WordPress Customizer Media Control has two default button labels: ‘Select File’ and ‘Change File’. These labels are displayed on the buttons that allow you to select or change the media file associated with a particular control. You can customize these labels by using the get_default_button_labels() method of the WP_Customize_Media_Control class.
How can I implement media surfaces on mobile devices?
Implementing media surfaces on mobile devices involves using the Android Media APIs. You can use the MediaSession API to control the playback of media files, and the MediaBrowserService API to browse and select media files. You can also use the MediaRouter API to route media files to external devices. These APIs provide a comprehensive set of tools for implementing media surfaces on mobile devices.
How can I cast media files from WordPress to a Chromecast device?
Casting media files from WordPress to a Chromecast device requires the use of a Chromecast-enabled app or browser extension. You can use the Google Cast SDK to develop your own Chromecast-enabled app, or you can use an existing app like Google Chrome or YouTube. Once you’ve set up your Chromecast device and connected it to the same Wi-Fi network as your WordPress site, you can use the Cast button in your app or browser extension to cast media files to your Chromecast device.
How can I customize the WordPress Customizer Media Controls?
Customizing the WordPress Customizer Media Controls involves modifying the code in your theme’s functions.php file. You can use the $wp_customize object to add, remove, or modify controls. For example, you can use the add_control() method to add a new control, the remove_control() method to remove an existing control, and the get_control() method to modify an existing control. You can also use the WP_Customize_Media_Control class to customize the properties of media controls, such as the button labels and the media type.
 Jérémy Heleine
Currently a math student, Jérémy is a passionate guy who is interested in many fields, particularly in the high tech world for which he covers the news everyday on some blogs, and web development which takes much of his free time. He loves learning new things and sharing his knowledge with others.