WordPress is extremely popular with small businesses, but more and more product businesses are also opening up e-commerce stores using Shopify. It’s possible to keep an existing info site and use of the Shopify API with a custom page template to pull a feed of products from Shopify into a WordPress site.
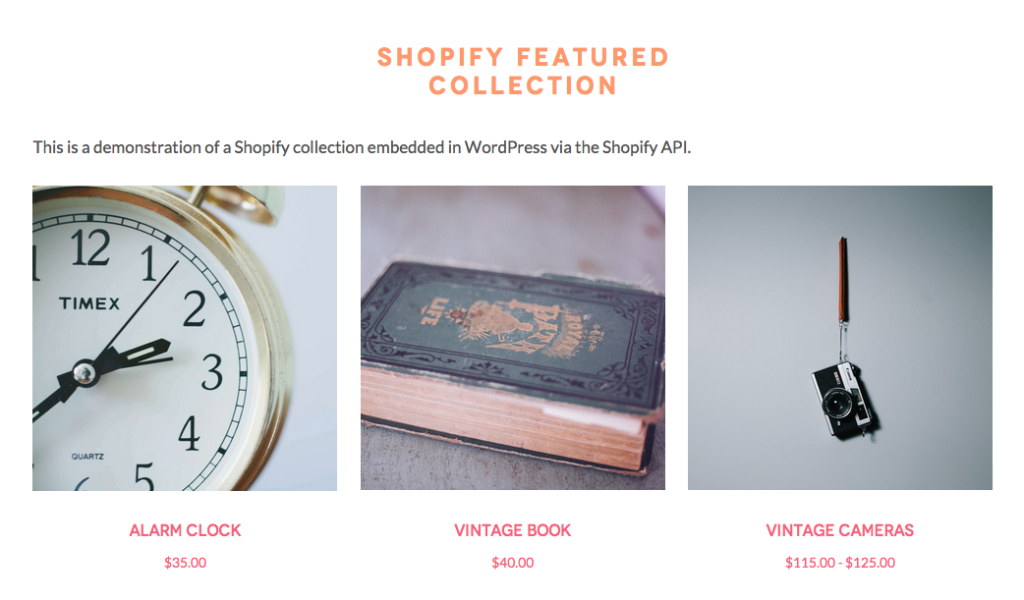
There is a working feed of products on this demo page, which pulls from a demo Shopify store, and the end result looks like this:
 Let’s get started!
Set up on the Shopify Side
In order to set up integration with Shopify, you’ll need to have a collection to pull into your WordPress page and a private app set up so that you can call into the Shopify API.Identify Your Collection
While you may be used to using the collection title or handle in Shopify templates, for integration purposes the primary identifier is the collection ID number. You can find the ID number for a given collection by editing the collection in the Shopify admin and looking at the end of the URL: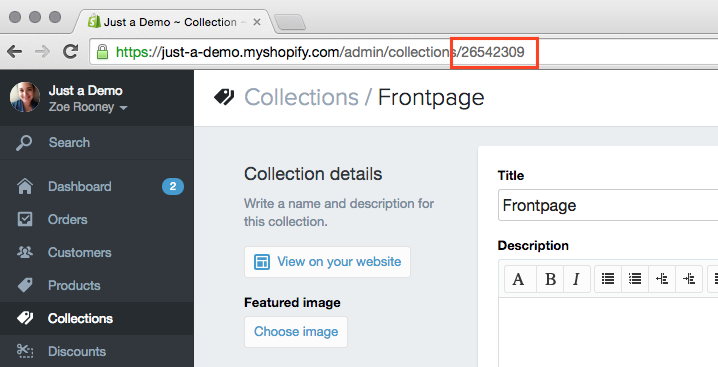 Make sure that your selected collection has a handful of products in it, and note that ID number for use on your WordPress site.
Creating a Private App
While you’re in Shopify’s admin, you will need to create a private app. This is what gives you access to your shop information via the Shopify API. To create an app, head to the Apps page in the admin and click on the Private Apps button in the top right corner. On the next page, click the button to Create a Private App. You’ll need to give the app a title and you can optionally include a contact email address (if you don’t enter an email it will default to your user’s email address).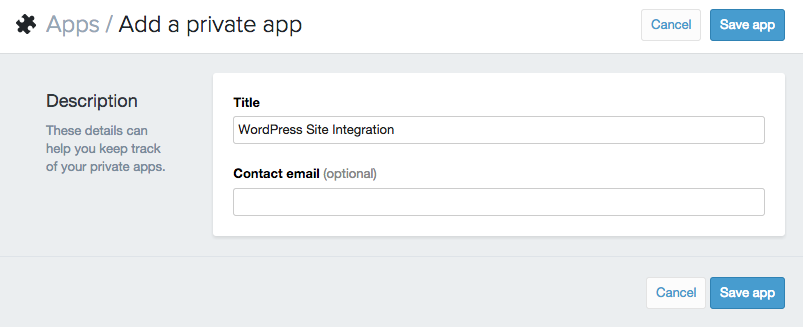 Click the save button and your app is live! Click on the title of the app in the Private Apps list to get the full set of authentication details you’ll need to connect via the API. The sample URL at the very bottom has the correct formatting, so that’s a great place to start.
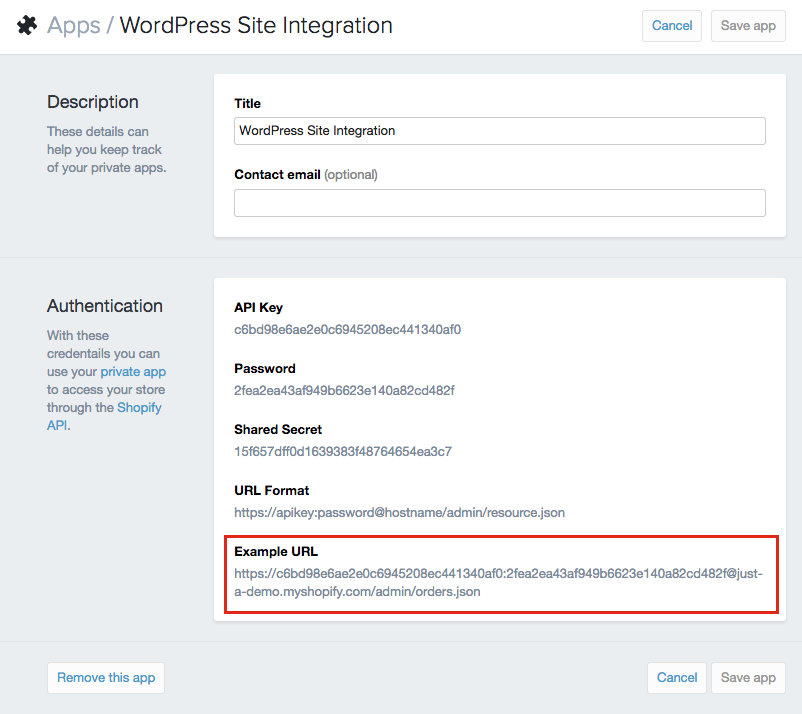 The full Example URL is what you’d use to access the Orders information for your shop via the API, so you’ll want to note just the beginning of the URL. In this example, you’d note the following:
https://c6bd98e6ae2e0c6945208ec441340af0:2fea2ea43af949b6623e140a82cd482f@just-a-demo.myshopify.com
WordPress Set Up
The bulk of the integration happens on the WordPress side, where you’ll create a custom template to display your selected collection. First, make sure that you are working within a child theme or a completely custom theme that won’t be overwritten on update.Create a New Page Template
For this demo, we’ll create a custom page template with our collection feed, so the first step is to create a new file in the theme with the file namepage-shopify.php. The initial contents of this page should look something like this:
<?php
/**
* Template Name: Shopify Collection Demo
*
*/

get_header(); ?>

<div id="primary" class="full-width">

<?php while ( have_posts() ) : the_post(); ?>

<article id="post-<?php the_ID(); ?>" <?php post_class(); ?>>
<header class="entry-header">
<h1 class="page-title"><?php the_title(); ?></h1>
</header><!-- .entry-header -->

<div class="entry-content">
<?php the_content(); ?>
</div><!-- .entry-content -->

</article>

<?php endwhile; ?>

</div><!-- #primary -->

<?php get_footer(); ?>Create a Page and Assign the Template
The most important feature to maintain from the custom template example above is the template name in the first comment block – this allows you to assign this template to a page in your WordPress admin. That’s what you’ll want to do next – create a new page in WordPress and assign your new template to that page: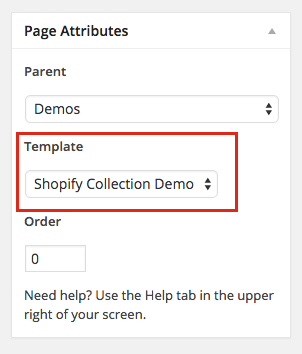 At this point, you’ll be able to view your new page with your custom template applied but there won’t be much to see since we haven’t added any of the integration code yet.
Optional: Create Custom Fields for Shopify Data
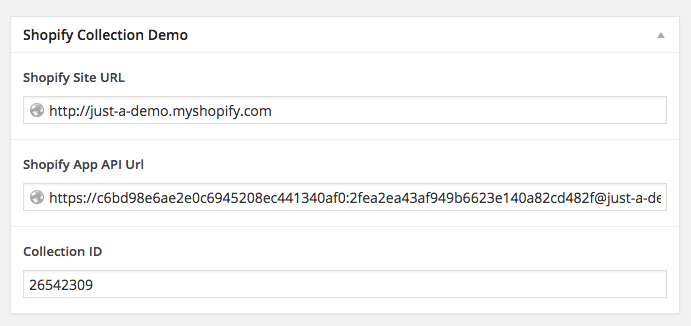
While you don’t strictly have to do this next step, I like to use custom fields for the Shopify data such as the collection ID and API authentication URL. In contrast with hard-coding that data into the template, custom fields let me easily change that information if I want to in the future. While the API URL may not change, you may decide to feature a different collection and it’s nice to not have to edit the template to make that change. I use the Advanced Custom Fields (ACF) plugin for this type of thing because it’s free, quick, easy, and creates a nice interface for the custom fields. You’ll want to set up three fields: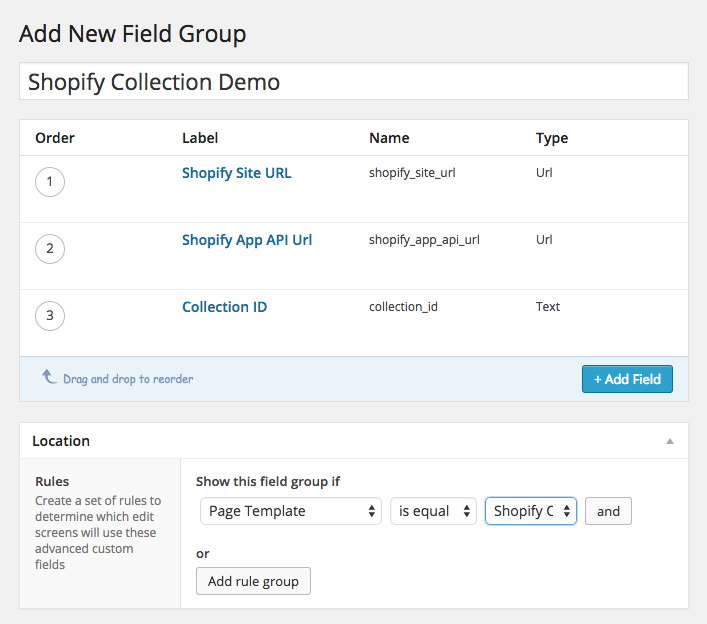 Once these fields are set up and applied to the custom page template, you’ll see them when you edit your new page and you can use them to enter the data you collected from your Shopify account earlier:
Embed the Collection
Now that the setup is done on both sites, it’s time to get into the bulk of the custom code to pull in your collection via the Shopify API. For reference, you can access the full code used in my demo template in this GitHub Gist. I started out by creating a new div just under my regularentry-content area to hold my feed:
<div class="row product-feed"></div>Assign Base Variables
To get started, we’ll create a couple of PHP variables to hold the Shopify information.With Advanced Custom Fields
If you used Advanced Custom Fields, your variable setup would look like this:// Set variables
$api_url = get_field( 'shopify_app_api_url' );
$shop_url = get_field( 'shopify_site_url' );
$collection_id = get_field( 'collection_id' );Hard-Coding Your Values
If you didn’t use custom fields, you can still set up the same variables, but you’ll hard code the values in place, like so:// Set variables
$api_url = 'https://c6bd98e6ae2e0c6945208ec441340af0:2fea2ea43af949b6623e140a82cd482f@just-a-demo.myshopify.com';
$shop_url = 'http://just-a-demo.myshopify.com';
$collection_id = '26542309';Access the API Data
The Shopify API is fairly well documented and has a wide variety of access points. We’ll be using two of those access points in this tutorial, collect and product.Get the List of Products
A collect is a kind of funny unit in that it’s not something you ever interact with in the Shopify admin, but it’s the object that holds information about which products are in a custom collection. The collect will output an array of products in the collection, including each product’s ID As such, the first file we’ll pull from the API is the collect data for the featured collection, which we will do by setting up a variable equivalent to the URL for the collect JSON file:// Create the API URL for the Shopify collect
$collects_url = $api_url . '/admin/collects.json?collection_id=' . $collection_id . '&limit=3';API URL + /admin/collects.json?collection_id= + COLLECTION ID followed by optional parameters. We’ve used our variables for the API URL and collection ID, and also added a parameter to limit the number of products returned to 3 (if you want to return more or fewer products, you could edit that final digit on the URL).
Get the File Contents (with Caching)
Now that we have that URL, we’ll want to get the file it points to, but in order to prevent hitting Shopify’s API limits (and to improve performance), we can use a WordPress transient to temporarily cache the file. The next code in the file checks for a transient with the nameshopify_product_feed. If it doesn’t find one, it gets the file from Shopify and sets the transient to store that data for 4 hours:
// Use a transient for the feed URL (performance boost)
if ( false === ( $collects_content = get_transient( 'shopify_product_feed' ) ) ) {
$collects_content = @file_get_contents( $collects_url );

// Put the results in a transient. Expire after 4 hours.
set_transient( 'shopify_product_feed', $collects_content, 4 * HOUR_IN_SECONDS );
}

// Decode the JSON in the file
$collects = json_decode( $collects_content, true );@ symbol at the beginning of @file_get_contents. That suppresses PHP errors if there is a problem getting the file contents, which could happen if you do hit an API limit. You may want to remove that while you’re testing your implementation because you may want those errors to appear until you have everything working.
The last line in the above snippet decodes the JSON data in the file and stores it in an array.
Loop Through the Collect
Now that we’ve got the initial array of product data for the collect, we’ll loop through it and create a set of variables that we’ll use later on to display the data in the template. This loop starts out:// Reset variant inventory count
$variant_inventory = 0;
// Loop through products in the collection
for ( $prod = 0; $prod < 3; $prod++ ) {
// Get the product ID for the current product
$product_id = $collects['collects'][$prod]['product_id'];for loop. If you’ve changed your product number (by changing the limit parameter in the collect URL) you’ll want to also update the limit in this line ($prod < 3).
Within the loop, we start out by getting the product ID for the current product and assigning it to the variable $product_id.
Access Product Data via the API
Once we’ve got the product ID, we can go back to the Shopify API to get all the data we’ll display for that product. The format for this API call is:// Get the product data from the API (using the ID)
$product_url = $api_url . '/admin/products/' . $product_id . '.json?fields=images,title,variants,handle';
// Decode the JSON for the product data
$product_json = json_decode( @file_get_contents( $product_url ), true );$product_id variable we just created to grab a particular product’s data. The parameters at the end of the URL allow us to limit which data gets returned by the API – in this case, we’re just getting the product title, handle, images, and variant data.
While it’s a good idea to cache the collect data, I would advise against caching product data (or if you do cache it, setting a lower expiration time frame). This is because product data such as availability is more likely to change at any given time, and you likely want your feed to reflect up to the moment data on pricing and availability.
As such, there’s no transient for this file, instead the product data is accessed directly and the resulting array of information for the product is assigned to the variable $product_json.
Setting Product Data Variables
The first few pieces of data we’ll display for each product are easy enough to get from the array:// Set some variables for product data
$current_product = $product_json['product'];
$product_handle = $current_product['handle'];
$product_title = $current_product['title'];// Get the product image and modify the file name to get the large size thumbnail
$image_src_parts = pathinfo( $current_product['images'][0]['src'] );
$product_image_src = $image_src_parts['dirname'] . '/' . $image_src_parts['filename'] . '_large.' . $image_src_parts['extension'];_large string to specify which size thumbnail to return. This is reliant on Shopify’s file naming conventions for image sizes, but those have remained consistent over time so I feel it’s a safe move.
The last set of information we’ll display about each product is its availability and price. We’ll use inventory to determine if a product should show as sold out, and we’ll get information about variants and pricing to determine whether to show a single price or a range.
// Get product variant information, including inventory and pricing
$variants = $current_product['variants'];
$variant_count = count( $variants );

$variant_price = 0;
$variant_prices = array();
if ( $variant_count > 1 ) :
for ( $v = 0; $v < $variant_count; $v++ ) {
$variant_inventory += $variants[$v]['inventory_quantity'];
$variant_prices[] = $variants[$v]['price'];
}
$price_min = min( $variant_prices );
$price_max = max( $variant_prices );
else :
$variant_price = $variants[0]['price'];
$variant_inventory = $variants[0]['inventory_quantity'];
endif;

?>Display Each Product
Now that we have all the data, we’ll display set to variables, we can set up the display.Full Markup
<div class="product-feed-item">
<a href="<?php echo $shop_url; ?>/products/<?php echo $product_handle; ?>">
<img src="<?php echo $product_image_src; ?>" alt="<?php echo $product_title; ?>"/>
<h3><?php echo $product_title; ?></h3>
<?php if ( $variant_inventory > 0 ) : ?>
<?php if ( $variant_price > 0 ) : ?>
<span class="price small"><?php if ( $variant_price > 0 ) : ?>$<?php echo $variant_price; ?><?php else : ?>FREE<?php endif; ?></span>
<?php elseif ( ( $price_min > 0 ) && ( $price_max > 0 ) ) : ?>
<span class="price small">$<?php echo $price_min; ?> - $<?php echo $price_max; ?></span>
<?php endif; ?>
<?php else : ?>
<span class="sold-out">OUT OF STOCK</span>
<?php endif; ?>
</a>
</div>element.
Product Inventory and Price
Finally, there are some conditionals to check whether the product is in stock and whether it has a range of prices:<?php if ( $variant_inventory > 0 ) : ?>
<?php if ( $variant_price > 0 ) : ?>
<span class="price small"><?php if ( $variant_price > 0 ) : ?>$<?php echo $variant_price; ?><?php else : ?>FREE<?php endif; ?></span>
<?php elseif ( ( $price_min > 0 ) && ( $price_max > 0 ) ) : ?>
<span class="price small">$<?php echo $price_min; ?> - $<?php echo $price_max; ?></span>
<?php endif; ?>
<?php else : ?>
<span class="sold-out">OUT OF STOCK</span>
<?php endif; ?>Styling the Output
With the product feed in place, the only thing left to do is some styling. I’ve included some basic styles inline in my demo, just to give the grid some shape:.product-feed-item {
display: inline-block;
vertical-align: top;
width: 31%;
margin-right: 2%;
text-align: center;
}
.product-feed-item img {
max-width: 100%;
height: auto;
}Wrap Up
There are a lot of potential applications for integrating the Shopify API with WordPress beyond featuring a single collection on a page. Sites I’ve created have integrated featured products into each blog post, and have gone so far as to allow you to add a product to your Shopify cart from within WordPress. Integrating a single collection is a great first step to getting more familiar with the API and how it works in a WordPress context, but the sky is the limit!Frequently Asked Questions (FAQs) about Using the Shopify API with WordPress
What is the Shopify API and how does it work with WordPress?
The Shopify API is a powerful tool that allows developers to access and interact with the Shopify platform in a programmatically way. It can be used to create, retrieve, update, or delete data on Shopify. When integrated with WordPress, it allows you to display Shopify products on your WordPress site, manage your Shopify store from your WordPress dashboard, and even create a seamless shopping experience for your customers. This integration is made possible through the use of plugins or custom code.
How can I integrate the Shopify API with my WordPress site?
Integrating the Shopify API with your WordPress site can be done in two ways: through a plugin or custom code. Plugins like WP Shopify provide an easy way to sync your Shopify store with your WordPress site. Alternatively, you can use custom code to make API calls to Shopify and display the data on your WordPress site. This requires a good understanding of both Shopify’s API and WordPress development.
What are the benefits of using the Shopify API with WordPress?
Using the Shopify API with WordPress allows you to leverage the best of both platforms. You can use WordPress for its superior content management and SEO capabilities, while using Shopify for its robust ecommerce features. This integration also allows you to manage your Shopify store from your WordPress dashboard, providing a unified experience.
Can I use the Shopify API to create a custom shopping experience on my WordPress site?
Yes, the Shopify API allows you to create a custom shopping experience on your WordPress site. You can use the API to retrieve product information, create shopping carts, manage customer information, and process orders. This allows you to create a shopping experience that is tailored to your brand and your customers’ needs.
What data can I access with the Shopify API?
The Shopify API provides access to a wide range of data. This includes product information, customer data, order details, and more. You can use this data to create custom features on your WordPress site, such as product galleries, customer profiles, and order tracking systems.
Is it safe to use the Shopify API with WordPress?
Yes, it is safe to use the Shopify API with WordPress. Shopify uses OAuth 2.0 for authentication, which ensures that your data is secure. However, it’s important to follow best practices for API usage, such as limiting the number of API calls and securing your API keys.
Do I need to know how to code to use the Shopify API with WordPress?
While using a plugin to integrate Shopify with WordPress doesn’t require coding knowledge, using the Shopify API directly does require a good understanding of coding. You’ll need to be familiar with making API calls, handling responses, and integrating the data into your WordPress site.
Can I use the Shopify API to manage my Shopify store from my WordPress dashboard?
Yes, the Shopify API allows you to manage your Shopify store from your WordPress dashboard. You can use the API to create, update, and delete products, manage orders, and handle customer information. This provides a unified experience, allowing you to manage your ecommerce business without leaving your WordPress site.
How can I troubleshoot issues with the Shopify API on my WordPress site?
If you’re experiencing issues with the Shopify API on your WordPress site, there are several steps you can take. First, check the API response for any error messages. These can often provide clues as to what’s going wrong. You can also check Shopify’s API documentation for any changes or updates that might be affecting your integration.
Can I use the Shopify API to create a multi-channel shopping experience?
Yes, the Shopify API allows you to create a multi-channel shopping experience. You can use the API to sync your Shopify store with your WordPress site, social media platforms, and other online marketplaces. This allows you to reach more customers and provide a seamless shopping experience across multiple platforms.
 Zoe Rooney
Zoe Rooney runs a small front-end web development company focused on working with talented designers to create beautiful, functional Shopify and WordPress websites. She is also an instructor for Girl Develop It Philly and Tech Girlz.