- Installing the Dependencies
- Setting up the App
- A Little CSS
- Handling Authentication
- Saving New User Data
- Saving Statuses
- Adding the Current User to $rootScope
- Deleting Statuses
- Adding Your Own Firebase Account
- A Note About Security
- Wrapping Up
- Frequently Asked Questions (FAQs) about Real-Time Status Update App with AngularJS and Firebase
If you’ve spent any time with AngularJS then you’ll likely be familiar with Firebase—a realtime data store that makes it very easy to save and sync data across any platform. Firebase provides an AngularJS binding for its platform called AngularFire which makes using the Firebase API even easier.
In this tutorial we will be creating a simple status update app that will let us see how AngularJS and Firebase interact. For the UI, we’ll use Angular Material which is the AngularJS implementation of Google’s Material Design and comes with a large set of great UI components. Angular Material is based on flexbox which might take a bit of getting used to if you haven’t become familiar with it yet. We’re also going to focus a lot on the authentication portion of the app which, as we’ll see, is made simple by Firebase’s built-in authentication system.
This tutorial will assume that you’re familiar with AngularJS and that you have a cursory understanding of what Firebase is and how it works.
As ever, the code for this tutorial can be found on GitHub.
Installing the Dependencies
Let’s start by installing what we’ll need for the app using npm.
From the command line:
mkdir status-app && cd status-app
npm install angular-material angular-ui-router angularfire angular-md5
Installing Angular Material will give us other packages as well, including the most recent version of AngularJS. We’ve included UI Router as we’ll need to handle two different states—one for logging in/registering and another for viewing statuses. Angular MD5 will give us a quick way to hash email addresses which will be needed for getting Gravatar images for our users.
You’ll also need some kind of server to view and interact with the app. For this purpose http-server is ideal.
Setting up the App
We’ll want a folder structure that gives us a clean way of breaking out the different areas of responsibility. For this, let’s use a folder called components. The entire folder structure should look like this:
status-app
|-- components
    |-- auth
    |-- status
    |-- user
|-- node_modules
    * dependencies
-- app.js
-- index.html
-- style.css
Let’s setup our index.html file with references to the dependencies we installed already, as well as the application scripts that we haven’t yet created.
<!-- index.html -->

<!DOCTYPE html>
<html>
  <head>
    <title>Status App</title>
    <link rel="stylesheet" href="node_modules/angular-material/angular-material.css">
    <link rel="stylesheet"
          href="https://fonts.googleapis.com/css?family=RobotoDraft:300,400,500,700,400italic">
    <link rel="stylesheet" type="text/css" href="style.css">
  </head>
  <body ng-app="statusApp">
    <div layout="row">
      <div flex="33" offset="33">
        <div ui-view></div>
      </div>
    </div>
  </body>

  <!-- Application Dependencies -->
  <script src="node_modules/angular/angular.js"></script>
  <script src="node_modules/angular-ui-router/build/angular-ui-router.js"></script>
  <script src="node_modules/angular-material/angular-material.js"></script>
  <script src="node_modules/angular-animate/angular-animate.js"></script>
  <script src="node_modules/angular-aria/angular-aria.js"></script>
  <script src="https://cdn.firebase.com/js/client/2.2.6/firebase.js"></script>
  <script src="node_modules/angularfire/dist/angularfire.js"></script>
  <script src="node_modules/angular-md5/angular-md5.js"></script>

  <!-- Application Scripts -->
  <script src="app.js"></script>
  <script src="components/auth/authController.js"></script>
  <script src="components/auth/authService.js"></script>
  <script src="components/status/statusController.js"></script>
  <script src="components/status/statusService.js"></script>
  <script src="components/user/userService.js"></script>
</html>
We’ve bootstrapped the app on the body tag and called it statusApp. We’re also immediately making use of Angular Material in the body by specifying that the opening div tag should have a layout of row. By setting the layout to row, everything inside the container will be placed horizontally. If we were to set the layout to column, everything would be stacked vertically.
In the next div, we’re setting the width to be 33% by putting a value of 33 on the flex attribute. The offset attribute lets us center the element by saying it should be moved over to the right by a third.
The last element is our ui-view tag which is the point at which our (yet to be created) UI Router states will be loaded.
We’ll also need an app.js file to get the application started.
// app.js

(function() {
  'use strict';

  angular
    .module('statusApp', ['firebase', 'ngMaterial', 'angular-md5', 'ui.router'])
    .config(function($stateProvider, $urlRouterProvider) {

    // If a route other than status is requested,
    // go to the auth route
    $urlRouterProvider.otherwise('/auth');

    $stateProvider
      .state('auth', {
        url: '/auth',
        templateUrl: 'components/auth/authView.html',
        controller: 'AuthController as auth'
      })
      .state('status', {
        url: '/status',
        templateUrl: 'components/status/statusView.html',
        controller: 'StatusController as status'
      });
    });
})();
As you’ll see, we’re calling the AngularJS module statusApp which matches up with our ng-app declaration on the body tag. We’ve injected the modules we need by specifying them in the array next to the module name and then setup some configuration for the app. The configuration block is where we’ll setup the rules for UI Router to handle our different states. To make this happen we need to pass the configuration function $stateProvider and $urlRouterProvider.
We’ve yet to setup the actual controllers and templates for these states, but what we’re saying here is that when we are at a URI of /auth, we want to load the auth view and auth controller. This state is responsible for providing a login and registration box for users.
Once logged in, we want to go to the /status state which loads the status controller and view. Finally, we want to negate any other routes so we tell $urlRouterProvider if in doubt, send the user to the /auth state.
A Little CSS
We’ll need a little bit of CSS to style the status listings in our app.
/* style.css */

.face {
  border-radius: 30px;
  border: 1px solid #ddd;
  width: 48px;
  margin: 16px;
}

.remove-status {
  cursor: pointer;
  color: red;
  font-weight: bold;
}
Handling Authentication
Our app is going to need to be able to register and authenticate users and fortunately for us, Firebase provides an easy to use, hosted solution for authentication. While it offers ways to authenticate with Google, Facebook and others, we’re going to keep things simple by relying on their email and password method.
NOTE: The code samples reference my own Firebase app that I’ve created which you are free to use. Alternatively, you may create your own Firebase account and change up the references to in the code to point to it. To do so, see the section Adding Your Own Firebase Account at the end of the article.
First, let’s create an authentication service.
// components/auth/authService.js

(function() {
  'use strict';

  angular
    .module('statusApp')
    .factory('Auth', AuthService);

  function AuthService($firebaseAuth) {
    var ref = new Firebase("https://statusapp.firebaseio.com");
    return $firebaseAuth(ref);
  }

})();
We give this factory a name of Auth and setup a connection to the already-created Firebase app called statusapp. We pass our application reference to $firebaseAuth which is the service responsible for handling the Firebase authentication methods. Returning this from our Auth service will allow us to hook into it from our controller.
Next, let’s setup the authentication controller with some methods that will login and register users.
// components/auth/authController.js

(function() {
  'use strict';

  angular
    .module('statusApp')
    .controller('AuthController', AuthController);

  function AuthController(Auth, $state) {

    var vm = this;

    vm.createUser = createUser;
    vm.login = login;

    function createUser() {

      // If there is already a user logged in,
      // log them out before proceeding
      Auth.$unauth();

      Auth.$createUser({
        email: vm.email,
        password: vm.password
      }).then(function(userData) {
        login();
      }).catch(function(error) {
        vm.error = error;
      });
    }

    function saveUser() {
      // TODO: save the user data at the /users endpoint
    }

    function login() {

      Auth.$authWithPassword({
        email: vm.email,
        password: vm.password
      }).then(function(data) {
        vm.email = null;
        vm.password = null;
        $state.go('status');
      }).catch(function(error) {
        console.log(error);
      });
    }
  }

})();
The first method we have on this controller is createUser which is responsible for accepting user input and using the Auth service we created earlier to create the new user in Firebase. You’ll notice that the Auth methods we are calling weren’t created by us anywhere. Rather, these methods are actually accessed from the $fireabaseAuth service which is what we are returning from our Auth service.
When the new user is successfully created, we call the login method in which we are again using one of the built-in Firebase authentication methods, $authWithPassword. This method accepts an object with and email and password key which we set to be whatever the user has input for those fields. The success handler within then lets us clear the user input and redirect them to the main status page if their login was successful. If the login was unsuccessful, we catch it and for now just log the error to the console.
You’ll see that in the saveUser method we currently just have a code comment that we need to add support to save the user data at the /users endpoint in Firebase. We’ll need to create another service to handle this which we will do in the next section.
Before moving on, let’s put the HTML for our authentication page in place so that we can see what we’ve got.
<!-- components/auth/authView.html -->

<md-content class="md-padding">
  <md-tabs md-dynamic-height md-border-bottom>

    <md-tab label="login">
      <md-content class="md-padding">
        <h1 class="md-display-2">Login</h1>
        <md-input-container>
          <label>Email</label>
          <input ng-model="auth.email" type="text">
        </md-input-container>
        <md-input-container>
          <label>Password</label>
          <input type="password" ng-model="auth.password" type="text">
        </md-input-container>
        <md-button class="md-raised md-warn" ng-click="auth.login()">Login</md-button>
      </md-content>
    </md-tab>

    <md-tab label="register">
      <md-content class="md-padding">
        <h1 class="md-display-2">Register</h1>
        <md-input-container>
          <label>User Name</label>
          <input ng-model="auth.username" type="text">
        </md-input-container>
        <md-input-container>
          <label>Email</label>
          <input ng-model="auth.email" type="text">
        </md-input-container>
        <md-input-container>
          <label>Password</label>
          <input type="password" ng-model="auth.password" type="text">
        </md-input-container>
        <md-button class="md-raised md-primary" ng-click="auth.createUser()">
          Register
        </md-button>
      </md-content>
    </md-tab>

  </md-tabs>
</md-content>
That’s some pretty dense HTML! Angular Material is great and makes for very nice UI design, but the HTML can tend to add up. However, the nice thing is that we have very descriptive custom HTML tags that help us get a sense of what each element is for.
We’re making use of Angular Material’s tabs for the login/registration page. We’ve got two buttons at work here—one for logging in and the other for registering. You’ll see that we have an ng-click declared for each of them and that they call the appropriate methods from the authController.
If everything is working properly, you should see this:
Saving New User Data
Firebase authentication makes it very easy to manage simple user authentication with an email and password; however, one limitation to it is that we can’t store any other arbitrary data about the user when we create accounts for them. It would be great to have the ability to store a username and any biographical info that might be of interest.
Fortunately we can get around this quite easily by creating an endpoint dedicated solely to users and their data which can then be accessed across our app.
To get us started, let’s create a new service that will be responsible for handling data storage related to users.
// components/user/userService.js

(function() {

  'use strict';

  angular
    .module('statusApp')
    .factory('User', UserService);

  function UserService($firebaseObject) {

    function newUserRef(user) {
      var ref = new Firebase("https://statusapp.firebaseio.com/users/" + user.uid);
      return $firebaseObject(ref);
    }

    function getUserData(user) {
      var ref = new Firebase("https://statusapp.firebaseio.com/users/" + user);
      return $firebaseObject(ref);
    }

    function getLoggedInUser() {
      var user = localStorage.getItem('firebase:session::statusapp');
      if(user) {
        return JSON.parse(user);
      }
    }

    return {
      newUserRef: newUserRef,
      getUserData: getUserData,
      getLoggedInUser: getLoggedInUser
    }

  }

})();
Here we have a new factory service called User which returns three methods. You’ll notice that we’re making use of Firebase’s $firebaseObject service here to setup a synchronized object.
The newUserRef method is responsible for creating a key at the /users endpoint for the newly registered user. We rely on the uid for the new user, which is a unique identifier that Firebase creates for us that is guaranteed to be distinct across all the authentication providers that Firebase supports. The uid is formatted using the provider method and then a number representing the user. In the case of our simple login method, the 30th user would get a uid of simplelogin:30. When a new user registers, the object that is returned on success contains the uid for that user, and this is what allows us to tap into it in the User service.
The second method, getUserData, is responsible for accessing the user data for a specific user at the /users endpoint which gives us an easy way to access user information across the app.
Finally, the getLoggedInUser method lets us access data that Firebase stores in local storage for the currently logged-in user. For our app, Firebase keeps this data on a key called firebase:session::statusapp. Since the data is stored as a string, we have to apply JSON.parse to turn it into a useful object.
Now that our User service is in place, let’s add some logic to our authController to make use of it.
// components/auth/authController.js

(function() {

  'use strict';

  angular
    .module('statusApp')
    .controller('AuthController', AuthController);

  function AuthController(Auth, User, $state) {

    var vm = this;

    vm.createUser = createUser;
    vm.login = login;
    vm.loggedInUser;

    function createUser() {

      // If there is already a user logged in,
      // log them out before proceeding
      Auth.$unauth();

      Auth.$createUser({
        email: vm.email,
        password: vm.password
      }).then(function(userData) {
        saveUser(userData);
        login();
      }).catch(function(error) {
        vm.error = error;
      });
    }

    function saveUser(userData) {

      var user = User.newUserRef(userData);
      user.username = vm.username;
      user.email = vm.email;

      user.$save().then(function(success) {
        vm.username = null;
        vm.email = null;
        vm.password = null;
        $state.go('status');
      }, function(error) {
        console.log("there was an error! " + error);
      });
    }

  ...
We start by injecting the User service into the AuthController function so we can make use of its methods in saveUser. The saveUser method takes some user data as an argument which, in our case, will be the object that Firebase returns when a new user is created. This user data is passed to the newUserRef method on the User service which, as we saw earlier, establishes a new user key at the /users endpoint.
You’ll see that we’re establishing some properties—username and email—on the newly established user. If we then just call AngularFire’s $save method, the data will be pushed up to Firebase.
If the save was successful, we clear the user input and redirect the user to the status state.
That was a lot of setup! Let’s now get to the fun part and actually save and retrieve user’s statuses.
Saving Statuses
We’re going to save all the user statuses at the /status endpoint in our Firebase data store. To setup that connection, let’s create a new service called Status.
// components/status/statusService.js

(function() {

  'use strict';

  angular
    .module('statusApp')
    .factory('Status', StatusService);

  function StatusService($firebaseArray) {
    var ref = new Firebase("https://statusapp.firebaseio.com/status");
    return $firebaseArray(ref);
  }

})();
In this service we see the third of the AngularFire service wrappers—$firebaseArray—which is used to setup a synchronized collection.
With the Status service in place, we can now make use of it in a controller that will be responsible for feeding status data to the view and adding new statuses.
 // components/status/statusController.js

(function() {

  'use strict';

  angular
    .module('statusApp')
    .controller('StatusController', StatusController);

  function StatusController($rootScope, Status, md5) {

    var vm = this;

    vm.addStatus = addStatus;
    vm.md5 = md5;
    vm.statusData = Status;

    function addStatus() {
      if(vm.statusText) {
        vm.statusData.$add({

          // Add the status data to Firebase
          date: Firebase.ServerValue.TIMESTAMP,
          text: vm.statusText,
          user: {
            username: $rootScope.loggedInUserData.username,
            email: $rootScope.loggedInUserData.email
          }
        });
        vm.statusText = '';
      }
    }
  }

})();
We can get all of our status data as an array by simply making a call to the Status service and assigning that call to a key, which is what we’ve done here with vm.statusData = Status. We’ll now be able to do an ng-repeat on this data in our view, which we’ll see next.
We’ll want to get Gravatar images for our users to display beside their status updates and this will require that we hash their email addresses. We’ll take care of all of that right in the view to keep things simple, but to do so we’ll need access to Angular MD5 in the template. This is accomplished by setting vm.md5 = md5.
In our addStatus method, we’re first checking to see if a status entry exists from the view, and if it does, we use AngularFire’s $add method to add the entry to the data store. We pass in an object with some extra data, including the date which is equal to the actual timestamp on the server. It’s important that we use the Firebase server’s timestamp as it is the “official” time that an entry gets recorded. If we relied on the user’s own timestamp from their computer, small delays when sending the data over the wire would mean inaccuracies in the actual time the data is recorded, which can then lead to mis-ordered data later on.
You’ll see that in the user object passed to the $add method, we’re setting a username and email key that get their data from $rootScope. We haven’t yet set $rootScope up for this, but we will do so in the next section.
Finally, after the status has been added we clear the vm.statusText field.
Now that the controller is in place, let’s move onto the template.
<!-- components/status/statusView.html -->

<md-input-container>
  <label>Status</label>
  <textarea ng-model="status.statusText" type="text"></textarea>
</md-input-container>
<md-button class="md-raised md-warn" ng-click="status.addStatus()">Post</md-button>

<md-content>
  <md-list>
    <md-list-item class="md-3-line" ng-repeat="statusItem in status.statusData | orderBy:'-date'">
      <img ng-src="http://www.gravatar.com/avatar/{{status.md5.createHash(statusItem.user.email)}}" class="face" alt="{{statusItem.user.username}}">
      <div class="md-list-item-text">
        <h3>{{statusItem.user.username}}</h3>
        <span>{{statusItem.date | date:'mediumDate'}}</span>
        <p>{{statusItem.text}}</p>
      </div>
      <md-divider md-inset></md-divider>
    </md-list-item>
  </md-list>
</md-content>
At the top of the view we have a text area and submit button for our users to log their statuses. We set ng-model to equal our statusText key and ng-click on the submit button to equal addStatus.
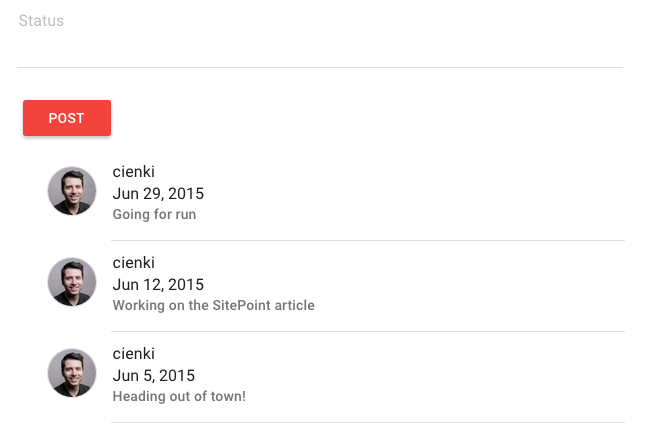
To display saved statuses we use Angular Material’s md-list-item element and set an ng-repeat on it to loop over the array of statuses. You’ll see that we’re ordering by date here, but in reverse so that we get the latest statuses at the top. To accomplish this we can simply put a negative sign in front of date, so we get orderBy:'-date'.
To get Gravatar images for our users we simply need to set the ng-src of an img tag to Gravatar’s domain and add the user’s hashed email address at the end. Since we have a reference to Angular MD5 in the controller, we can now use it in the view. We call the createHash method and pass in the user’s email address to generate the hash.
From there we are simply displaying the username, date, and text of the status update. If everything worked out, you should see this:
Adding the Current User to $rootScope
As we noted earlier, for the addStatus method to work properly, we need to add some properties to $rootScope which reference the data for the currently logged-in user. We can do this in the run method in our app.js file by using Angular’s $on event listener with the $stateChangeStart event that comes with UI Router. Essentially what we want is to get the data for our logged-in user from the /users endpoint we setup earlier that gets populated when a new user registers. To complete this step we’ll use a couple of the methods we saw earlier in the User service.
//app.js

(function() {

  'use strict';

  angular
    .module('statusApp', ['firebase', 'ngMaterial', 'angular-md5', 'ui.router'])
    .config(function($stateProvider, $urlRouterProvider) {

    // If a route other than status is requested,
    // go to the auth route
    $urlRouterProvider.otherwise('/auth');

    $stateProvider
      .state('auth', {
        url: '/auth',
        templateUrl: 'components/auth/authView.html',
        controller: 'AuthController as auth'
      })
      .state('status', {
        url: '/status',
        templateUrl: 'components/status/statusView.html',
        controller: 'StatusController as status'
      });
    })
    .run(function($rootScope, $state, User) {

      // Listen for changes to the state and run the code
      // in the callback when the change happens
      $rootScope.$on('$stateChangeStart', function() {

        // Use the User service to get the currently
        // logged-in user from local storage
        var loggedInUser = User.getLoggedInUser();

        // Check that we actually have a logged-in user
        // saved in local storage
        if(loggedInUser) {

          // Use the getUserData method on the User service
          // to grab the data from the /users endpoint in
          // Firebase for the logged-in user
          $rootScope.loggedInUserData = User.getUserData(loggedInUser.uid);
        }
      });
    });

})();
In the run method we are listening for changes to the app’s state—for example, after the user logs in or registers and is redirected to the status state. When this happens we want to use the User service to get the currently logged-in user which relies on using the data that Firebase keeps in local storage for the user with the key firebase:session::statusapp. If there is data stored there, we want to call the getUserData method on the User service and pass in the uid for our logged-in user. The data returned from that call is then placed on the loggedInUserData property of $rootScope which lets us access it across the app.
Now that we have our current user’s data on $rootScope, we can can access it in the StatusController so that when the user makes a status update, their username and email are saved with their status.
Deleting Statuses
The final thing we’ll want to do here is give the logged-in user the ability to delete their own statuses. To do so, we can use the $remove method that AngularFire provides. Let’s create a new method in our StatusController that will handle the delete.
// components/status/statusController.js

(function() {

  'use strict';

  angular
    .module('statusApp')
    .controller('StatusController', StatusController);

  function StatusController($rootScope, Status, md5) {

    var vm = this;

    vm.addStatus = addStatus;
    vm.deleteStatus = deleteStatus;
    vm.md5 = md5;
    vm.statusData = Status;

    function addStatus() {
      if(vm.statusText) {

        // Add the status data to Firebase
        vm.statusData.$add({
          date: Firebase.ServerValue.TIMESTAMP,
          text: vm.statusText,
          user: {
            username: $rootScope.loggedInUserData.username,
            email: $rootScope.loggedInUserData.email
          }
        });
        vm.statusText = '';
      }
    }

    function deleteStatus(status) {

      // Remove the status that was passed in
      // from the views
      vm.statusData.$remove(status);
    }
  }

})();
We’ve added a method called vm.deleteStatus which references the newly defined deleteStatus function. This will accept a status and use AngularFire’s $remove to delete it from Firebase and automatically update the view to reflect the removal. With this method in place, we need to put it to work in the view.
<!-- components/status/statusView.html -->

...

<md-content>
  <md-list>
    <md-list-item class="md-3-line" ng-repeat="statusItem in status.statusData | orderBy:'-date'">
      <img ng-src="http://www.gravatar.com/avatar/{{status.md5.createHash(statusItem.user.email)}}" class="face" alt="{{statusItem.user.username}}">
      <div class="md-list-item-text">
        <h3>{{statusItem.user.username}}</h3>
        <span>{{statusItem.date | date:'mediumDate'}}</span>
        <p>{{statusItem.text}}</p>
      </div>
      <md-divider md-inset></md-divider>
      <md-icon class="remove-status"
          ng-if="statusItem.user.username === loggedInUserData.username"
          ng-click="status.deleteStatus(statusItem)">
          X
      </md-icon>
    </md-list-item>
  </md-list>
</md-content>
You’ll see here that we’ve added a new md-icon element to the view. The ng-if directive says that we only want this element to be included if the username of the status is equal to the username of the currently logged-in user. This way, the option to delete a status is only shown to the owner of that status. We set the ng-click to the deleteStatus method we created in the StatusController and pass in the current statusItem. Now when the user clicks the X, that status will be deleted.
Adding Your Own Firebase Account
Getting your own Firebase account working with the status application is very easy. You’ll first need to sign up for Firebase which will give you access to the free starter tier. Once you’ve signed up, add an application by selecting “Create New App” in your dashboard and give it whichever name you like. Next, you’ll need to enable simple authentication by selecting “Manage App”, then “Login and Auth” from the sidebar and checking the box next to “Enable Email and Password Authentication”. Finally, you’ll need to change the name of the Firebase account that the app communicates with by swapping out statusapp for the name of your application in three different files:
- components/auth/authService.js
- components/status/statusService.js
- components/user/userService.js
A Note About Security
Before going to production, we really do need to add an additional layer of security to the app. Without it, users with knowledge of how Firebase works could tamper with the application and create and delete statuses belonging to other users. Specifically, we need to add rules to our app that define who gets to do what. For example, we need to say that a user must be authenticated to be able to add new statuses and that users can only delete statuses if they are the owners of them.
Firebase rules are written in JSON and can be defined in the Security and Rules tab from the application dashboard. To find out more about Firebase rules and how to implement them in your application, read about User Based Security.
Wrapping Up
In this tutorial we’ve seen how to put together an AngularJS and Firebase application using AngularFire and Angular Material for styling. We focused pretty heavily on the authentication portion of the app but also looked at how to create and delete user statuses.
Hopefully this will be useful for you when it comes time to implement Firebase for your next project. I’d love to hear about what you’re working on in the comments!
Frequently Asked Questions (FAQs) about Real-Time Status Update App with AngularJS and Firebase
How can I integrate Firebase with AngularJS for real-time updates?
Integrating Firebase with AngularJS for real-time updates involves a few steps. First, you need to include the Firebase and AngularFire libraries in your project. AngularFire is the officially supported AngularJS binding for Firebase. After including these libraries, you need to inject the ‘firebase’ service into your AngularJS application. Then, you can use the $firebaseObject or $firebaseArray services to synchronize objects or collections from Firebase in real-time.
What are the benefits of using Firebase for real-time updates in AngularJS?
Firebase provides a real-time database and backend as a service. The service provides application developers an API that allows application data to be synchronized across clients and stored on Firebase’s cloud. This means that you can build a real-time application with AngularJS without worrying about managing servers or writing server-side code. Firebase also provides robust security rules to protect your data.
How can I handle data migration in AngularJS?
Data migration in AngularJS can be handled using the $http service for AJAX calls. You can use the $http.get method to fetch data from a server, and the $http.post method to send data to a server. If you’re migrating from an older version of AngularJS, you might need to refactor your code to use the newer $http service instead of the deprecated $resource service.
What are some common issues faced when creating a real-time status update app with AngularJS and Firebase?
Some common issues include dealing with Firebase’s security rules, handling data synchronization conflicts, and managing offline data. Firebase’s security rules can be complex to set up correctly, especially for larger applications. Data synchronization conflicts can occur when multiple clients try to update the same data at the same time. Managing offline data can be challenging because Firebase does not automatically cache data for offline use.
How can I create a real-time dashboard using AngularJS and Firebase?
Creating a real-time dashboard with AngularJS and Firebase involves using Firebase’s real-time database to store and sync data, and AngularJS to display the data. You can use the $firebaseArray service to sync a collection of data from Firebase, and then use AngularJS’s data binding features to automatically update the dashboard as the data changes.
How can I troubleshoot issues with real-time updates in AngularJS and Firebase?
Firebase provides a number of tools for troubleshooting issues with real-time updates. The Firebase console allows you to view and edit your database in real-time, and the Firebase DebugView provides detailed information about events and user properties. You can also use the JavaScript console in your browser to debug your AngularJS code.
How can I optimize the performance of a real-time status update app with AngularJS and Firebase?
Performance optimization can be achieved by minimizing the amount of data transferred between the client and Firebase, using Firebase’s indexing features to speed up queries, and using AngularJS’s $digest cycle efficiently. You should also consider using Firebase’s Cloud Functions to offload heavy processing tasks to the server.
How can I secure my real-time status update app with AngularJS and Firebase?
Firebase provides robust security features to protect your data. You can use Firebase’s security rules to control who has access to what data in your database. You can also use Firebase Authentication to authenticate users in your app. AngularJS also provides features to prevent common web vulnerabilities like cross-site scripting (XSS) and cross-site request forgery (CSRF).
Can I use other databases with AngularJS for real-time updates?
Yes, while Firebase provides an easy-to-use solution for real-time updates, you can also use other databases with AngularJS. However, you may need to write additional server-side code to handle real-time updates, and the implementation details will depend on the specific database you’re using.
How can I test my real-time status update app with AngularJS and Firebase?
You can use AngularJS’s built-in testing framework, called Protractor, to write end-to-end tests for your app. Firebase also provides a local emulator suite that you can use to test your Firebase code without affecting your live database.
 Ryan Chenkie
Ryan is a full-stack developer from Canada who works for Auth0 as a Tech Writer where he provides in-depth tutorials and seed projects for the newest frameworks such as Angular 2, React, and Aurelia as well as other modern web technologies. Ryan also writes for his own site and you can get notified about his latest articles by signing up for his mailing list.