5 Upcoming Web Design Trends for 2022


Key Takeaways
- Immersive image design is expected to be a key trend in 2022, with the potential to inspire consumers to purchase more by creating a digital environment that feels real.
- Changing typography, including the addition of motion to text, will be used to draw attention to content and make websites stand out.
- Line art backgrounds will be employed to create visual interest and guide visitors through a website, contributing to increased engagement.
- Positive color palettes will be used to create a gentler experience for visitors, with more reserved palettes setting websites apart from those using bold, excitable colors.
This sponsored article was created by our content partners, BAW Media. Thank you for supporting the partners who make SitePoint possible.
Web design trends don’t appear out of nowhere. They come in response to the actual needs that web users have at a given time. Those needs can address anything from making the exploring the web more useful, more enjoyable, or more comfortable.
When the world outside is undergoing changes that can make everyday life more difficult or less predictable, people look for stability and balance. That is what our world looks like at the moment, and the desire for a greater sense of stability and calmness is what we see reflected in web design trends of 2022.
Let us take a close-up look at five of these trends. As we do so, we’ll use a selection of BeTheme pre-built websites to illustrate what these trends involve. You can use them for inspiration or use them to rapidly and cost-effectively create or redesign sites for your clients.
If you design your clients’ websites with the latest web design trends, you’ll help them capture the attention of consumers looking for cutting-edge brands. Here are five new trends for 2022 you’ll want to be aware of and your clients will appreciate.
1. Immersive Image Design Can Inspire Consumers to Purchase More
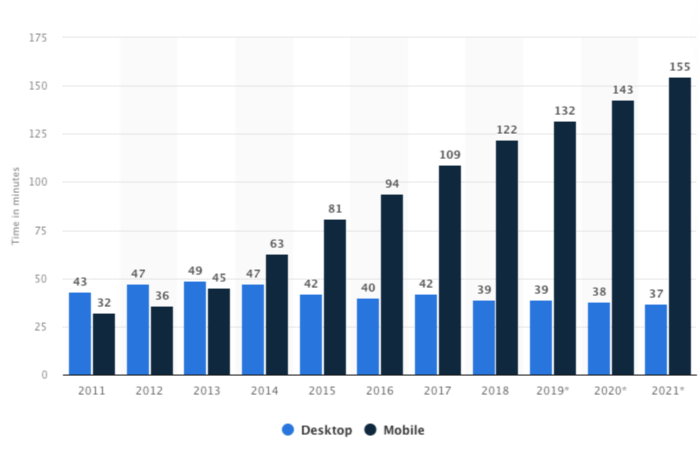
According to Statista — and as you may have noticed yourself — people all over the world spend more than 2½ hours every day on their smart phones, and another ½ hour at their desktop.
Some of this time is devoted to entertainment, and some is no doubt spent on conducting business or simply conversing with someone.
As for the rest of the time, it’s often spent looking for information on things to do outside of their screens, which could involve anything from looking for information to shopping for a product or service.
If you have or are building a website that sells a product or a real-world experience, you should be giving this some thought. The most effective way to sell something is to let the consumer “feel” it.
How do you do that?
With products, it’s not all difficult. Perhaps more so when hand-held devices are involved, but still not all that difficult. There are many ways you can display a product that will let a customer “feel” it.
An experience is a different story. In this case, a designer needs to create a digital environment that feels real to the observer. Here are two examples of how this is accomplished.
Many of BeTheme’s pre-built websites have been designed with this approach in mind. The BeCottage2 pre-built website uses an image blurring and filtering effect to blend the landscape images into the digital content.
Surfing2 employs a similar strategy. In this example, the lightest part of the ocean image is blended seamlessly into the website background.
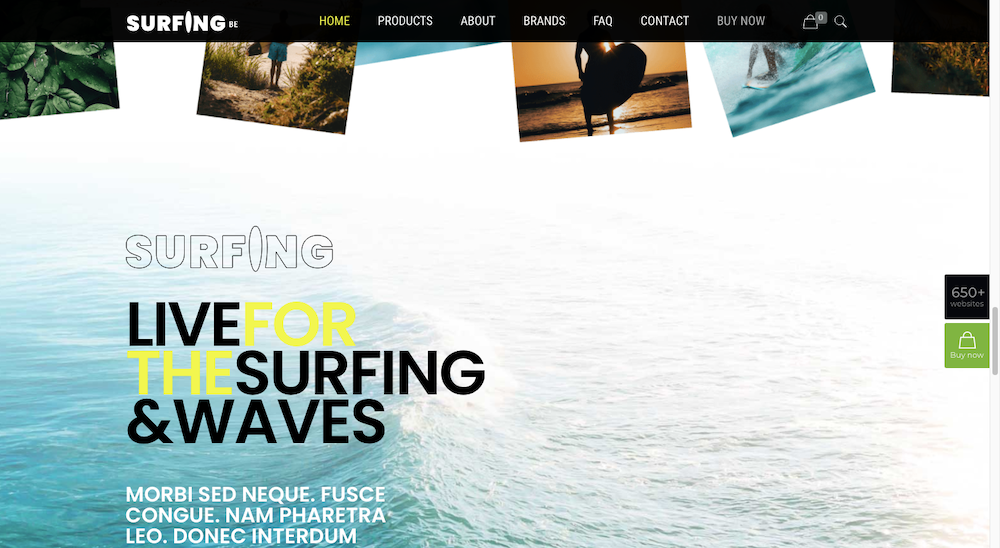
What the designer has accomplished here is to enable visitors to experience a smooth and easy flow from the digital content into a natural setting.
2. Changing Typography Draws Attention to Content
Changes in website typography size, color, and style are often employed to great effect as attention-getting strategies. In 2022, we’re going to see motion added to the text as well.
Motion in an otherwise quiet or still setting is always noticeable, and strategically placed and well-timed motion applied to content can really make a website stand out in the crowd.
Motion applied to text is a strategy that should be applied sparingly and applied only to text you want the visitor to take special note of.
BeDietShop does this effectively in its hero image by directing attention to the tasty food items.
BeEvent7 takes a different approach and uses motion to suggest the ticking of a clock.
You can put moving typography like that in this example in many ways. You can count up, you can count down, or you can count things like sales or charitable contributions.
3. Line Art Backgrounds Can Be Used to Serve As Useful Guides
Web designers have been experimenting with various website background trends for years. More recently, the focus has been on the use of dramatic gradients. Background video sliders and dark mode color schemes have also been popular.
In 2022, it’s going to be something quite different. Line art will be used to create visual interest, and just as importantly, will also be used to provide visitors with helpful guidance.
As you’ll see, pointing a visitor in a desired direction doesn’t require using arrowheads or pointing fingers. More abstract designs can be put in play that suggest rather than point but end up having the same effect.
The BeCoworking pre-built site is an example of an abstract, more subtle approach.
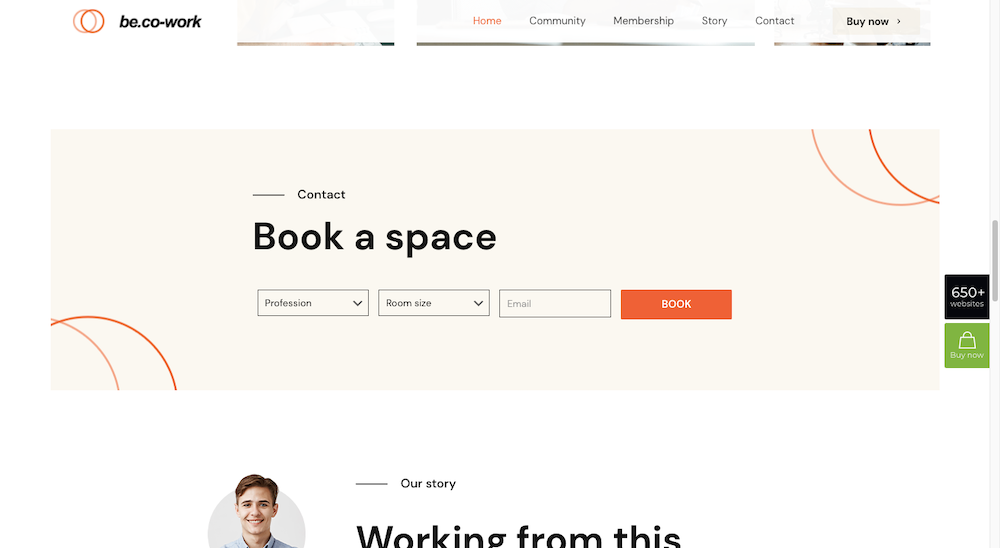
The circles in the two corners are, in their own way, attention getting. Of even greater importance is how the shapes curve inward. In doing so, they draw greater focus on the booking form in the center.
BeAgency6 is another site that uses line art backgrounds effectively.

The formless shapes may appear to be merely decorative at first, but as was the case with the previous example, they subtly guide the visitor’s eyes through the content.
When you think about the many ways there are for people’s eyes to scan across a page, it’s little wonder that subtle line art can do wonders for website engagement.
4. Interactive Graphics Provide Added Context for Users
Most commercial web designs address three basic objectives: attracting visitors, engaging them with the content, and getting them to convert.
Engaging visitors involves getting and holding their attention, and there are right and wrong ways to go about it.
One very good way is to make key elements look interactive — like making a button look like it’s begging to be clicked, instead of looking like any other flat object on a flat surface; or like making a design element change or animate when a visitor hovers over it.
But you need to be creative. There will be instances where you want a visitor to stop and learn more about something as opposed to using interaction to keep them constantly on the move towards some desired goal.
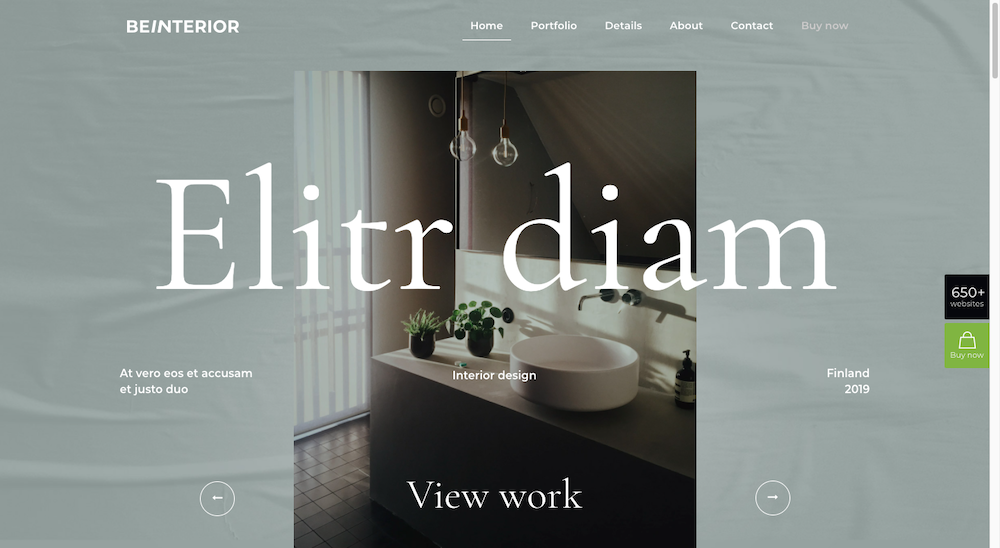
One example of getting a visitor to pause is to take what normally would be scrollable content and replace it with a slideshow experience — as BeInterior6 does at the top of its home page.
In fact, scrolling has become so automatic that you may need to add clear controls in some cases to get or enable visitors to stop and be able to engage with key or important content.
The BeDentist4 pre-built site replaced “before” and “after” images with this unique feature.
It’s telling the story just as well as side-by-side “before” and “after” images can do. It gets the visitor involved, and is more fun and entertaining to boot.
5. Use Positive Color Palettes to Send the Right Vibes to Visitors
Designers used to obsess over selecting the perfect color to bring about a desired emotion from a visitor.
It’s no secret that a given color can elicit a certain emotion given the context it’s being used in, but what is the underlying theory?
The truth is, there are several factors involved, like the shade of the color, its contrast with other website colors, the culture of the observer, and the aforementioned context in which it appears.
A splash of yellow can elicit a feeling of happiness, but splashing yellow throughout a website probably won’t create a happy customer or lead to a conversion.
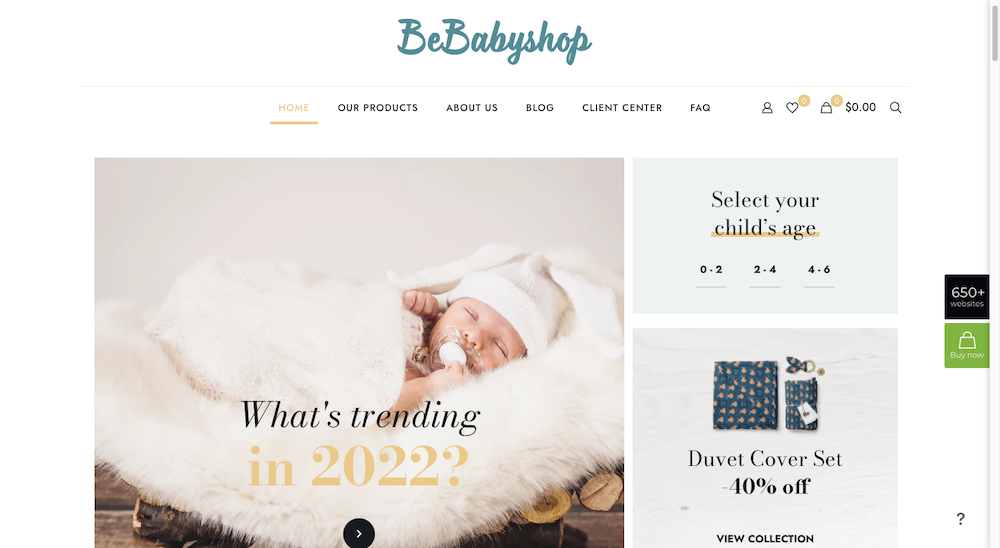
One example would be to use a color scheme that creates a gentler experience. The BeBabyShop pre-build website uses soft tone backgrounds surrounding the products.
You might expect the BePizza5 site to be quite different, but when looking closer you’ll note that it uses a somewhat neutral color palette, ranging from dusty green to dusty pink, with beige tones in between.

The use of a more reserved color palette sets this restaurant website apart from the many that rely more on bold, excitable colors to attract customers.
Keep Up with the Times with BeTheme’s Help
When a new design trend is ushered in, you shouldn’t have to stress out or go into a state of denial. Once you understand the reasoning behind the change, you shouldn’t have too much of a problem dealing with it.
In fact, you don’t have to risk leaving your comfort zone at all. BeTheme’s pre-built sites are always crafted using the latest trends, and any older version can easily be customized or repurposed to incorporate a new trend.
In fact, BeTheme gives you a whole host of ways to take advantage of 2022’s design trends. With BeTheme, you have the total WordPress design solution at your fingertips.
You have three different builders, 650+ professionally-crafted prebuilt websites, and a ton of design aids to work with to cost-effectively build a completely customized site for any client — or for yourself.
Frequently Asked Questions about Web Design Trends in 2022
What are the most significant web design trends for 2022?
The most significant web design trends for 2022 include the use of dark mode, immersive 3D elements, and interactive web design. Dark mode is a feature that allows users to change the background of a web page to a dark color, which can reduce eye strain and save battery life on mobile devices. Immersive 3D elements can make a website more engaging and visually appealing, while interactive web design involves creating a website that responds to user interaction in a meaningful way.
How can I incorporate dark mode into my website design?
Incorporating dark mode into your website design can be achieved by using CSS media queries to detect if a user has set their device to use dark mode. You can then apply a dark-themed stylesheet to your website when dark mode is detected. This can involve changing the background color of your website to a dark color, and adjusting the color of text and other elements to ensure they are still visible against the dark background.
What are immersive 3D elements and how can they enhance my website?
Immersive 3D elements are graphics or animations that give the illusion of depth and dimension on a webpage. They can enhance your website by making it more visually appealing and engaging. For example, you could use 3D animations to illustrate complex concepts or to showcase your products in a more realistic and detailed way.
How can I make my website more interactive?
Making your website more interactive can involve adding elements that respond to user interaction. This could include things like hover effects, where an element changes when the user hovers their mouse over it, or interactive forms that provide instant feedback to the user. You could also use JavaScript to add more complex interactive features, such as drag-and-drop functionality or interactive maps.
What is the importance of mobile-first design in 2022?
Mobile-first design is a design strategy that prioritizes the mobile experience over the desktop experience. This is important in 2022 because more people are using mobile devices to access the internet than ever before. By designing your website with mobile users in mind, you can ensure that your website is accessible and user-friendly for all users, regardless of the device they are using.
How can I implement a mobile-first design strategy?
Implementing a mobile-first design strategy involves designing your website for mobile devices first, and then scaling up for larger screens. This can involve using responsive design techniques to ensure that your website looks good and functions well on all screen sizes. It can also involve prioritizing content and features that are most important for mobile users, and ensuring that your website loads quickly on mobile devices.
What is the role of AI and machine learning in web design?
AI and machine learning can play a significant role in web design by automating certain tasks and providing personalized experiences for users. For example, AI can be used to automate the process of testing different design elements to see which ones perform best. Machine learning can be used to personalize the content and features of a website based on a user’s behavior and preferences.
How can I use AI and machine learning in my web design?
Using AI and machine learning in your web design can involve integrating AI-powered tools and services into your website. For example, you could use an AI-powered chatbot to provide customer support, or a machine learning algorithm to recommend products or content based on a user’s behavior. You could also use AI to automate the process of A/B testing different design elements.
What is the importance of accessibility in web design?
Accessibility in web design is important because it ensures that your website can be used by all people, regardless of their abilities or disabilities. This can involve designing your website in a way that is easy to navigate for people who use assistive technologies, and providing alternative text for images and other non-text content.
How can I make my website more accessible?
Making your website more accessible can involve following the Web Content Accessibility Guidelines (WCAG), which provide recommendations for making web content more accessible. This can involve things like providing alternative text for images, ensuring that your website can be navigated using a keyboard, and using clear and simple language.
Sponsored posts are provided by our content partners. Thank you for supporting the partners who make SitePoint possible.


Published in
·Career Advancement·Computing·Entrepreneur·Productivity·Productivity Tools·March 10, 2022