How to Remove a Background in Photoshop: 7 Quick & Easy Methods

With many advances to Photoshop over the last several years, removing the background from an image has never been easier or quicker. This article will show you all the different ways of how to remove the background of a picture in Photoshop.
Knowing the best method to use for the type of image you’re working with is key to getting the best results with the best technique available.
Here are seven ways to remove backgrounds from your photos using Adobe Photoshop Creative Cloud and when to use each technique to achieve the best results.
Key Takeaways
- Utilize Photoshop’s AI-powered Remove Tool for a quick, one-click background removal experience, perfect for straightforward tasks.
- Employ the Object Selection Tool for automatic subject detection and background removal, leveraging Adobe Sensi AI for precision.
- Opt for the Quick Action feature when speed is essential, though be prepared for potentially less accuracy with complex images.
- Use the Background Eraser Tool to manually control the removal process, ideal for high contrast images where detailed adjustment is needed.
- The Pen Tool offers the highest level of control for separating subjects from intricate backgrounds, though it requires more time and precision.
- Consider the Magnetic Lasso Tool for subjects with complex edges against high-contrast backgrounds, allowing for semi-automatic edge detection and faster processing.
1. Remove a Background in Photoshop with Photoshop’s new Remove Tool, powered by AI.
New to Photoshop in 2023 are several enhancements to the program thanks to AI. One of those enhancements is their new Remove Tool, which as you can tell by the name, helps you remove things from your images.
This tool is similar to Photoshop’s Object Selection Tool (discussed below), while taking it a step further to achieve exactly what you’re looking for, which is to remove the background.
Depending on what you’re looking to remove, you can either remove objects, or in our case, remove the background entirely.
If you’re looking to remove the background in an image in Photoshop using just a couple of clicks, using the Remove Tool and harnessing its AI power is an easy way to achieve the result you want.
Remove Tool Steps
We’re going to remove the background from this image:
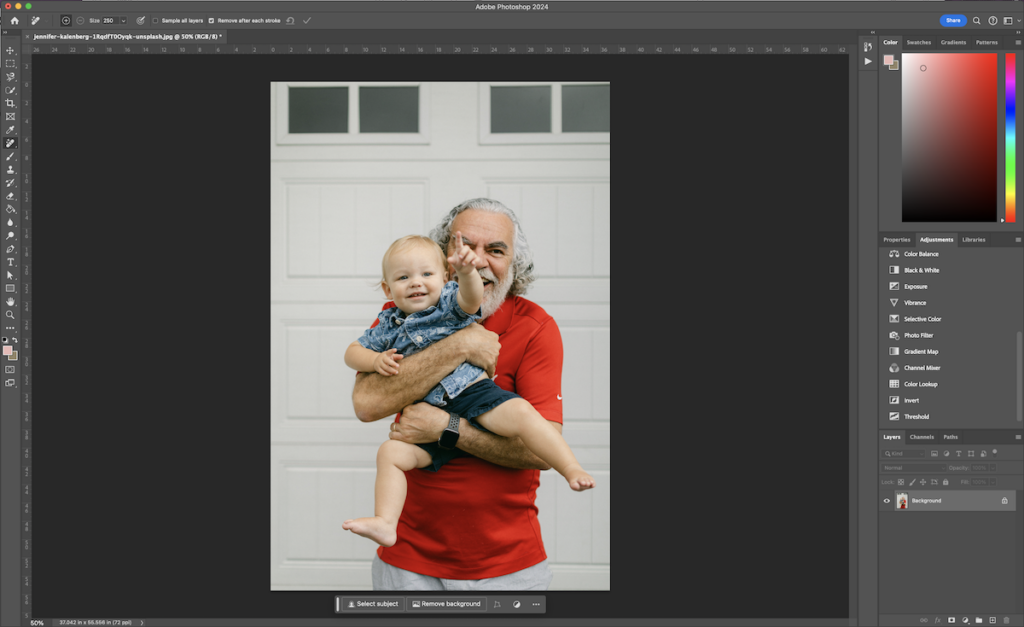
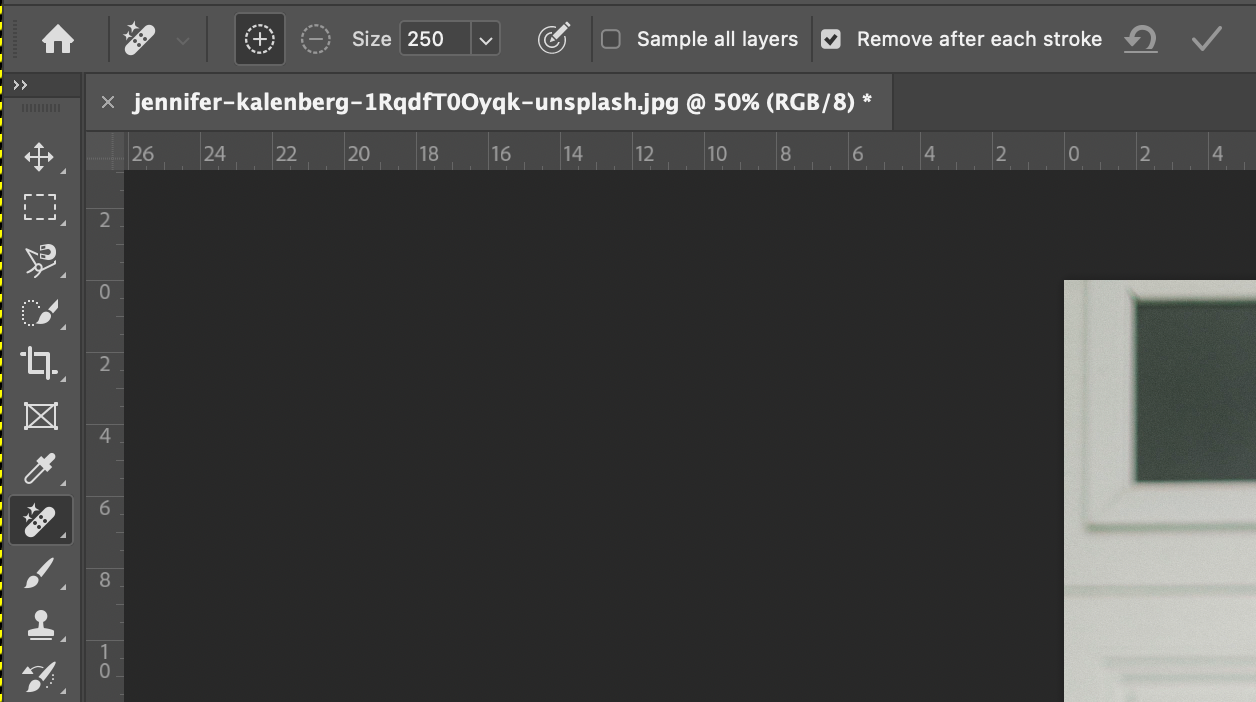
- Select the “Remove Tool” (found in the tool drawer with the Spot Healing Brush).
- Below your image, you’ll see a box appear with a couple of buttons. Without anything selected in your image, select “Remove Background.”

- You’ll now see the background has been removed from your image.
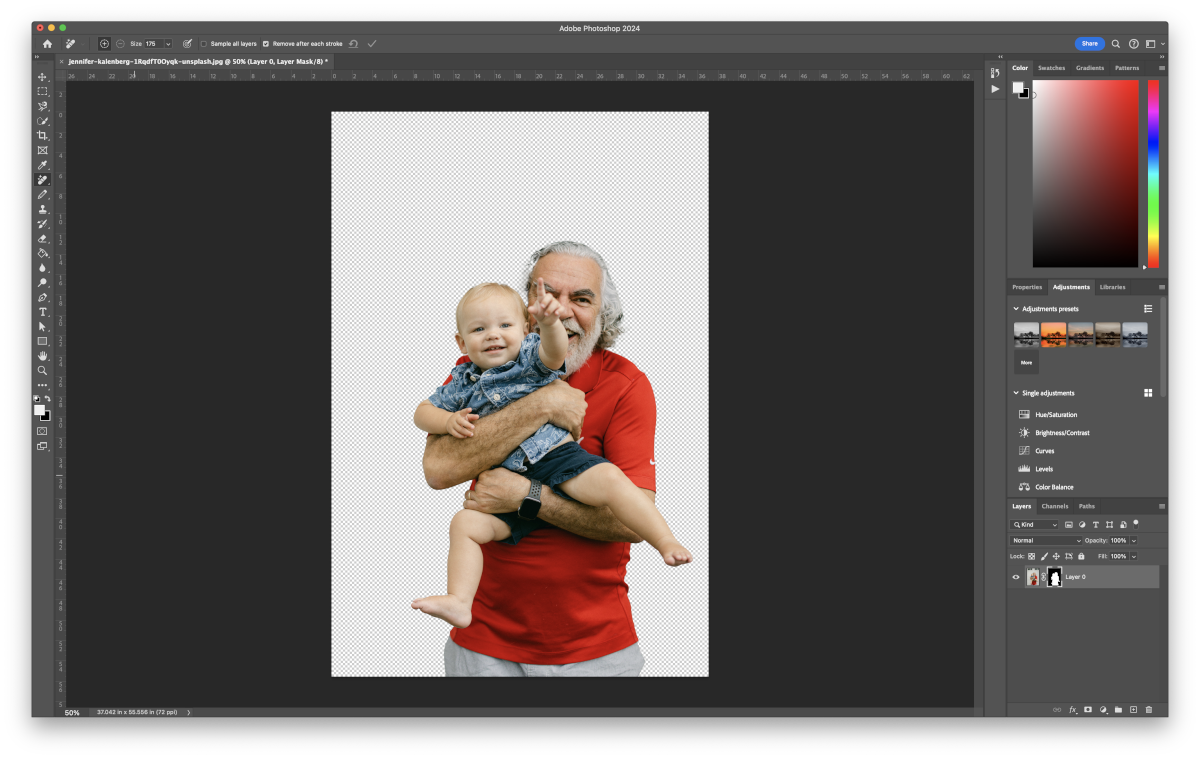
- To refine the edges, you can alternate between the “Subtract from Mask” and “Add to Mask” options below the image. Subtract from Mask should be used to remove any remaining background that may be left behind. Add to Mask should be used to add back any of your subject that may have been accidentally removed.
Note: If you want to do this in a non-destructive manner, be sure to copy your background layer so that you can use the Remove Tool on the copy layer and not the original background layer.
The Remove Tool is handy to remove your background from your image using AI with just one click of a button. However, it does have the ability for you to “paint” what you want removed and the tool decides what you meant by that.
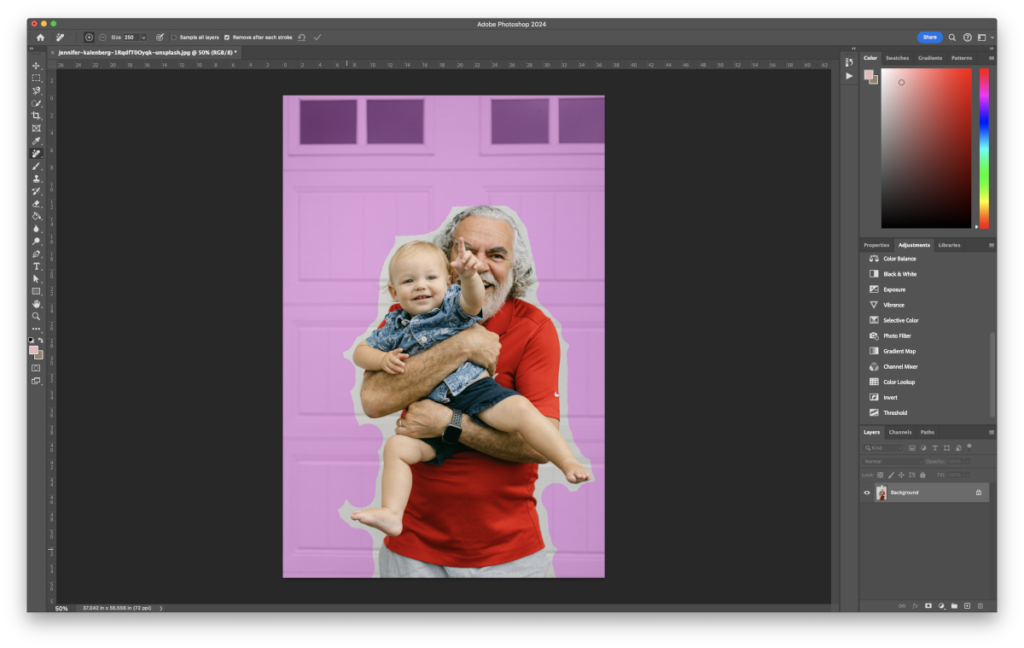
For example, in the image above I “painted” the background all in one stroke, without letting go. When I let go, Photoshop then calculated from there on how to remove the background.
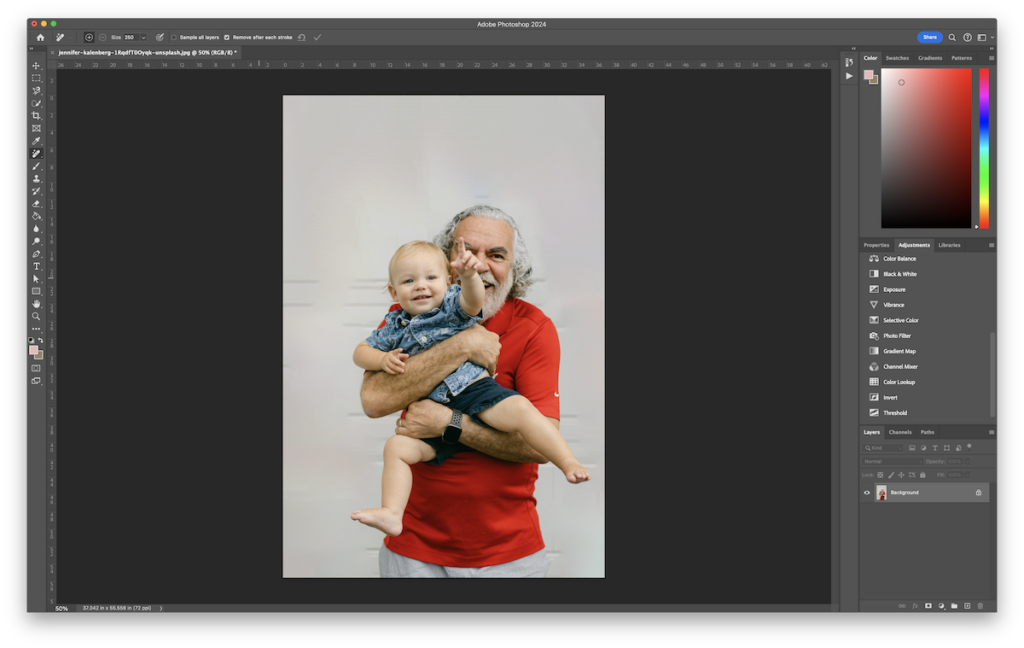
The result is that it more or less “smoothed” out the background (for the most part) instead of removing it entirely, as shown above.
This can be handy if you are working with a busy background but don’t necessarily want it completely removed to transparency, but doing this method does take extra time and work to paint it, edit the result, and get it to look exactly the way you want.
The Remove Tool is also handy for removing objects as well, not just backgrounds. For more information on that, check out the Photoshop documentation article: https://helpx.adobe.com/photoshop/using/tool-techniques/remove-tool.html
Photo Credit: Jennifer Kalenberg on Unsplash.
2. Remove a Background in Photoshop with the Object Selection Tool
One of the most remarkable features to have come to Photoshop is the new Object Selection tool, which is new to Photoshop 2022. The Object Selection tool utilizes Adobe Sensi AI technology to do just about all the work for you in selecting the subject in your photos.
Object Selection Tool Steps
- Open your photo in Photoshop and select the Object Selection tool in the toolbar on the left (in the same menu as Quick Selection Tool).
- Now, hover your cursor over your subject and wait for it to turn blue. (Move your cursor in tiny circles if it doesn’t immediately turn blue.)
- In an instant, your subject is ready to be selected.
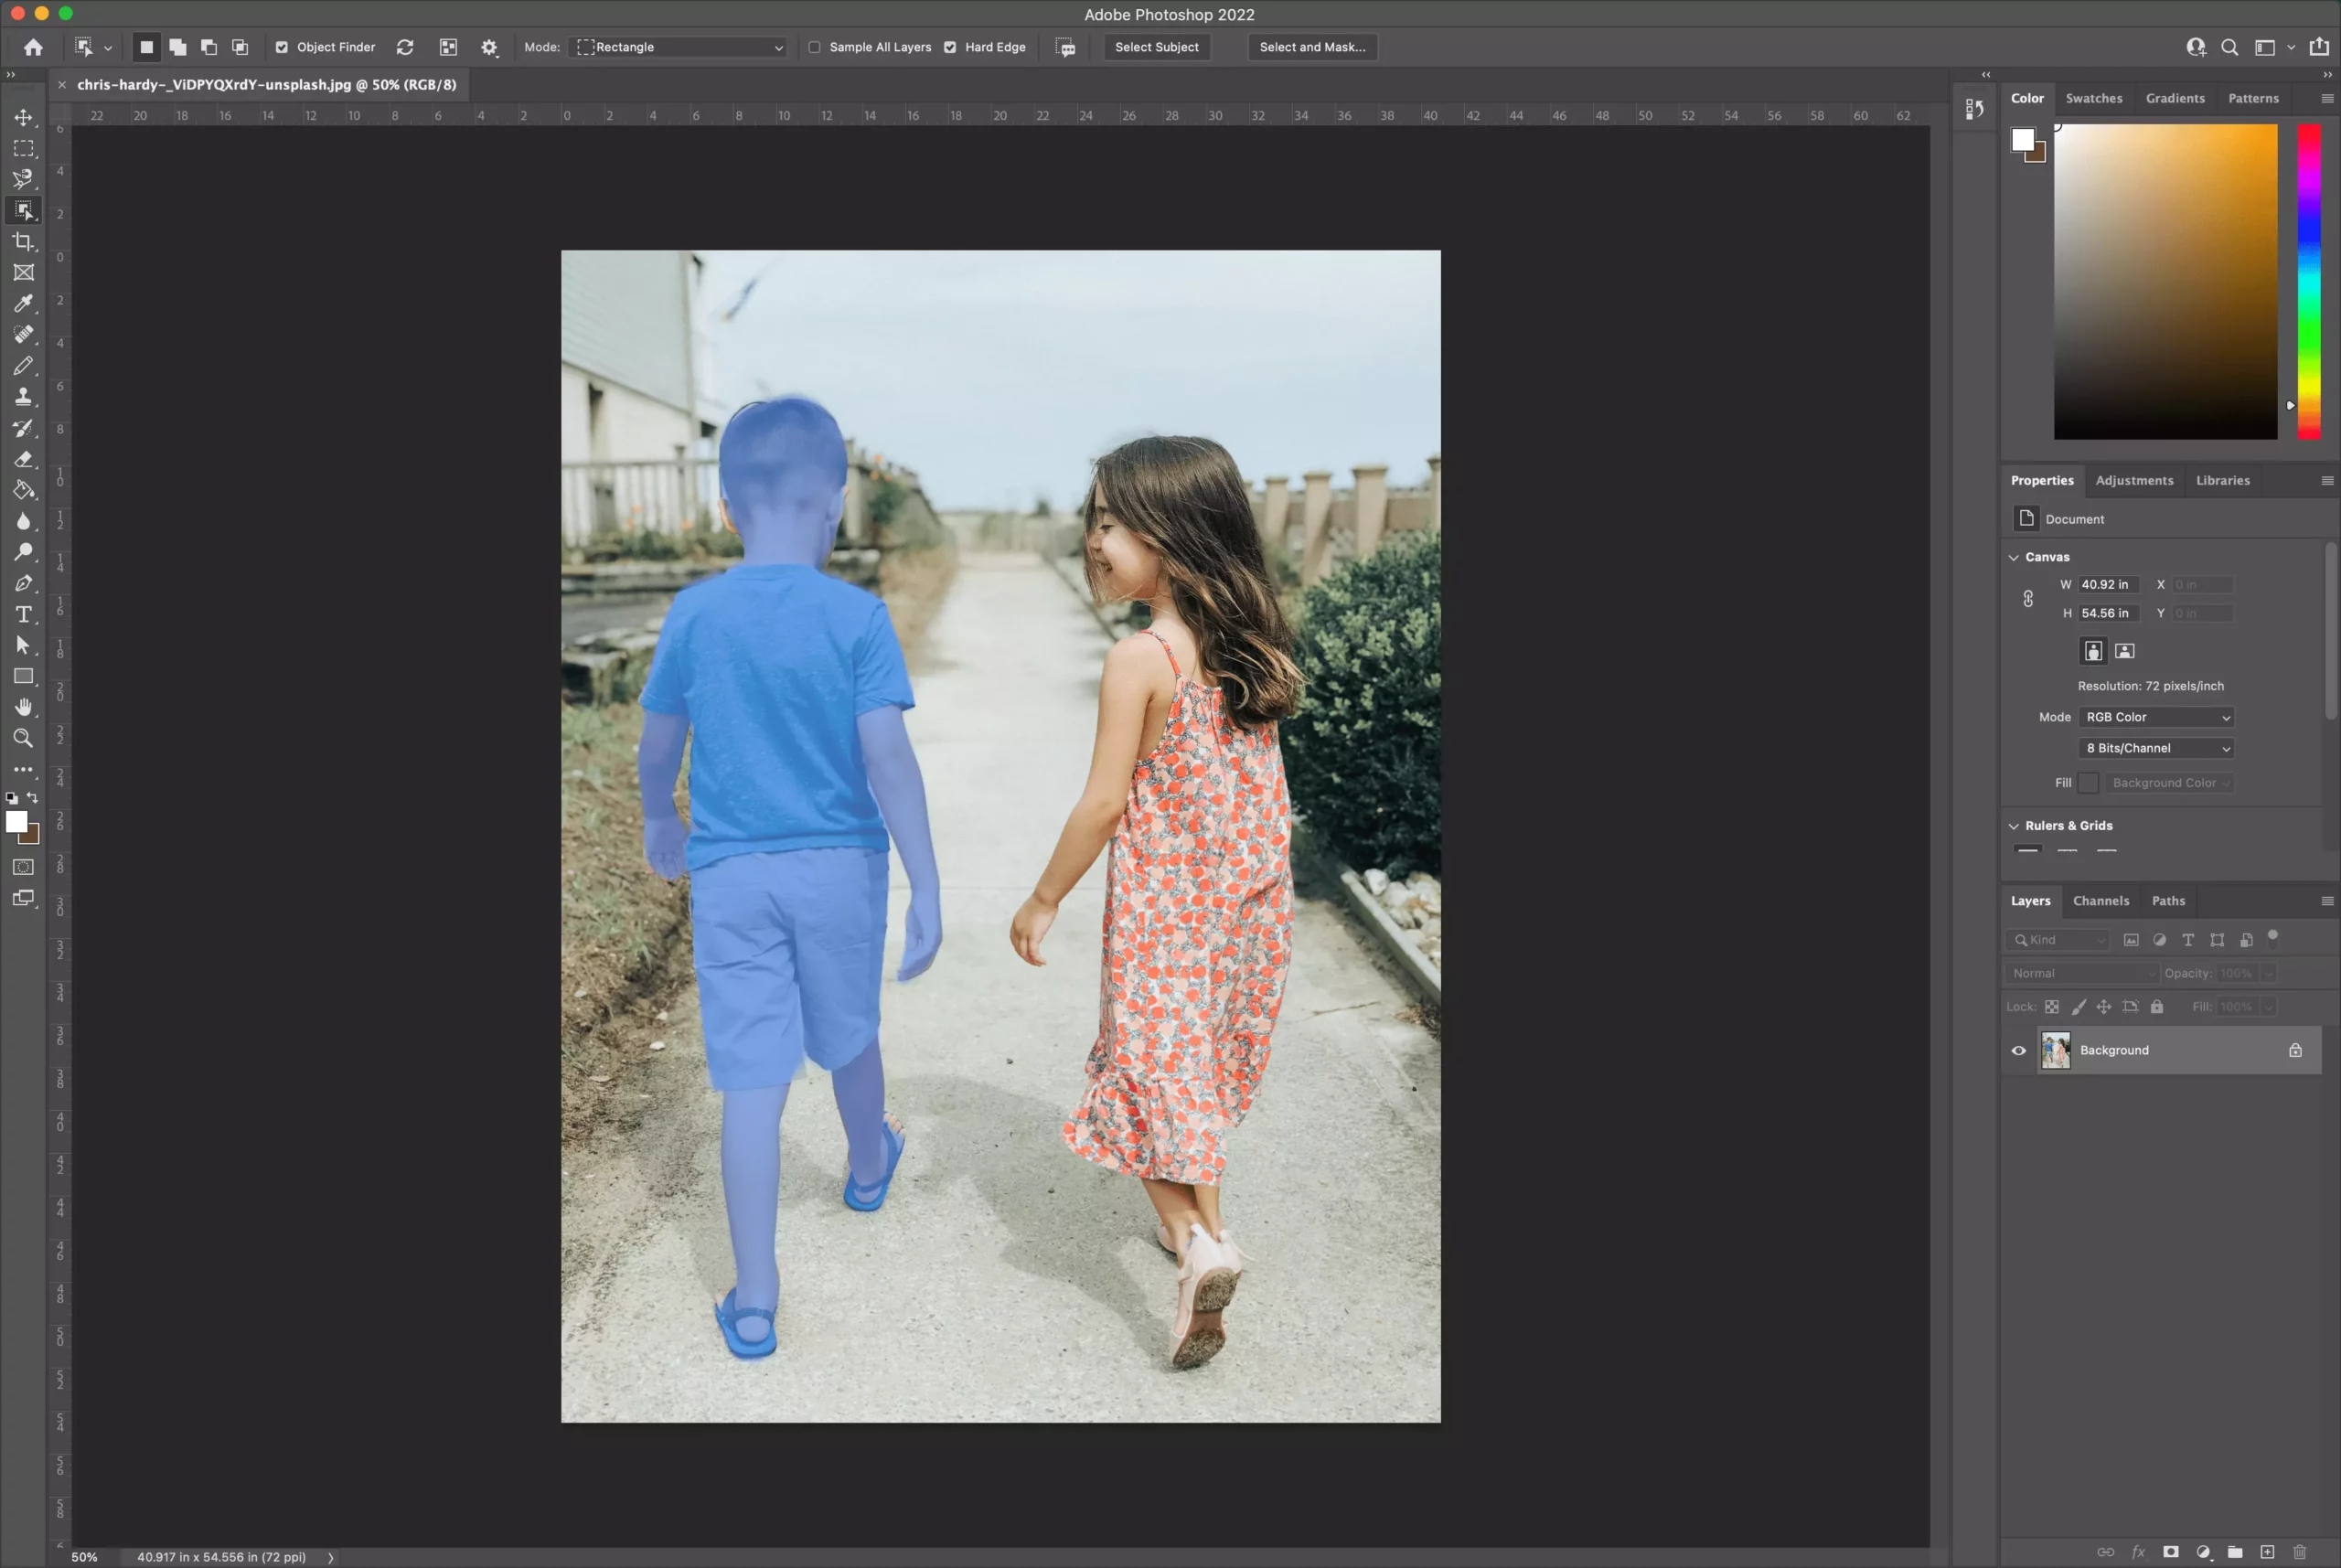
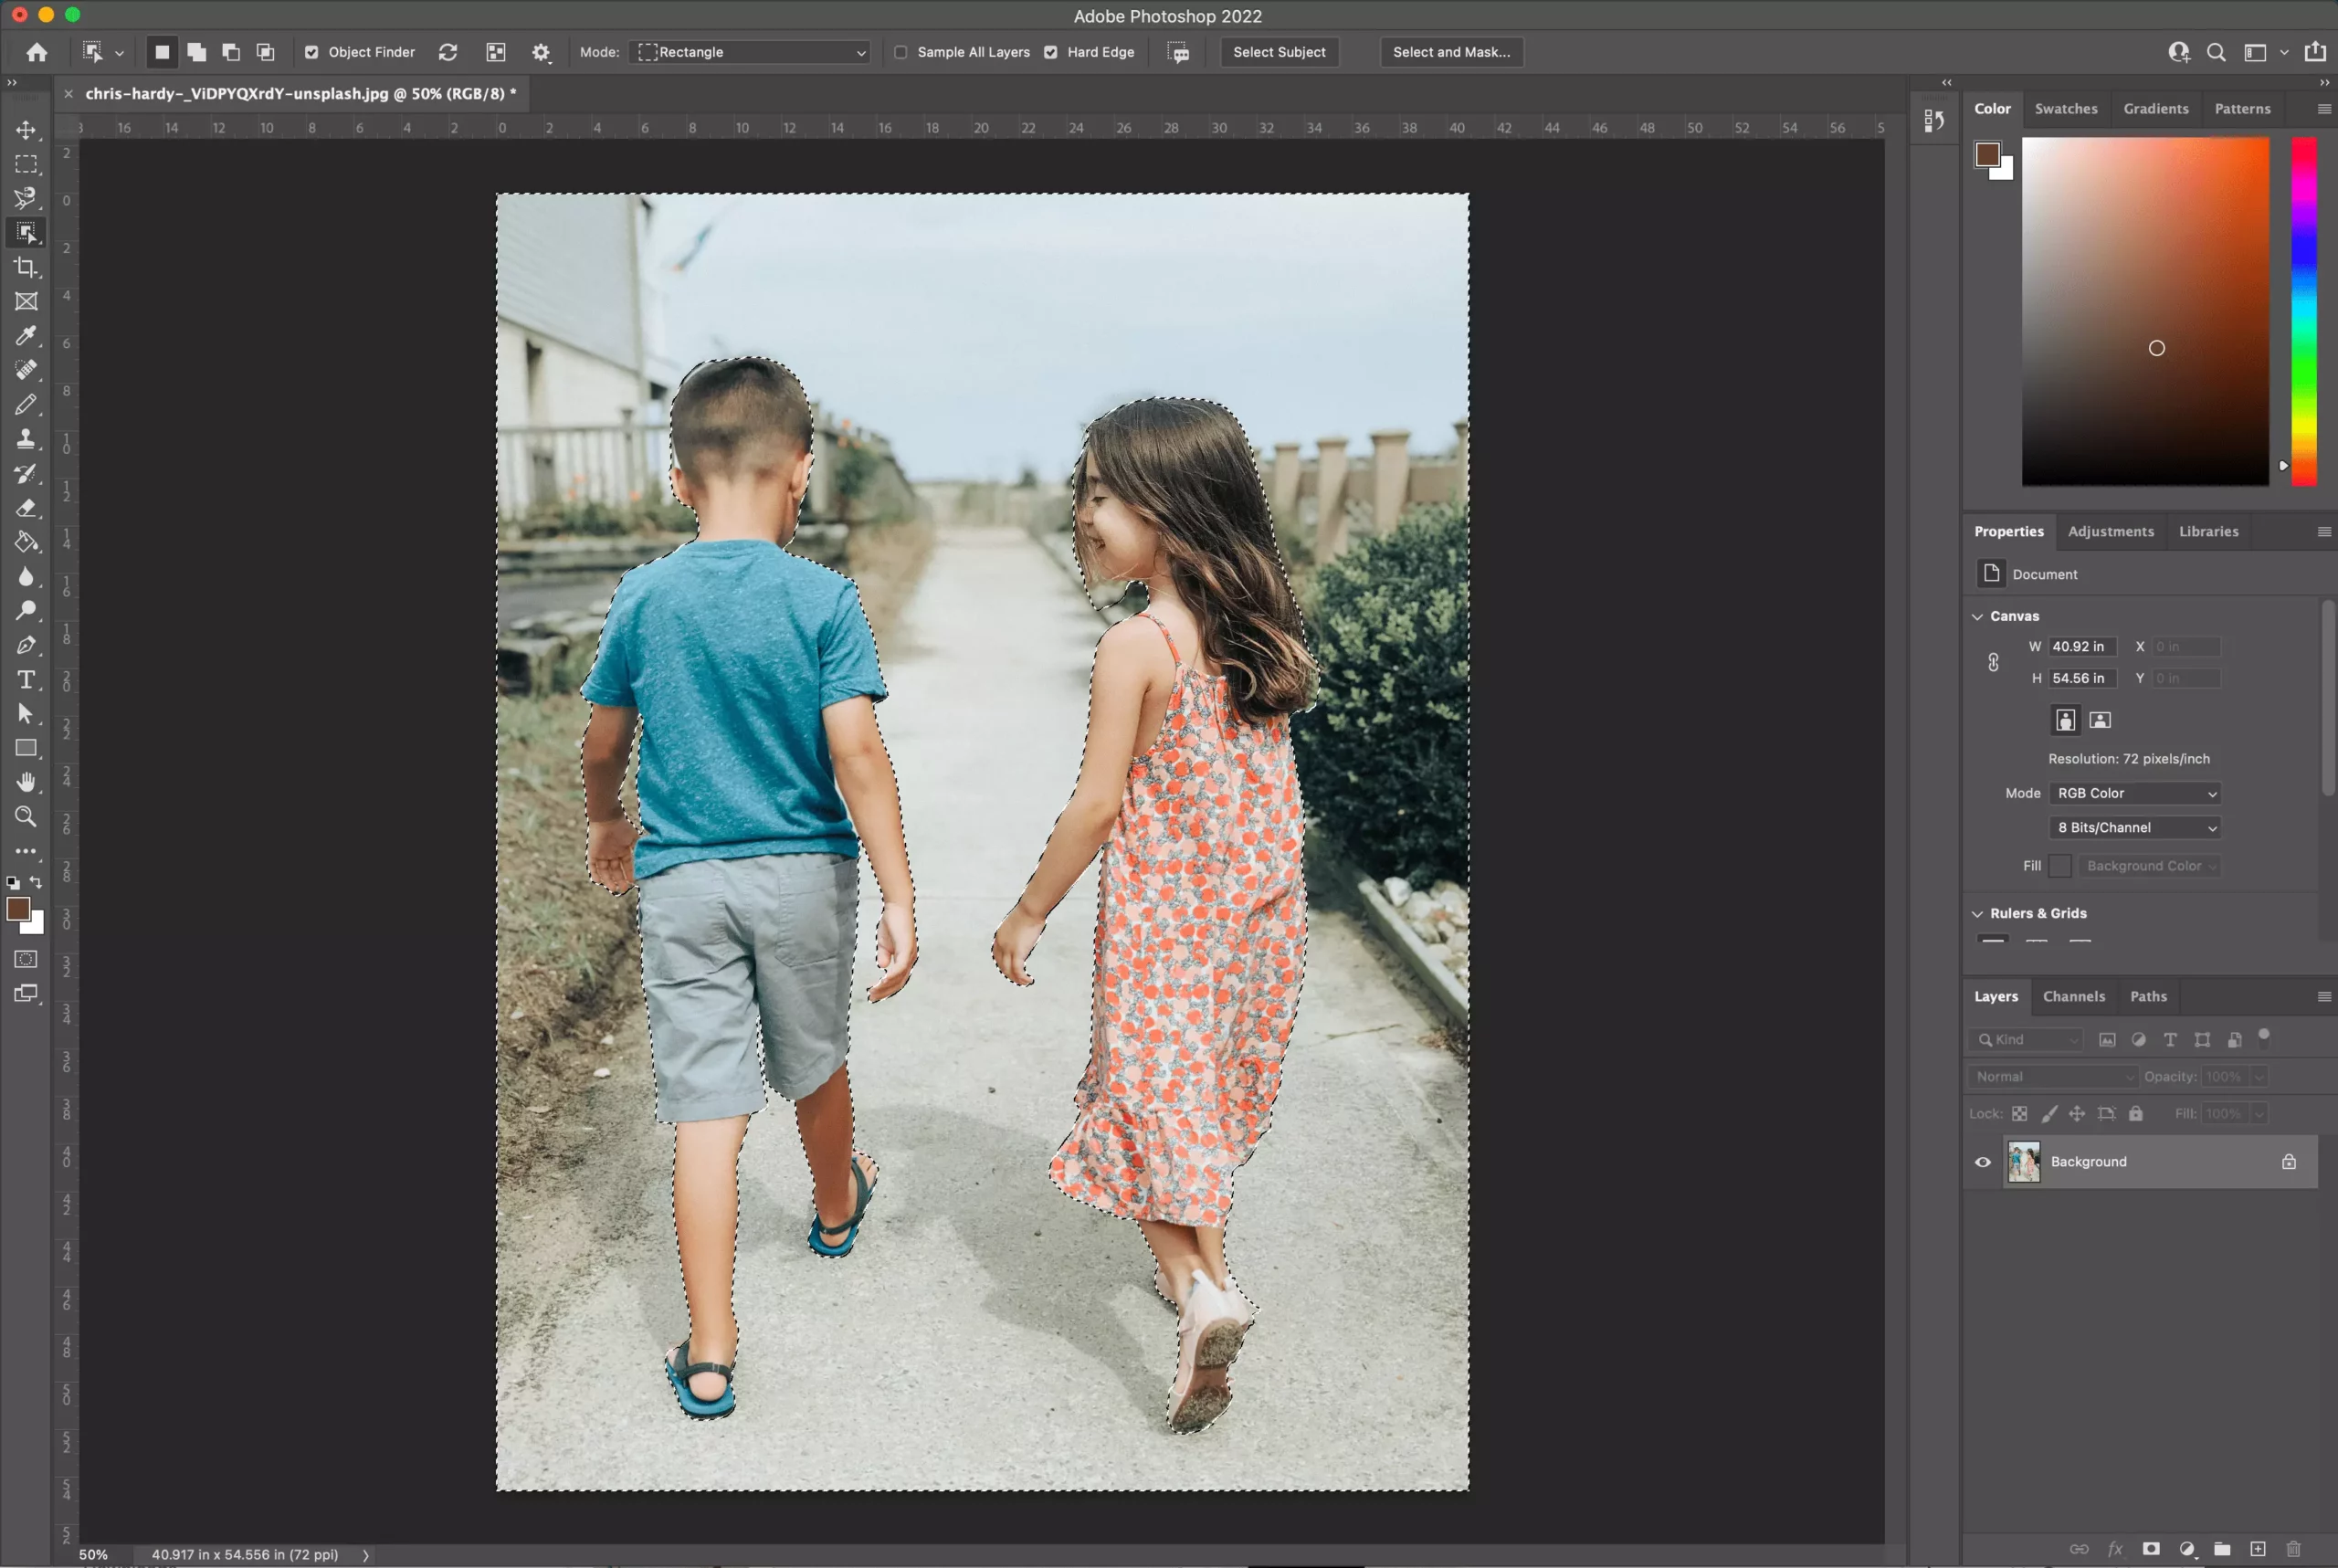
- To erase background material from here, press the shift key while selecting all objects you’d like to keep in the photo. This shortcut will auto-select each object for you (showing you the marching ants around each entity).
- Next, go to Select > Inverse to invert the selection (meaning that your background is now selected instead of your objects).
- Depending on what you want the background to be (in my case, I want it to be transparent), you’ll likely need to unlock your image, so it’s no longer considered a background.
- Next, click the lock on the right side of your image’s layer to unlock it. The layer name will change to “Layer 0” if you have no other layers. To remove the background, click the Eraser Tool (making sure your brush is large) and start erasing the background.
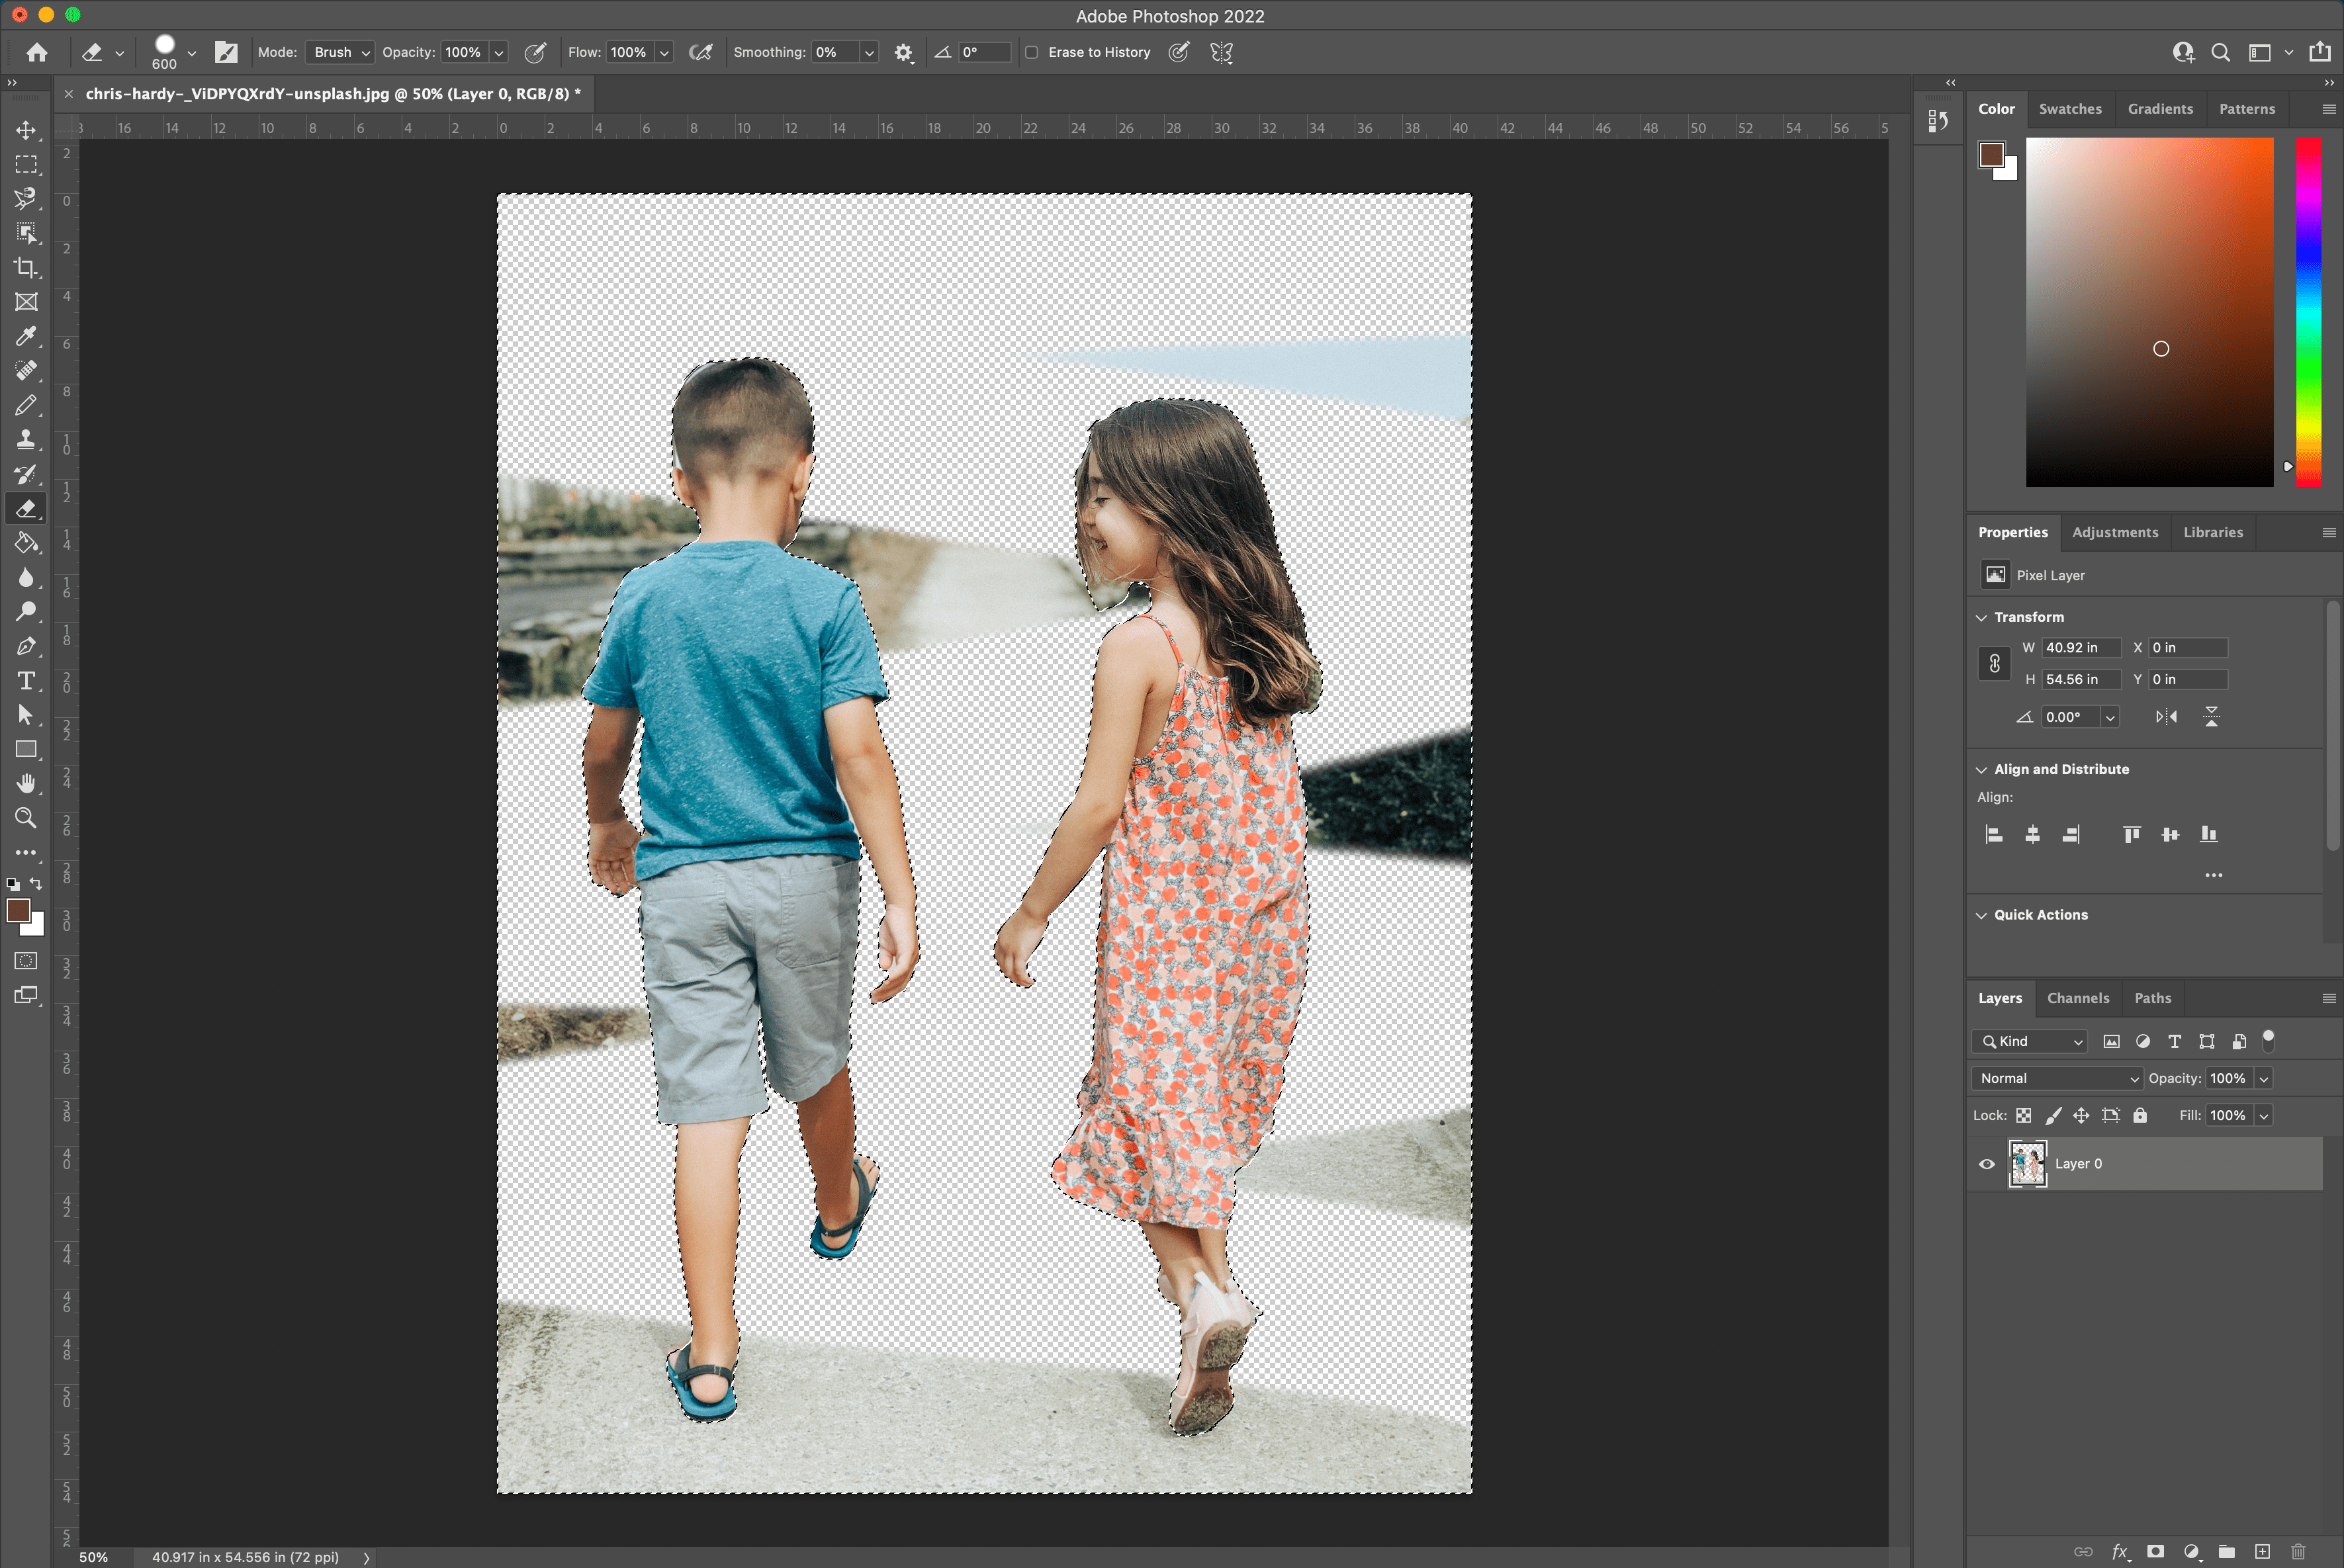
You don’t have to worry about Photoshop losing the selections. If you ever need to reselect your objects, select the Object Selection tool and hover over your objects again.
You can learn how to edit the resulting mask created by the Object Selection tool (if it didn’t get everything in the initial selection).
Photo credit: Chris Hardy on Unsplash
3. Remove Background in Photoshop with Quick Action
This tool is goo to use when you need it fast, and you’re not necessarily looking for perfection. It’s best to use with images with high contrast between subject and background, and when the subject has fairly simplistic lines.
By far, the quickest method discussed here is the built-in Photoshop Quick Action for removing backgrounds in Photoshop. It was introduced in Photoshop 2021 (in the Creative Cloud subscription) and provides an Adobe background remover that’s effective and easy to use.
With speed, however, comes less accuracy. Using Photoshop Quick Action will do most of the work for you, but the results may fall short of your expectations, depending on your image. If that’s the case, you can use any methods described here to polish up the result.
Quick Action Steps
- With your image open in Photoshop, right click your Background layer and click Duplicate Layer. In the dialog box that pops up, name your layer (calling it whatever you like) and click OK. Click the eye icon to the left of the original layer to turn that layer off.
- Make sure your Properties panel is open by going to Window > Properties. (If it was already checked, there’s no need to click it; if it isn’t checked, click it to open it up on the right-hand side by default.)
- In your Layers panel, click your new layer. In the Properties panel (by default this should be above your Layers panel), click the Remove Background button under Quick Action.

- The quick action has now removed the background, leaving your layer with a mask around the subject.

From here, you can make refinements by going into the mask and adjusting as needed (such as around the dog’s feet at the bottom left of the image). While outside the scope of this article, if you need help with working with masks, check out this Adobe tutorial.
Photo credit: Karsten Wingert on Unsplash
4. Remove a Background in Photoshop with the Background Eraser Tool
This tool is good to use when working with high contrast images, although it takes a fair bit of time and effort to produce a good outcome.
The Background Eraser tool is excellent if you need more control over removing a background in Photoshop but still want Photoshop to do some of the heavy lifting for you. For more control, you’ll have to sacrifice some time to get the desired result. Depending on your photo, using the Background Eraser tool could be highly effective and a time saver and get you closer to your desired outcome with some time involved.
Background Eraser Tool Steps
- With your image open in Photoshop, right click your Background layer and click Duplicate Layer. In the dialog box that pops up, name your layer (calling it whatever you like), and click OK. Click the eye icon to the left of the original layer to turn that layer off.
- Select the Background Eraser tool from the toolbox on the left-hand side. This tool may be hidden below the Eraser tool. Click and hold the Eraser tool to reveal more options to and select the Background Eraser tool.
- In the tool options bar at the top of the screen, click the brush icon to reveal the brush panel.
Change the hardness so that it’s near or at 100%.
The size can be whatever you deem appropriate for the image you’re working with. In this case, I’m starting with 50px.You can adjust it as we go by using the square brackets ([ and ]) to decrease and increase the size of the brush.
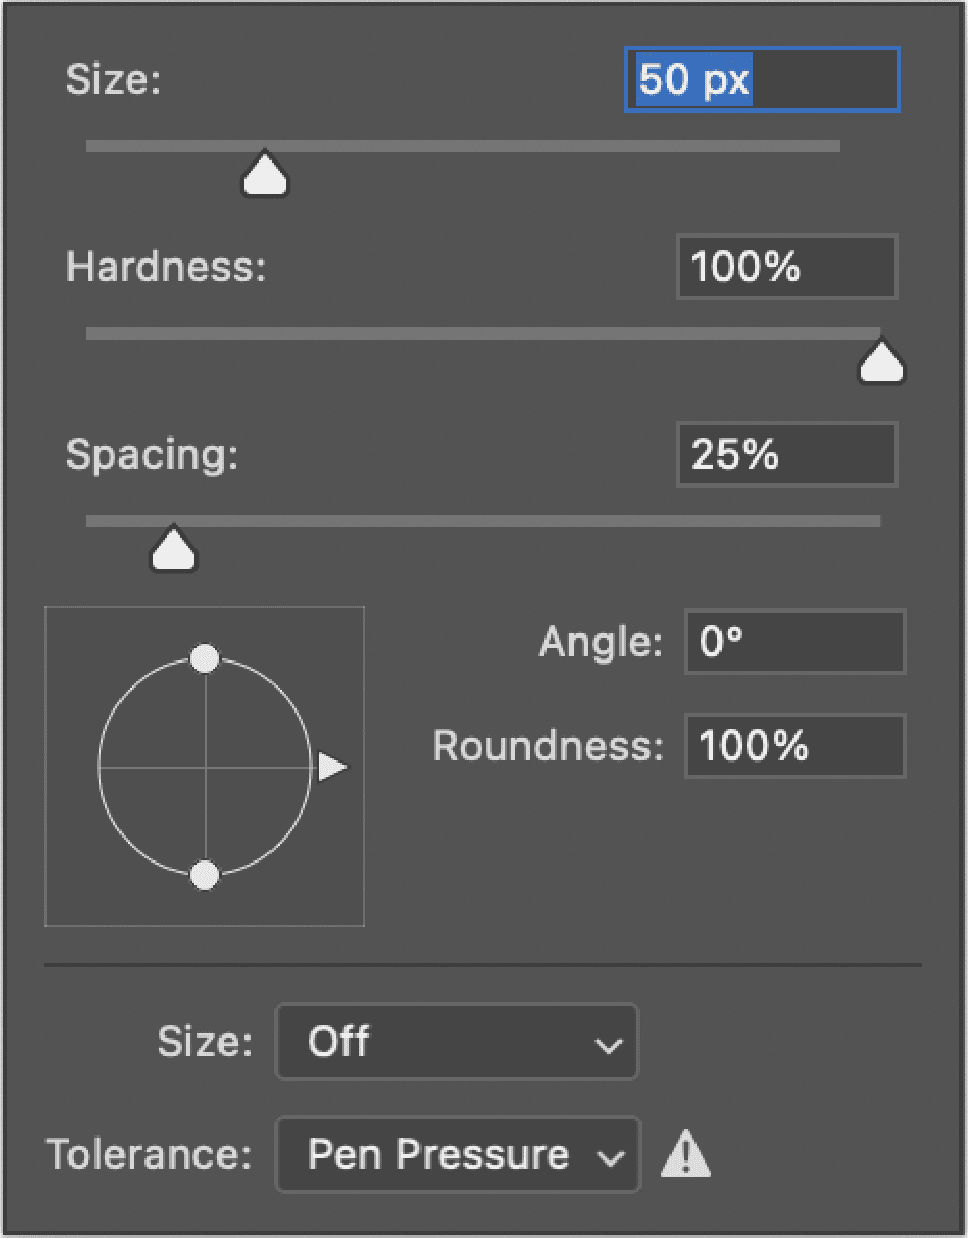
- Still in the tool options bar at the top, set the Sampling to be Continuous. It’s the first of three icons after the brush size option. Next, set the Limits to Find Edges and the Tolerance to be somewhere in the range of 20–25%.
Note that the lower the tolerance, the fewer color variations it will pick up. Conversely, the higher the tolerance, the more colors the tool will select.
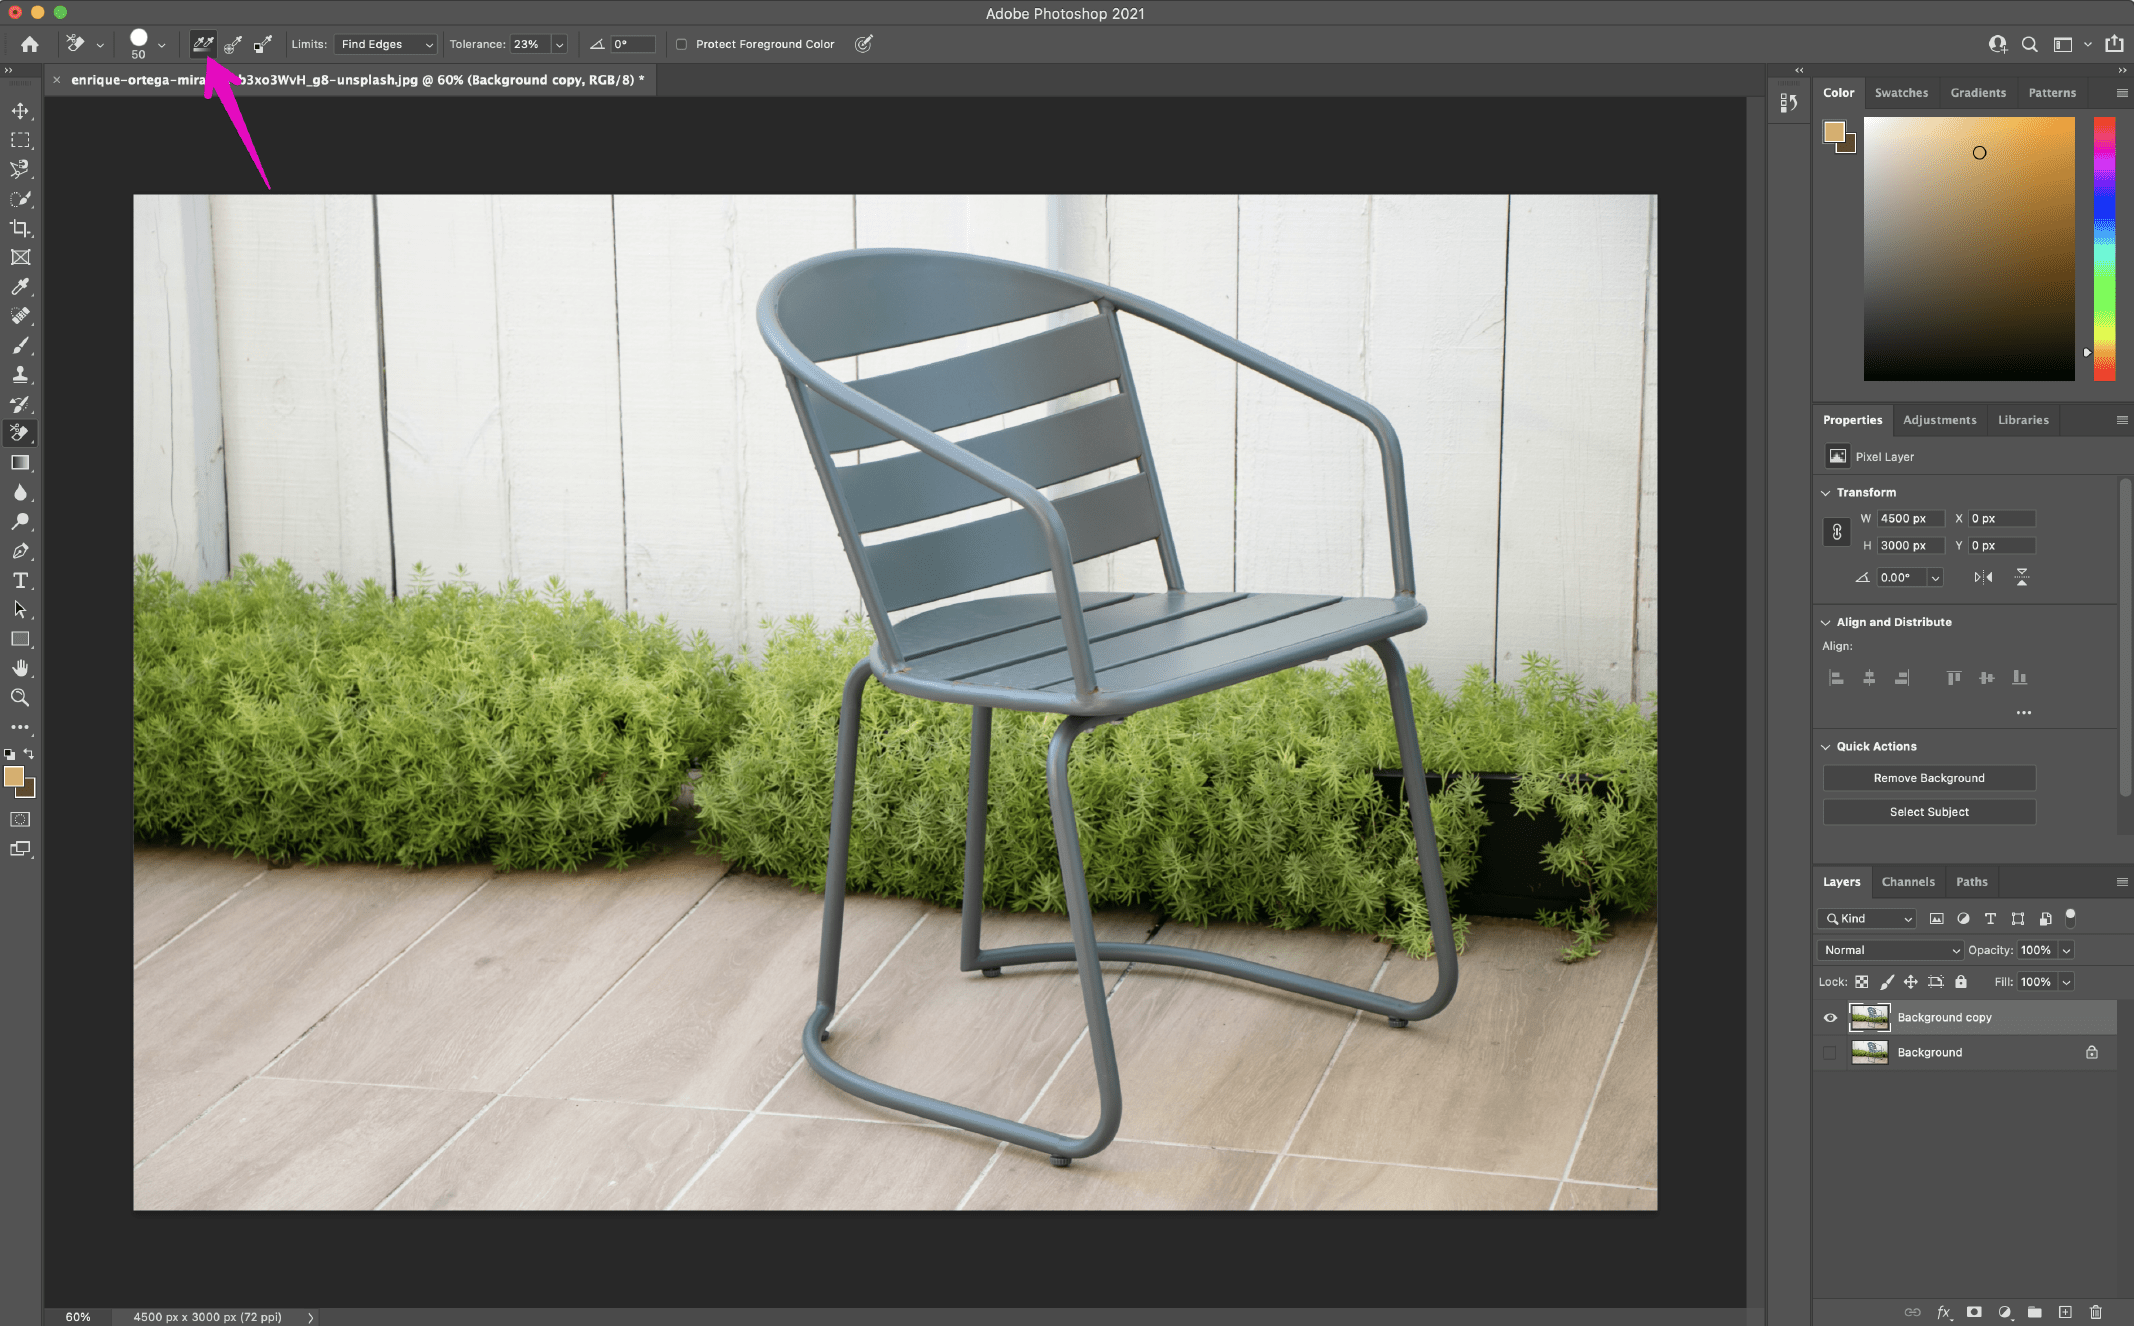
- Start erasing the background around your subject using the Background Eraser tool by clicking and holding while moving the brush. The goal here is to keep the crosshairs inside the tool from touching your subject. Zoom in on the image if you need to see more close details.
I recommend you do short strokes with the brush (remembering to let go of the mouse from time to time) so that you can always Undo if the brush goes too far.
In the more difficult areas, you may find that you need to adjust the size of your brush as you go. You can do this by revisiting the tools option bar at the top, or using [ and ] to adjust down and up the size of your brush.If resizing the brush doesn’t work and it’s erasing your subject, first undo your action. After that, go into the tool options bar at the top and adjust the Sampling to Once (the middle icon in the set of three), the Limits to Discontiguous, and Tolerance to around 10%. As a result of these settings, the brush will only use the color under the crosshairs in that moment and not resample as you go along.
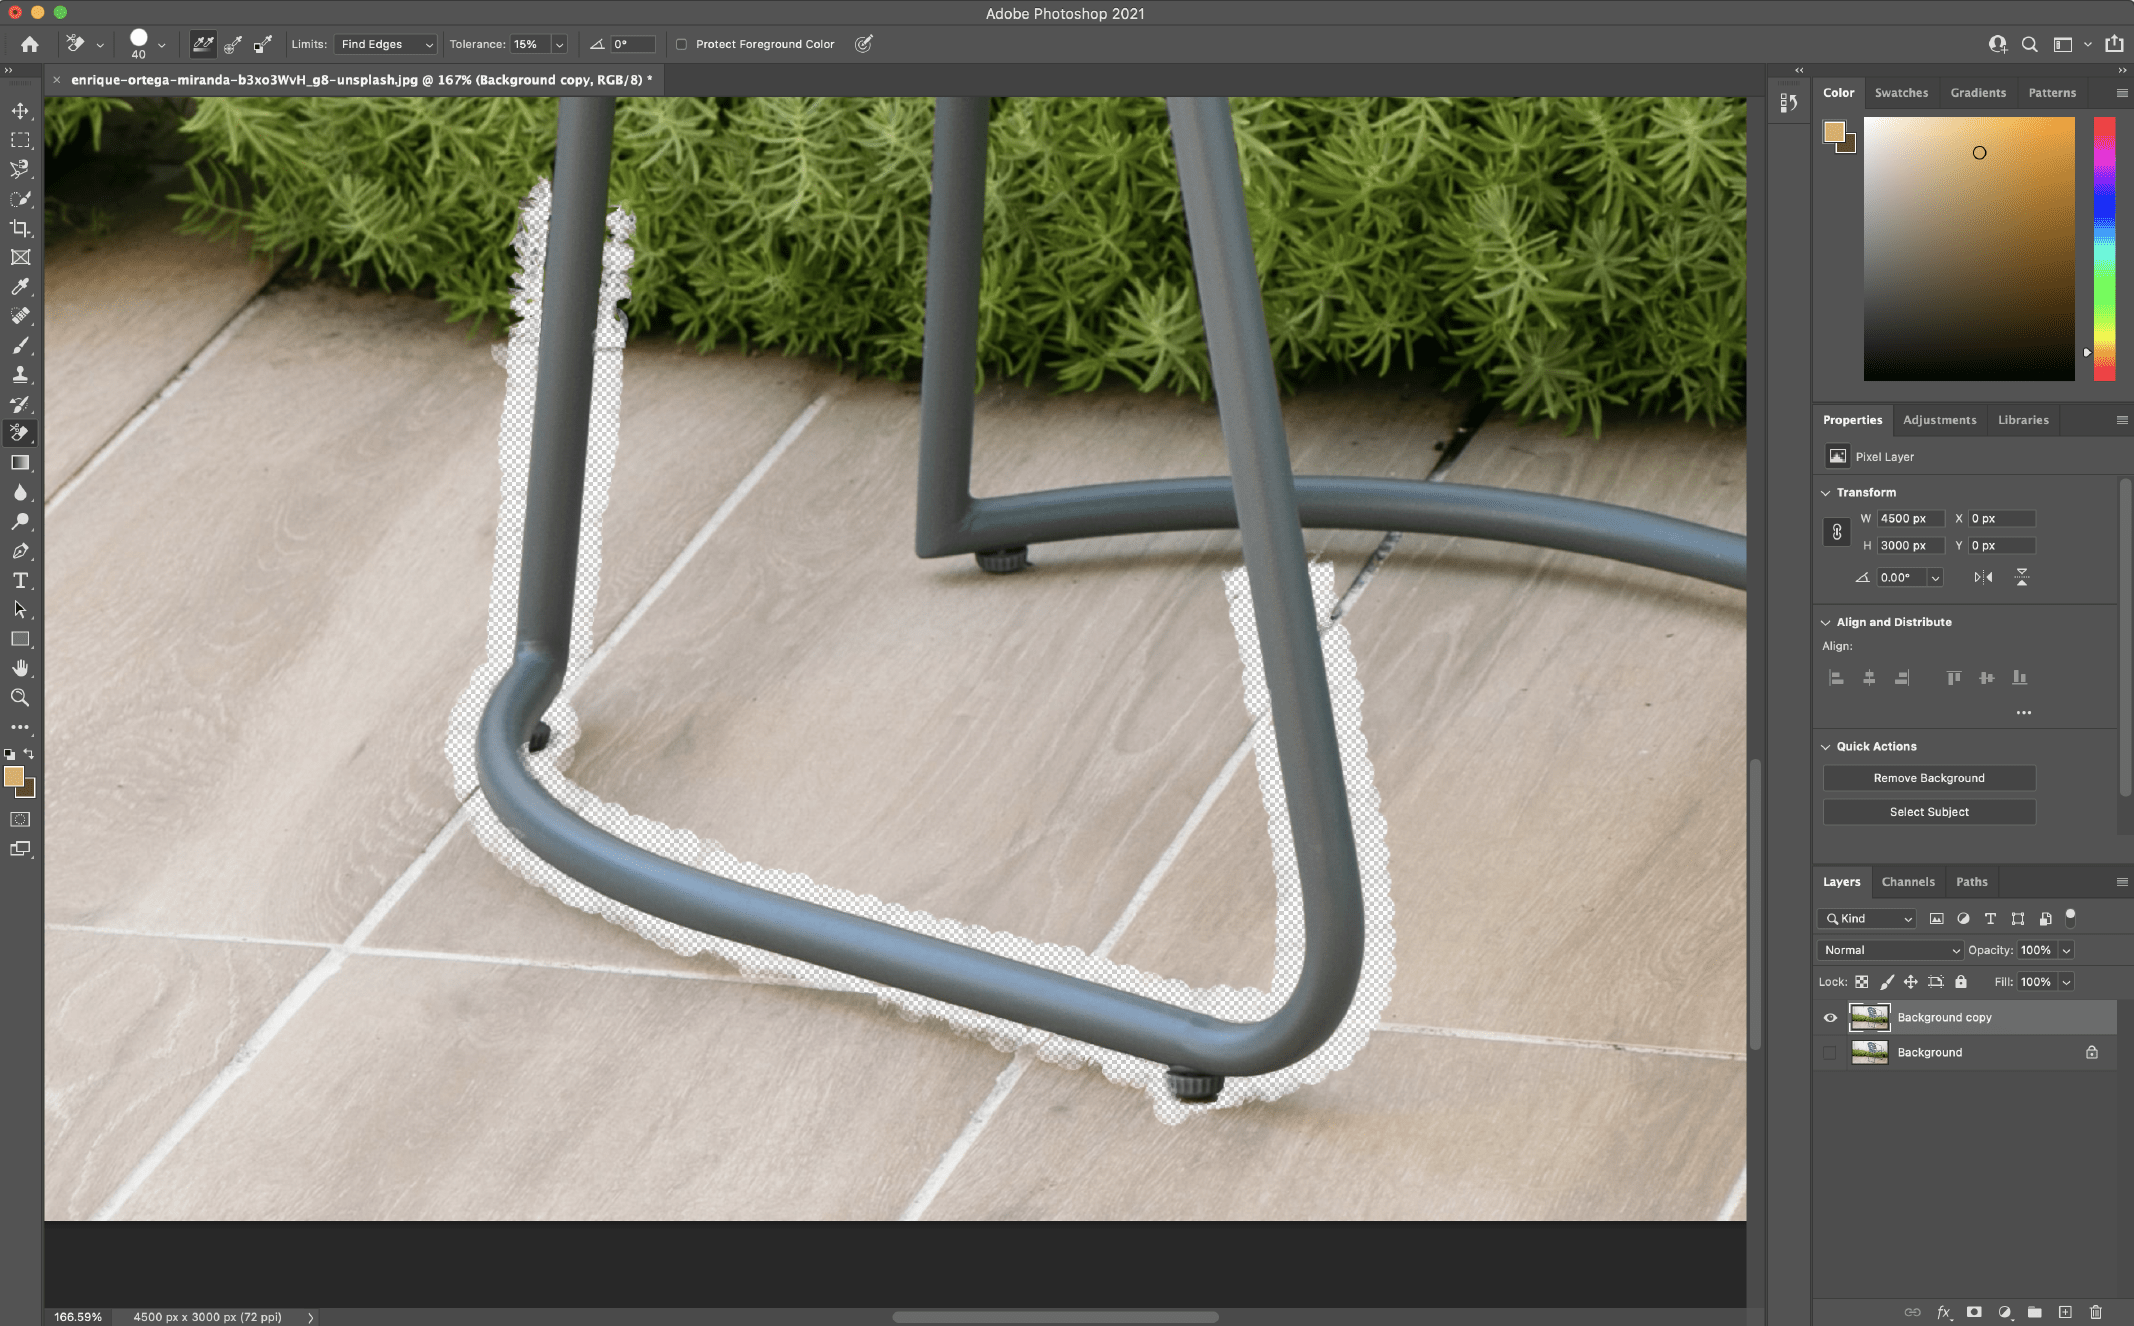
While this process can be quick or tedious depending on your image, it provides good result. You’re in control of determining what the subject is and what isn’t. If this doesn’t complete the job, other methods mentioned here could help you get closer to your desired result.
Check out this Adobe tutorial for more detailed info on the Background Eraser tool.
Photo credit: Enrique Ortega Miranda on Unsplash
5. Remove a Background in Photoshop with the Pen Tool
This tool is good to use when the subject and background are not highly contrasted or when other tools such as the Quick Action or Background Eraser tool mentioned above aren’t producing desired results. It gives you the most control out of all the methods listed here.
The Pen tool is one of the most tried and true ways to remove backgrounds from images in Photoshop. It gives you the most control over the outcome. However, because it gives you the most control, it can also be the most time-consuming. The Pen tool requires patience.
Pen Tool Steps
- With your image open in Photoshop, right click your Background layer and click Duplicate Layer. In the dialog box that pops up, name your layer (whatever you’d like), and click OK. Click the eye icon to the left of the original layer to turn that layer off.
- Select the Pen tool from the toolbox on the left-hand side (above the Text tool). Zoom in to an area of your image to start. Start at the edge of your subject (or a suitable starting point) and click to start the first anchor. Then start working your way around your subject, adding additional anchors to start outlining your subject.
If you need to make a curved line, click-hold-drag to produce a curved line, moving the mouse to adjust the curve as needed.
To adjust an anchor point or directional lines for fine tuning, use the Direct Selection tool (hidden under the Path Selection tool) in the toolbox.To undo an anchor, go to File > Undo or use your keyboard shortcut (Command + Z for macOS, Control + Z for Windows).
For more info about the Pen tool and working with paths in Photoshop, read this Adobe tutorial.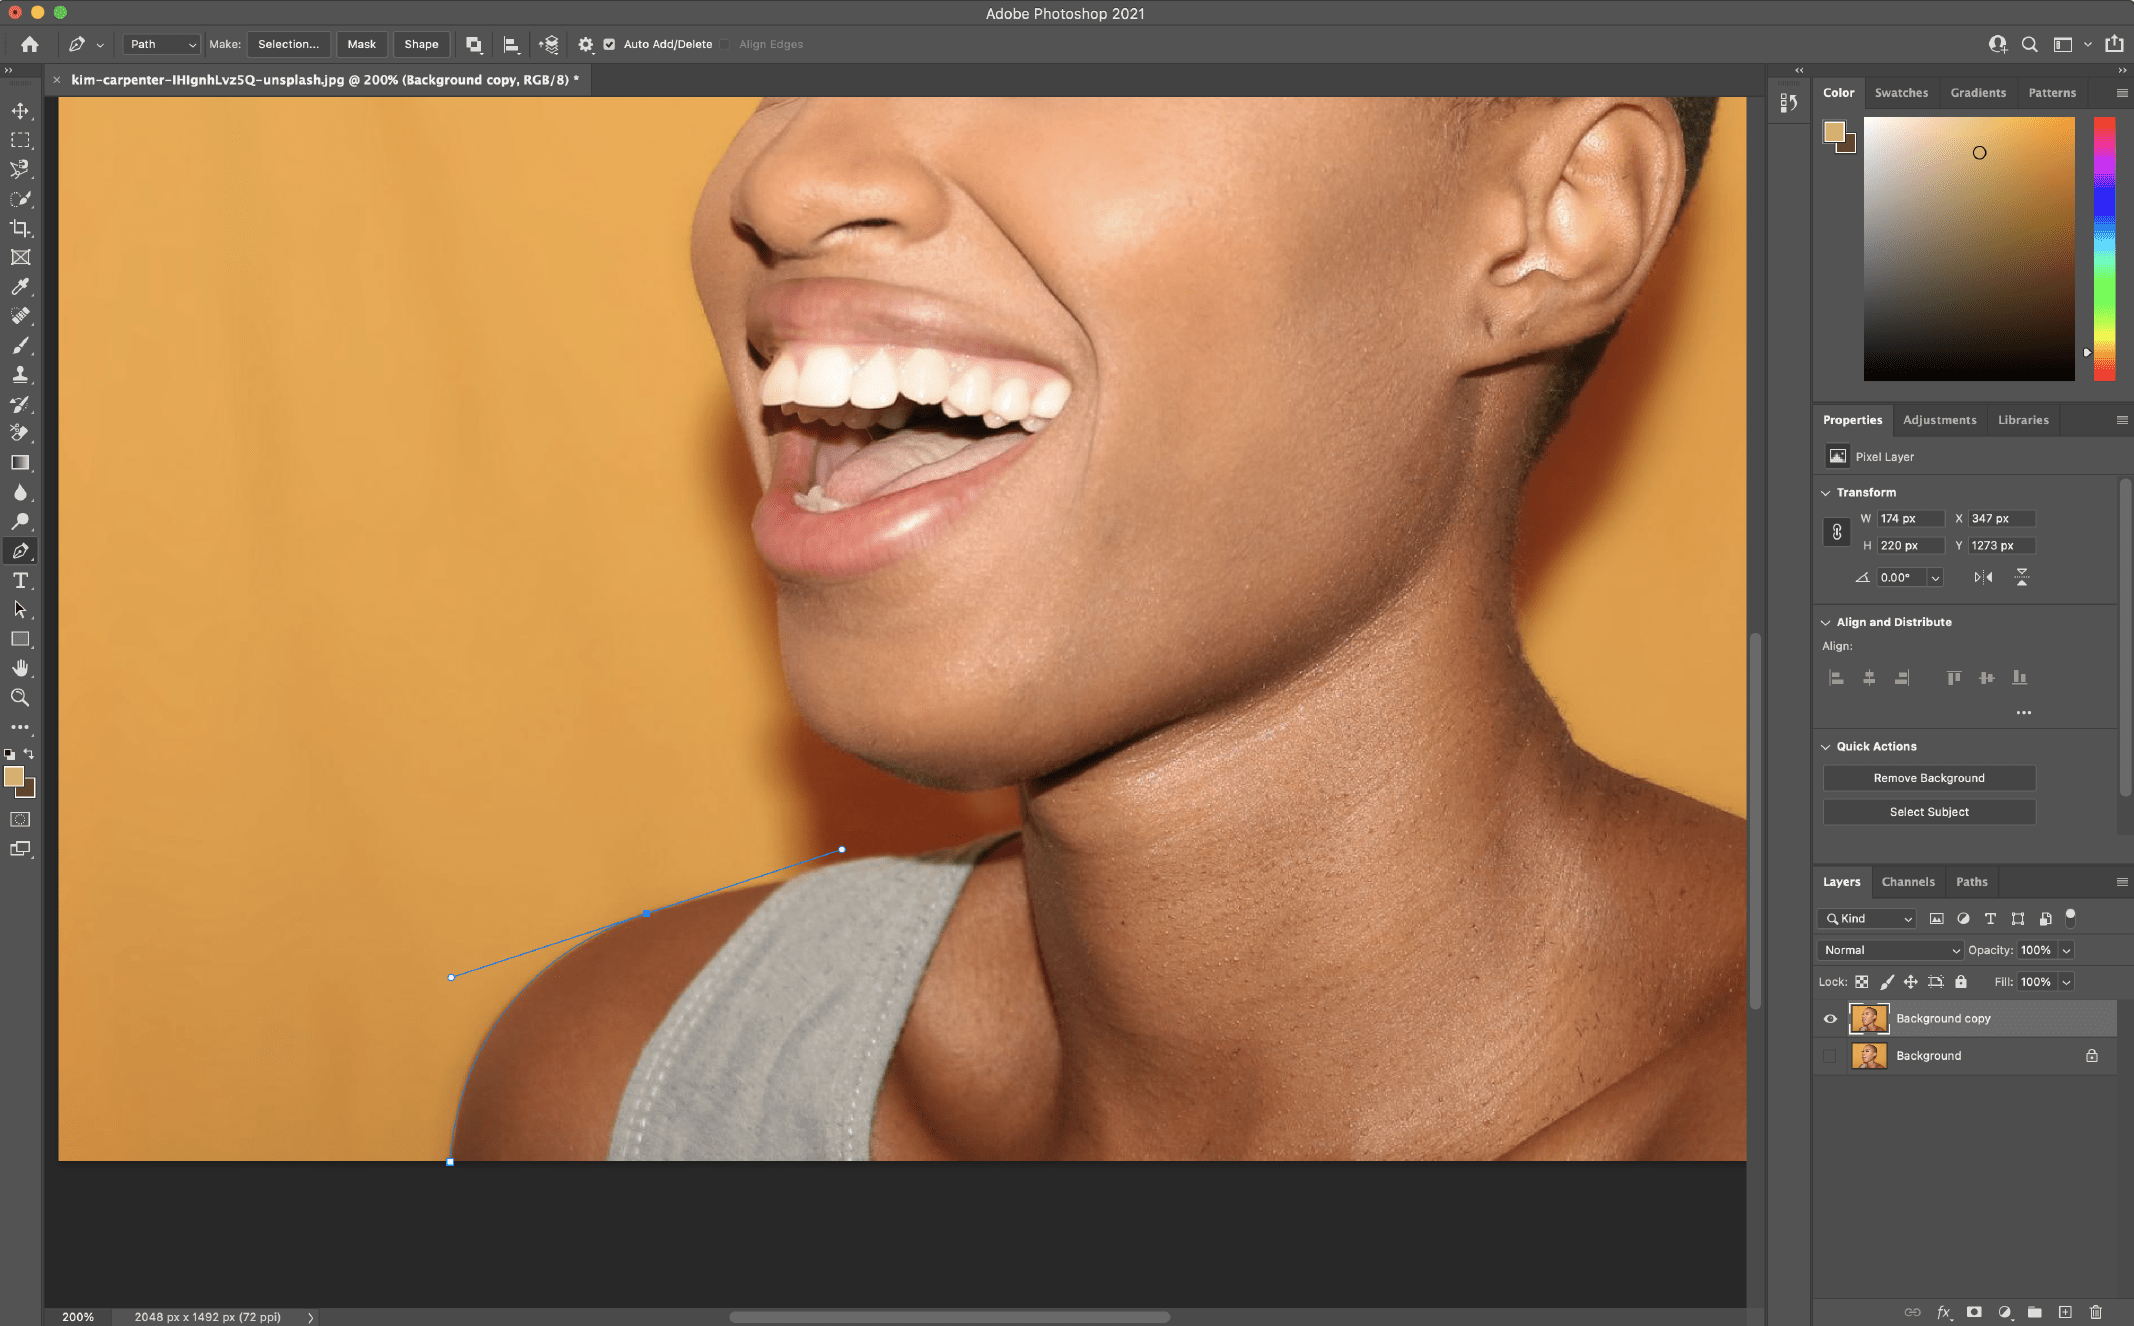
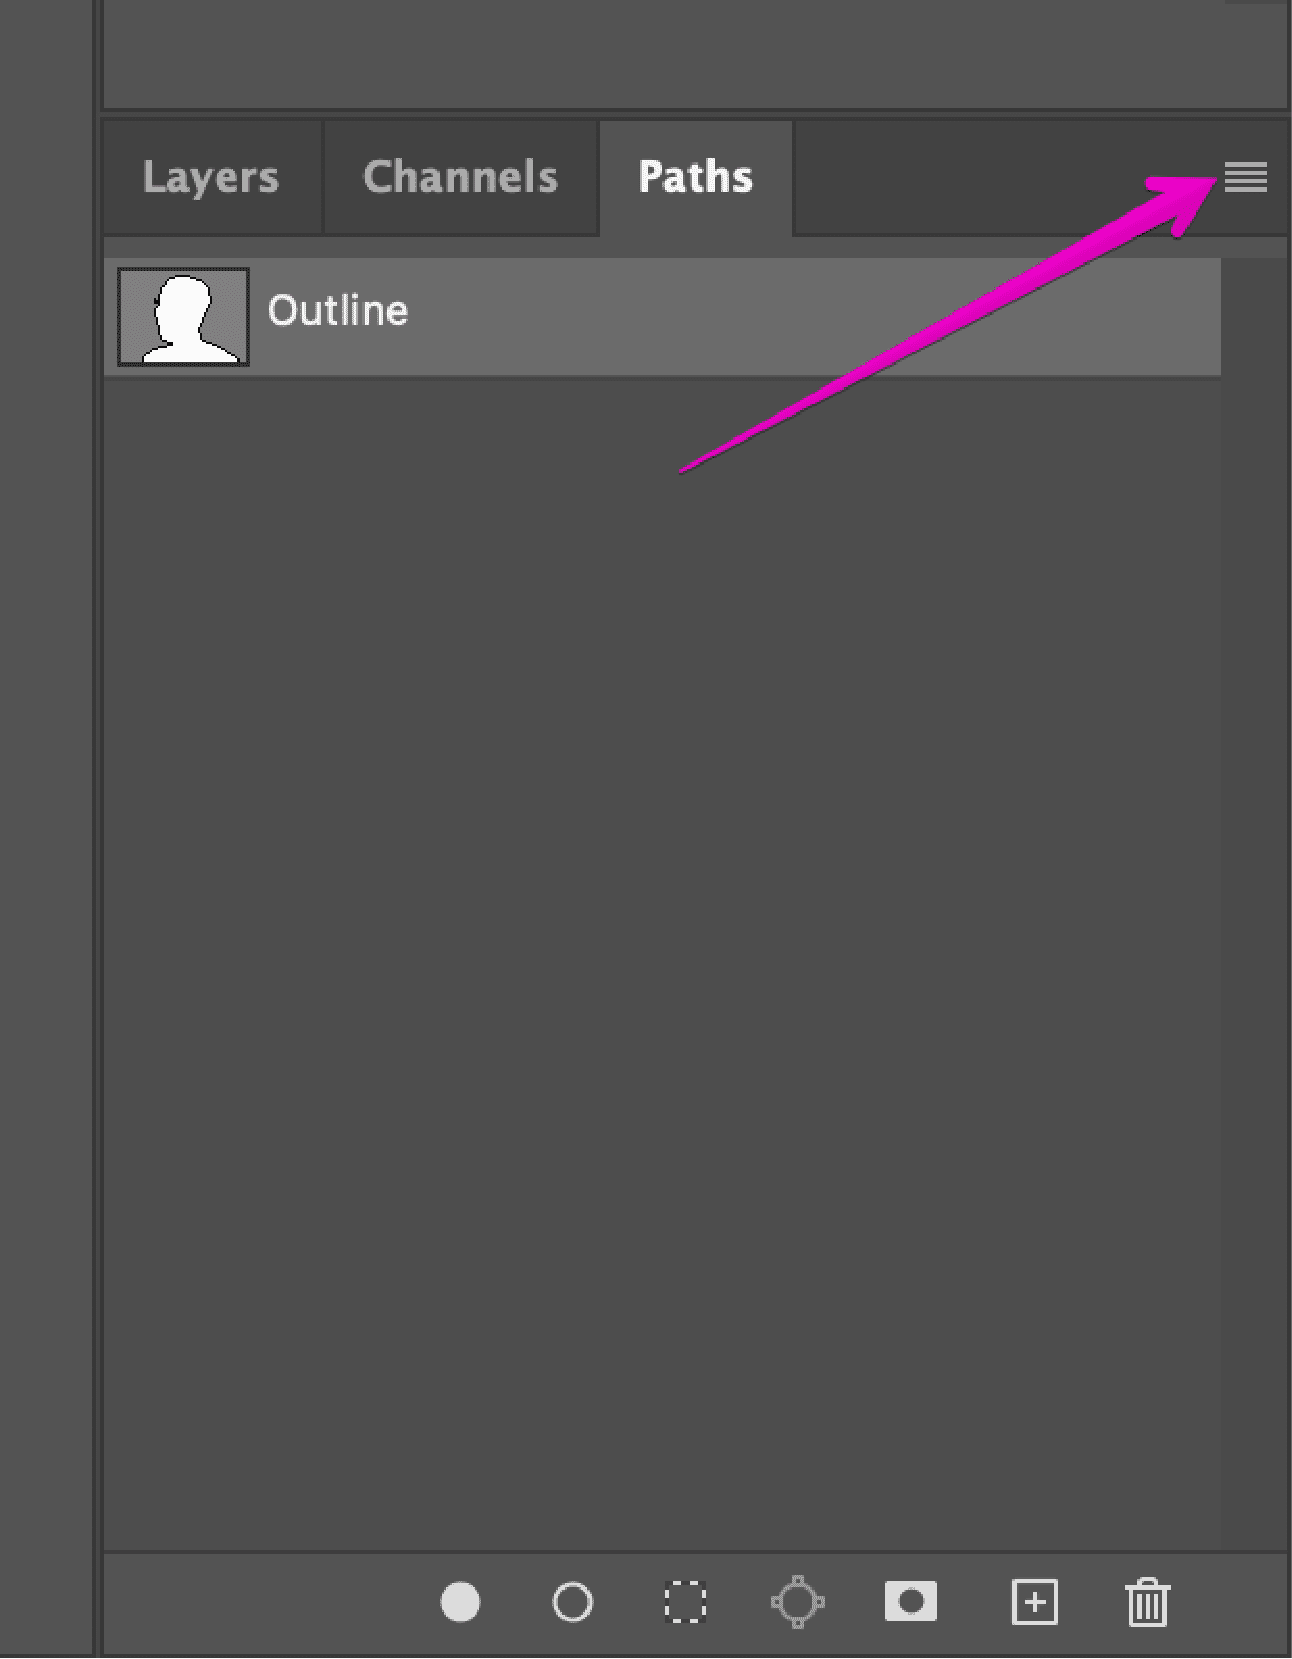
- Make sure you complete the path once you’re done by meeting up with your first point. Once you’ve completed the path and you’re happy with the results, you’ll want to save the path. Go to Window > Paths to reveal the Paths panel (it should appear on the right-hand side by default). Click the three bar menu at the right and click New Path, and name your path. Now your path is saved in the Paths panel.
- Next, right click your new path in the Paths panel and select Make Selection, then click OK in the dialog box (leave all defaults for now). This will give you the marching ants outline where your path was.
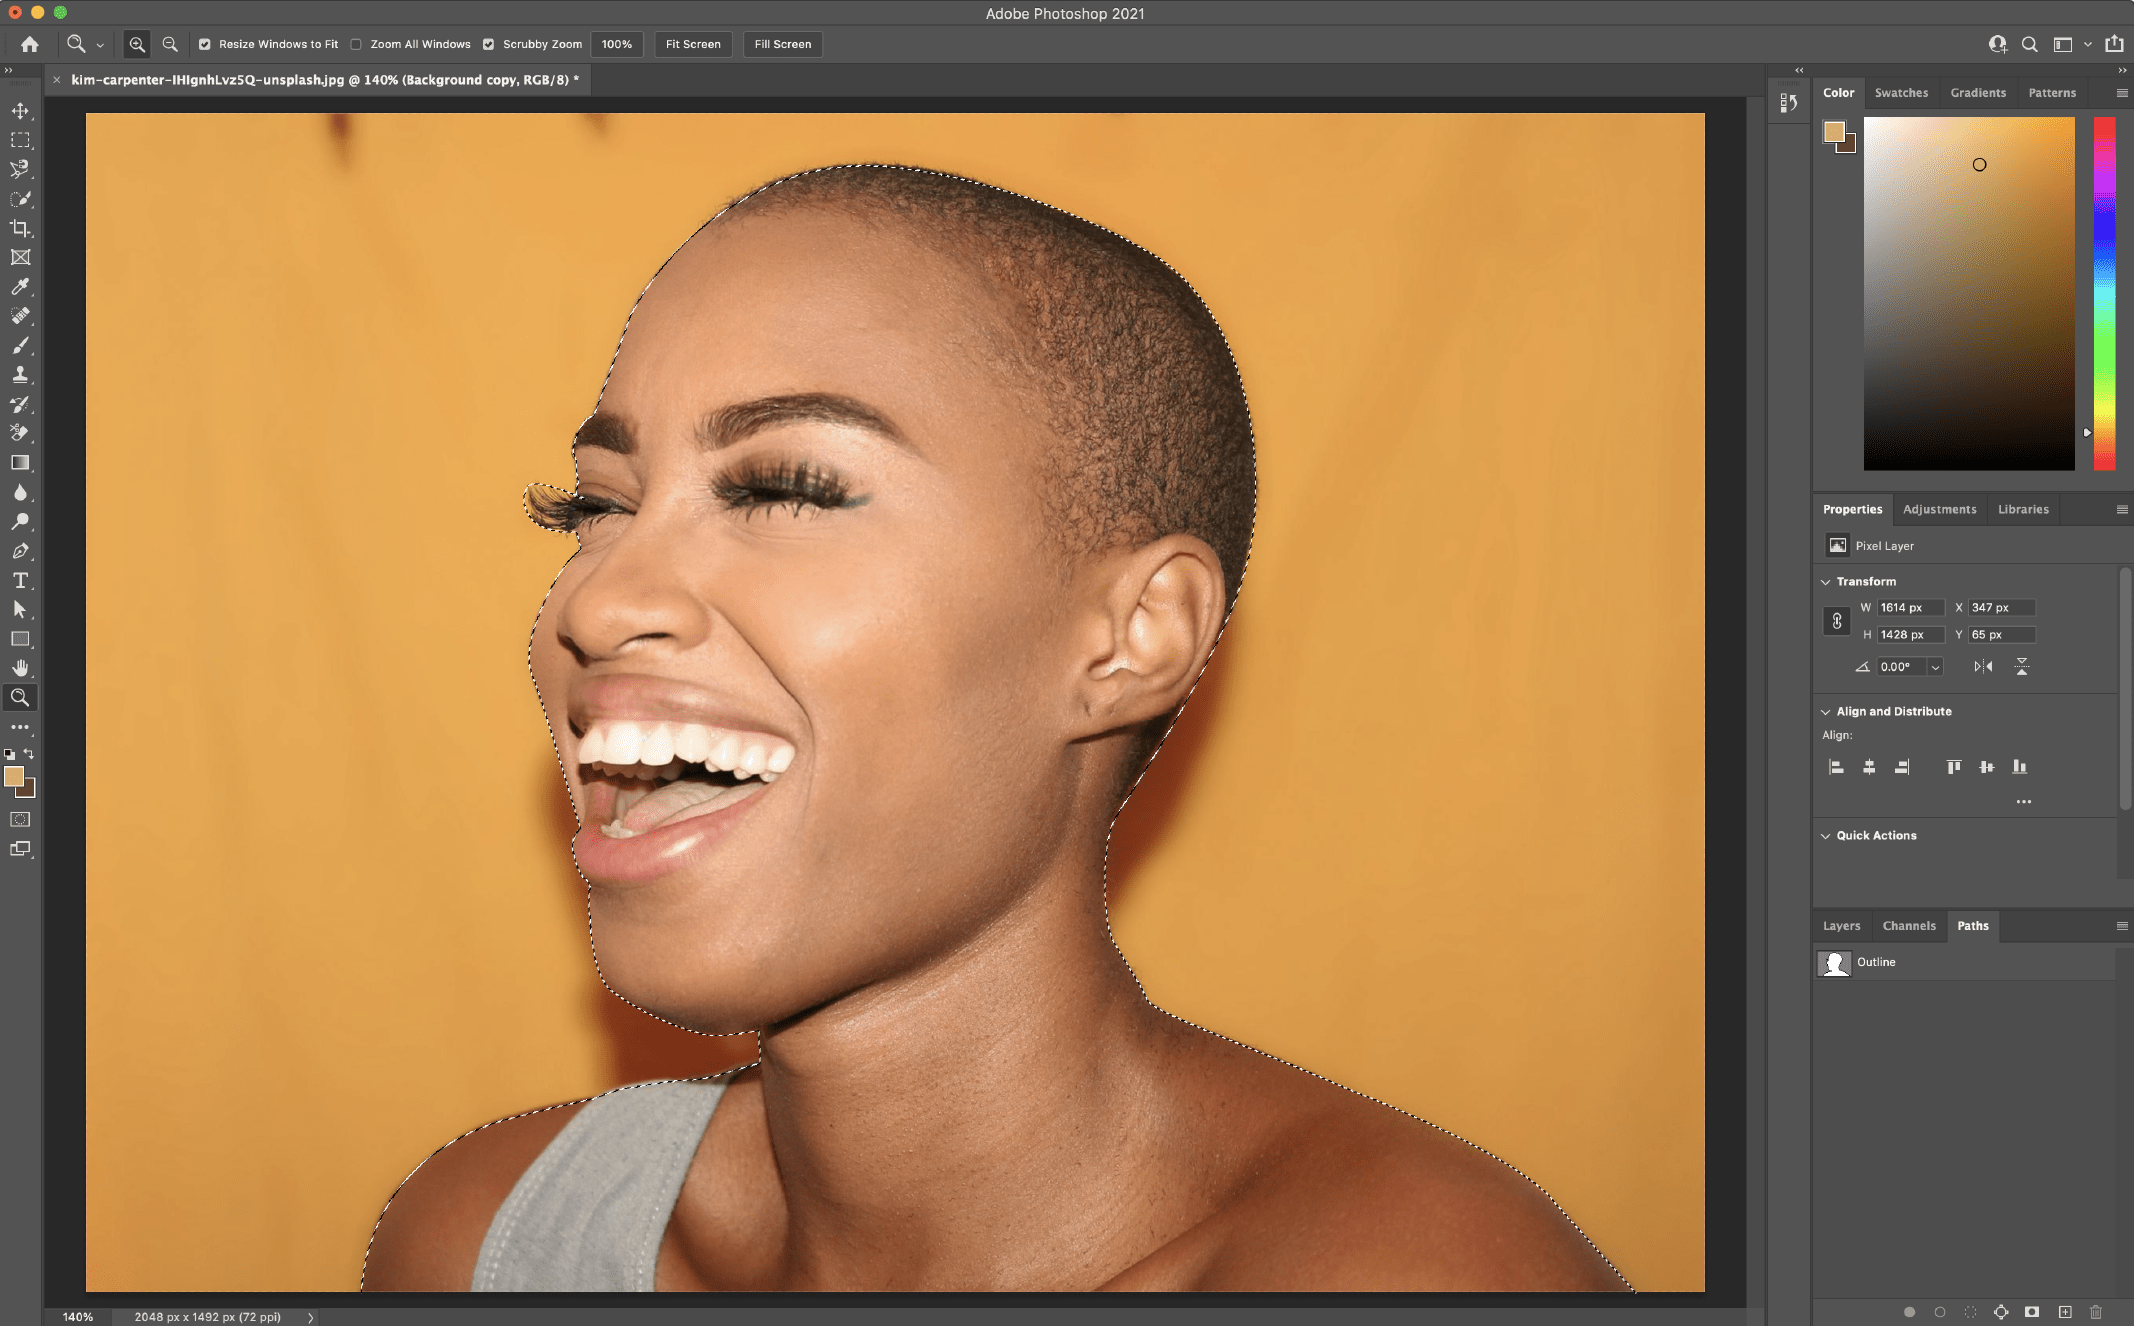
- Since we don’t want to delete what’s inside the selection, we’ll want to change the selection to be everything except the subject. Go to Select > Inverse. You’ll see the marching ants are now around the entire image and the subject, essentially selecting the background.
- To delete the background, press Delete. You should now see the white/gray checkered background instead of your previous background.
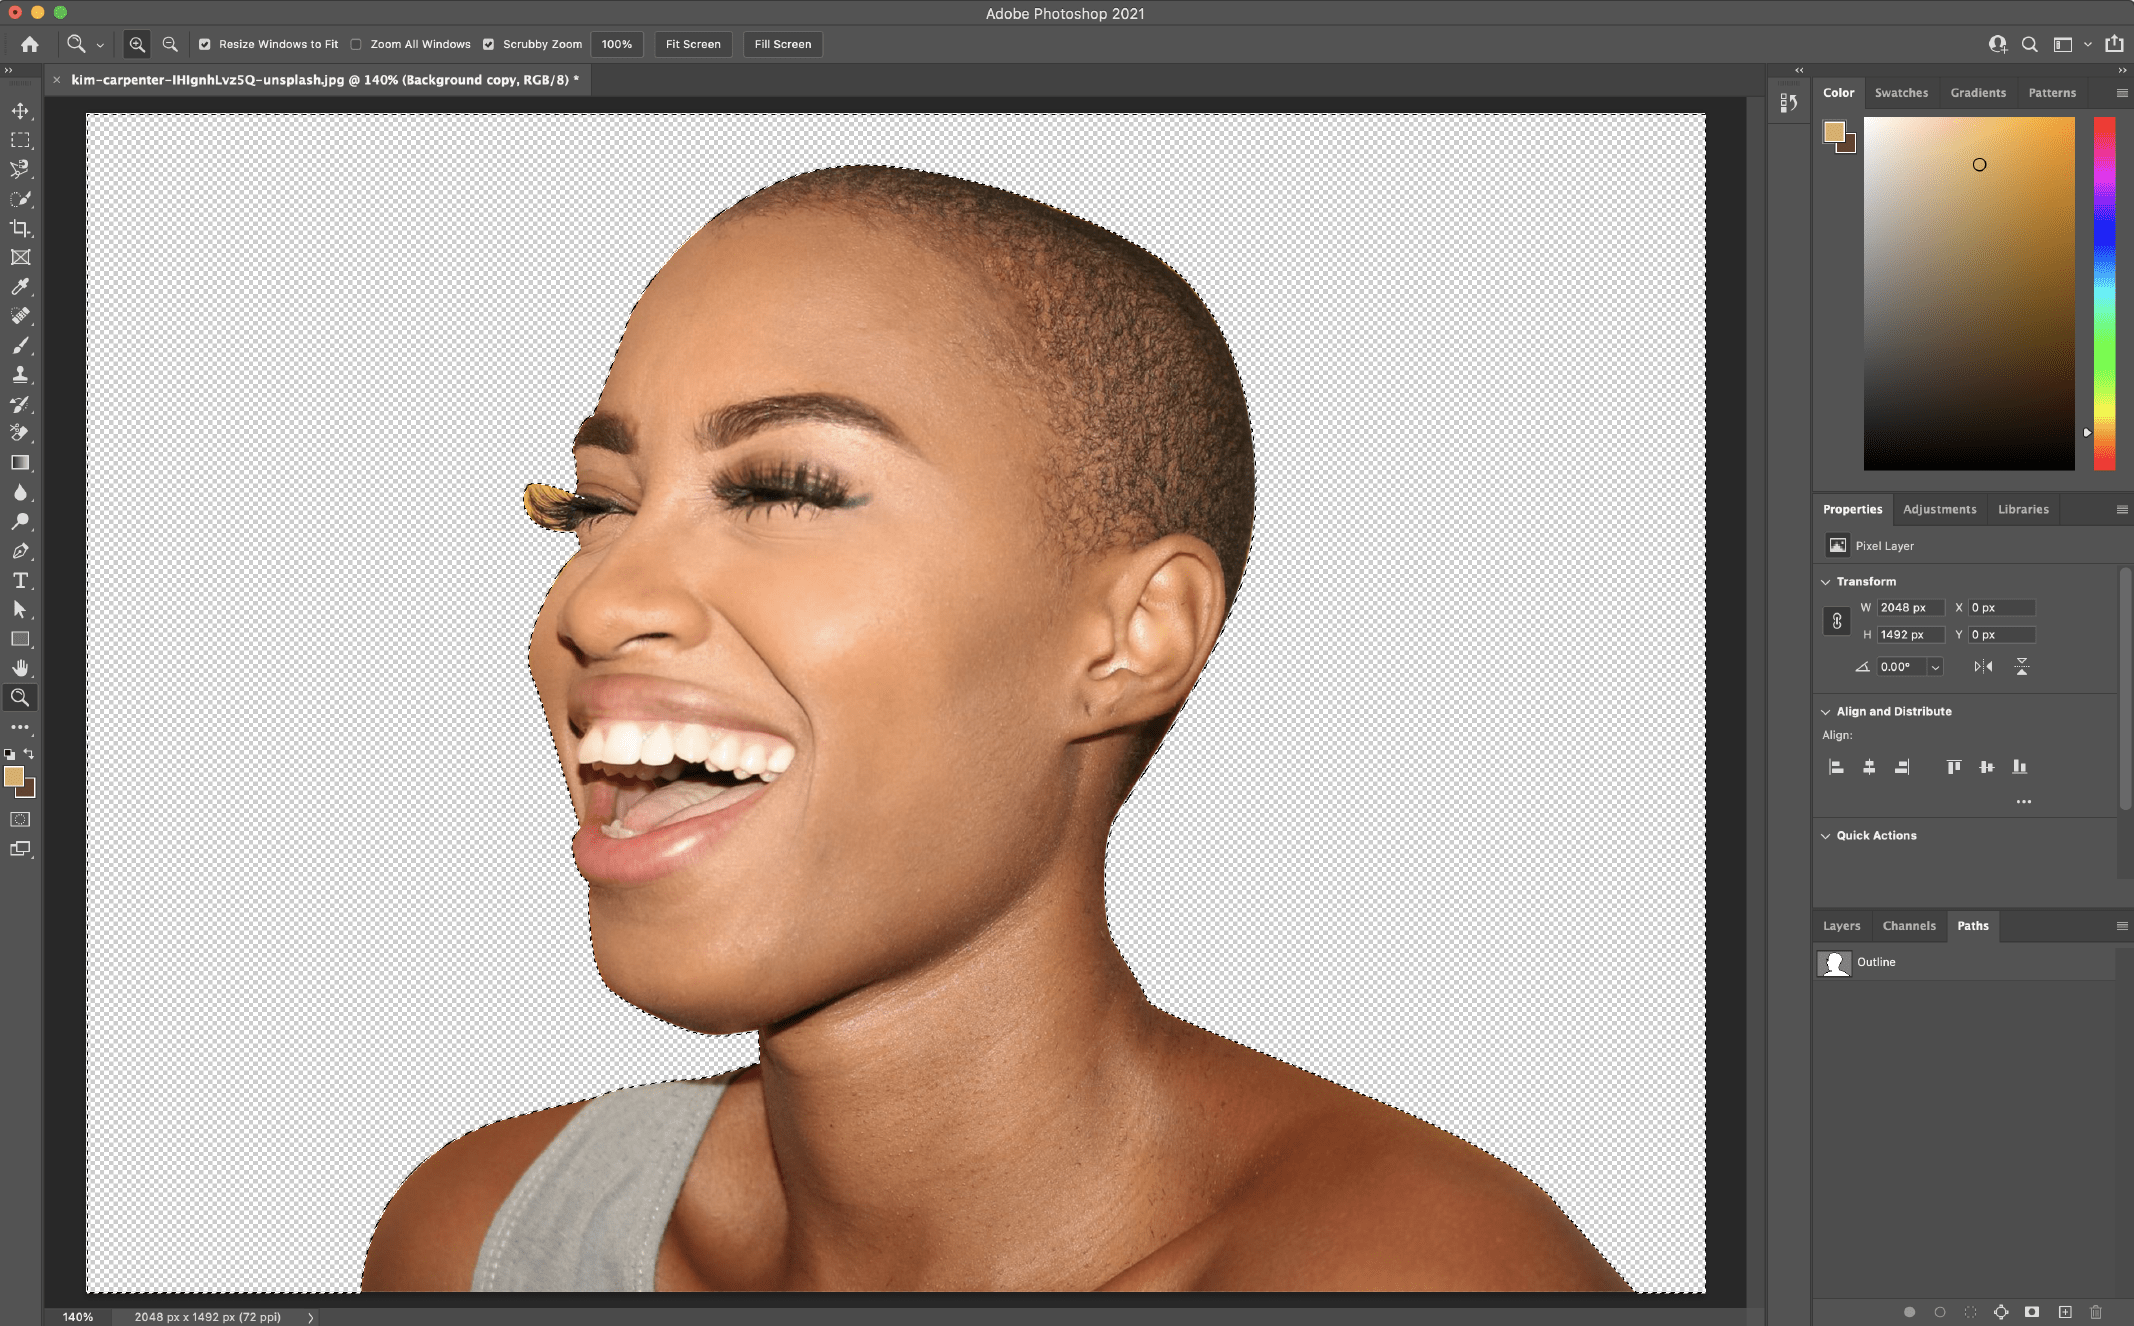
As with the other methods listed, you may find that this doesn’t get you to 100%. Using a combination of the Pen tool and other methods here will help you get closer to your desired result. (For instance, I would use a different method to help refine the woman’s eyelash area in this particular photo.)
For more detailed info on the Pen tool, have a look at this Adobe tutorial.
Photo credit: Kim Carpenter on Unsplash
6. Remove a Background in Photoshop with the Magnetic Lasso Tool
This tool is good to use when the subject is mostly high contrasted from the background and with complex edges, and where you want to save time and have Photoshop detect the path for you.
If the Pen tool is too labor-intensive, or you don’t want to take the time to draw out your subject, the Magnetic Lasso tool may be a good starting point for quickly getting you where you need to be so you can spend your time refining the details.
Magnetic Lasso Tool Steps
- With your image open in Photoshop, right click your Background layer and click Duplicate Layer. In the dialog box that pops up, name your layer (whatever you’d like), and click OK. Click the eye icon to the left of the original layer to turn that layer off.
- Select the Magic Lasso tool from the toolbox on the left. Start drawing along the edge of your subject with the tool. You’ll see it will start drawing the path for you as you move your cursor. Patience is key here, as you’ll want to be slow, steady, and deliberate with your moves.
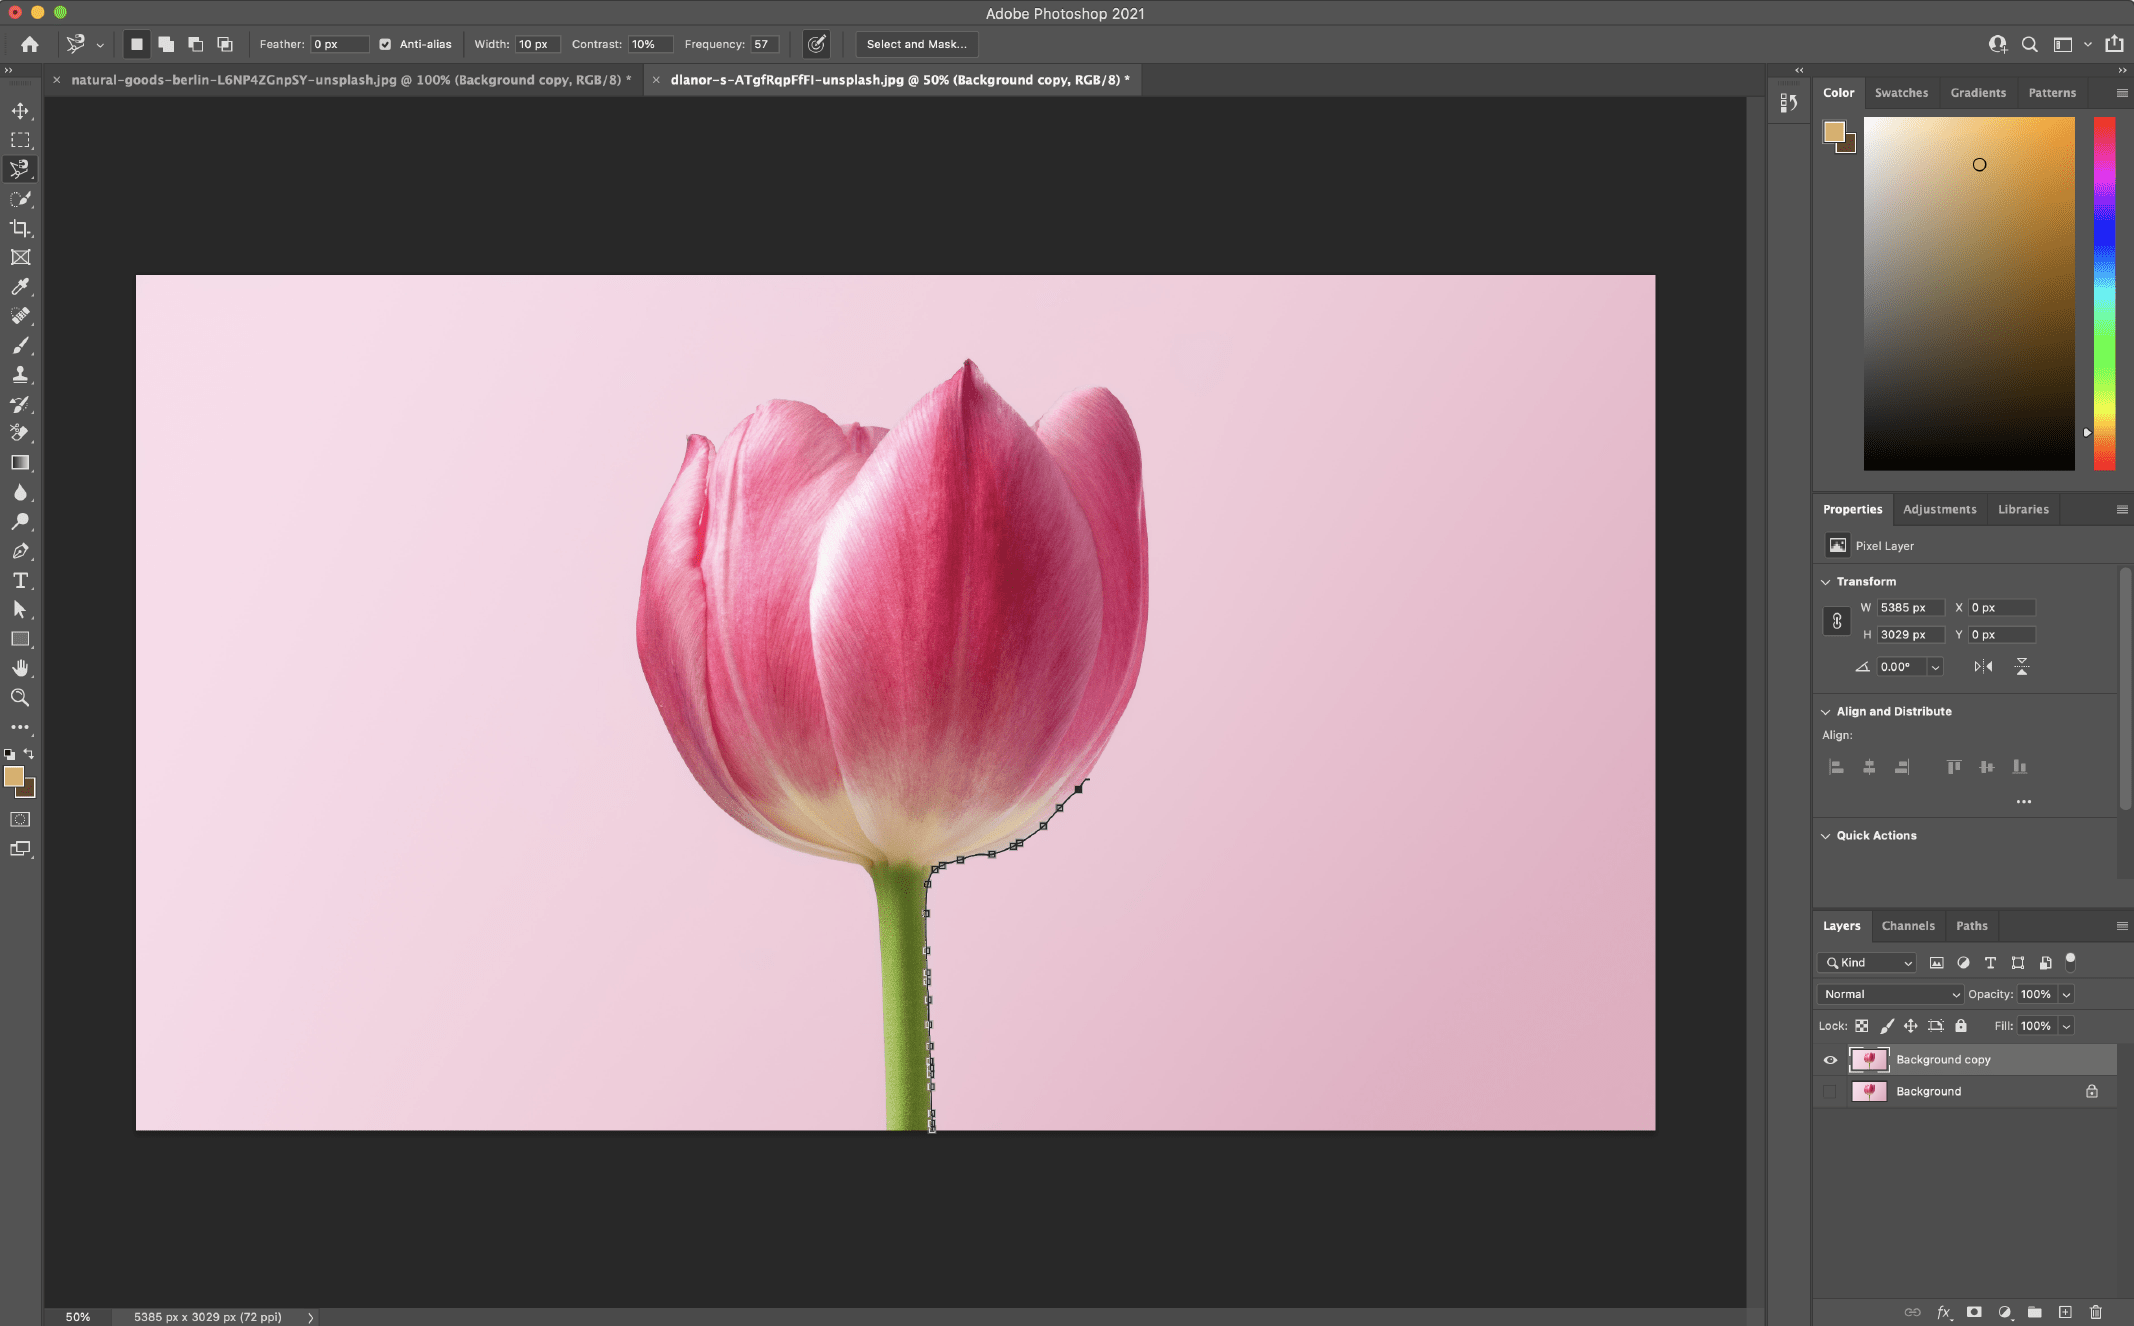
- Once you’ve started the tool, you’ll need to go around your subject completely and connect to your starting point. Once you’ve made it back around to the beginning, click the starting point. The selection will then turn into marching ants around your selection.
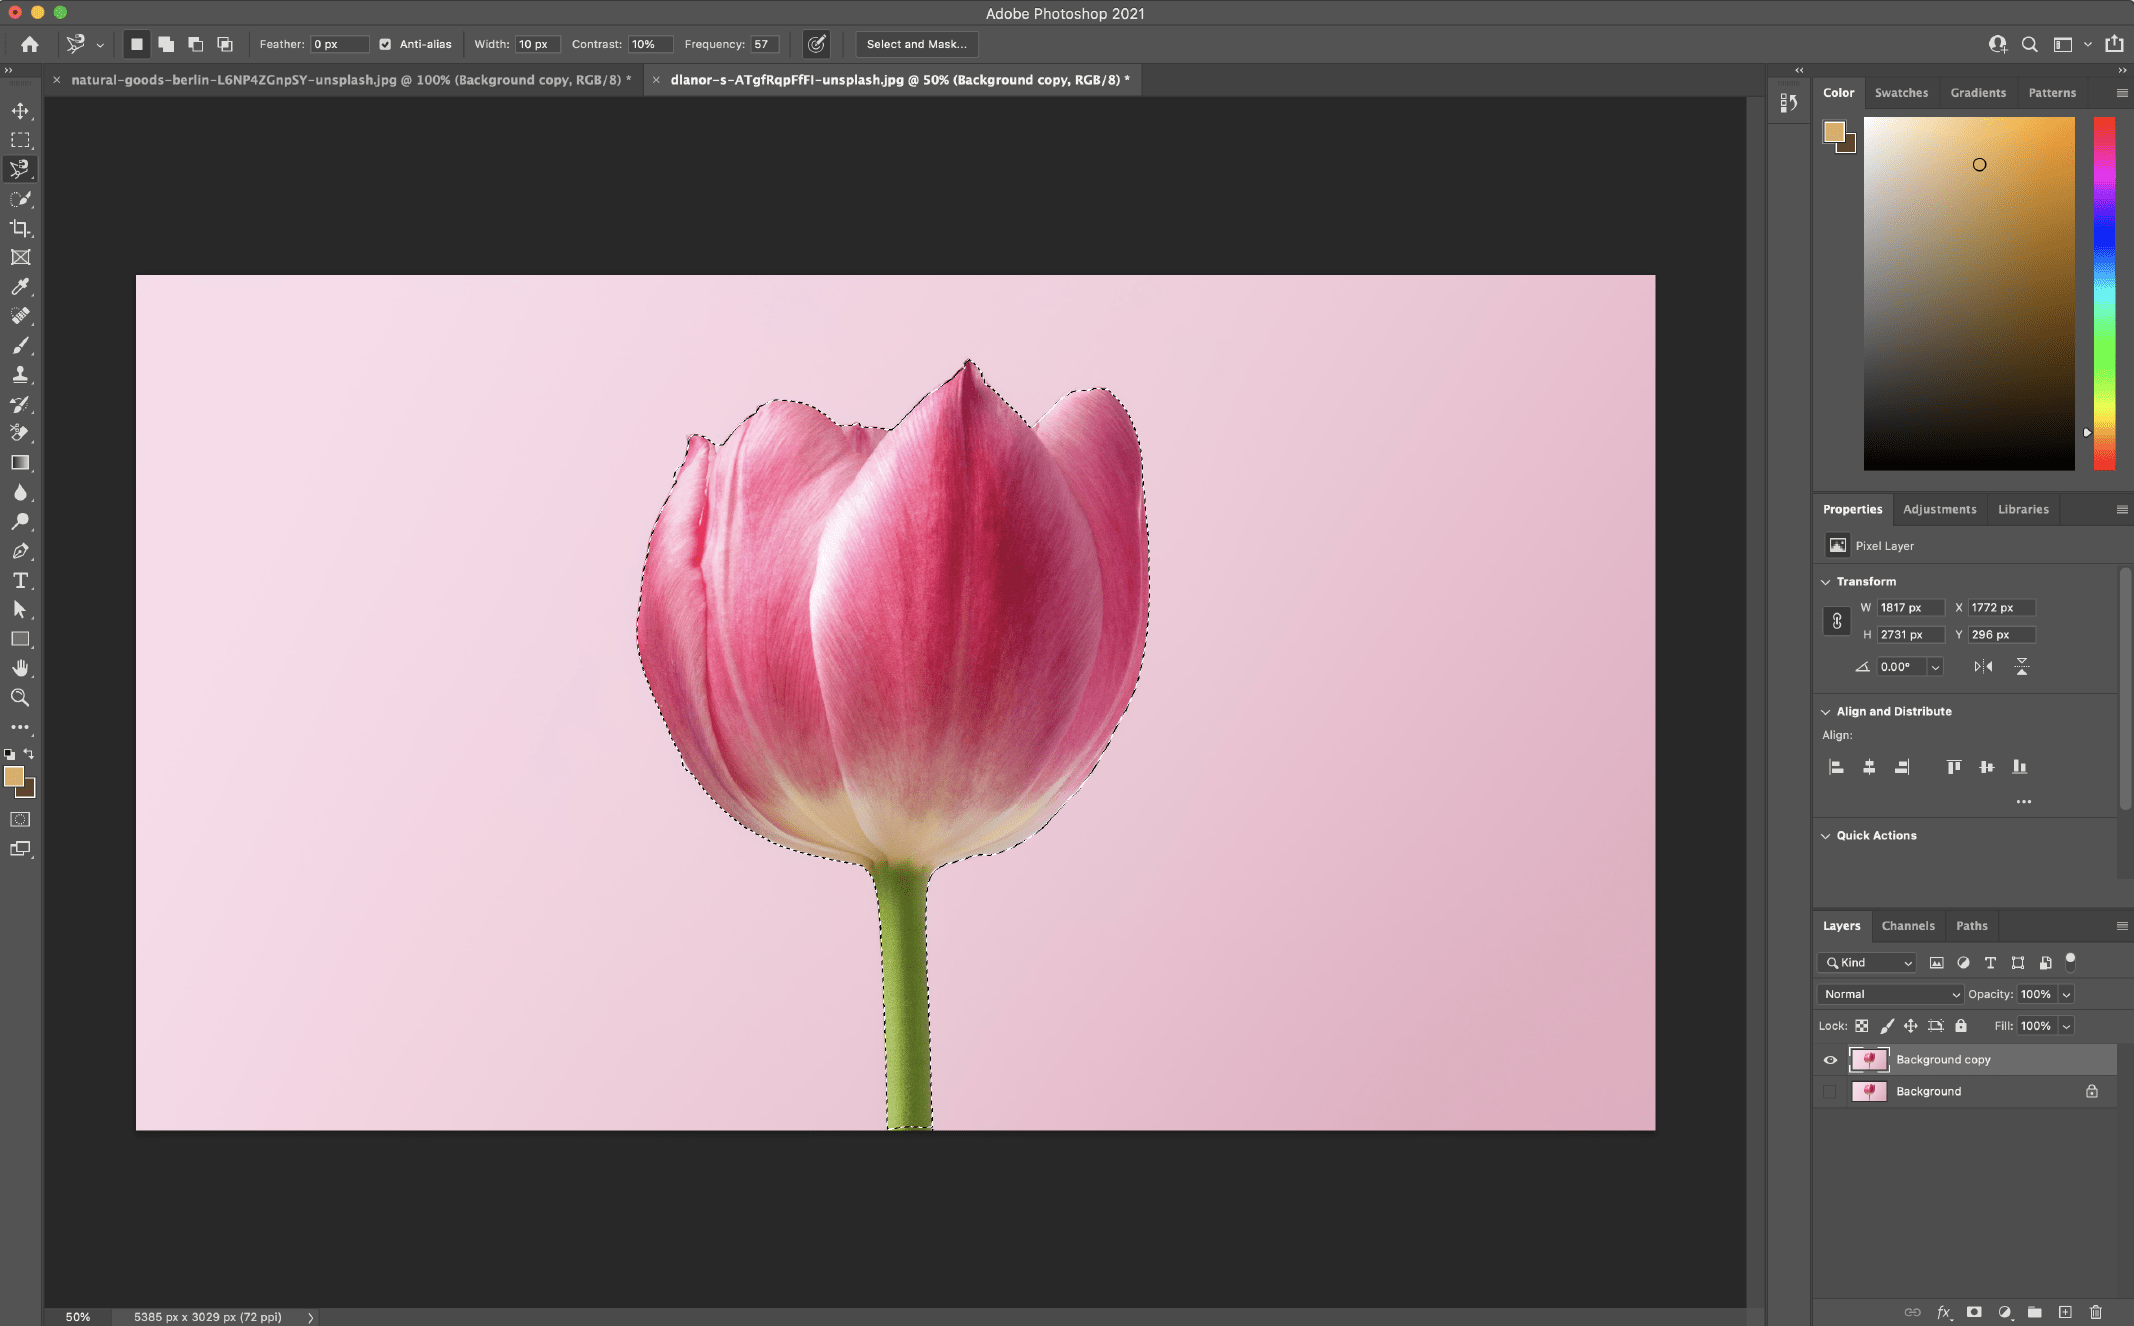
- Save your selection by going to Selection > Save Selection and giving it a name.
- To delete the background, go to Select > Inverse to invert the marching ants (they should now be running around the edge of the image and your subject). Click delete. You should now see the white/gray checkered background instead of your previous background.
If you feel you need to make adjustments to the selection, you can backtrack a couple of steps and redo them to get better results, or use a combination of other techniques listed in this article to get you closer to your desired result.
For more detailed info about how the Magnetic Lasso tool works, check out this Adobe tutorial.
Photo credit: Dlanor S on Unsplash
7. Remove a Background in Photoshop with the Quick Selection Tool
This tool is good to use hwne the subject is somewhat contrasted and/or the image has “wispy” or intricate details, or when you want to save time and need decent accuracy and the ability to quickly refine.
The Quick Selection tool is perhaps my favorite method here because it’s the fastest way to select a subject and allows for quicker refinements. It also can be used on a much wider range of possible photos than other methods listed here, because it works by detecting color changes to determine where the selection should be.
Quick Selection Tool Steps
Removing a Background Image with the Quick Selection Tool
- Duplicate the image layer
With your image open in Photoshop, right-click your Background layer and click Duplicate Layer. In the dialog box that pops up, name your layer (whatever you’d like), and click OK. Click the eye icon to the left of the original layer to turn that layer off.
- Select the Quick Selection tool
Select the Quick Selection tool from the toolbox on the left (may be hidden under the Object Selection tool).
- Paint the subject of the image
Using the tool, start painting your subject. You’ll see the marching ants start appearing while you paint. To adjust your tool size, use the [ or ] keys to decrease or increase the size.
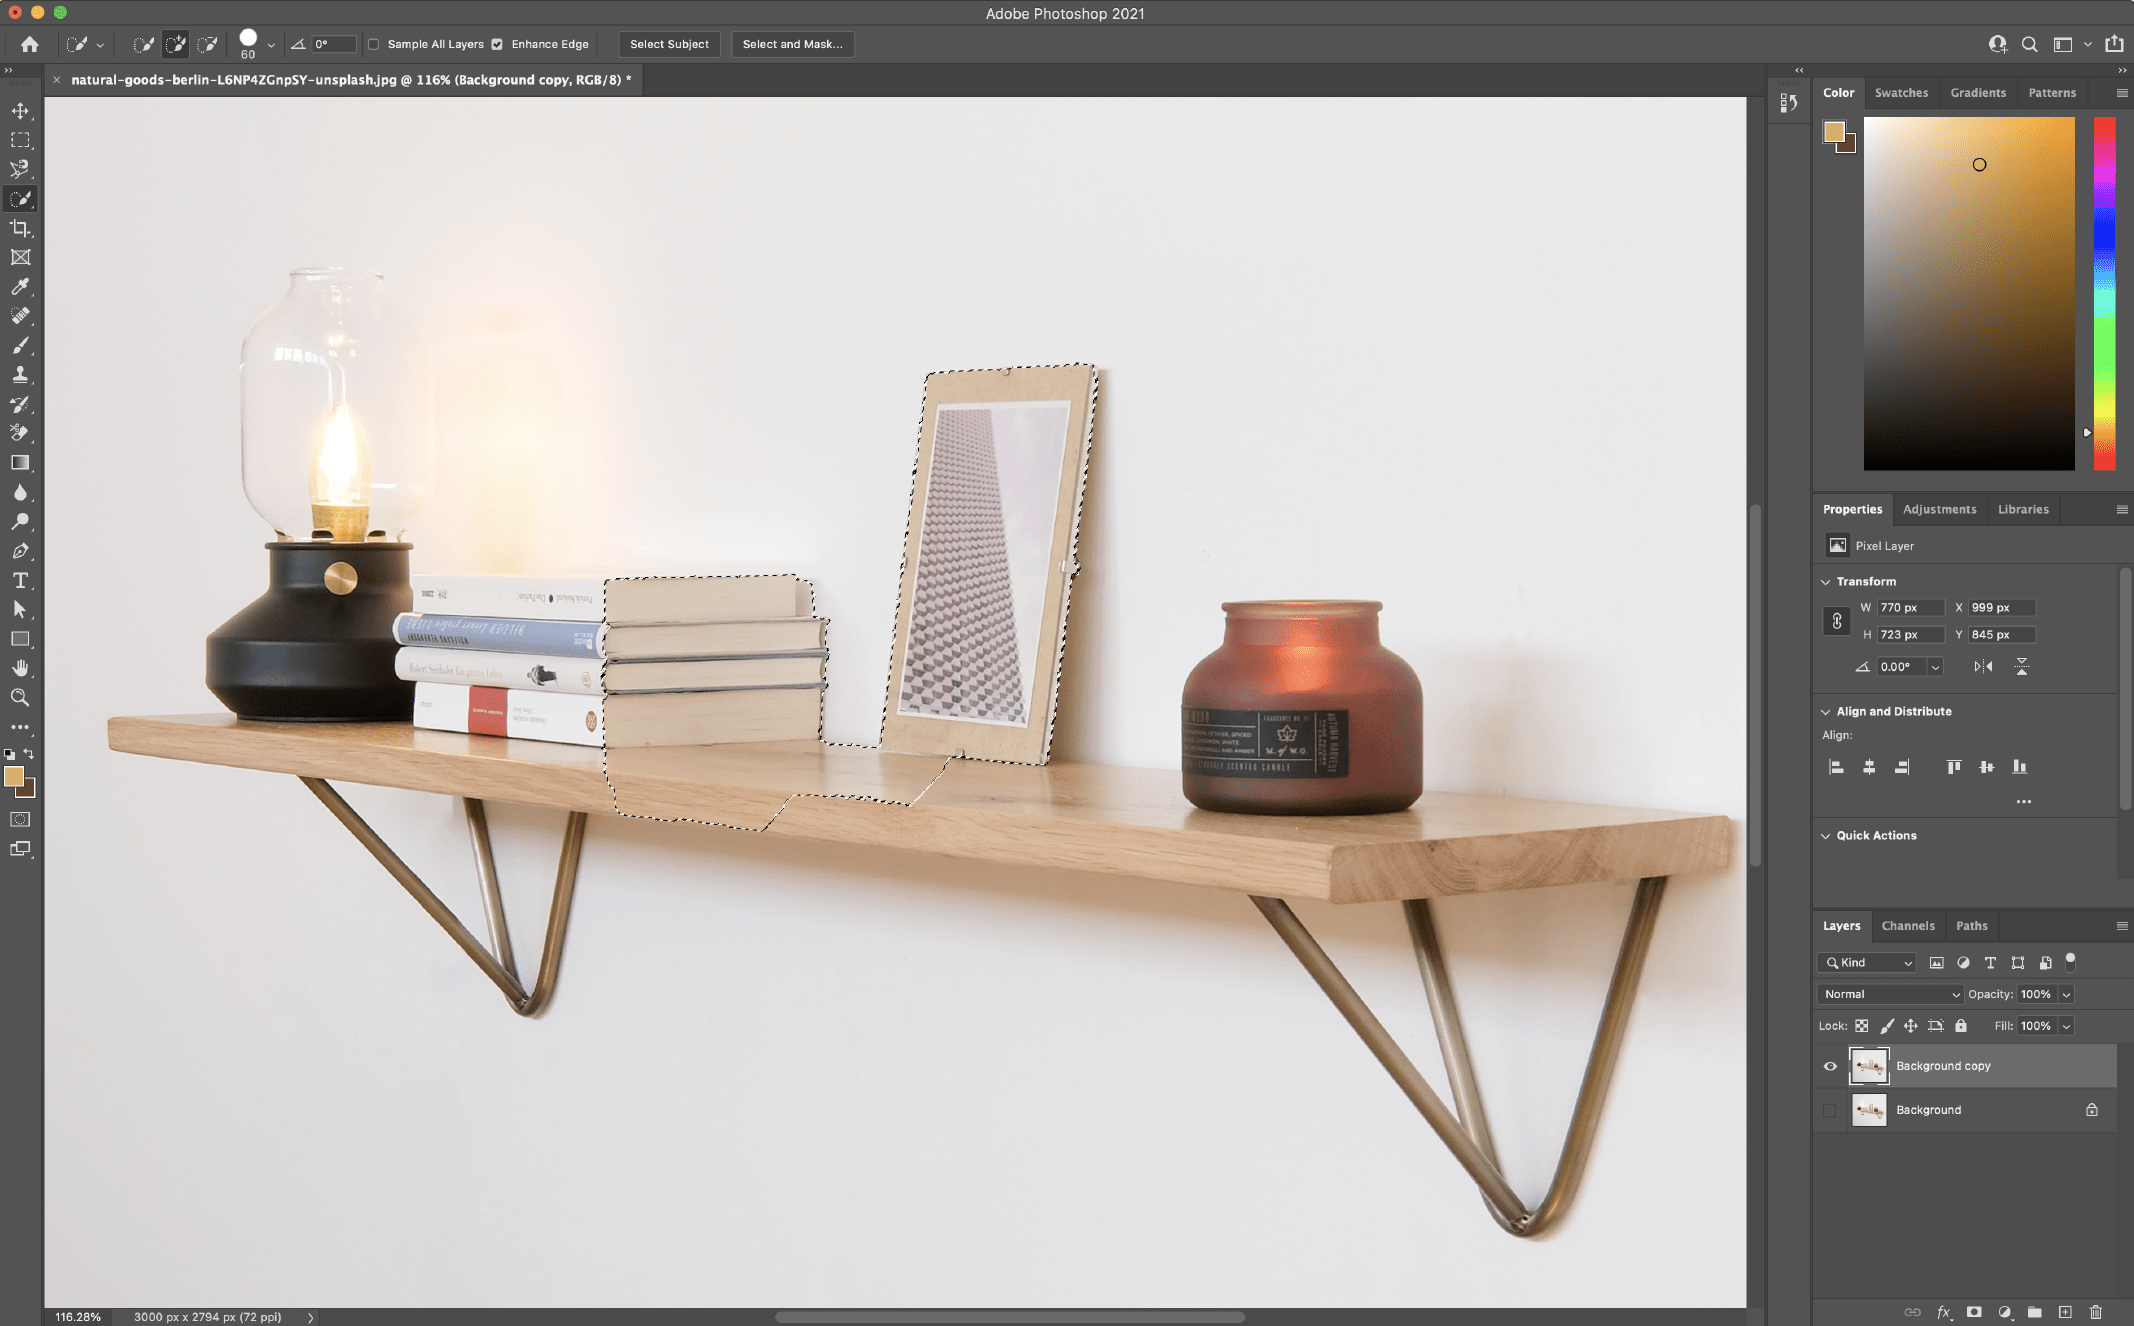
- Clean up the selection path
If you find you’ve painted outside of the subject, click and hold the Option key (macOS) or Alt key (Windows) and you’ll see the center of the tool turn from a
+symbol to a-symbol, indicating it will now take away from the selection. Paint on the part of the selection you want to remove while holding the Option/Alt key.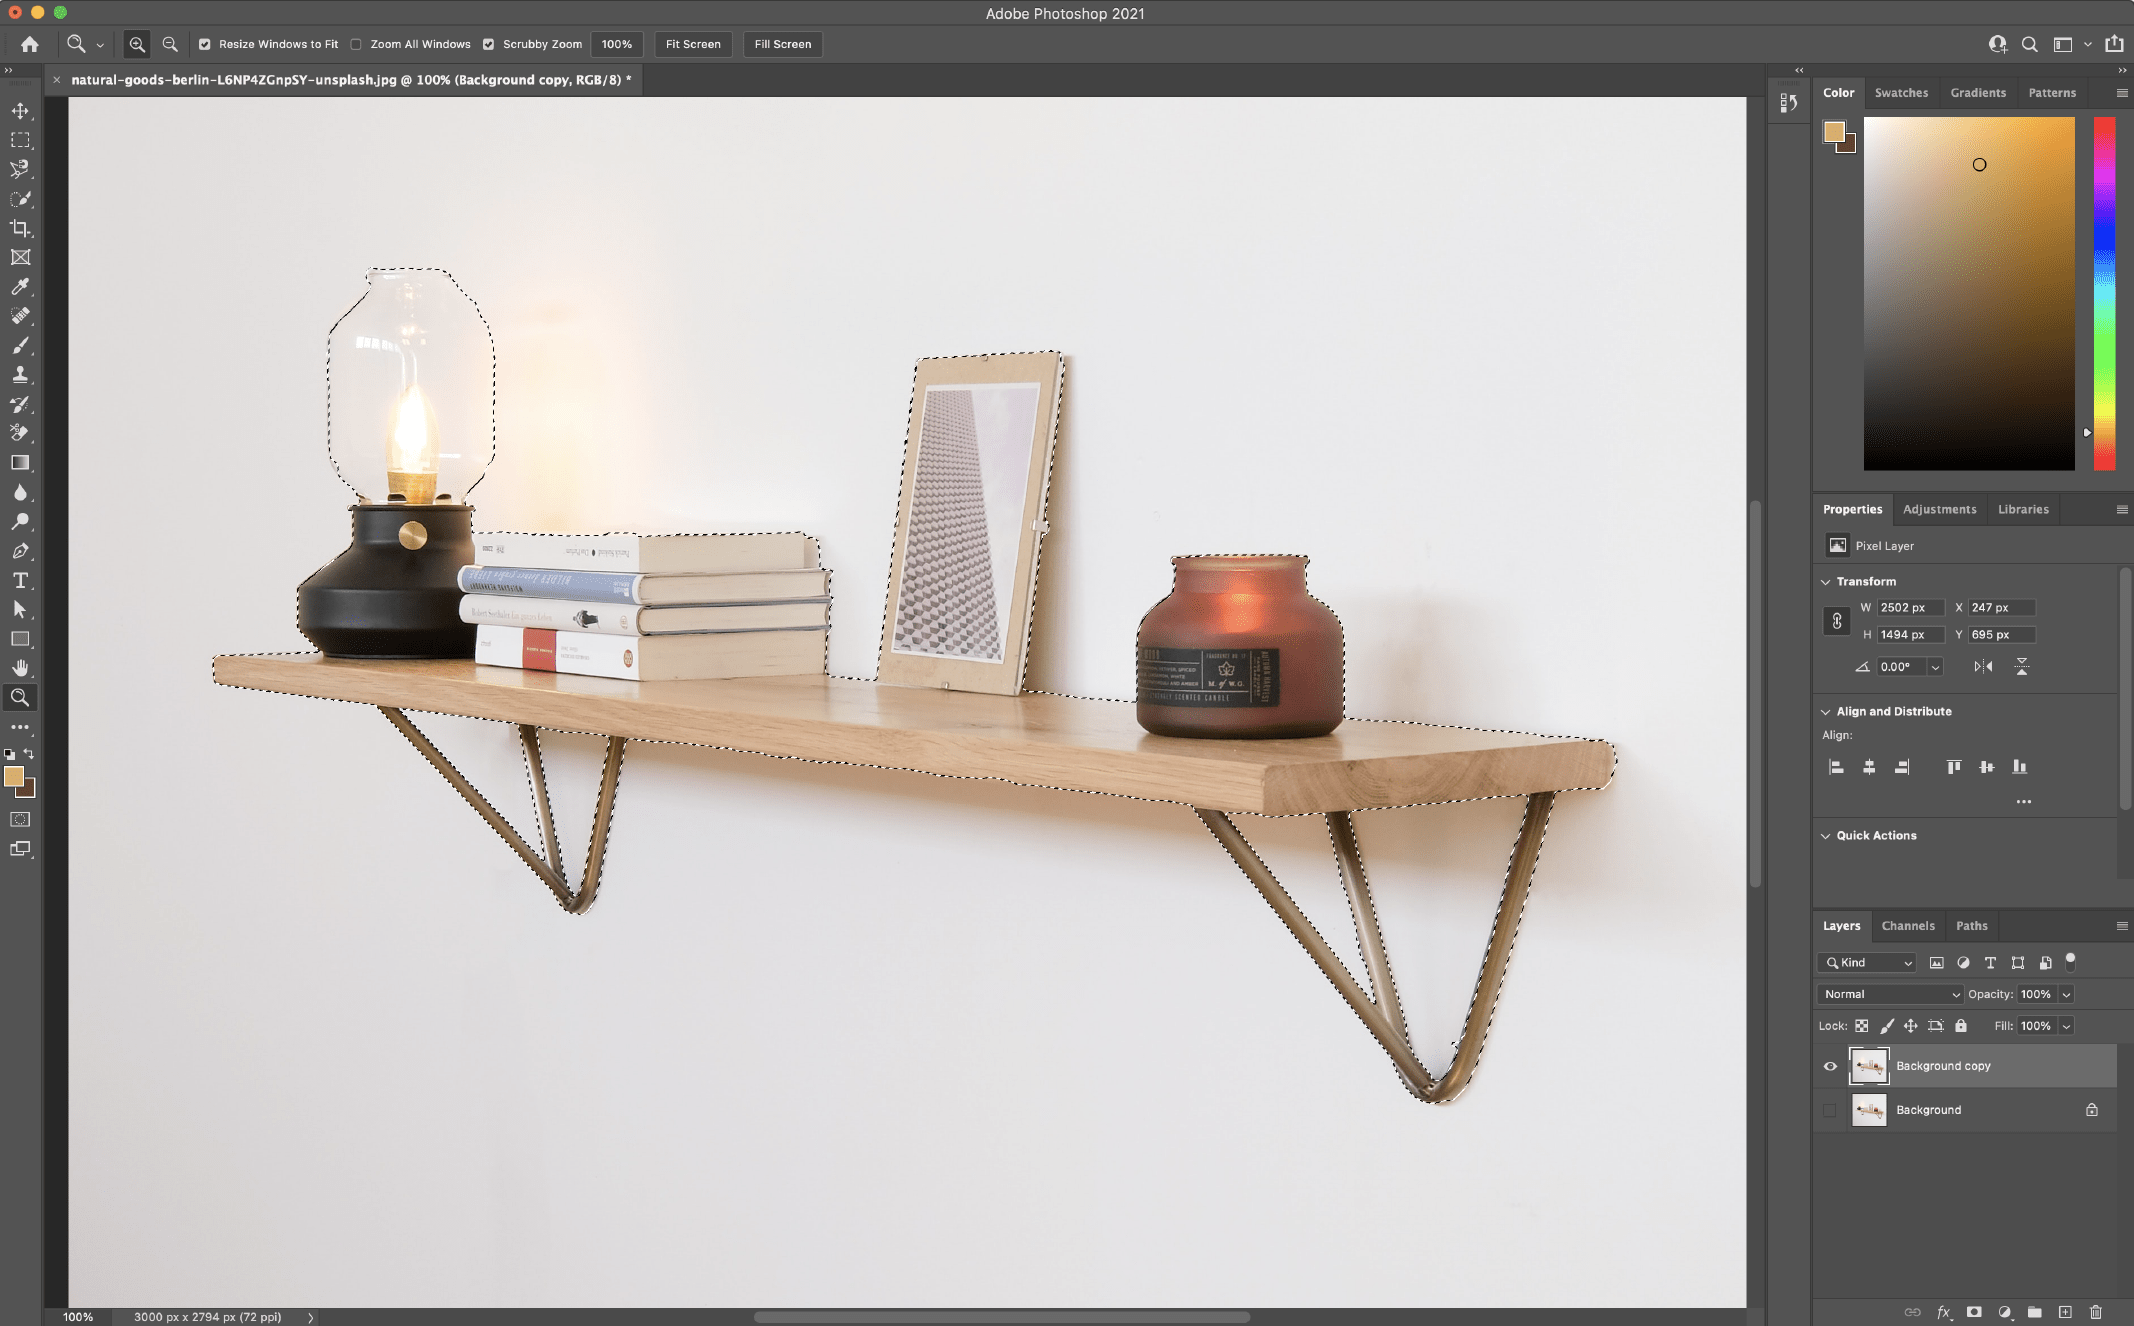
- Save your selection
Save the selection by going to Select > Save Selection and giving it a name. This is in case you want to come back and make adjustments.
- Delete the background
To delete the background, go to Select > Inverse to invert the marching ants (they should now be running around the edge of the image and your subject). Click delete.
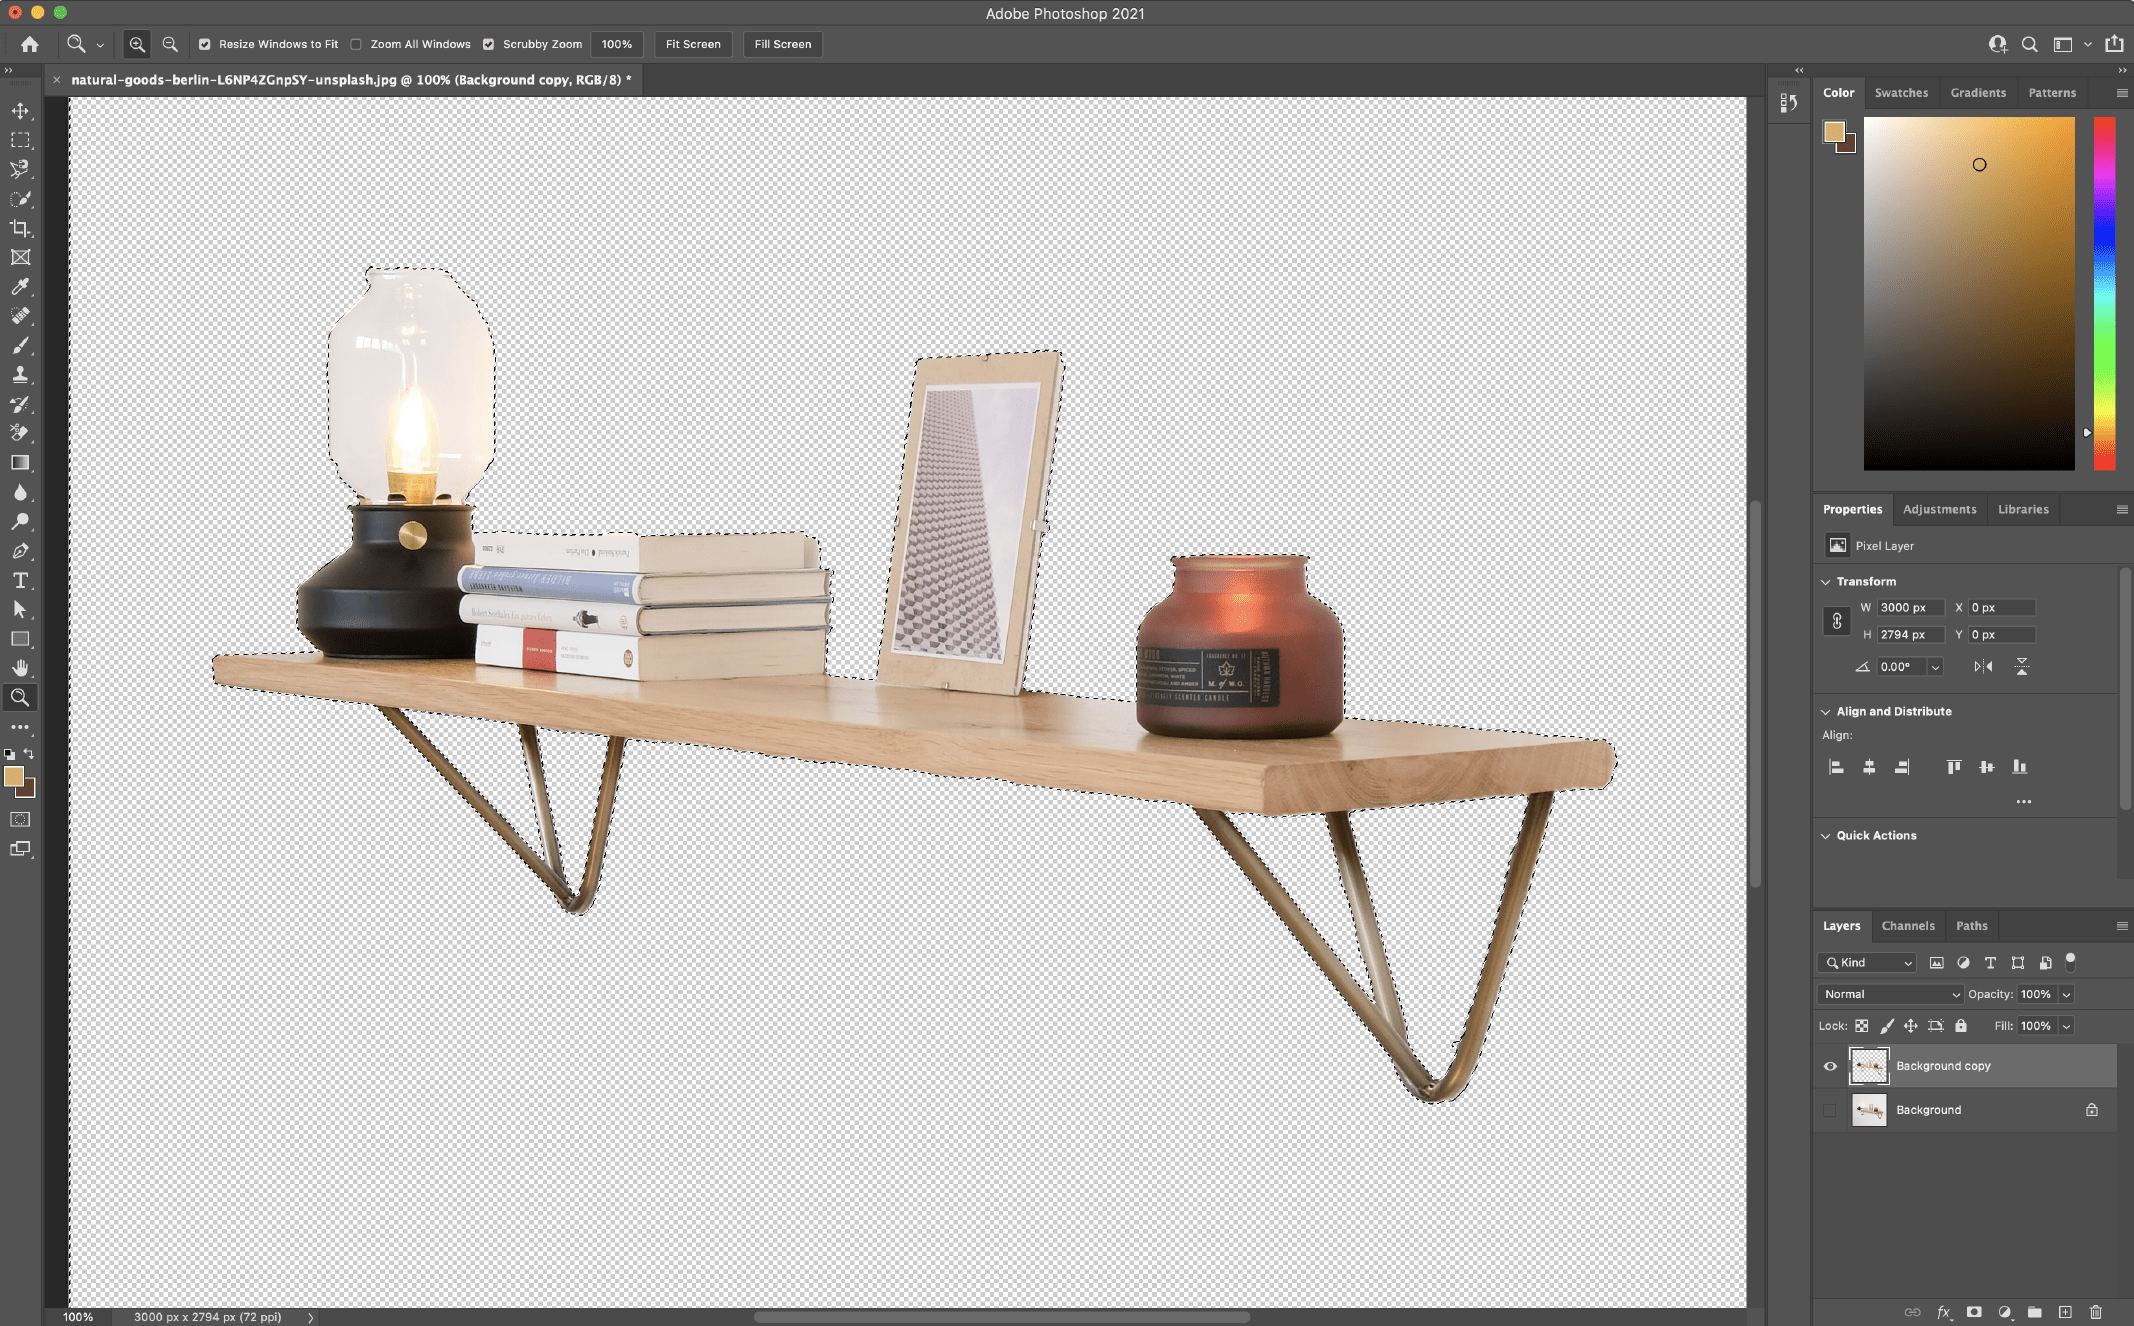
If you find you’ve missed a spot or need further refinements, you can backtrack a couple of steps to do the refinement and resave your selection and try again.
For more detailed information on how the Quick Selection tool works, have a look at this Adobe tutorial.
Photo credit: Natural Goods Berlin on Unsplash
Removing a Background in Photoshop Has Never Been Easier
Through these methods in Photoshop, it has never been easier to remove a background from an image. Whether you’re looking for a quick and easy way to pull a subject out of a photo, or you need a way to replace the background of a more detailed image, the methods above will help you get to your end result much quicker and with better results.
Knowing which method to use and when will not only make your workflow go much quicker, but you’ll also end up with a much better final image.
Finally, depending on your ultimate use case, if you need to save your image without the background, don’t forget to save it as a transparent PNG so that you can use it in other applications and maintain your new background-free image.
FAQs About Removing Backgrounds in Photoshop
How do I remove the background from an image in Photoshop?
To remove the background from an image in Photoshop, follow these steps:
Open Your Image: Launch Photoshop and open the image from which you want to remove the background.
Select the Background: Use the selection tool of your choice to select the background you want to remove. The “Magic Wand” tool or the “Quick Selection” tool can work well for simple backgrounds, while more complex backgrounds might require the “Pen Tool” for precise selection.
Refine the Selection: After selecting the background, refine the selection using the “Select and Mask” option or the “Refine Edge” tool. This helps to smooth out edges and make the selection more accurate.
Remove the Background: Once your background is selected, press the Delete key (or Backspace on a Windows PC). This will remove the selected background.
Add a New Background (Optional): You can either leave the background transparent or add a new one. To add a new background, create a new layer and place it below the image layer. Then, fill the new layer with your desired background color or image.
Final Touches: To make the edges of the subject blend seamlessly with the new background, you may need to use the eraser tool or layer masks to further refine the edges.
Save Your Image: After you’re satisfied with the result, save your image in a format that supports transparency (e.g., PNG) to preserve the removed background.
These are the basic steps to remove a background in Photoshop. The specific tools and techniques you use may vary depending on the complexity of the image and your editing preferences.
What tool removes background in Photoshop?
In Photoshop, you can use the Remove Tool to remove backgrouns, as explained in teh article above. Or you can use a combination of selection tools to manually isolate the background, and then delete or mask it. The choice of selection tool depends on the complexity of the image and the nature of the background. Some commonly used selection tools include:
Magic Wand Tool: This tool selects pixels of similar color with a single click. It works well for simple backgrounds with distinct contrast between the subject and background.
Quick Selection Tool: This tool allows you to paint over the area you want to select, and it automatically detects the edges of the subject. It’s useful for images with more complex backgrounds.
Pen Tool: The Pen Tool is a precise option for creating paths around the subject. It’s particularly useful for intricate selections and subjects with well-defined edges.
Lasso Tool: The Lasso Tool lets you draw a freehand selection around the subject. It’s helpful for irregularly shaped subjects.
Select and Mask (or Refine Edge): After making a selection, you can use the “Select and Mask” option (or “Refine Edge” in older versions of Photoshop) to fine-tune the selection and refine the edges, making the transition between the subject and the background smoother.
After using these selection tools to isolate the background, you can delete it or add a layer mask to hide it. The specific method you use depends on your desired result. So, there isn’t a single tool for background removal, but rather a combination of tools and techniques to achieve the desired effect.
How do I remove the background from a logo in Photoshop?
To remove the background from a logo in Photoshop, follow these steps:
Open Your Image: Launch Photoshop and open the image containing the logo.
Select the Logo: Use one of the selection tools like the Magic Wand, Quick Selection, or the Pen Tool to select the logo. Ensure that the logo is completely selected, leaving the background unselected.
Refine the Selection: To make the logo selection more precise, go to “Select” > “Select and Mask” (or “Refine Edge” in older versions). Adjust the settings to smooth out the edges and improve the selection as needed.
Invert the Selection: With the logo selected, go to “Select” and choose “Inverse.” This inverts the selection, so now the background is selected instead of the logo.
Delete the Background: Press the Delete key (or Backspace on Windows) to remove the selected background. The logo should now be on a transparent background.
Save the Logo: After you’ve removed the background, save the logo as a file format that supports transparency, such as PNG, to preserve the transparent background. To do this, go to “File” > “Save As” and select the desired format
How do I remove a white background in Photoshop?
To remove a white background in Photoshop, follow these steps:
Open Your Image: Launch Photoshop and open the image with the white background that you want to remove.
Select the Magic Wand Tool: Click on the “Magic Wand” tool in the Photoshop toolbar.
Tolerance Setting: Adjust the tolerance setting in the options bar at the top. A lower tolerance selects only very similar white tones, while a higher tolerance selects a wider range of tones. Start with a moderate tolerance setting (e.g., 32).
Select the White Background: Click anywhere on the white background. The Magic Wand tool will select all connected areas of similar color. If your image has anti-aliased edges or slight gradients, you might need to experiment with the tolerance setting to ensure all the white background is selected.
Refine the Selection (Optional): After selecting the white background, you can refine the selection by going to “Select” > “Select and Mask” (or “Refine Edge” in older versions). This allows you to smooth the edges and make any necessary adjustments to the selection.
Delete the Background: Press the Delete key (or Backspace on a Windows PC) to remove the selected white background.
Check for Residual White Areas: After deletion, zoom in and check for any remaining white fragments or edges. Use the Eraser tool or the Brush tool with a soft brush to clean up any unwanted white areas.
Save Your Image: Save your image in a format that supports transparency (e.g., PNG) to preserve the background removal. To do this, go to “File” > “Save As.”
Owner and Creative Director of January Creative in Nashville, Tennessee, Amber has been a self-employed graphic and web designer for over 14 years, starting early in her collegiate career. Amber has a unique passion for not only all things design, but all things business as well. Freelancing as a student gave Amber an opportunity to write a student freelancing book, appropriately named Students Freelancing 101: A Start to Finish Course to Becoming a Student Freelancing, to help other students who want to start freelancing.


