Corrie Haffly has just added the finishing touches to Photoshop CS6 Unlocked, 101 Tips, Tricks and Techniques – the second edition of her previous best-selling book – The Photoshop Anthology.
Let’s have a look inside the book, with an excerpt from Chapter 3, which shows you how to make a super cool shiny plastic button. Over to you Corrie …
Making a Shiny Plastic Button
The iPhone interface brought back the shiny plastic button look, à la Figure 3.23. In this solution, you’ll learn how to make your own, starting with a basic gradient button.
 Figure 3.23. A shiny plastic button with icon
Solution
- Create a rounded rectangle vector shape using the Rounded Rectangle Tool (U). With your vector shape layer selected, open the Layer Style dialog box by clicking on the Add a layer style button at the bottom of the Layers panel; then select Gradient Overlay… from the menu that appears. The options for the gradient overlay will be displayed—we want to apply a gradient overlay such as in Figure 3.24.
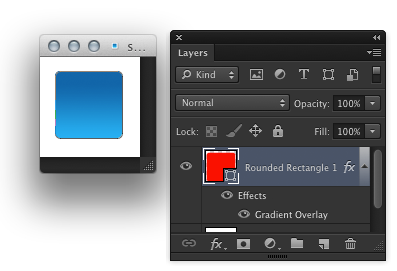 Figure 3.24. Starting with a gradient button
Adjust your gradient by clicking on the Gradient patch in the Layer Style dialog box. This will bring up the Gradient Editor dialog box. You’ll want the gradient to have a bright color on the bottom and a darker version of the same color on top. Start the darker color patch position at around 80%, as represented in Figure 3.25.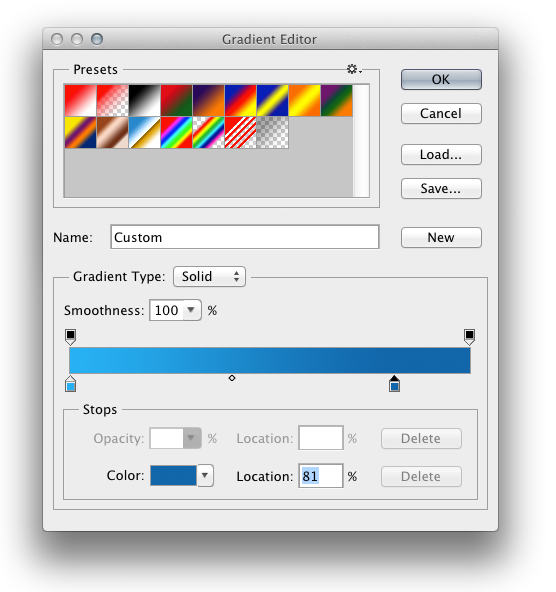 Figure 3.25. Manipulating your gradient settings
 - Now we will work on the highlight layer. Duplicate your rounded rectangle layer by typing Command–J (Ctrl–J on Windows). In the Layers panel, double-click the Gradient Overlay layer effect to bring up the Layer Style dialog box; then click the gradient color patch to edit the gradient. Change both color patches using the bottom color stops to white. Then, click on the top-left opacity stop and change the Opacity value to 50, as shown in Figure 3.26. Click OK, and OK again.
 Figure 3.26. Editing the gradient settings for your highlight layer
 - Select the Delete Anchor Point Tool. Click on the bottom two points, highlighted in Figure 3.27, to remove them.
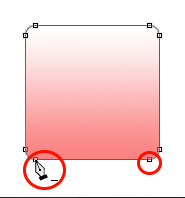 Figure 3.27. Deleting anchor points
 - Switch to the Convert Point Tool, and click on the two remaining bottom points so that they change to corner points, as shown in Figure 3.28.
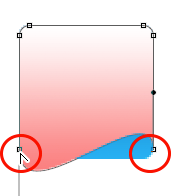 Figure 3.28. Converting anchor points
 - With the Direct Selection Tool (A), select the converted points and move them so that they’re about two-thirds of the way up the button, as depicted in Figure 3.29.
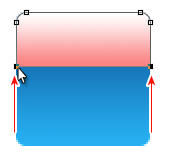 Figure 3.29. Moving anchor points
 - Switch to the Add Anchor Point Tool and click on the middle of the new bottom edge, shown in Figure 3.30, to add a point.
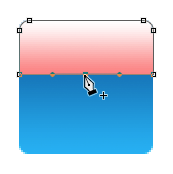 Figure 3.30. Adding another anchor point
 - Grab the Direct Selection Tool (A) again and drag the new center point down to just past the button’s center, as shown in Figure 3.31, to form a curve.
 Figure 3.31. Making the bottom curve
 - The original color of your layer may show through, so change the Fill to 0 in the Layers panel. Lower the Opacity slightly; in Figure 3.32, I’ve changed it to 65%.
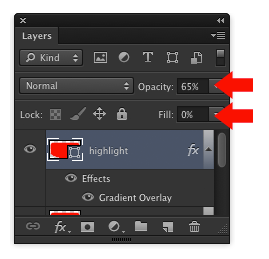 Figure 3.32. Changing the fill to 0
 - Your shiny plastic button can now be seen in Figure 3.33. If you decide to add text or an icon to it in Photoshop, apply a slight drop shadow effect for an app-button feel.
 Figure 3.33. Plastic button with icon, and the Layers panel that produced it
Discussion
By creating a gradient button using vector shapes and layer styles, we now have a scalable button that’s easy to edit. If we want to change its colors, all we have to do is change the hue of the gradients and effects in our layer styles. If we want our button to be a different shape, we can use the Direct Selection Tool (A) to modify the vector path. This solution demonstrates an important concept about layers: even when the fill of a layer is set to 0%, the layer styles are still evident! You may find this useful when you’re creating your own effects. What’s also cool about this technique is that once you’ve created your first shiny plastic button, it’s very easy to create other buttons—just copy the layer effects.
—
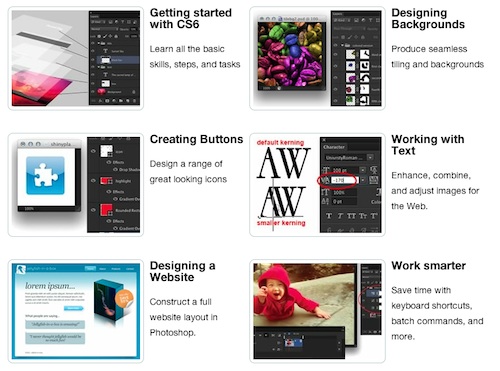
Thanks Corrie for letting us have a look inside! For heaps more: how-to’s, examples and timesaving suggestions, check out the full 400+ page copy of the book, which covers:
- Getting Started with CS6: Learn all the basic skills and steps
- Designing Backgrounds: Produce seamless tiling and backgrounds
- Creating Buttons: Design a range of great looking icons
- Working with Text: Manipulate and make your text stand out
- Optimizing Images: Enhance, combine, and adjust web images
- Designing a Website: Design a full website layout in Photoshop
- Working Smart : Save time with shortcuts and batch commands
PLUS … all the exciting NEW CS6 tools, including: Content-aware, Blur gallery, Perspective crop tool, and more.
Grab yourself a copy, and feel free to share your thoughts in the comments (below).
- PRINT Book + Digital EPACK Bundle – for $34 (SAVE 50%)
- Digital EPACK (pdf, epub, mobi) – for $17 (SAVE 42%)
Mick is a digital sales architect with over 13 years experience on the web. He helps businesses, clients and start-ups - plan, action and measure their digital sales success. Including getting hands-on with Google AdWords, conversion rate optimization, retargeting and email marketing.


