Moving your WordPress site to a new host can be a bit stressful. If it’s not done properly, it can result in some annoying and unexpected errors. However, if it’s handled correctly, it should be a stress free experience.
In this tutorial, I’ll demonstrate how to migrate a WordPress site to a new host and domain name, avoiding many of the common problems experienced with migrations.
Note: There are many ways to approach a migration, in this tutorial I’ll be introducing you to a manual approach. It’s not always the easiest option, but once you understand how it works, you’ll be better equipped to tackle any problems you come across when moving sites. If you’re looking for a plugin to use to migrate, try this article that runs through five useful plugins for WordPress backup and migration, but keep in mind that understanding the manual approach presented here will help you considerably when using those.
Key Takeaways
Deactivate All Plugins
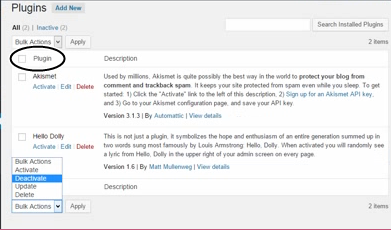
Before you begin, I’d recommend that you deactivate all plugins because, when moving a WordPress site to a new host, the things that are likely to fail are your WordPress plugins. WordPress itself is well designed to adapt to new changes, but the plugins might not be.
Therefore, to deactivate all activated plugins, go to the admin page -> Plugins -> Installed Plugins -> Mark all -> Bulk action -> Deactivate -> Apply
Backing up WordPress Database and Files
It’s best practice to always backup your website before making any changes, and a WordPress migration is no exception. There are a couple of WordPress plugins for doing this, but a manual approach is best if you want to be in complete control of the process.
Now, I’ll show you how to backup your WordPress files and database with a manual approach, and also via a plugin.
Backing up Manually
To back up your WordPress database manually: Log in to your phpMyAdmin, click on your WordPress database and select Export as shown in the image below.
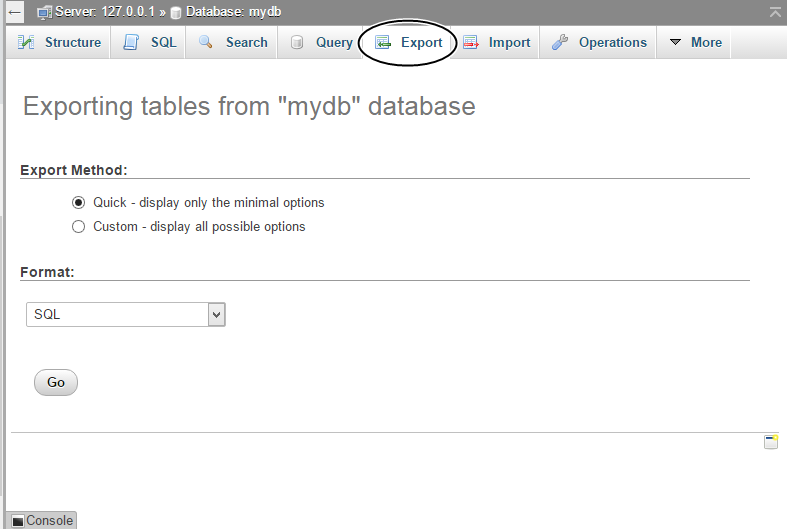
Ensure that you’re exporting in SQL Format and click Go. Your WordPress database will then be downloaded as a .sql file. I recommend that you save the downloaded SQL file to a special folder on your computer so that you can easily locate it later. You can also use the command line to export a copy of your database, you can find more information on that here.
To backup your files manually: I would recommend that you download your complete WordPress installation folder so that you won’t lose anything.
Using any FTP/SFTP client like FileZilla, log in to your host by FTP/SFTP and download your htdocs or public_html folder (or anywhere your WordPress installation resides).
Backing up with a Plugin
Download and install the UpdraftsPlus Backup and Restoration plugin. At the Installed Plugins page, locate the UpdraftsPlus plugin and activate it.
Once you have the plugin installed, at the admin page, go to Settings -> UpdraftsPlus Backups, and then click the Backup.
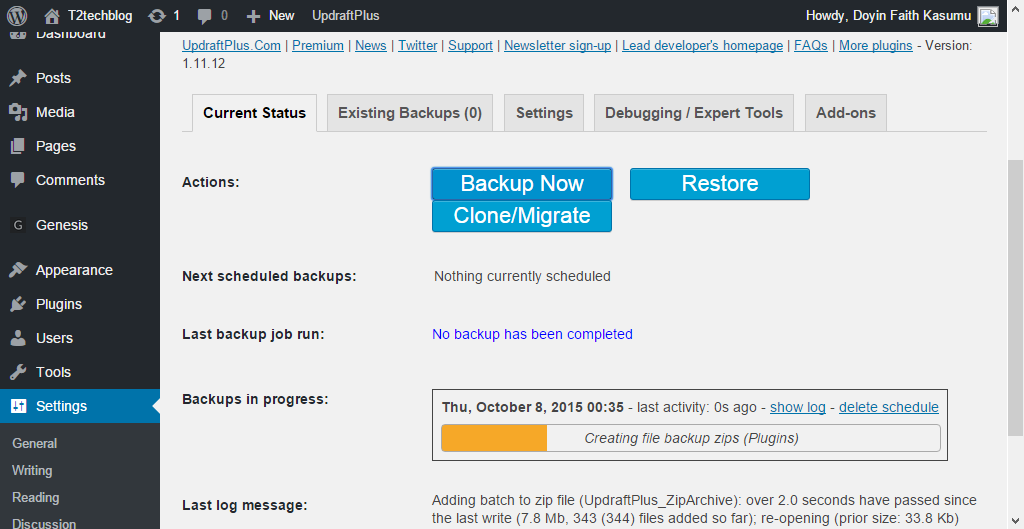
This might take a while depending on the size of your WordPress site, but once the process has been completed, click on the Exisiting Backups tab to download the backup to your computer and then you can move it to a special folder too.
Preparing Your Backup for Upload
Now that we have the backup, we need to modify a few things before we can move on to uploading our backup(s). Before proceeding, log in to phpMyAdmin of your new host and create a new database. Note down the name of the database, as you will be needing it later in this tutorial.
Updating the wp-config.php file
There is some information to be modified in our WordPress configuration file before moving on. Extract the ZIP archive of the WordPress installation folder you downloaded earlier, locate the wp-config.php file and open it for editing using your favorite text editor such as Notepad and Notepad++.
Edit the lines below, replace with the details of your new host and save.
define('DB_NAME', 'replace_with_database_name_you_noted_down');

/** MySQL database username */

define('DB_USER', 'replace_with_new_host_mysql_user_name');

/** MySQL database password */
define('DB_PASSWORD', 'replace_with_new_host_mysql_password');

/** MySQL hostname */
define('DB_HOST', 'replace_with_new_mysql_host');
Uploading Your Backup
We’re almost done. The next action to take is to upload your modified WordPress installation folder to the new host via FTP/SFTP.
After uploading is completed, proceed to upload your database backup.
To upload the database backup, log in to your phpMyAdmin in your new host and click the Import menu as shown below.
![]()
Select the SQL database backup and upload.
Updating the WordPress Home URL and Site URL
There are several ways to set your URL for WordPress, we’ll discuss a few common methods.
If you’re moving to a new domain too, ensure you have successfully pointed your new domain to your hosting account (refer to your hosting support documentation for the exact details).
Using wp-config.php
You can set your URLs by adding the following lines to wp-config.php, this overrides and will disable these options in the WordPress dashboard.
define('WP_HOME','http://example.com');
define('WP_SITEURL','http://example.com');
The WordPress Codex has a good explanation of this.
Using a WordPress Theme functions.php File
Paste the below lines in your active theme’s functions.php file immediately after the initial < ?php line, using the editor provided by an online FTP/SFTP client, or your preferred text editor.
update_option ( 'siteurl', 'http://your_new_domain_name.com' );

update_option ( 'home', 'http://your_new_domain_name.com' );
Replace the http://your_new_domain_name.com with your new domain URL. The above code will automatically update the siteurl home option names with your new blog URL in the database. Visit your WordPress login or admin page and your site should work.
Once your site is back up, ensure that you delete the lines you added to your theme’s function.php file to prevent the updating each time your site is viewed.
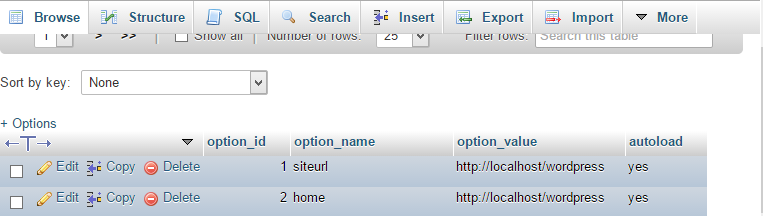
Manually Updating the WordPress Home URL and Site URL
To manually update your WordPress Home URL and Site URL, login back to your phpMyAdmin, open your WordPress database, click on the wp_options table and modify the values of the site_url and home column with your new URL.
Reactivating All Plugins and Updating Permalinks
Now that everything is working fine, go ahead and activate your necessary plugins. To do that, navigate to Plugins -> installed plugins, select activate from the Bulk action drop down and hit the Apply button.
To update your permalinks, go to Settings -> Permalinks, select your desired permalinks structure and Save Changes.
301 Redirection Setup
To transfer your old domains SEO juice (or SEO value) to the new one, it’s important that you set up a 301 redirect as follows.
Open the .htaccess file in your old WordPress install folder and append the rewrite rules below so that anyone visiting your site using your old domain URL will be redirected to the new domain.
<IfModule mod_rewrite.c>

RewriteEngine On

RewriteCond %{HTTP_HOST}^olddomain.com$

[OR]

RewriteCond %{HTTP_HOST}^www.olddomain.com$

RewriteRule (.*)$ http://www.newdomain.com/$1 [R=301, L]

</IfModule>
Some Useful Tips
php.ini and .htaccess files
These files can contain settings that only work with your previous hosting, so if things don’t work, check these files first. Try renaming or commenting out various lines, and look for hard coded paths that might not exist on your new environment.
Caching Plugins
Some caching plugins will modify your .htaccess or create files to absolute paths that might not exist on your new hosting setup.
Google reCaptcha Plugin
In case you have any Google reCaptcha plugins installed, you should remember to get a new API key for your new domain, so that the plugin won’t find it difficult to display the reCaptcha.
Jetpack Plugin
Also, if you have the Jetpack plugin installed, you should remember to re-connect your WordPress site to WordPress.com because you’ve moved to a new domain.
Genesis Club Lite Display Module
If you have the Genesis Club Lite plugin installed, and the display module is activated, you should remember to change the domain part of your URL from the old domain to the new one. This is done at Genesis Club Lite -> Display -> Logo effect the change and save the changes.
Conclusion
In this tutorial, I walked through how to move a WordPress site to a new host and how to change a domain name associated with it if you need to. If you’ve used absolute URLs in your content, you’ll need to update these too. Many plugins also need to be updated, but hopefully this points you in the right direction.
Before you start any site migration, I’d highly recommend reading the WordPress Codex for even more details on the various processes.
If you have any questions or suggestions please let us know in the comments below, it’s a broad topic so I’d love to hear your feedback and ideas on your own approach.
Frequently Asked Questions about Migrating a WordPress Site to a New Domain and Hosting
What are the potential risks of migrating a WordPress site to a new domain and hosting?
Migrating a WordPress site to a new domain and hosting can be a complex process. If not done correctly, it can lead to data loss, broken links, and a drop in search engine rankings. It’s crucial to back up your site before starting the migration process to prevent any data loss. Also, ensure to update all internal and external links to reflect the new domain to avoid any broken links. Lastly, to maintain your SEO rankings, set up proper 301 redirects from your old domain to the new one.
How can I ensure that my SEO rankings are not affected during the migration?
To ensure your SEO rankings are not affected during the migration, it’s important to set up 301 redirects from your old domain to the new one. This tells search engines that your site has permanently moved to a new location. Also, update your sitemap and submit it to search engines to help them crawl and index your new site quickly.
Can I migrate my WordPress site to a new domain and hosting without any downtime?
Yes, it’s possible to migrate your WordPress site to a new domain and hosting without any downtime. This can be achieved by keeping your old site live until you’ve fully set up and tested your new site. Once you’re sure that everything is working correctly on the new site, you can then switch your domain to point to the new hosting.
What should I do if I encounter errors during the migration process?
If you encounter errors during the migration process, don’t panic. Most errors can be resolved by checking your database and file transfer for any issues. If you’re unable to resolve the issue, consider seeking help from a professional or your hosting provider.
How can I ensure that all my content is transferred during the migration?
To ensure that all your content is transferred during the migration, it’s important to back up your entire WordPress site, including your database, themes, plugins, and uploads. This ensures that you have a copy of all your site’s content and settings, which can be restored if anything goes wrong during the migration.
Can I change my WordPress theme during the migration?
Yes, you can change your WordPress theme during the migration. However, it’s recommended to do this after you’ve successfully migrated your site to the new domain and hosting. This is because changing your theme can potentially introduce new variables and complications into the migration process.
How long does it take to migrate a WordPress site to a new domain and hosting?
The time it takes to migrate a WordPress site to a new domain and hosting can vary depending on the size of your site and the speed of your internet connection. However, in general, it can take anywhere from a few hours to a few days.
Do I need to update my DNS settings after migrating my WordPress site?
Yes, after migrating your WordPress site to a new domain and hosting, you’ll need to update your DNS settings to point to the new hosting. This ensures that when users visit your site, they’re directed to the new location.
Can I migrate my WordPress site to a new domain and hosting myself, or do I need to hire a professional?
While it’s possible to migrate your WordPress site to a new domain and hosting yourself, it can be a complex process. If you’re not comfortable with tasks like backing up your site, transferring files, and updating DNS settings, you may want to consider hiring a professional.
What should I do after migrating my WordPress site to a new domain and hosting?
After migrating your WordPress site to a new domain and hosting, it’s important to thoroughly test your site to ensure everything is working correctly. Check all pages, links, and functionality. Also, update your sitemap and submit it to search engines to help them crawl and index your new site. Lastly, monitor your site’s performance and SEO rankings to ensure they’re not negatively affected by the migration.
Software developer and marketing consultant. Loves experimenting with product development and design.