In previous articles, we covered the Origami prototyping tool when it was still built on top of Quartz Composer. While the prototypes that Origami generated were always excellent, many people were a little bemused by the requirement for Quartz Composer. What even is it? Who uses it?
“If only Origami worked with software we actually used every day – something like Sketch!”
It seems Facebook listened – or at least had the same concern.
In early 2017 Facebook’s Origami was completely overhauled and relaunched to run as a standalone app. You won’t need to install anything else to make it run on your OSX system.
What’s more, Origami will take your static Sketch files and make them live.
Although it features significant UI changes, it is fair to say that the logic behind how you wire the patches together, and how you make your prototype work is still the same. In this tutorial, we will be covering the highlights and improvements of this major update and how to turn a simple Sketch UI file into a working prototype.
Getting Started
Before we get started, if you don’t already have Origami installed, you can go over to their website and hit the download button found here – yes, it’s free.
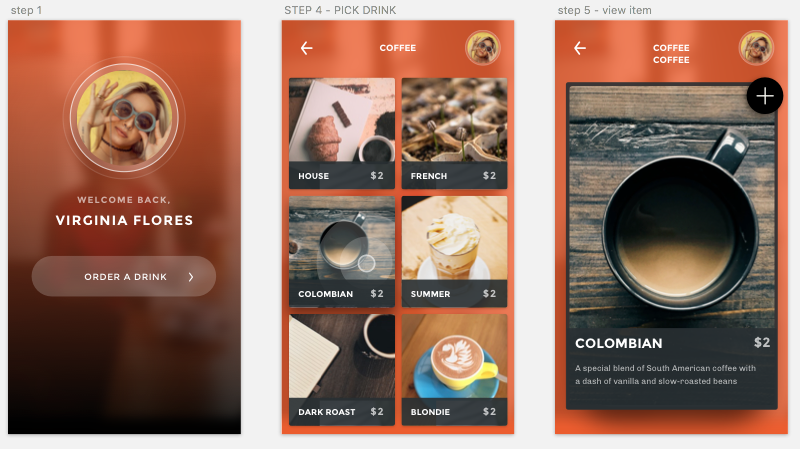
And to make it easy to follow along, we are going to use a prebuilt Sketch UI file that you can download here (it’s free). It is a Coffee ordering app composed of many Artboards, but we won’t need to use all of them since this tutorial is going to cover the fundamentals of prototyping with Origami and Sketch.
These are the three artboards we will be using – you can delete the others.
- Step 1: Splash screen
- Step 4: Pick your drink
- Step 5: View item
The GIF below illustrates the result we will achieve by the end of this tutorial.

Getting around Origami
Origami has four main panels you need to learn your way around.
The Viewer
Inside the Viewer you can interact with your prototype.
Layers + Inspector
Origami layers are very similar to Sketch layers. Each layer has its own attributes and can be ordered and nested. In the inspector you can adjust it’s behaviour by changing its attributes.
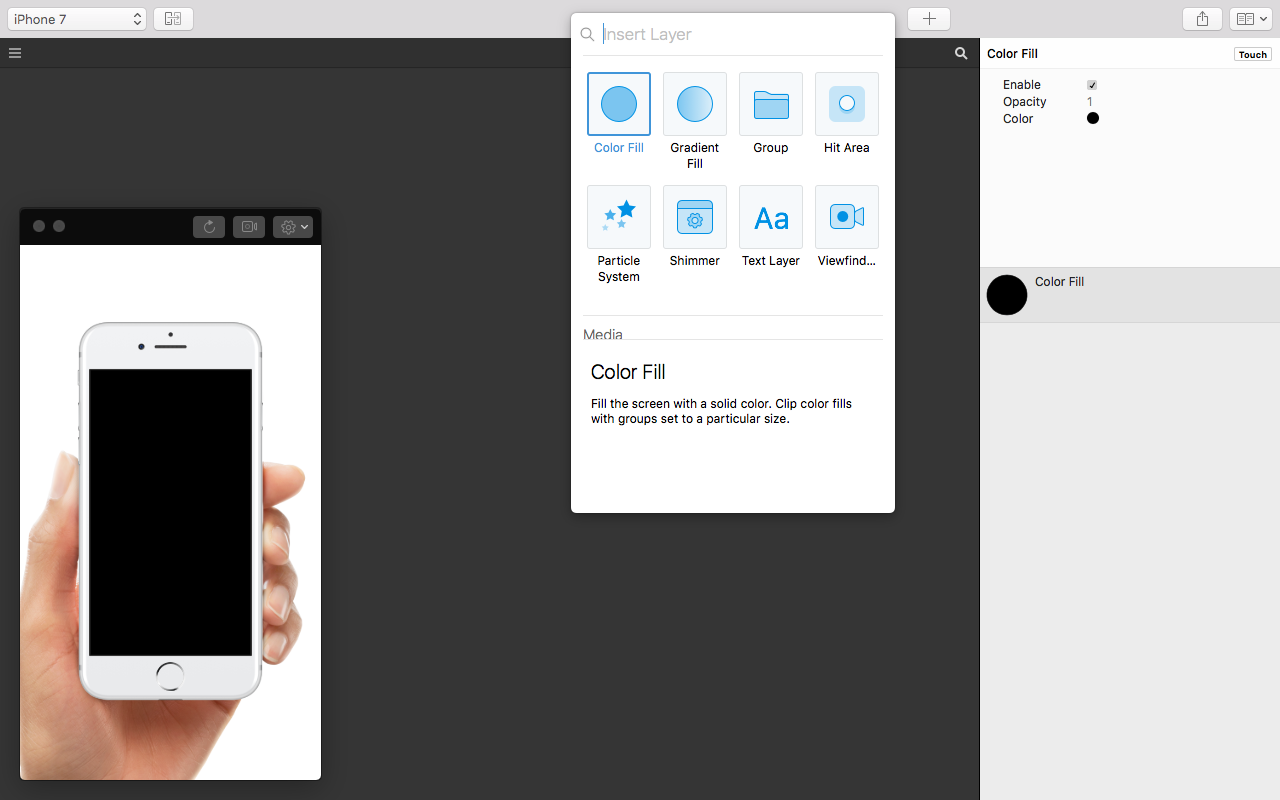
The Patch Library
You can access the patch library any time by using the CMD+Enter shortcut keys or by double taping on the patch editor area. To select and add a patch, select it and press enter.
The Patch Editor
The patch editor panel is the empty looking area in which you wire together interaction, animation, and behaviour to your prototype using blocks.
Sketch + Origami Studio
Without doubt, the biggest highlight of the new Origami Studio is the way it works with Sketch Files. It is now very easy to turn your Sketch designs into working components and views. You can then wire those components together to create a working prototype out of thin air.
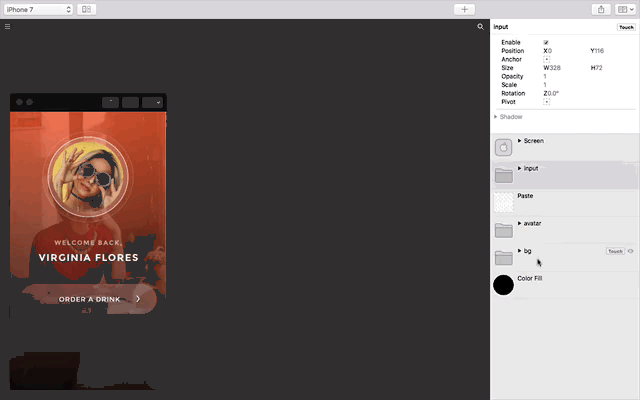
Step 1: Import the Sketch Layers into Origami
Inside the Sketch design file, jut copy and paste the layers into the Origami project window as follows. When pasting, make sure to use the Origami layer inspector to adjust the position of the pasted layers. Also keep in mind to nest them inside the corresponding screen layers.
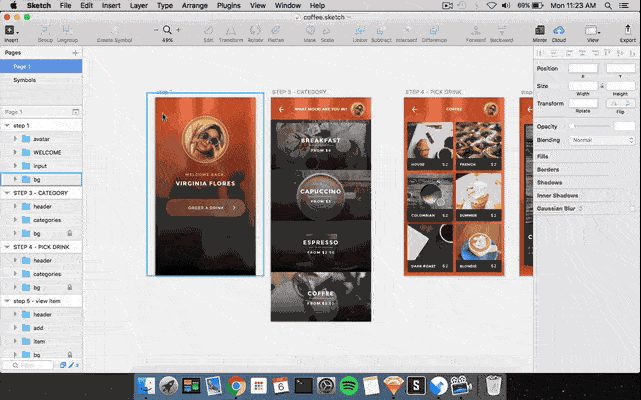
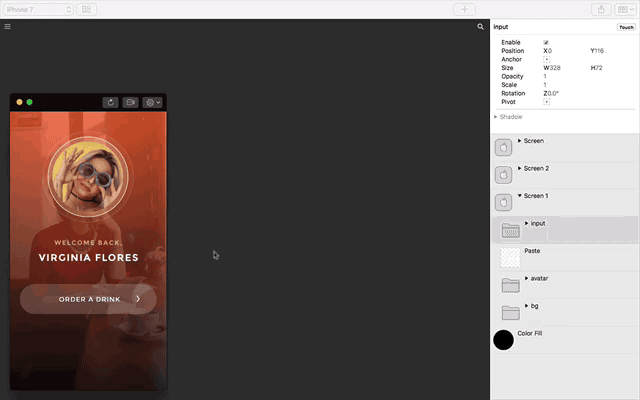
Step 2: Creating the Screens
After pasting and positioning all the elements of the first Artboard from Sketch inside Origami, add a Screen layer and nest all the pasted elements inside the Screen Layer you just added.
Do the same thing for the remaining two Artboards.
Copy and Paste the elements from Sketch inside the Origami project window, position them correctly through the inspector panel and then nest them inside the corresponding extra Screen layers you will have to create. But for these two new screens, you don’t change the start state because logically we shouldn’t see the next two screens when the prototype starts running.
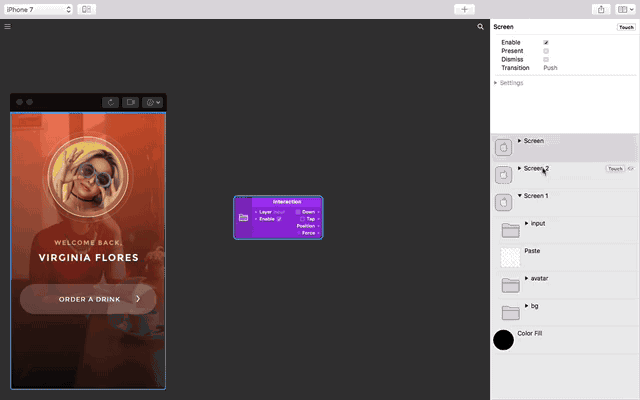
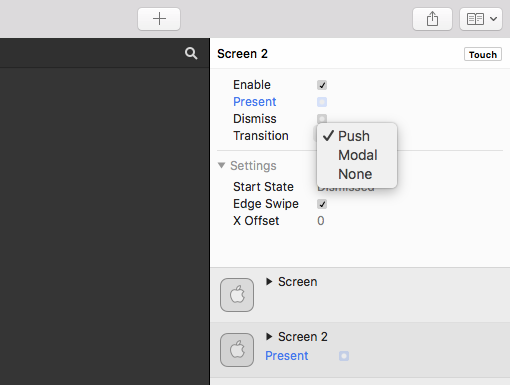
Step 3: Create a Screen Flow
Our next step involves ‘wiring together’ the Screens. This will mean when you hit the button on the welcome screen, it will takes you to the screen two. Happily, Origami makes this very easy to do.
On the right hand side of the layer you want to interact with, there is a small label that has the word ‘Touch‘ written on it. Click it, and you’ll see a dropdown of all available touch interactions. In this case, we just need the simple ‘Tap’ interaction (clearly this is an interaction you’ll use often).
The logic behind how the pages will show and disappear is as follows: When you tap the button, the tap interaction patch triggers a state change in the ‘output’ of our tap. This needs to be wired with the present attribute of Screen 2 layer at the inspector panel for that layer.
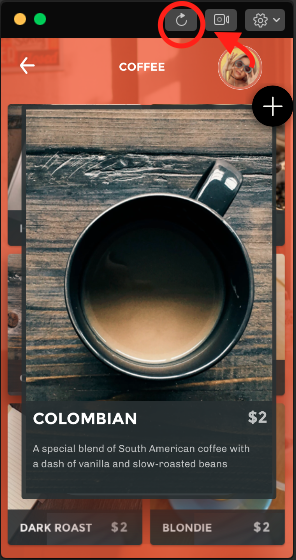
After wiring those together, this is what the prototype looks like now.
But what about going back? The logic is pretty much the same just with a little addition. Instead of just wiring the back arrow button from Screen 2 with the presented attribute in the inspector panel for Screen 1, we have to also dismiss Screen 2 by wiring together the dismiss attribute in the inspector panel of Screen 2 with the tap output of the interaction patch for the back arrow button as follows.

Step 4: Display a Modal
The last step to complete our prototype is to show a modal panel on top of Screen 2. To keep this demo simple, we will bind the whole group of options to the tap interaction. You’re free to wire them to separate screens in your demo.
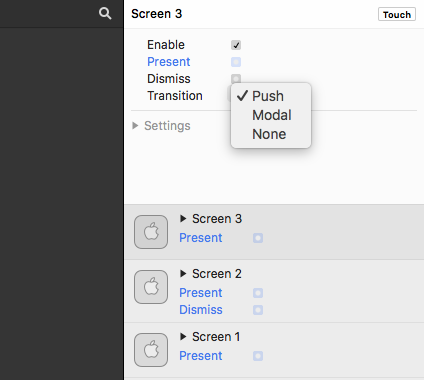
The logic behind launching the modal is the similar to before. However, this time we will not be dismissing Screen 2 so that that the modal appears on top of it.
Tip: To reset the screen so that we can see the whole result and test our prototype, hit the refresh icon on the viewer panel.
Wrap-up
This new approach to Origami is certainly easier to work with than its predecessor. Being able to use your Sketch files, without having to import each layer into the project individually, saves lots of time and hassle.
Origami comes packed with tonnes of interactions and animations out-of-the-box, so there is plenty of space to experiment and explore once you understand the basic application mechanics.
Understand that though we’ve purposefully kept this demo to simple clicks, there are few limits to the kinds of interactions you can build with Origami – a sophistication that is simply impossible with tools Invision or MarvelApp.
Finally, you can download the files I have used: both the Origami final project file and the Sketch UI file here.
Feel free to let me know of any questions in the comment section below.
Frequently Asked Questions on Prototyping with Sketch Files and Origami
What is the main advantage of using Origami for prototyping?
Origami is a powerful tool for prototyping that offers a high level of interactivity. It allows designers to create detailed, interactive prototypes with a lot of depth. The main advantage of using Origami is its ability to create complex interactions and animations. It also provides real-time preview which helps in making immediate adjustments. Moreover, it supports Sketch and Photoshop, making it easier for designers to import their designs directly.
How can I import Sketch files into Origami?
Importing Sketch files into Origami is a straightforward process. First, ensure that both Origami and Sketch are installed on your computer. Open Origami and go to the ‘File’ menu, then select ‘Import’. From the dropdown menu, choose ‘Sketch’. Navigate to the location of your Sketch file, select it, and click ‘Open’. Your Sketch file will then be imported into Origami, ready for you to start prototyping.
Can I use Origami for mobile app prototyping?
Yes, Origami is an excellent tool for mobile app prototyping. It allows you to create highly interactive and realistic prototypes that can mimic the functionality of a real app. You can also preview your prototypes on actual devices, which can give you a better understanding of the user experience.
How can I share my Origami prototypes with others?
Origami provides several options for sharing your prototypes. You can export your prototype as a video, a GIF, or a live demo. You can also generate a link that allows others to interact with your prototype online. This makes it easy to share your work with clients, stakeholders, or team members.
Is Origami suitable for beginners?
While Origami has a bit of a learning curve, it is certainly suitable for beginners. There are plenty of tutorials and resources available online to help you get started. Once you get the hang of it, you’ll find that Origami is a powerful tool that can greatly enhance your prototyping process.
Can I use Origami on Windows?
Currently, Origami is only available for macOS. However, there are other prototyping tools available that are similar to Origami and can be used on Windows, such as Framer, Principle, and Adobe XD.
How does Origami compare to other prototyping tools?
Origami stands out for its high level of interactivity and the ability to create complex animations. It also integrates seamlessly with Sketch and Photoshop. However, it is only available for macOS and has a steeper learning curve compared to some other tools.
Can I use Origami for web design prototyping?
While Origami is primarily used for mobile app prototyping, it can also be used for web design prototyping. However, it may not be as efficient as some other tools that are specifically designed for web design.
Is Origami free to use?
Yes, Origami is a free tool provided by Facebook. You can download it from the Origami website and start using it right away.
Can I export code from Origami?
Yes, Origami allows you to export code for iOS, Android, and the web. This can be a great time-saver for developers, as they can use the exported code as a starting point for building the actual product.
 Mateo Prifti
Mateo is a student constantly thinking about and building products that may have a positive impact in peoples lives. He gets involved with everything that would help him facilitate the reach of such goals such as programming, design, visual arts and business. Currently his main interests are youth entrepreneurship and tech startups.