There’s no industry that’s unaffected by face-to-face impressions. Even web designers who perform the majority of their work remotely often end up competing in their local market alongside their nearby competitors. Rarely do clients fully understand the subtleties of your work that separate you from your fellow designer, and for better or worse, they often distinguish designers based on articulation and in-person professionalism. If your work involves periodic, infrequent (monthly) meetings, it’s even more important to make a good impression during your rare opportunities in front of your clients.
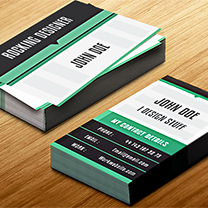
So today, we will design a clean vertical business card in InDesign. We will use several straightforward techniques to achieve the final outcome. Let’s take a look ahead at our end result before we start:
 (Download the finished, layered InDesign file.)
Step 1:
Open InDesign and click on “File” > “New” > “Document,” set the number of pages to “2,” and uncheck “Facing pages.” Remember, you can always adjust and tweak the document size according to your printer requirements; for this I’m setting a 2in width and a 3.5in height with 0.5in margins and a 0.125in bleed.
Step 2:
First create a new layer; you can click on the “New layer” option from the layer panel. Now let’s move to the background. Click on the rectangle tool to create a rectangle using a dark gray color swatch (C=0 M=0 Y=0 K=8). I’m changing the screen mode to “Preview” so you can properly see the design.
Step 3:
Select the rectangle tool and create a small rectangle on the side. Make sure to fill it using a light color swatch (C=0 M=0 Y=0 K=4).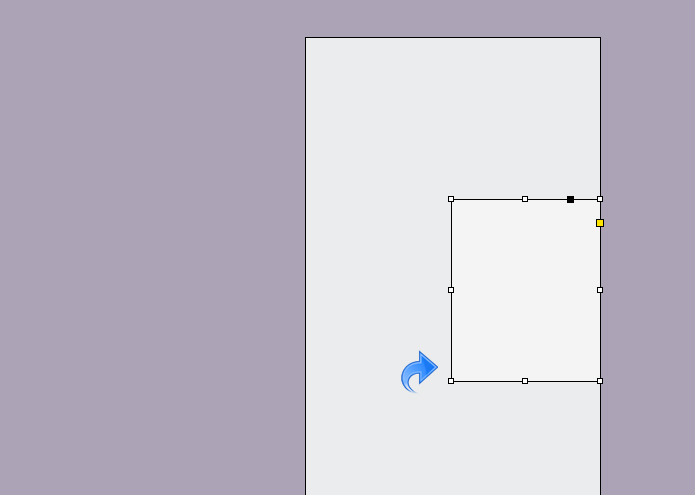
Step 4:
Again using the same rectangle tool, create a small strip using the same color swatch (C=0 M=0 Y=0 K=4).
Step 5:
Repeat the same process and create 3 more strips using the same light color swatch (C=0 M=0 Y=0 K=4).
Step 6:
Again, select the rectangle tool and create a vertical strip using the light color swatch (C=0 M=0 Y=0 K=4).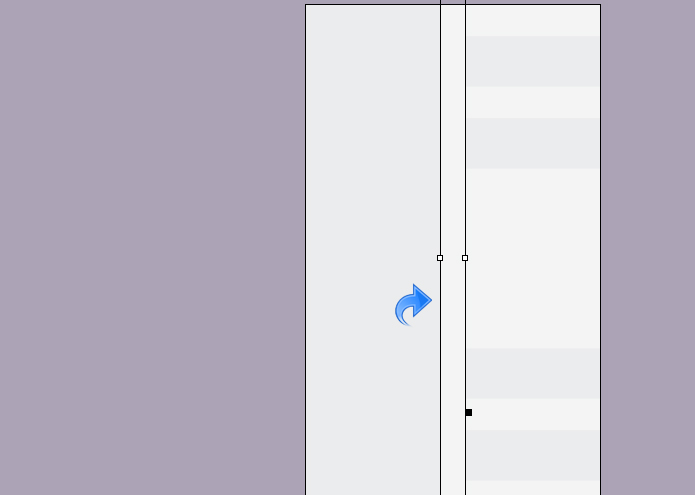
Step 7:
Create a big rectangle on the side and make sure to fill it with color swatch (C=59 M=1 Y=48 K=18).
Step 8:
Again, repeat the same process and create another rectangle on the side, then fill it with color swatch (C=54 M=1 Y=48 K=1). Now, add a “solid” 2pt stroke to the rectangle using color swatch (C=0 M=0 Y=0 K=91). Create another strip with the same color and place it on the right side. Add a 5p solid stroke to the strip with color swatch (C=0 M=0 Y=0 K=4).
Step 9:
Now, click on the rectangle tool and create a rectangle. Make sure to fill it using the dark color swatch (C=0 M=0 Y=0 K=91) used before. Then select the pen tool and create an arrow tip, use the same color to fill the tip as the above rectangle.
Step 10:
We’re going to add some text to our card, so click on the type tool and add the text using color swatch (C=0 M=0 Y=0 K=2). Now, select the text layer and click on “Effects” to add some drop shadow and inner shadow to the text using the following settings.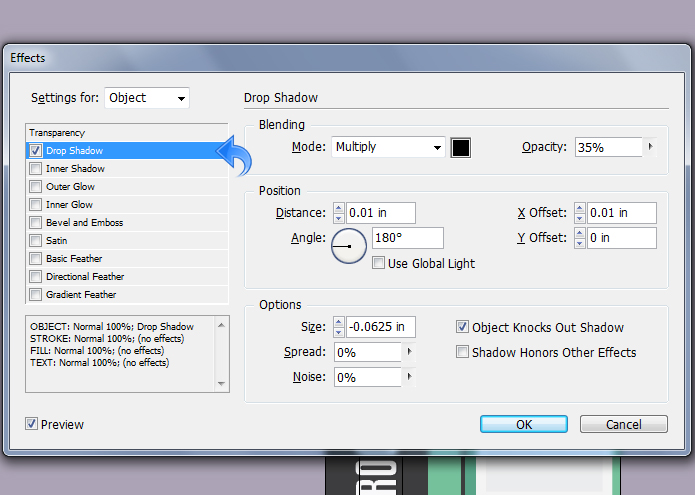
Step 11:
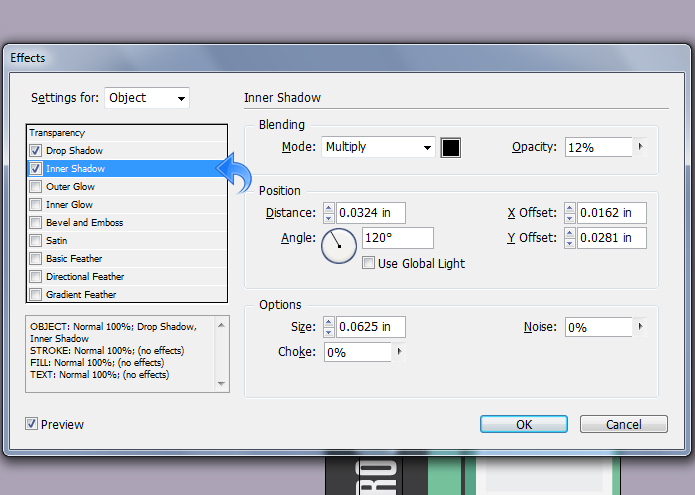
Again, select the type tool to add the title text; use color swatch (C=0 M=0 Y=0 K=91) for the title. Then, select the text layer, and click on “Effects,” and add drop shadow using the settings below. Now, apply an inner shadow using the following settings.

Step 12:
One side of our card is ready, so let’s start with the other side. To begin building the background, click on the rectangle tool and create a rectangle. Make sure to fill the rectangle using color swatch (C=0 M=0 Y=0 K=91).
Step 13:
Create a box using the rectangle tool and make sure to fill it with color swatch (C=0 M=0 Y=0 K=4).
Step 14:
Now, create a small horizontal strip and fill the strip using color swatch (C=59 M=1 Y=48 K=18). Then, select the pen tool and create an arrow tip, use the same color as the strip above to fill the tip.
Step 15:
Now, create another box using the rectangle tool and fill the box using color swatch (C=54 M=1 Y=48 K=1).
Step 16:
Create three strips using the rectangle tool and make sure to fill these using color swatch (C=0 M=0 Y=0 K=4).
Step 17:
Repeat the same process and create three more strips using the rectangle tool; make sure to fill these with color swatch (C=0 M=0 Y=0 K=91).
Step 18:
Now, create another horizontal strip, but this time fill the strip using color swatch (C=59 M=1 Y=48 K=18).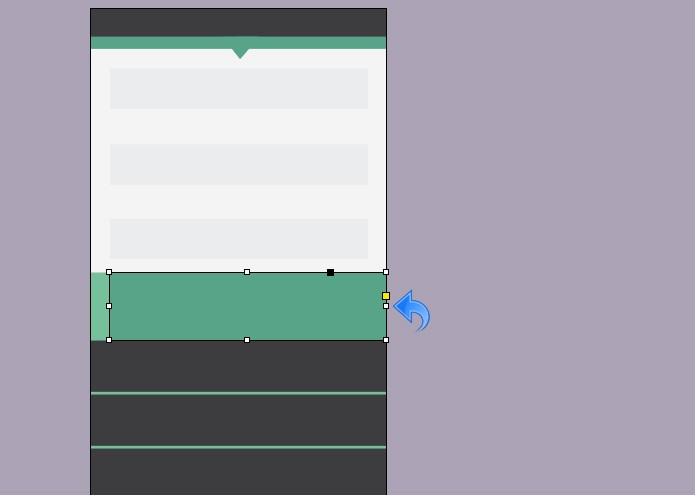
Step 19:
Select the rectangle tool and create a small box on the side, now fill the shape using color swatch (C=0 M=0 Y=0 K=93). Repeat the same steps and create two more boxes on the side.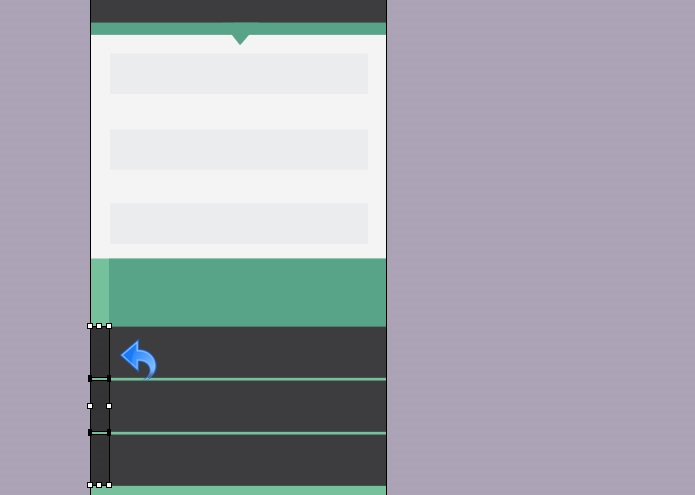
Step 20:
Now select the type tool to add some title text. Use the color swatch (C=0 M=0 Y=0 K=91) for the name and color swatch (C=0 M=0 Y=0 K=58) for the text. Then select the text layer and click on “effects” to add some drop shadow and inner shadow. Make sure to use the same settings as we did for the text above.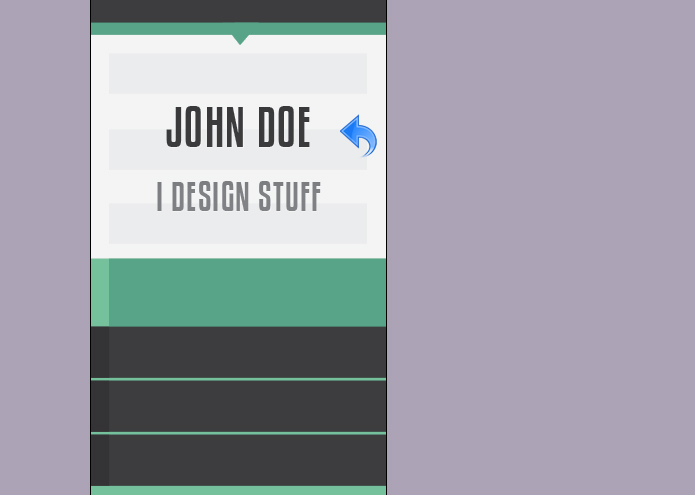
Step 21:
Now, add the contact details using the type tool and then click on “effects” to add some drop shadow. For the drop shadow keep the settings same as shown in the image below. Let’s have a look at our final product.
Our clean vertical business card is ready. I hope you enjoyed the tutorial and your new business card design.
Let’s have a look at our final product.
Our clean vertical business card is ready. I hope you enjoyed the tutorial and your new business card design.
Frequently Asked Questions (FAQs) about Creating Clean Vertical Cards in InDesign
How can I add color effects to my vertical card in InDesign?
Adding color effects to your vertical card in InDesign can enhance its visual appeal. To do this, select the object you want to apply the color effect to. Then, go to the ‘Effects’ panel and choose the type of effect you want to apply. You can adjust the settings according to your preference. Remember, the use of color effects should complement the overall design of your card and not overpower it.
Can I add a drop shadow to my vertical card in InDesign?
Yes, you can add a drop shadow to your vertical card in InDesign. To do this, select the object you want to apply the shadow to, then go to the ‘Effects’ panel and choose ‘Drop Shadow’. You can adjust the settings such as opacity, distance, and size to achieve the desired effect. A drop shadow can add depth to your design, making it more visually appealing.
How can I add text to my vertical card in InDesign?
To add text to your vertical card in InDesign, select the ‘Type Tool’ from the toolbar. Click and drag on your document where you want the text to appear. A text box will appear where you can type your text. You can adjust the font, size, and color of the text using the ‘Character’ panel.
Can I import images to my vertical card in InDesign?
Yes, you can import images to your vertical card in InDesign. To do this, go to ‘File’ > ‘Place’, then select the image file you want to import. You can resize and reposition the image as needed. Remember to use high-quality images to maintain the professional look of your card.
How can I save my vertical card in InDesign?
To save your vertical card in InDesign, go to ‘File’ > ‘Save’. Choose the location where you want to save the file and enter a name for it. You can choose to save it as an InDesign document (.indd) or as a template (.indt) if you plan to use the same design in the future.
Can I print my vertical card directly from InDesign?
Yes, you can print your vertical card directly from InDesign. To do this, go to ‘File’ > ‘Print’. Make sure to adjust the print settings according to your needs. You can choose the printer, paper size, and print quality. Always do a print preview before printing to ensure that your card will print correctly.
How can I create a bleed for my vertical card in InDesign?
To create a bleed for your vertical card in InDesign, go to ‘File’ > ‘Document Setup’. In the ‘Bleed and Slug’ section, enter the amount of bleed you want. A bleed ensures that your design will extend to the edge of the paper when it is cut.
Can I create a double-sided vertical card in InDesign?
Yes, you can create a double-sided vertical card in InDesign. To do this, when creating a new document, check the ‘Facing Pages’ box. This will create a two-page spread where you can design the front and back of your card.
How can I align objects on my vertical card in InDesign?
To align objects on your vertical card in InDesign, select the objects you want to align. Then, go to the ‘Align’ panel and choose the type of alignment you want. Proper alignment can make your design look more organized and professional.
Can I use layers in my vertical card design in InDesign?
Yes, you can use layers in your vertical card design in InDesign. Layers can help you organize your design elements. To create a new layer, go to the ‘Layers’ panel and click the ‘New Layer’ button. You can rename the layer and change its color to help you identify it easily.
 Anum Khan
Anum is Web and Graphic designer. Addicted to Photoshop and crazy for pixel perfection. She is also an active blogger, sharing her passions, skills and creative details on her blog Websoulz. She loves to connect with the community, sharing the latest design gossips and rolling her eyes on boring trends.


