This tutorial explains the key steps for using Bootstrap and WordPress together, integrating the latest release of the Bootstrap library with a WordPress theme.
Both Bootstrap and WordPress are highly popular: 3.7 websites on the internet are built with Bootstrap and 29% of the web uses WordPress. Clearly, knowing how to build websites and apps using these two robust and mature, open-source technologies can be a valuable skill for developers in the workplace.
There’s quite a lot to cover, so let’s dive in!
Why WordPress?
WordPress is open-source software you can use to create a beautiful website, blog or app.
The popularity of WordPress is mostly due to its ease of use and powerful options for appearance, customization, and extensibility (via themes and plugins).
Thanks to WordPress themes, webmasters with little to no coding experience can power their websites with a professional appearance and custom functionality. Users can easily select different themes with a few clicks using the Appearance menu in the administration dashboard or copy theme files directly into the wp-content > themes folder. Themes can be purchased from dedicated marketplaces, individual developers, or can also be freely installed from the WordPress.org themes directory.
As developers, we can create our own theme, which is what we’re going to do in this tutorial. More specifically, we’re going to perform the key steps towards building a simple WordPress theme that integrates the latest release of the Bootstrap library.
Why Bootstrap?
Bootstrap is a robust and comprehensive UI library for developing responsive and mobile-first websites and apps. Here are some advantages of using Bootstrap as the styling framework for a WordPress theme.
Advantages of Using Bootstrap and WordPress Themes Together
In my view, there are many advantages of using Bootstrap to style a WordPress theme.
Bootstrap is a popular, open-source project with extensive development and continuous maintenance, which over time has resulted in fewer bugs.
It’s a cross-browser framework that supports major browsers with a good CSS baseline called [Reboot] (http://getbootstrap.com/docs/4.0/content/reboot/).
It has an extensive and thorough documentation.
It deals with reset, grids, typography, utilities, and media queries, thereby freeing up development time.
It’s widely used by developers to style websites, so it’s easy to find tutorials, demos, and open-source projects to learn from or extend.
Bootstrap can be used to quickly create a mobile-first and mobile-optimized WordPress theme without reinventing the wheel.
There are tons of starter themes made available by the community, such as Understrap, which aim to provide a quick starting point for developers to create WordPress themes with Bootstrap.
Although it’s not created with WordPress in mind, Bootstrap can be easily integrated with WordPress.
We can easily customize Bootstrap to meet specific project requirements, once we have enough knowledge of the available classes.
We can take advantage of hundreds of JavaScript/jQuery plugins already integrated with Bootstrap.
Starting with Bootstrap 4, plugins use modern ES6.
With the release of Bootstrap 4, the library now uses Sass instead of Less as the preprocessor of choice, which makes it more widely compatible with a huge number of developer workflows.
Bootstrap 4 introduces new components such as the card component. Bootstrap cards make it easy to create a modern, card-based layout such as the Masonry-style interface.
The Bootstrap 4 grid system is built on top of flexbox, which makes the grid even more flexible, developer-friendly and clean.
Are There Any Disadvantages of Using Bootstrap and WordPress Together?
As for the disadvantages, the developer community has raised a few concerns, including the following.
Bootstrap isn’t designed for straightforward integration with WordPress, but that shouldn’t be a huge obstacle for most developers.
If we need to override a lot of predefined Bootstrap styles to meet the design requirements, it might not be worthwhile to use a CSS framework at all.
It’s true that Bootstrap makes it easy to quickly add responsive styling to our theme. However, we also need to invest time learning about Bootstrap to be able to add our customizations so that our themes look different from the numerous Bootstrap-based websites on the Internet.
Bootstrap depends on jQuery, so in some situations we might have to deal with problems related to jQuery — such as outdated plugins, or having to include the whole jQuery library, even if our project only needs a small feature like
$.ajax().
Prerequisites for Following Along
In this tutorial, I assume you have a development environment with PHP, MySQL and WordPress installed — such as Homestead Improved. This quick tip will help you get up and running with a brand new Homestead Improved Vagrant VM in no time.
You also need to be familiar with WordPress — particularly how to install and activate themes, add WordPress Menus, create posts and pages, etc.
Finally, you need to have some knowledge of how to build a WordPress theme. In fact, this is a tutorial on integrating Bootstrap in a WordPress theme, not a tutorial on how to build a fully functional WordPress theme, which would have a much wider scope than what we have available in this article.
Key Steps to Integrate Bootstrap and WordPress
In this section, we’re going to learn about the key steps we need to perform to integrate Bootstrap in a simple WordPress theme project.
First, let’s review which files we’re going to create.
The Structure of a WordPress Theme
A WordPress theme has a predetermined file structure. Some files are required for the theme to be recognized by WordPress.
The first required file is style.css. This CSS file contains styles for the theme. Most importantly, this file also has a special task: it provides meta information about the theme such as the theme name, description, author, and other extra details. The meta information needs to be present in the head of the file in the form of CSS comments.
The other required file is index.php, which is the main WordPress theme file, and the last fallback template file WordPress relies on, in case it can’t find any other template file to display its content.
There are many optional files, but for our simple Bootstrap-based theme we’re only going to add the following files:
header.phpandfooter.php, to lay out the header and footer sections of our WordPress theme respectively, which are displayed on every page of our themefunctions.php, where we’re going to write the code for loading our theme’s custom stylesheet, Bootstrap styles and scripts, and more.
If you’re curious, check out the other templates that you can customize from the WordPress docs.
Let’s get down to business!
Step 1: Creating the Theme Folder
First, we head over to our WordPress installation folder and navigate to wp-content -> themes. Here, we create a folder for our theme. Let’s call it bs-theme.
Step 2: Adding style.css
Let’s create our first required file, style.css, where we’re going to put our custom CSS code.
At the very top of this stylesheet document (make sure you leave no blank space at the top), we add the meta information about our theme between CSS comments (remember to replace the <THEME_URI>, <AUTHOR_NAME>, and <AUTHOR_URI> placeholders with values relating to your own project):
/*
Theme Name: BS 4 Theme
Theme URI: <THEME_URI>
Description: A Theme for WordPress with Bootstrap for styling.
Author: <AUTHOR_NAME>
Author URI: <AUTHOR_URI>
Version: 1.0
*/
Now WordPress can display our theme’s info in the admin area.
We can add our custom styles below the meta information comments. For example, let’s add a few CSS rules to style the <body>:
@import url(https://fonts.googleapis.com/css?family=Montserrat:700);

body {
  padding-top: 4.5rem;
  font-family: 'Montserrat','Helvetica Neue',Arial,sans-serif;
  color: #001A33;
}
Step 3: Creating the Header Section
Let’s start by creating header.php in the themes folder. Next, we add the following content:
<!DOCTYPE html>
<!--[if lt IE 7]><html class="no-js lt-ie9 lt-ie8 lt-ie7"> <![endif]-->
<!--[if IE 7]><html class="no-js lt-ie9 lt-ie8"> <![endif]-->
<!--[if IE 8]><html class="no-js lt-ie9"> <![endif]-->
<!--[if gt IE 8]><!--> <html class="no-js"> <!--<![endif]-->
<head>
<meta charset="utf-8">
<meta http-equiv="X-UA-Compatible" content="IE=edge,chrome=1">
<title><?php wp_title('«', true, 'right'); ?> <?php bloginfo('name'); ?></title>
<meta name="description" content="">
<meta name="author" content="">
<meta name="viewport" content="width=device-width">
<link rel="pingback" href="<?php bloginfo('pingback_url'); ?>" />
<?php wp_head(); ?>
</head>
<body <?php body_class(); ?>>
<nav class="navbar navbar-expand-md navbar-dark fixed-top bg-dark">
<a class="navbar-brand" href="#">
<?php bloginfo('name'); ?>
</a>
<button class="navbar-toggler" type="button" data-toggle="collapse" data-target="#navbarCollapse" aria-controls="navbarCollapse" aria-expanded="false" aria-label="Toggle navigation">
<span class="navbar-toggler-icon"></span>
</button>
<div class="collapse navbar-collapse" id="navbarCollapse">
<ul class="navbar-nav mr-auto">
<li class="nav-item active">
<a class="nav-link" href="/">
Home <span class="sr-only">(current)</span>
</a>
</li>
</ul>
</div>
</nav>
In the code above, most meta information for the HTML head section is added using various WordPress tags, such as bloginfo('name') for getting the site’s name, wp_title() to get the title for the page, and wp_head() to fire the wp_head action hook used by WordPress to add links and other functionality to the head section.
We’ve also used different Bootstrap classes to create a responsive navigation bar. However, as it is, the navigation bar is not dynamic. That is, it’s not integrated with the WordPress menu functionality. This means that we can’t build a WordPress menu in the admin area and see it displayed on the front end of our website.
Giving the static Bootstrap navigation bar the power of WordPress will be our next step.
Step 4: Integrating Bootstrap Navigation with the WordPress Menu
To accomplish our task, we need a WordPress walker class, which lets developers traverse tree-like data structures with a view to rendering HTML markup. There are a few Bootstrap navigation walker classes available on the Internet. For this tutorial, we’ll go with Dominic Businaro’s BS4navwalker, which is freely available on GitHub.
We grab bs4navwalker.php and save it in the root directory of our theme (which we called bs-theme earlier in this tutorial).
Next, we’re going to create a functions.php file (this name is required by WordPress) in the theme’s root folder, and we’ll write this line of code:
require_once('bs4navwalker.php');
Now we can use the Bootstrap navigation walker class in our theme files.
We locate the markup for the nav element we just wrote and modify it as follows:
<nav class="navbar navbar-expand-md navbar-dark fixed-top bg-dark">
  <a class="navbar-brand" href="#">
    <?php bloginfo('name'); ?>
  </a>
  <button class="navbar-toggler" type="button" data-toggle="collapse" data-target="#navbarCollapse" aria-controls="navbarCollapse" aria-expanded="false" aria-label="Toggle navigation">
    <span class="navbar-toggler-icon"></span>
  </button>
  <?php
    wp_nav_menu([
      'menu'            => 'primary',
      'theme_location'  => 'menu-1',
      'container'       => 'div',
      'container_id'    => 'navbarCollapse',
      'container_class' => 'collapse navbar-collapse',
      'menu_id'         => false,
      'menu_class'      => 'navbar-nav mr-auto',
      'depth'           => 0,
      'fallback_cb'     => 'bs4navwalker::fallback',
      'walker'          => new bs4navwalker()
    ]);
  ?>
</nav>
The code above assumes we’ve already created a menu in the WordPress admin area and have a few pages stored in the WordPress database.
To display our navigation bar, we’re using the wp_nav_menu() function.
The values for the menu and theme_location parameters we’re passing to wp_nav_menu() are taken from the settings of our WordPress menu, which we should have created already in the admin area.
The values for the container, container_id, and container_class parameters are taken from the Bootstrap classes and CSS id attribute on the div element that wraps the ul element containing the list items for our navigation links.
The menu_class parameter’s value comes from the Bootstrap class on the ul element.
The depth parameter’s value indicates how many hierarchical levels our navigation menu is going to have. We’ve set this to 0, which is the default value and stands for all.
The walker parameter is here very important, and we’ve set it to a new instance of the bs4navwalker class, which is responsible for rendering the Bootstrap navigation markup.
And we’re done!
You’ll find a detailed explanation with the full list of parameters for the wp_nav_menu() function on the WordPress.org documentation page.
Step 5: Creating the Footer Section
The next step is to create the footer.php file and add the following content:
    <footer>
    </footer>
    < ?php wp_footer(); ?>
  </body>
</html>
wp_footer() is used by WordPress to dynamically place different markup elements, such as links to stylesheet and JavaScript files, at the bottom of the page.
It’s important to note that many plugins use the wp_head() and wp_footer() hooks to place required elements in the head and footer of the page. Therefore, you’ll need to make sure to add both hooks as shown in this tutorial. Doing so will avoid breaking these plugins’ functionality when our theme is activated.
Step 6: Adding the index.php Template File
index.php is the second required file for every WordPress theme, so let’s go ahead and create it. We then add the content below:
<?php get_header(); ?>
  <!-- Other Content here -->
<?php get_footer(); ?>
Using get_header() and get_footer() instructs WordPress to include the previously created templates, header.php and footer.php, inside index.php.
Step 7: Adding the WordPress Loop
To show our posts, we’ll be using the famous WordPress loop.
Inside index.php, between the header and footer tags, let’s add the following code:
<div>
  <?php if ( have_posts() ) : while ( have_posts() ) :   the_post(); ?>
    <h2>
      <a href="<?php the_permalink() ?>">
        <?php the_title(); ?>
      </a>
    </h2>
    <?php the_content(); ?>
  <?php endwhile; else: ?>
    <p>There no posts to show</p>
  <?php endif; ?>
</div>
This is what happens above:
- We check if there are any posts by calling
have_posts(). - Using a
whileloop, we loop over all the existing posts. - Finally, we show the title and content for each post. We could also get extra information such as the date when the post is published, the author of the post, comments associated with each post, and so on.
Step 8: Adding Bootstrap
After adding our template files, we now have a good starting theme that we can activate via the Appearance menu in the admin panel.
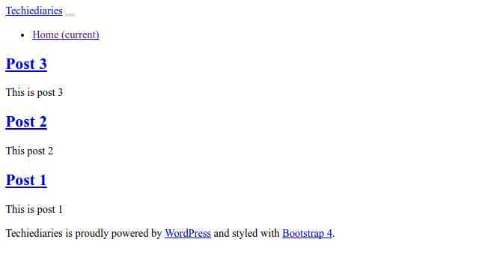
If we preview our theme, we’ll get an unstyled site, which looks like the following screenshot:
To give our theme a Bootstrap look and feel, we need to include the Bootstrap files in our project.
Let’s grab the Bootstrap ZIP file from getbootstrap.com and copy the files into our theme. (For organizational purposes, we can add css and js folders to our project and place the corresponding files inside the appropriate folder.)
Our folder structure should look like this:
- bs-theme
  - style.css
  - footer.php
  - functions.php
  -  header.php
  - index.php
  - single.php
  - css
      - bootstrap.min.css
  - js
    - vendor
      - bootstrap.bundle.min.css
Next, we’ll do the following:
- Enqueue Bootstrap stylesheet and JavaScript files
- use WordPress hooks to insert the Bootstrap files into the web page.
Let’s start by opening functions.php and adding the following code:
<?php

function themebs_enqueue_styles() {

  wp_enqueue_style( 'bootstrap', get_template_directory_uri() . '/css/bootstrap.min.css' );
  wp_enqueue_style( 'core', get_template_directory_uri() . '/style.css' );

}
add_action( 'wp_enqueue_scripts', 'themebs_enqueue_styles');

function themebs_enqueue_scripts() {
  wp_enqueue_script( 'bootstrap', get_template_directory_uri() . '/js/vendor/bootstrap.bundle.min.js', array( 'jquery' ) );
}
add_action( 'wp_enqueue_scripts', 'themebs_enqueue_scripts');
We’ve used various WordPress methods here, so let’s briefly look at each one of them:
wp_enqueue_style(): this method enqueues and loads the stylesheet passed as a parameter. In the code above, we use it to load both the Bootstrap stylesheet and our custom CSS file.wp_enqueue_script(): this method enqueues and loads a script file. We’ve used it to load Bootstrap’s JavaScript bundle, indicating the jQuery library as a dependency. jQuery comes already bundled with WordPress, so we don’t need to load it using a URL. (WordPress knows exactly where to get it.)get_template_directory_uri(): this method gets the URI of the current activated theme directory.add_action('wp_enqueue_scripts', '...'): this method hooks our functions into the wp_enqueue_scripts action (used when en-queuing styles and scripts that need to appear on the front-end of the website).
You can find more about including CSS and JavaScript files in the WordPress theme docs.
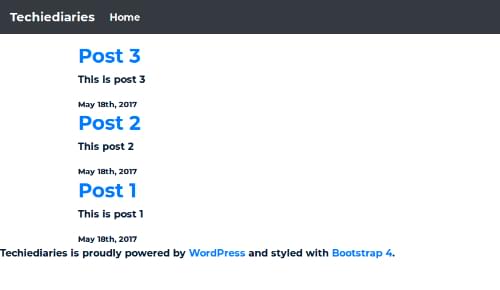
This is our theme now with its shiny Bootstrap appearance:
Conclusion
In this tutorial, we’ve seen how to create a simple WordPress theme that integrates the latest version of Bootstrap.
With this new skill under your developer belt, you’re now ready to create your own awesome, Bootstrap-based WordPress theme and share it with the world!
If you’ve heard about Bootstrap but have been putting off learning it because it seems too complicated, then play through our Introduction to Bootstrap 4 course for a quick and fun introduction to the power of Bootstrap.
Frequently Asked Questions on Bootstrap WordPress Theme Integration
How can I integrate Bootstrap with my WordPress theme?
Integrating Bootstrap with your WordPress theme involves a few steps. First, you need to download the latest version of Bootstrap. Once downloaded, extract the files and locate the CSS and JS folders. These folders contain the Bootstrap files that you need to integrate into your WordPress theme. You can upload these files to your theme directory using an FTP client. After uploading, you need to enqueue the Bootstrap files in your theme’s functions.php file. This will make Bootstrap available to your theme. Remember to enqueue the scripts properly to avoid any conflicts with other scripts.
What are the benefits of using Bootstrap in WordPress?
Bootstrap is a popular framework that can help you create responsive and mobile-first websites. By integrating Bootstrap into your WordPress theme, you can take advantage of its pre-designed templates, CSS and HTML components, and JavaScript plugins. This can save you a lot of time in designing and developing your website. Moreover, Bootstrap ensures that your website is compatible with different browsers and devices, improving your site’s accessibility and user experience.
Can I use Bootstrap with any WordPress theme?
Yes, you can use Bootstrap with any WordPress theme. However, the integration process may vary depending on the structure and design of the theme. Some themes may already have built-in support for Bootstrap, while others may require manual integration. It’s important to check the theme’s documentation or consult with the theme developer if you’re unsure.
How can I customize my Bootstrap WordPress theme?
Customizing your Bootstrap WordPress theme can be done through CSS. Bootstrap provides a set of CSS classes that you can use to style your website. You can override these classes in your theme’s style.css file to apply your own styles. Additionally, you can use Bootstrap’s SASS variables and mixins to customize the design further. Remember to create a child theme before making any changes to your theme’s files to prevent losing your customizations when updating the theme.
Are there any plugins that can help with Bootstrap WordPress theme integration?
Yes, there are several plugins that can help with Bootstrap WordPress theme integration. For example, the Bootstrap Shortcodes for WordPress plugin allows you to add Bootstrap elements to your posts and pages using shortcodes. The WP Bootstrap Navwalker plugin helps you implement a Bootstrap navigation menu in your theme. These plugins can simplify the integration process and enhance the functionality of your Bootstrap WordPress theme.
How can I add a Bootstrap navigation menu to my WordPress theme?
Adding a Bootstrap navigation menu to your WordPress theme involves modifying your theme’s header.php file and functions.php file. In the header.php file, you need to replace the existing navigation code with the Bootstrap navigation markup. In the functions.php file, you need to register the new navigation menu and enqueue the necessary Bootstrap files. Remember to backup your theme’s files before making any changes.
Can I use Bootstrap with a WordPress page builder?
Yes, you can use Bootstrap with a WordPress page builder. Many page builders, like Elementor and Beaver Builder, are compatible with Bootstrap. They allow you to use Bootstrap components in your layouts and provide options to customize the design using Bootstrap’s CSS classes. This can make it easier to create responsive and professional-looking pages without coding.
How can I update my Bootstrap WordPress theme?
Updating your Bootstrap WordPress theme involves replacing the old Bootstrap files with the new ones. You can download the latest version of Bootstrap and upload the new files to your theme directory. After uploading, you need to enqueue the new files in your theme’s functions.php file. Remember to test your website after updating to ensure that everything works correctly.
How can I troubleshoot issues with my Bootstrap WordPress theme?
Troubleshooting issues with your Bootstrap WordPress theme can involve several steps. First, check if the Bootstrap files are correctly enqueued in your theme’s functions.php file. If there are any errors, they may prevent Bootstrap from working properly. Second, check your theme’s code for any conflicts with Bootstrap’s CSS classes or JavaScript plugins. If you’re still having issues, consider seeking help from a professional or the WordPress community.
Can I use Bootstrap with a WordPress eCommerce theme?
Yes, you can use Bootstrap with a WordPress eCommerce theme. Bootstrap can help you design a responsive and user-friendly online store. However, the integration process may be more complex due to the additional eCommerce features. It’s recommended to use a theme that already supports Bootstrap or consult with a professional if you’re unsure.
 Ahmed Bouchefra
Ahmed is a technical author and web developer living in Morocco with a Master's degree in software development. He authors technical content about JavaScript, Angular and Ionic. He is also a fan of entrepreneurship, poetry, and teaching. You can contact me on my personal website and read my other articles on Techiediaries.