If you remember the launch of Windows 95, then you might remember the Hover. If you had any free time on your hands back then, you may have even been good at it like this guy! It all started as a free game on the original Windows 95 installation CD as a way to show what’s possible on a PC with the Windows Games SDK – that is, cutting edge multimedia and 3D graphics.
So what better way to showcase the new capabilities of 3D graphics in modern browsers like Internet Explorer 11 – using WebGL and HTML5 – than bringing back a little nostalgia!
And you can download our WebGL boilerplate project and create your own 3D shader. Game on!

Bringing Hover to the browser with HTML5 and WebGL
Hover was among the first 3D games that ran on Windows. Even though its multimedia capabilities were sophisticated for the time, by modern standards it is a pretty simple game. This makes it a perfect example to help you learn the basics of WebGL and even discover some practical application to your project. Thinking in 3D can also be a lot different than writing a 2D game. If you’re interested in graphics and the cutting edge scenarios that 3D enables, then that kind of thinking can be a lot of fun.
While WebGL is a general purposes graphics library, its best known for its 3D capabilities and, prior to its introduction, there was no way to render real 3D scenes in a browser without using a plug-in. Beyond games, 3D can be used in a variety of ways to enhance learning and understanding in web pages and apps.
WebGL gives developers access to the sophisticated 2D and 3D capabilities of modern graphics hardware (your computer’s GPU) directly from JavaScript. This enables all kinds of exciting experiences on the web without the need for plugins, including games like Hover! More importantly, WebGL is becoming mainstream and with its introduction in Internet Explorer 11, it has some level of support in all major browsers. Still it’s important to use feature detection to check that your users have a browser that supports WebGL – the scan on modern.IE will help you check that you aren’t using browser detection in your sites.
Let’s get started
Creating the World
In the original Hover game, most of the 3D came in the form of walls and floors–flat objects with perspective applied to them. The objects, the crafts themselves, the flags and the other “pickups” like the springs or the stop lights, were rendered as normal 2D images on top of the 3D world. Those 2D graphics were scaled and positioned to match the 3D game, but there was no real 3D processing applied to them.
Modern 3D scenes, including the new Hover, are composed from models, textures, and lighting – they are rendered when you point a virtual “camera” at them. Here’s a breakdown of each of those:
Models are definitions of the physical objects in the scene. In Hover, for example, we created models for each of the crafts and all of the pickups. Here’s how these models looked before we had applied texture or lighting:
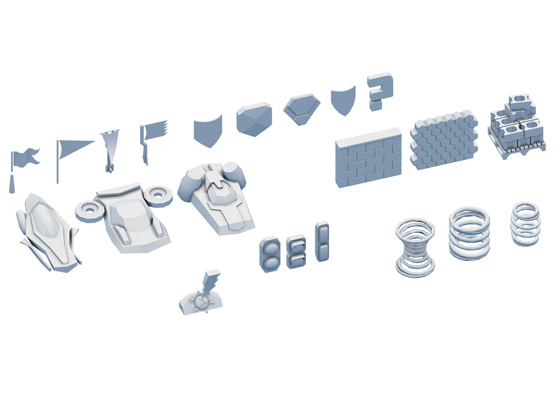
Where the fundamental unit of a regular 2D graphic is a pixel, the fundamental unit of a 3D model is a polygon, typically a triangle in 3D space. When you place enough of those polygons next to one another, a three-dimensional object emerges (much like many pixels combine to create a 2D image). The seams between the triangles are called vertices (or “vertex” in the singular) and we’ll mention those again in a bit.
Textures are images or colors that “wrap” the models. They paint life onto the model to make it seem more realistic. Here is an example of a texture that we use when rendering one of the crafts in the game:
If you look closely, you can see how that texture image would correspond to the geometry of the “Chicago” craft from the game. You also might notice that the texture contains the color for the craft but also some details like shadows and, in some cases, color variations to give a softer “sandy” feeling to the craft.
Finally, after you place the models into the scene and apply their corresponding textures, you finalize the 3D effect by placing lights into the scene. Some lighting is pretty basic. An ambient light, for example, will light the entire scene in a roughly even way. You can also create spotlights, directional lights and point lights, all of which can light objects within the scene in different ways.
Rendering and Shaders
Now that you’ve defined the scene, you need to render it, transforming the 3D scene definition into the pixels that make up the 2D image that you see on the screen. This is a mathematically intense operation, but one that modern GPUs are very good at! In fact, the high framerate animation in a game like Hover means that the scene is being rendered and rerendered up to 60 times per second.
Because that code needs to be very fast, some of it gets executed directly on the GPU. That code is called a shader. All the objects added into the 3D scene are eventually processed by two special shaders: the vertex shader and the fragment shader.
The vertex shader operates on each vertex within the scene and transforms the vertex from 3D space in to 2D space for rendering to the screen. Remember that a vertex defines the boundary between two triangles in a model. Custom vertex shaders can transform the way that boundaray looks on the, maybe deforming it to smooth out a surface or create realistic effects like water ripples or waves.
The fragment shader (sometimes called a pixel shader) then operates on each pixel in the scene and can perform final color transformations to enhance lighting effects or create other effects. The fragment shader ultimately determines what color that individual fragment or pixel will be!
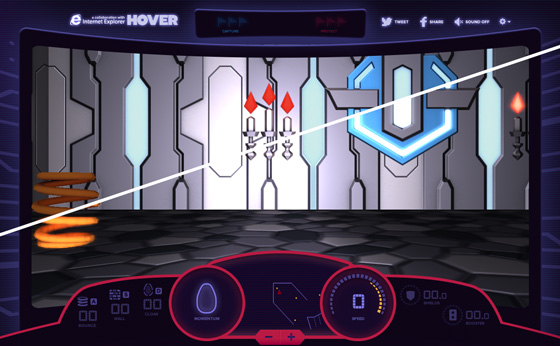
Shaders are unique in the browser because they get executed directly on the GPU instead of being executed by the browser’s JavaScript engine. This makes them a lot of fun and gives you a lot of power. Within Hover, you can see the effect of an advanced shader when you enable Hypercolor in the options dropdown.
Options dropdown:

Hypercolor on/off:
Create Your Own Shader!
It can be a little intimidating to start with WebGL and, like many things, some of the real fun starts once you’re well into the process. To help you join the party, we’ve created a boilerplate Hover 3D project with a scene already set up and we’ve included an example of a custom shader so you can jump straight to the fun part! So download it and impress your friends when you tell them you spent the afternoon writing custom shader code!
One note: because some parts of a WebGL app get executed directly on the GPU, it has some security sensitivities and as a result you can only load WebGL resources from the same domain as the rest of the site (i.e. it’s protected by CORS). You can run this code locally, but you’ll need to setup a local web server. Sorry! Turns out that you need to be a little hardcore to write shaders after all.
Learn more about WebGL
There are many resources on the web for learning WebGL Here’s a few of our favorites:
- BabylonJS – a new framework that helps make WebGL simpler + a collection of experiments written to show cross-browser support
- ThreeJS – a popular 3D library and collection
- LearningWebGL – a great set of 101 projects to learn from
- WebGL on MSDN – new to Internet Explorer 11
- WebGL specification
- WebGL working group
 Josh Holmes
Josh Holmes is a passionate soul who gets his kicks solving problems with deep fried awesomeness. He is currently employed by Microsoft as a program manager on the Internet Explorer team. Josh is a frequent speaker and lead panelist at national and international software development conferences focusing on web technologies on the Microsoft stack such as ASP.NET, PHP, IronRuby, JavaScript and more.