This article was sponsored by Webydo. Thank you for supporting the sponsors who make SitePoint possible!
Web development without composing a single line of HTML? Blasphemy, you say? Only if it’s not done well. Thankfully, for creative designers who need to create advanced websites for their clients without relying on their own coding skills or on developers, there is a new platform that makes it easier than ever: Webydo. This community-led platform of 35,000 designers, made by designers for designers, aspires to present an alternative to the powerful open-code developers communities such as WordPress with a Photoshop-like interface for code-free web design.
In the past, up to 70% of website production budget was used for the manual development of code. Webydo offers a full code-free solution for the whole process of creating, managing and hosting business websites, including efficient management of your client accounts and billing directly from your Webydo dashboard.
Let’s clear the air for a quick moment by making it known that online software like Webydo is not meant to provide a solution for complex enterprise web projects, and Webydo isn’t a solution for the hardcore JavaScript guru, or for advanced developers. Though it’s a good idea for web designers to learn how to code, Webydo provides a fantastic solution for creative designers who want to build advanced websites for their clients with custom tailored web designs, independently.
The first thing to know about Webydo is that it was created specifically for professional graphic and web designers working with clients, not for amateur web users. Therefore, Webydo’s online software is packed with graphic tools familiar to designers from other professional software such as Adobe Photoshop or InDesign. Designers will feel quite at home among the rulers and gridlines. Webydo enables you to design a website from scratch, working directly in the browser, with pixel perfection and all the necessary elements such as ecommerce, social and HTML widgets, responsive cross-platform design, blogs and other features most clients ask for.
I found the Webydo interface very intuitive. You just drag and drop your design elements into the canvas and Webydo automatically creates the HTML code and a fully functioning website including integrated CMS and SEO management tools. Webydo’s built-in CMS allows clients to update their website’s content, making for a much more collaborative experience between clients and designers, and eliminating the chicken-or-egg problem of which comes first: the design or the content. Webydo’s CMS even allows designers to lock specific design elements preventing their clients from disturbing the design, preventing unwanted changes and preserving the designer’s artistic control.
For designers wishing to focus on the creative side, Webydo represents a fantastic opportunity to grow their online web design business and provide their clients with high quality websites, without the coding hustle.
Jumping Right In
First stop on the train to code-free web design is a visit to Webydo’s website to set up a free account. Webydo provides a full cloud environment that allows you to work on your projects from any computer, at work or at home. The design work is done directly in the browser, and there is no need to install or update anything on your computer — perfect for client work.
Upon entering the requisite information and confirming your account, Webydo presents you with three foundational choices to start your design.
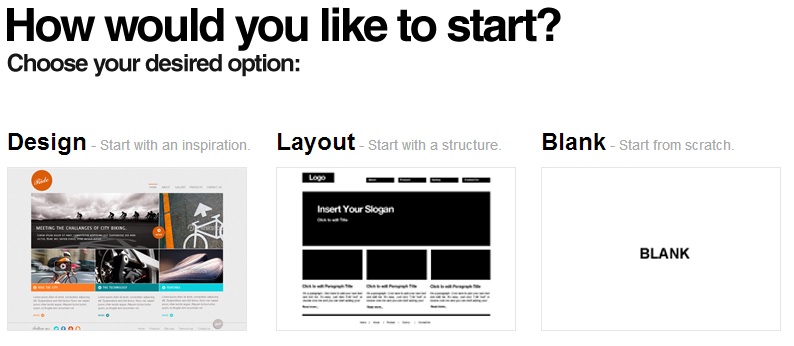
These three choices essentially govern how much of a framework or template you’d like to start with.
Choose Design and you’re given predesigned inspiration websites in which every element is editable. This option is good for testing the system or for really fast paced projects where you can just adjust the design to fit your needs.
Layout, the next starting option, gives you a basic site structure, in which you can insert your graphic design work. Again here, every element can easily be adjusted.
Finally, the Blank Canvas option offers exactly what you might expect, with absolutely no predefined structures, colors, or graphic, allowing you to work with no limiting templates. That’s why we’ll be using this option as the starting point of our tutorial.
Whichever option you choose, it’s important to note that all three can be customized; you’re never stuck with the preset options.
Basic Elements of Web Design
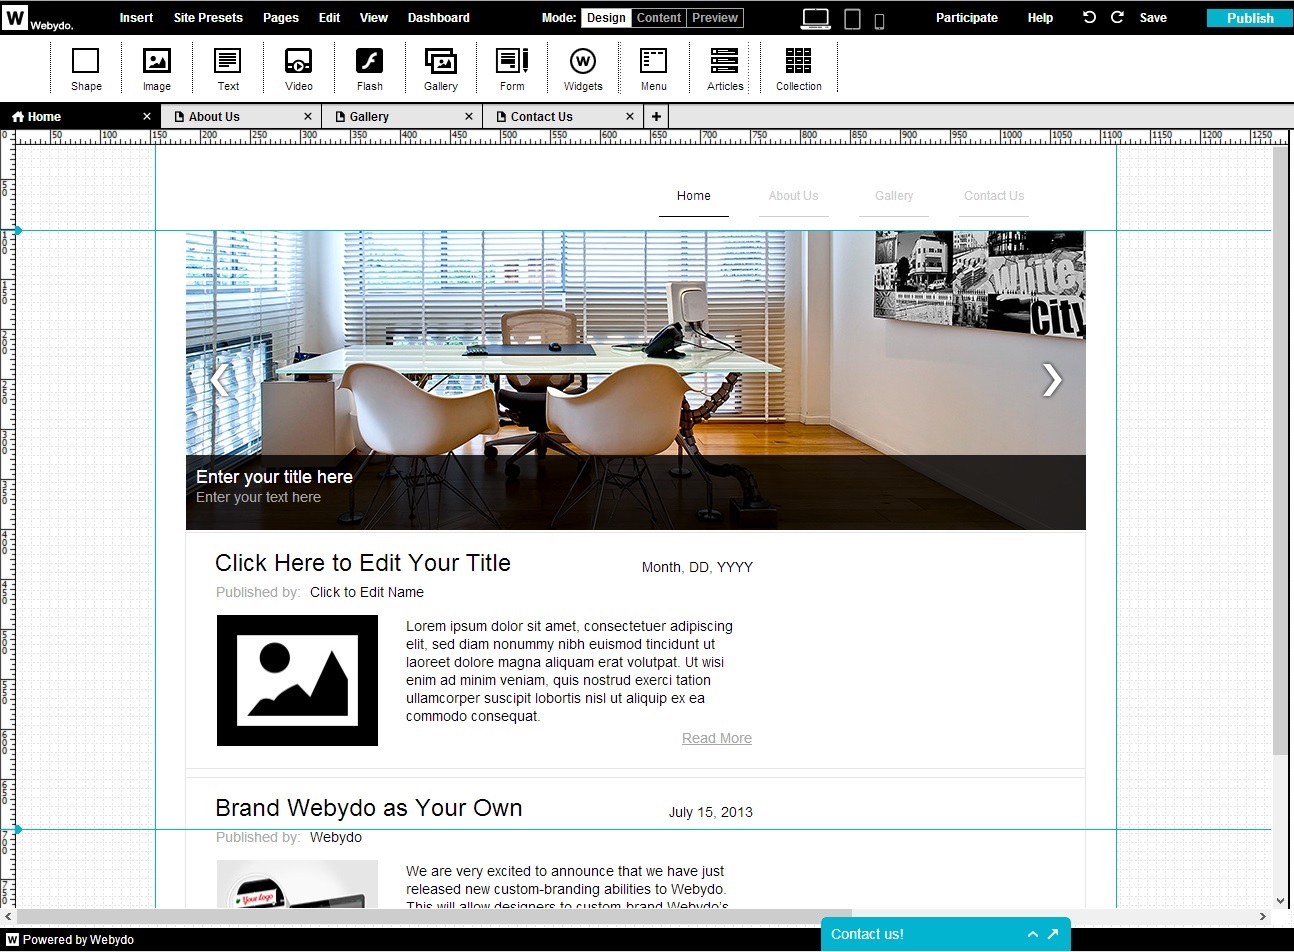
Webydo has three views, called “Modes”. The “Design” mode comes first and presents designers with a familiar canvas (blank in our case) complete with rulers and grid lines. At the top of the design mode, a menu displays options for inserting page elements such as text, images, video, menus, forms, flash galleries, widgets, and so on. You can even insert your own HTML code, if needed. From this top menu you can adjusting site presets, edit selected elements, and control other canvas options. Each of these options presents a new set of tools in the toolbar beneath it when selected.

We’ll start off by adding a fancy image gallery element to the top of our home page. This element will scroll through selected images that could conceivably contain news and content updates. By simply clicking the “Gallery” tool in the insert menu, a gallery element is placed in our empty canvas. We can then drag, resize and manipulate this element just as you would in a desktop design application.
Once this element has been dragged into a suitable position, we can use the toolbar to change settings such a dimensions, fade in, and autoplay. Yep, it’s really that easy! All complementary code is generated behind the scenes, in compliance with the latest web standards, and is W3C valid.
Let’s now add to our home page by inserting an “Articles” element that will showcase the content we’d like to display. Just as before, we simply click the tool we’d like inserted, then drag it.
In addition to our image gallery and article collection, let’s add some site navigation to our header. Yet again, we simply click, drag and drop our element in place. Since we’d like elements in our header to remain the same on all pages, let’s select the “Repeat on all pages” option from the edit menu.
It’s worth mentioning here that a quick right-click anywhere within the canvas brings up the same insert menu with selected elements being placed at the point of the click. This might save some time when throwing lots of elements together.
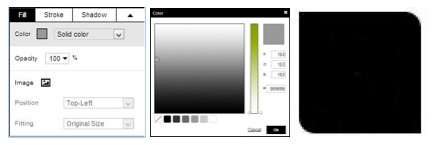
To put the finishing touches on our home page we’ll add a custom shape and some text to our header. Once more we’ll click the appropriate insert option, but this time after dragging the element to the top left corner of the page, we’ll make use of the “Properties Panel” on the right side of the screen. The properties panel manages element-specific properties like fill, stroke, and shadow. From here, we’ll set the fill color of the square we just created to one of the site’s color palette options, defined in the site presets menu. We’ll also use the stroke option to round the corners.
Next, we’ll add a text element on top of the custom shape we created, and another neighboring it to the
right. We’ll also need to set the option to repeat on all pages so our header remains consistent.
With our home page complete, lets take a look at our work:

Content is King
With our basic layout designed we move onto the second stage of web design with Webydo. This mode is labeled “Content”, and that’s exactly what your focus will be here.
The “Content” tab shows you how your website will look to the client in the integrated CMS> In many cases, designers find it useful to create the design layout first, and then add content to the site. Whichever process you prefer, you can add the content in the Design view as well.
With every element we’ve placed in the previous stage glued in place, we are free to edit the site’s content without worrying about accidental design changes. You could almost think of the previous stage as creating a template to be fleshed out in this mode. Images, text, labels, form fields and the like can all be refined here, which helps to separate the site’s graphic design from the content.
Once all content has been filled in, the site is ready for the third mode, “Preview”. Switching to this view shows the site in a production-like environment giving you a fair representation of what visitors will see. Should everything be coming up daisies at this point, you’re ready to publish.
Publishing Your Site
Webdyo hosts all websites created with its software on its own Akamai backed network. This makes publishing simple, and site management even easier with a dashboard capable of editing SEO content, updating domains, and even managing client billing.
Designers can create as many websites as they like on Webydo, free of charge. You can even host these websites for free on Webydo’s sub-domain. Once your client approves of the site, you can bill your client for a premium Webydo account, which allows for hosting with custom domains, increased storage, and CMS and SEO management tools. There is also an option to export the created site from Webydo and host it with another provider (though you then lose access to the built-in CMS).
The CMS is worth mentioning here: when you’re ready to work with the client on ongoing site management, you can assign the client permissions in the CMS directly from your Webydo dashboard, and send a link to the client. If you prefer, there’s an option to white label and re-brand Webydo, so your client will work in an environment that puts your web design brand at the core.
Independence for Designers
Using Webydo, we’ve created a professional home page in a matter of minutes without writing a single line of code — you could even do this alongside your client.
One thing that sets Webydo apart is its focus on the design community. The software was created by designers, and is supported by a community of over 35,000 designers. Webydo’s feature planning is influenced by user votes, and their staff is active in answering questions and providing guidance.
Have you tried Webydo? What did you think?
 Joe Hewitson
Growing up with a love for coding, I’ve greatly enjoyed learning many forms of programming, especially web development. This has lead me to professional success ranging from the creation of cutting edge, web based, healthcare applications to simple CMS frameworks.