In the second part of our series on Intel XDK we looked into the frameworks it supports, undertook some coding and ran our app in the emulator. In this third part we will finish the application and will see how to use the Intel XDK API bridge. Finally we will learn how to test, debug and build an application.
You can find the final code we will be working on here.
Lets code again
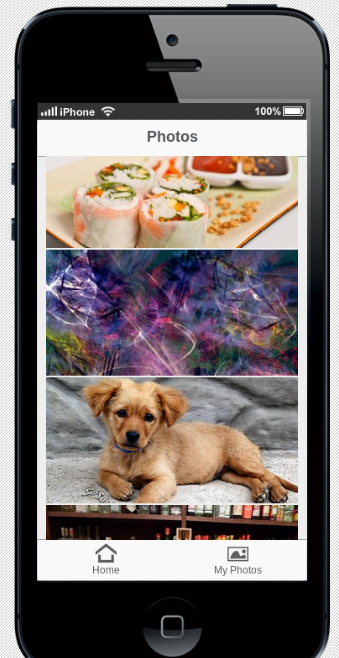
The app currently has two tabs that links to two different views. In the first view (the selected view) we will show some photos and if one of them is clicked, a new view will display that photo with additional information.
We have to create a container to be filled with a list of photos that responds when clicked. App Framework provides a special method for executing functions when an element is selected. Use data-load and give the name of a function as a parameter. Your HTML should look something like this:
<div class="panel" title="Photos" id="main_pg" data-load="displayData"  selected="selected">
        <div id="photoList"></div>
    </div>
The new div with id="photoList" will serve as a parent for every image. Did you notice the data-load property? The displayData function is executed when this view is selected. That function still doesn’t exist but we will create it shortly. Create another panel inside the div with id="content":
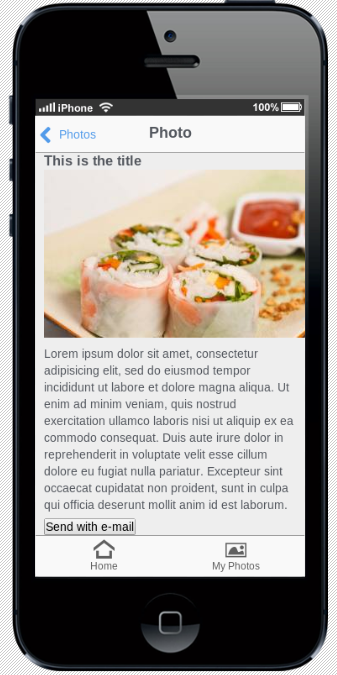
<div class="panel" title="Photo" id="photo">
<h3> </h3>
<img id="photoImg" src="#">
<p> </p>
<div>
<button id="emailButton">Send with e-mail</button>
</div>
</div>Now that the html is finished lets write some Javascript. In the img folder I already added some images and I will be referencing those local images. In this example app we are using local data but it can be swapped to a Rest API with few changes.
In the data.js file I added:
var data = [
    {
        id: 0,
        title: "This is the title",
        url: "img_1.jpeg",
        description: "Lorem ipsum dolor sit amet, consectetur adipisicing elit, sed do eiusmod tempor incididunt ut labore et dolore magna aliqua. Ut enim ad minim veniam, quis nostrud exercitation ullamco laboris nisi ut aliquip ex ea commodo consequat. Duis aute irure dolor in reprehenderit in voluptate velit esse cillum dolore eu fugiat nulla pariatur. Excepteur sint occaecat cupidatat non proident, sunt in culpa qui officia deserunt mollit anim id est laborum."
    },
    {
        id: 1,
        title: "This is the title",
        url: "img_2.jpeg",
        description: "Lorem ipsum dolor sit amet, consectetur adipisicing elit, sed do eiusmod tempor incididunt ut labore et dolore magna aliqua. Ut enim ad minim veniam, quis nostrud exercitation ullamco laboris nisi ut aliquip ex ea commodo consequat. Duis aute irure dolor in reprehenderit in voluptate velit esse cillum dolore eu fugiat nulla pariatur. Excepteur sint occaecat cupidatat non proident, sunt in culpa qui officia deserunt mollit anim id est laborum."
    },
    {
        id: 2,
        title: "This is the title",
        url: "img_3.jpeg",
        description: "Lorem ipsum dolor sit amet, consectetur adipisicing elit, sed do eiusmod tempor incididunt ut labore et dolore magna aliqua. Ut enim ad minim veniam, quis nostrud exercitation ullamco laboris nisi ut aliquip ex ea commodo consequat. Duis aute irure dolor in reprehenderit in voluptate velit esse cillum dolore eu fugiat nulla pariatur. Excepteur sint occaecat cupidatat non proident, sunt in culpa qui officia deserunt mollit anim id est laborum."
    },
    {
        id: 3,
        title: "This is the title",
        url: "img_4.jpeg",
        description: "Lorem ipsum dolor sit amet, consectetur adipisicing elit, sed do eiusmod tempor incididunt ut labore et dolore magna aliqua. Ut enim ad minim veniam, quis nostrud exercitation ullamco laboris nisi ut aliquip ex ea commodo consequat. Duis aute irure dolor in reprehenderit in voluptate velit esse cillum dolore eu fugiat nulla pariatur. Excepteur sint occaecat cupidatat non proident, sunt in culpa qui officia deserunt mollit anim id est laborum."
    }
];
Open app.js and create a function that gets the data above.
function getData(){

    return data;

}
Now that we have the data, we need to display it.
function displayData(){

    $("#photoList").html('');

    var data = getData();

    $.each(data, function(index, photo){

        var img = $.create("img", {src: "images/" + photo.url, alt: "something"});
        img.attr("data-id", photo.id);
        img.attr("style", "width: 100%; margin: 2px auto; display: block;");

        var imgContainer = $.create("div",{});
        imgContainer.append(img);

        $("#photoList").append(imgContainer);

    });
}
This function selects the container that will hold the images and makes sure that it’s empty. It then retrieves the data from the getData function. The displayData function doesn’t know where the data is stored or where the getData function retrieves that data.
This is the first step in separating app logic from the data storage, and it’s extendable too. It gives us the freedom to develop without using an API and at the end, write an adapter to retrieve the data or to edit the data if something changes locally.
The $.each loops through the supplied data and appends any new images to the container with id="photoList".
Now test it in the emulator, you will hopefully see something like:
Now we have listed the photos, we need to display it’s data. Earlier we created a new panel and we’ll use that to display more information about a particular photo.
$("#photoList").on("click", "img", function (){

    var id = $(this).attr('data-id');

    $("#photo h3").html(getData()[id].title);
    $("#photo img").attr("src", "images/" + getData()[id].url);
    $("#photo p").html(getData()[id].description);

    $.ui.loadContent("#photo",false,false,"pop");

});
This is a JQuery like method for event handlers. It selects the #photoList element and if an img element is clicked, it executes the anonymous function.
It then selects the h3 and p tags and appends the description and title of the local data, again using the getData() function. This function returns an array and we can search for the given element using its id.
Finally we show the panel, $.ui.loadContent("#photo",false,false,"pop");allows us to make a transition from one panel to another. Read this post if you want to learn more about this function.
Test the app again. Click on one of the images and see what happens.
I’m not happy with the style. I added these lines of code to style.css so it looks much nicer:
#photo h3{
    text-align: center;
    margin: 5px;
}

#photo img{
    width: 100%;
    margin: 0 auto;
    display: block;
}

#photo button{
    display: block;
    margin: 0 auto;
    margin-top: 15px;
}
Finally we need to email that photo to someone. For this we will use the Intel XDK API.
Add this to app.js:
$("#emailButton").on("click", function(){

    var src = $("#photoImg").attr("src");

    console.log(src);

    intel.xdk.device.sendEmail(
        'Hi, Check out this photo:' + src, // The body raw
        "aleksanderkoko@gmail.com",     // To the email that you want to send
        "Something cool that i found",  // The subject
        true,                           // Is Html
        "",                             // CCed
        ""                              // BCCed
    );

});
This is an event handler. When the button is clicked the anonymous function is executed.
In the function we firstly select the src attribute from the photo. This is a problem as the src attribute points to a photo that is stored locally. If you convert the app to a Rest API then it will no longer be a problem. This is for demonstration purposes only.
The intel.xdk.device.sendEmail() is simple. We specify the text that will be sent, the subject, the recipient and if this is an HTML or plain text email. Have a quick read of the documentation for more details on this particular function.
The Intel XDK API has plenty of other functions to play with. A QR Code Reader, Orientation lock functions, SMS sending, Facebook Objects and many more. Take a look at the function documentation to find out more.
Test and Debug on device
I have an Android device so can easily test my application using the App Preview application. Do this by clicking on the Test tab and selecting which method you want to use, I used the WIFI mode. This means I have to connect my laptop and my android device to the same WIFI. When using WIFI mode select Local Apps after you open the App Preview application. You can also choose the mobile mode and pull the project from a server. Finally select the desired project from the list and click the launch button.
If you run the app on an iPhone it will look like an iOS7 app, on Android it will look like an Android app.
Try sharing a photo by email. In my case it gives me 3 options: Bluetooth, Drive and Gmail. I selected Gmail and then the send button.
![]()
This may not be the best looking email but at least it works and it is a good starting point.
You have two option for debugging. Debugging when testing in the test tab, here the Weinre tool is used and doesn’t provide much info. The second method is to debug via the debug tab. This only supports Android devices but it is a much more in-depth debugging tool than Weinre. Select which option suits you best.
You will have to add this line of code before the body tag to get Weinre to work.
<script src="http://debug-software.intel.com/target/target-script-min.js#ShkWrJQLqFOnYaUo-mmbXo6ZvNRwCQHyvboazA1qGFA"></script>Build the app
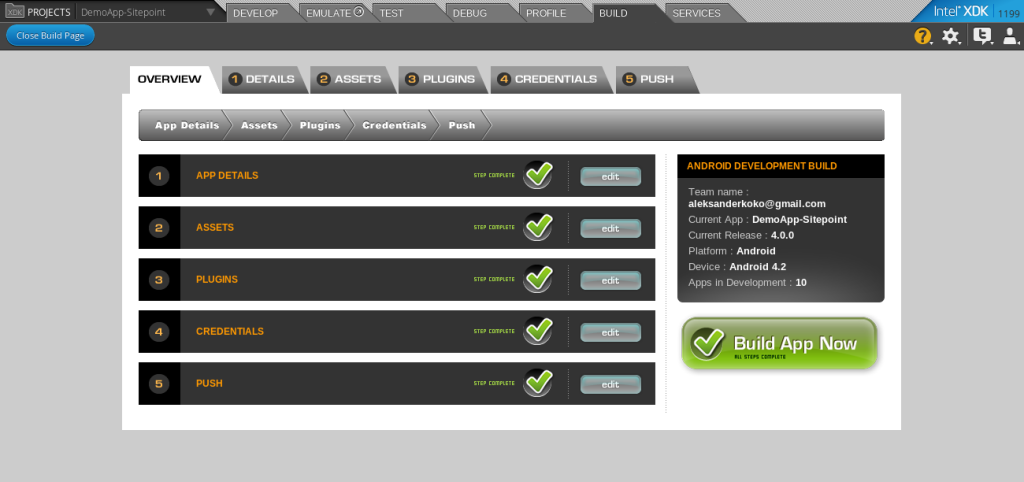
The build tab is the easiest part, although the two platforms will differ slightly. You can configure different options such as the app name, the version, app permissions, launch icon, splash screen, push notifications and more.
Intel XDK allows you to build your app in several other platforms as well, such as Windows 8.
Note that on IOS you don’t need to have Mac OS X but you will need an iOS developer account. After building you will still need to upload it to each store. With Intel XDK you can go from coding to building, only the publishing task is missing from the full development cycle.
Wrapping up
In this three part series we covered a lot of information. If you want to go further head to the documentation and read about the Intel XDK API and App Framework in-depth. Feel free to grab the project we coded and do what you want with it. My advice is to add a Rest API connection, fill the second tab and add more social sharing buttons.
If you have any comments just let me know in the comments section below, I will be glad to hear from you.
What do you think about Intel XDK?
 Aleksander Koko
Aleksander is young developer who loves to play with the newest web technologies. In his free time, he reads about PHP, Firefox OS or experiments with a new language. Currently, his main interests are PHP design patterns, laravel, dart and cloud.