

Key Takeaways
- Utilize the `
` element within SVGs to dynamically change properties like stroke and fill in response to user interactions such as mouse clicks, enhancing visual feedback and interactivity. - Overcome the limitations of SVG support across different browsers by manipulating SVG elements using Core DOM methods for broader compatibility, as demonstrated with the `setSpeed` function altering SVG properties based on user input.
- Introduce new SVG elements dynamically using JavaScript with `document.createElementNS`, and handle nuances such as the `xlink:href` attribute specifically for SVG image elements to ensure proper referencing.
- Employ JavaScript to manipulate existing SVG elements, like flipping images for aesthetic variation, using a combination of `translate` and `scale` transformations to adjust the positioning and orientation effectively.
- Enhance the interactivity of SVG-based applications by adding event listeners and manipulating SVG properties in response, as shown with the interactive zombie images that change speed settings upon user interaction.
A lot goes into surviving the apocalypse. Or at least into building an HTML5 app, which may be more or less difficult depending on the app and the apocalypse. So far, in Part 1 of this series, we’ve covered static SVG elements—text, image, circles, rectangles, and, most important, paths. Part 2 dipped into some of the cool animation tricks that can be done without JavaScript.
But our app isn’t going to save anyone from zombies, not as it stands now. To do that, it needs a little something extra, like buttons that work. So to that end, this walkthrough, the third in the series, will introduce two different methods for responding to user interaction, including attribute animation within the SVG element itself and using JavaScript to manipulate both Core DOM and SVG DOM elements.
Note: The code in this article builds on the final source code from Part 2 of this series. The code itself can be found behind http://justinwhitney.com/zombies/zombies_part2.htm. Also, this walkthrough adds some new images. A complete archive of assets used in this series can be found at http://justinwhitney.com/zombies/zombieAssets.zip.
Using the <set> Element
In the last walkthrough, the zombies began to move because of a little element called <animateMotion>, which, when embedded within the <image> element, defined a path of motion and a duration for that motion for the <image>. That approach barely scratches the surface of SVG animation. In addition to giving the user a visual indicator of a control’s function (or even just providing candy to a page), animation can and should be used to indicate a response to user interaction.
Traditionally, this is implemented by using JavaScript to swap images, or by using CSS to define a hover style, or any of a thousand similar techniques. SVG adds its own tools to the bat belt by allowing property changes to be embedded within the elements themselves and then wired to mouse events. One of the most common examples is the use of the <set> element to change stroke and/or fill color.
Go back to the shambling zombies. Right now, as they’re initially defined, the slow zombie is circled by a thick red stroke while the fast zombie gets a thin black stroke. Obviously, when the user clicks on the fast zombie, that will need to change. Usually, something needs to be added to the <image> element to respond to the click. But not in this case.
Take a look at the <circle> element with the id “fastCircle”. Right now, it’s defined as:
<circle id="fastCircle" cx="275" cy="325" r="40" stroke="black" fill="white" stroke-width="2" />
To have this element respond to a click, embed <set> elements defining all possible stroke and stroke-width changes and (here’s the important part) the mouse events on which they are to begin. In this case, the attributes of “fastCircle” will change when the “fastZombie” image receives a mousedown event, so the syntax would be:
<circle id="fastCircle" cx="275" cy="325" r="40" stroke="black" fill="white" stroke-width="2">

  <set attributeName="stroke" from="black" to="red" begin="fastZombie.mousedown" />

  <set attributeName="stroke-width" from="2" to="4" begin="fastZombie.mousedown" />

</circle>
(Note that the closing bracket has been changed to a closing </circle> tag.) Of course, this same element needs to respond to a “slowZombie” click, as well, so finish it out:
<circle id="fastCircle" cx="275" cy="325" r="40" stroke="black" fill="white" stroke-width="2">

   <set attributeName="stroke" from="black" to="red" begin="fastZombie.mousedown" />

  <set attributeName="stroke-width" from="2" to="4" begin="fastZombie.mousedown" />

  <set attributeName="stroke" from="red" to="black" begin="slowZombie.mousedown" />

  <set attributeName="stroke-width" from="4" to="2" begin="slowZombie.mousedown" />

</circle>
And “slowCircle” needs the same treatment, in reverse:
<circle id="slowCircle" cx="75" cy="325" r="40" stroke="red" fill="white" stroke-width="4">

  <set attributeName="stroke" from="black" to="red" begin="slowZombie.mousedown" />

  <set attributeName="stroke-width" from="2" to="4" begin="slowZombie.mousedown" />

  <set attributeName="stroke" from="red" to="black" begin="fastZombie.mousedown" />

  <set attributeName="stroke-width" from="4" to="2" begin="fastZombie.mousedown" />

</circle>
Based on just these additional elements, still without any JavaScript, the circles now respond to user interaction, as shown in Figure 1.
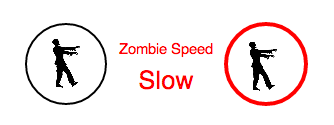
Figure 1. Using <set> to Change Stroke Attributes on mousedown
Manipulating <text> DOM with JavaScript: textContent
Using <set> is a neat trick, but it has one big problem: not all SVG-ready browsers implement this particular functionality. Fortunately, as an XML-based spec, SVG can be accessed the same way JavaScript accesses any document based on the Core DOM spec—that is, through getElement() and setElement(). So, to allow for maximum browser compatibility, add a new function called setSpeed(speed):
<script>
&NBSP;
function setSpeed(speed) {

  if (speed == 'Fast') {

    var circleSelected = document.getElementById('fastCircle');

    var circleUnselected = document.getElementById('slowCircle');

  } else {

    var circleSelected = document.getElementById('slowCircle');

    var circleUnselected = document.getElementById('fastCircle');

  }

  circleSelected.setAttribute('stroke','red');

  circleSelected.setAttribute('stroke-width','4');

  circleUnselected.setAttribute('stroke','black');

  circleUnselected.setAttribute('stroke-width','2');

}

</script>
This function grabs the fastCircle and slowCircle elements and then sets the “stroke” and “stroke-width” attributes by accessing them directly.
Now that the circles are switching based on user selection of fast or slow zombies, the text needs to change as well. This could be done using the same technique—accessing SVG attributes through Core DOM. But in some cases an element’s attribute can be accessed directly through the SVG DOM. Not only does this make for tighter code, but it also results in a performance boost. The trick is knowing the syntax for the attribute you need.
The content of a <text> element happens to be one of those attributes that can be accessed through SVG DOM, and in this case textContent is the correct answer. It’s “textContent”. You’re welcome.
function setSpeed(speed) {

  if (speed == 'Fast') {

    var circleSelected = document.getElementById('fastCircle');

    var circleUnselected = document.getElementById('slowCircle');

  } else {

    var circleSelected = document.getElementById('slowCircle');

    var circleUnselected = document.getElementById('fastCircle');

  }

  circleSelected.setAttribute('stroke','red');

  circleSelected.setAttribute('stroke-width','4');

  circleUnselected.setAttribute('stroke','black');

  circleUnselected.setAttribute('stroke-width','2');

  var speedText = document.getElementById('speedText');

  speedText.textContent = speed;

}
Be sure to add an onmouseup event to the zombie images:
<image id="slowZombie" x="375" y="1875" width="175" height="304" transform="scale(.16,.16)" xlink:href="zombie.svg" onmouseup="setSpeed('Slow');">

<image id="fastZombie" x="1630" y="1875" width="175" height="304" transform="scale(.16,.16)" xlink:href="zombie.svg" onmouseup="setSpeed('Fast');">
Clicking the zombies should now change the text as well as their container circles, as in Figure 2.
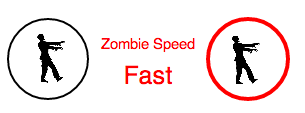
Figure 2. textContent Change on <text> Element
IEBlog on MSDN compares SVG DOM with Core DOM in more detail, and covers other best practices. . The SVG DOM spec can be found here.
Adding New SVG Elements
Way back on Part 1, this series introduced the <path> element and used several of them to create the increment/decrement controls in the controlPanelBox pane. Now would be a good time to use the power of JavaScript to breathe some life into these controls, first by creating new zombies, then later by adding rednecks and buildings, and finally by removing these elements on decrement.
Anyone familiar with creating new elements based on namespace definition will recognize the document.createElementNS command. This is the key to creating new SVG elements, as well.
In the header, create a new JavaScript function called newZombie(). More robust code will be added momentarily, but for now create a zombie by referencing the “image” definition of the “https://www.w3.org/2000/svg” namespace:
function newZombie() {

  var svg = document.createElementNS("https://www.w3.org/2000/svg","image");

}
Note that after the SVG element is created, the very next step demonstrates a bit of an anomaly in manipulating its attributes. While most of the attributes of the <image> element can be referenced through setAttribute, the source of the image itself, its xlink:href attribute, cannot. That attribute needs to be defined by referencing the source’s spec, in this case the href definition of the “https://www.w3.org/1999/xlink” namespace.
The W3 wiki covers this confusion by pointing out the most common mistakes when trying to create a new <image> element.
function newZombie() {

  var svg = document.createElementNS("https://www.w3.org/2000/svg","image");

  svg.setAttributeNS('https://www.w3.org/1999/xlink','href','zombie.svg');

}
Earlier in the series, when placing zombie <image> elements for the Speed control, some mad trickery was needed to make the images fully cross-browser compatible. Intuitively, one might think that setting the width and height you need for an image, and then placing it at the desired coordinates, would achieve the results you want. And in most browsers, that’s the case. But for the outliers, some scaling is needed. As an example, take another look at the slowZombie <image> definition:
<image id="slowZombie" x="375" y="1875" width="175" height="304" transform="scale(.16,.16)" xlink:href="zombie.svg" onclick="setSpeed('Slow');">
The goal here was to place a 50×50 image (or rather “height” is 50 and width is proportionate). The actual zombie.svg source defines an image that is 175×304. So, to make this work, the dimensions of the <image> element are defined as 175×304 and then transform:scale is applied using .16 as the scaling factor. Because of the scaling, the x,y coordinates also need to be changed so that the result, after scaling, would be 60,300.
When creating a new <image> element dynamically, similar voodoo needs to happen:
function newZombie() {

  var svg = document.createElementNS("https://www.w3.org/2000/svg","image");

  svg.setAttributeNS('https://www.w3.org/1999/xlink','href','zombie.svg');

  svg.setAttribute('width','175');

  svg.setAttribute('height','304');

}
But rather than calculating x,y coordinates based on the scaling factor and placing the image at those coordinates, try a different approach. Instead, use transform:translate to set the zombie’s location. The translate transform redefines the origin of an element. So, for instance, rather than placing an object at the x,y coordinate of 50,100 on a canvas with an origin of 0,0, translate will move the origin of the canvas itself to 50,100 and place the object at 0,0. The syntax for this would be:
svg.setAttribute('transform','translate(50, 100)');
Multiple transforms can be combined in the same line, so finish out the function with a “scale” transform:
function newZombie() {

  var svg = document.createElementNS("https://www.w3.org/2000/svg","image");

  svg.setAttributeNS('https://www.w3.org/1999/xlink','href','zombie.svg');

  svg.setAttribute('width','175');

  svg.setAttribute('height','304');

  var scale = .16;

  var x = Math.floor(Math.random()*550);

  var y = Math.floor(Math.random()*350);

  svg.setAttribute('transform','translate(' + (x) + ', ' + (y) + ') scale(' + scale + ', ' + scale + ')');

  document.getElementById('cityBox').appendChild(svg);

}
This example also sets x,y to a random spot in the “cityBox” pane, which is 600×400 (compensating for the 50×50 size of the image itself). The (0,0) origin, by default, is in the top-left corner. In the end, the new element is appended to the DOM like any other element, in this case specifying the “cityBox” <svg> element as its parent element.
To trigger the function, find the <path> element with the id “zombieMore” and add the newZombie() function to an onmouseup event. This will be the increment button for “City Population (000s)”, an important factor when predicting the prevalence of zombies during an apocalypse. For now, don’t worry about the other buttons since this is just for testing.
<path id=”zombieMore” d=”M 300 50 l -50 -25 l 0 50 l 50 -25″ stroke=”black” stroke-width=”1″ fill=”red” onmouseup=”newZombie();” />
Results will vary based on random placement, of course, but clicking the newly enabled increment button should dot the city landscape with new zombies, as in Figure 3.
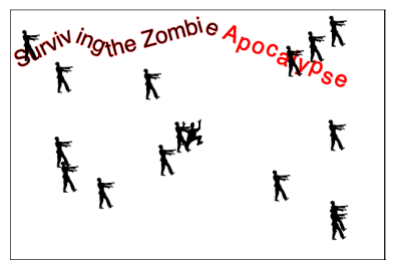
Figure 3. RUN!!!
The DOM manipulation works, but the code could use a couple of aesthetic tweaks. First, while the hungry zombie may look accurate catching, and presumably consuming the brains of, the human, this is more of an end game scenario. To serve as a “survival” predictor, the app might work better with a safe zone around the runner. Second, unless in the proximity of brains or noise, zombies tend to be directionally challenged (as witnessed with anyone trying to text and walk at the same time). So it might look better to flip some of the images horizontally, for variety.
The first tweak can be accomplished with basic JavaScript. The following code establishes a 200×100 safe zone around the screamer.
function newZombie() {

  var svg = document.createElementNS("https://www.w3.org/2000/svg","image");

  svg.setAttributeNS('https://www.w3.org/1999/xlink','href','zombie.svg');

  svg.setAttribute('width','175');

  svg.setAttribute('height','304');

  var scale = .16;

  var x = Math.floor(Math.random()*550);

  var y = Math.floor(Math.random()*350);

  var cityWidth = 600;

  var cityHeight = 400;

  var safezoneWidth = 200;

  var safezoneHeight = 100;

  var safezoneX = Math.round((cityWidth - safezoneWidth) / 2, 0);

  var safezoneY = Math.round((cityHeight - safezoneHeight) / 2, 0);

  if ( ((safezoneX - 50) <= x) && (x <= (safezoneX + safezoneWidth)) &&

  ((safezoneY - 50) <= y) && (y <= (safezoneY + safezoneHeight)) ) {

    switch (Math.floor(Math.random()*4)) {

      case 0:

      x = safezoneX - 50;

      break;

      case 1:

      x = safezoneX + safezoneWidth;

      break;

      case 2:

      y = safezoneY - 50;

      break;

      case 3:

      y = safezoneY + safezoneHeight;

      break;

    }

  }

  svg.setAttribute('transform','translate(' + (x) + ', ' + (y) + ') scale(' + scale + ', ' + scale + ')');

  document.getElementById('cityBox').appendChild(svg);

}
Although it doesn’t relate directly to SVG, this code does a couple of things to affect placement of the image. One, it sets a 200×100 safe zone and calculates the origin x,y coordinates of the zone, assuming it sits in the center of a 600×400 canvas. Two, if the zombie’s current x,y coordinates are within that zone, the image is pushed in a randomly chosen direction until it sits just outside the safe zone.
Figure 4 shows how the safe zone shows up after a particularly nasty wave of undead.
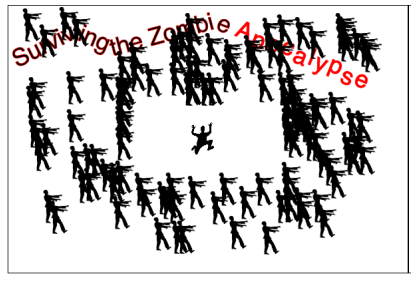
Figure 4. Safe Zone
Better, but it still looks more like a Black Friday sale than a zombie infestation (subtle difference, but a difference nonetheless). It would look better if some of these zombies were flipped. But there’s a problem: as noted in Part 2 of this series, the transform attribute can be used to scale, rotate, skew, translate or define an entirely new matrix. Notice what isn’t on this list: flip, whether horizontal or vertical. A tragic oversight, but one that can be overcome by using a combination of translate and scale.
Here’s the trick: an element can be flipped, either vertically or horizontally, by setting its scale factor to a negative number. However, this scales the element in relation to the origin point of its canvas. So, by leaving the origin at (0,0) and then applying a scale(-1,1), the element would be flipped into a sort of negative zone to the left of the monitor. It would exist, and the transform would be valid, but it would in effect make the element disappear.
Fortunately, because of the technique used to place the image in a cross-browser-friendly way, namely by using the transform:translate and transform:scale attributes, a negative scale multiplier can be slipped in with very little effort.
To summarize:
* There is no transform:flip attribute—it doesn’t exist.
* Using transform:scale(-1,1) alone would have the effect of flipping the image out of its parent <svg> element entirely.
* Using a combination of transform:translate and transform:scale effectively allows the image to be flipped in place; in this case transform:scale does double duty by scaling the image to the size you want, which needed to be done anyway.
To make it happen, add some clever randomization, a placement adjustment to compensate for the size of the image and a tweak to the transform:scale code:
function newZombie() {

  var svg = document.createElementNS("https://www.w3.org/2000/svg","image");

  svg.setAttributeNS('https://www.w3.org/1999/xlink','href','zombie.svg');

  svg.setAttribute('width','175');

  svg.setAttribute('height','304');

  var scale = .16;

  var x = Math.floor(Math.random()*550);

  var y = Math.floor(Math.random()*350);

  var cityWidth = 600;

  var cityHeight = 400;

  var safezoneWidth = 200;

  var safezoneHeight = 100;

  var safezoneX = Math.round((cityWidth - safezoneWidth) / 2, 0);

  var safezoneY = Math.round((cityHeight - safezoneHeight) / 2, 0);

  if ( ((safezoneX - 50) <= x) && (x <= (safezoneX + safezoneWidth)) &&

  ((safezoneY - 50) <= y) && (y <= (safezoneY + safezoneHeight)) ) {

    switch (Math.floor(Math.random()*4)) {

    case 0:

    x = safezoneX - 50;

    break;

    case 1:

    x = safezoneX + safezoneWidth;

    break;

    case 2:

    y = safezoneY - 50;

    break;

    case 3:

    y = safezoneY + safezoneHeight;

    break;

    }

  }

  flip = Math.floor(Math.random()*2)*2-1; //results in -1 or 1

  x += 25 - 25*flip; //adjust for 50x50 zombie size; results in +50 or +0

  svg.setAttribute('transform','translate(' + (x) + ', ' + (y) + ') scale(' + (scale * flip) + ', ' + scale + ')');

  document.getElementById('cityBox').appendChild(svg);

}
This results in a slightly more chaotic look for the apocalypse, shown in Figure 5.
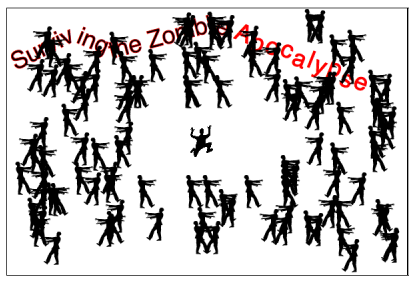
Figure 5. Zombies. Flipping Zombies. With transform:translate and transform:scale Applied
To see the Zombie Apocalypse Survival Predictor in action as it is now, go to http://justinwhitney.com/zombies/zombies_part3.htm. Be sure to look at the page’s source code for the sample code up to this point.
Wrapping Up
This is starting to look serious. The poor chewy human is doomed. There are only two things that can possibly save the screamer now: shopping malls and rednecks. But as with any good serial, this will have to be a cliffhanger. Will the rednecks escort the human to safety? Will they find a shopping mall in time to escape the ravenous hordes? Stay tuned.
This article is part of the HTML5 tech series from the Internet Explorer team. Try-out the concepts in this article with three months of free BrowserStack cross-browser testing @ http://modern.IE.
Frequently Asked Questions about Manipulating SVG with JavaScript
How can I manipulate SVG images using JavaScript for my zombie-themed website?
Manipulating SVG images using JavaScript involves several steps. First, you need to understand the SVG file structure. SVG files are XML-based, meaning they can be edited with any text editor and manipulated with JavaScript. You can change the attributes of SVG elements, such as their color, position, and size. For instance, you can create a function that changes the color of a zombie SVG image when a user clicks on it. This involves selecting the SVG element using the Document Object Model (DOM) methods and changing its fill attribute.
Can I animate SVG images with JavaScript?
Yes, you can animate SVG images using JavaScript. SVG has its own built-in animation elements, but JavaScript provides more flexibility. You can use JavaScript libraries like GSAP or anime.js that offer powerful animation capabilities. For example, you can make a zombie SVG image move across the screen or change its shape over time.
What are the advantages of using SVG over other image formats for my zombie-themed designs?
SVG images have several advantages over other image formats like JPEG or PNG. They are scalable without losing quality, which means they look sharp on all screen sizes and resolutions. They can be manipulated with CSS and JavaScript, allowing for interactivity and animation. Also, SVG files can be smaller than their bitmap counterparts, which can lead to faster load times.
How can I add interactivity to SVG images on my website?
You can add interactivity to SVG images using JavaScript event listeners. For example, you can create a function that is triggered when a user clicks on a zombie SVG image. This function could change the image’s attributes, start an animation, or even navigate to a different page.
Can I use SVG images in all web browsers?
SVG images are supported by all modern web browsers, including Chrome, Firefox, Safari, and Edge. However, older versions of Internet Explorer (IE 8 and below) do not support SVG. If you need to support these browsers, you may need to provide a fallback in a different image format.
How can I optimize SVG files for better performance?
There are several ways to optimize SVG files for better performance. You can minify the SVG code, removing unnecessary characters and spaces. You can also use tools like SVGO or SVGOMG to automatically optimize SVG files. These tools can remove unnecessary metadata, reduce the number of decimal places, and simplify complex paths without affecting the image’s appearance.
Can I use CSS to style SVG images?
Yes, you can use CSS to style SVG images. You can change the fill color, stroke color, stroke width, and other attributes of SVG elements. However, some CSS properties may not work as expected with SVG, so it’s important to test your styles in different browsers.
How can I create SVG images for my zombie-themed website?
You can create SVG images using vector graphics software like Adobe Illustrator or Inkscape. These programs allow you to draw shapes and paths, which are then saved as SVG code. You can also find pre-made SVG images on websites like Etsy or Design Bundles, or hire a graphic designer to create custom images for you.
Can I use JavaScript to change SVG images in response to user input?
Yes, you can use JavaScript to change SVG images in response to user input. For example, you could change the color of a zombie SVG image when a user hovers over it, or start an animation when a user clicks on it. This can make your website more interactive and engaging.
Can I use SVG images in responsive web design?
Yes, SVG images are ideal for responsive web design. Because they are vector-based, they can scale to any size without losing quality. This means they look sharp on all screen sizes, from small mobile devices to large desktop monitors. You can also use CSS and JavaScript to change the appearance and behavior of SVG images based on the screen size.

