

If your bookmarks contain even one Web development blog, you’ll undoubtedly know that remote scripting is being touted as the new “future of the Web”.
Although I get the feeling that a few people are perhaps a little over-excited about it, the recent release of numerous high-profile Web applications that use remote scripting has shown that there are definite advantages to utilising these techniques in the creation of seamless Web applications, and to augment Web page functionality.
This article aims to give you an introduction to the foundations of remote scripting, in particular, the emerging XMLHttpRequest protocol. We’ll then walk through an example application that demonstrates how to implement that protocol, while creating a usable interface.
To begin, download the code archive, which contains all the files you’ll need to create the working examples presented here.
Key Takeaways
- AJAX and remote scripting enhance web applications by allowing data exchange with the server without needing to refresh the webpage, leading to smoother and more interactive user experiences.
- XMLHttpRequest is a crucial component in AJAX, enabling the fetching of data from the server asynchronously, thereby preventing the webpage from freezing during data retrieval.
- Proper error handling and accessibility considerations are essential when implementing AJAX to ensure all users, including those with disabilities or older browser technology, can access content effectively.
- The creation of an XMLHttpRequest object varies across browsers, necessitating fallback mechanisms for compatibility, especially with older versions of Internet Explorer that require ActiveX for AJAX functionalities.
- AJAX applications must handle data securely to protect against common web vulnerabilities like Cross-Site Scripting (XSS) and Cross-Site Request Forgery (CSRF), emphasizing the importance of secure coding practices.
- Debugging AJAX can be complex due to its asynchronous nature, but modern development tools in browsers can assist in monitoring and troubleshooting AJAX requests and responses effectively.
What Is Remote Scripting?
Essentially, remote scripting allows client-side JavaScript to request data from a server without having to refresh the Web page. That’s it. Everything else that goes into making a seamless Web application draws upon the established methods of manipulating the Document Object Model. This might be something as simple as creating a list of words to select from, as per Google Suggest. Or it could involve the creation of an entire interface for navigating and zooming map images, like that at map.search.ch.
However, along with the ability to create new Web experiences, remote scripting gives us the ability to make new unusable Web experiences. Remote scripting and seamless applications bring with them a host of problems from the desktop application design realm, making those same issues possible on the Web. It’s your duty to ensure that your remote scripting interfaces address those issues, and give your users the best possible experience they can get.
Remote Scripting and Accessibility
As with any online application or Web page, we must always take into consideration the needs of users. Some users may have browsers that lack JavaScript capabilities, or, even if they can execute JavaScript, they may not have remote scripting capabilities.
It’s a generally accepted best practice that JavaScript interaction and remote scripting functions add on to the basic functionality of Web-based content: the content must still be accessible and usable without these technologies. In the case of fully fledged Web applications, it may be acceptable to provide an entirely different system for users who don’t have JavaScript or remote scripting capabilities. The team at GMail recently implemented a non-JavaScript, alternative interface to the service.
Remote Scripting Using XMLHttpRequest
Although XMLHttpRequest is not a public standard, most modern browsers implement it consistently, and it’s well on its way to becoming a de facto standard for JavaScript data retrieval. Internet Explorer 5 for Windows, Mozilla 1.0, Safari 1.2 and the upcoming version 8.0 of Opera all introduce XMLHttpRequest as an available object.
The Internet Explorer XMLHttpRequest API is available for download.
You can also download the Mozilla documentation.
If you require support for browsers that are older than these, methods using iframes provide a viable solution; however, coding for these browsers will also limit your ability to utilize standard JavaScript DOM methods. This article will focus on the more contemporary XMLHttpRequest method.
Creating an XMLHttpRequest Object
For any browser, except Internet Explorer, we can create an XMLHttpRequest object like this:
var requester = new XMLHttpRequest();However, in Internet Explorer, XMLHttpRequest is implemented as an ActiveX object. For IE, an object is created like this:
var requester = new ActiveXObject("Microsoft.XMLHTTP");Note: this also means that if users have ActiveX objects disabled in Internet Explorer, they will be unable to use XMLHttpRequest even if JavaScript is enabled.
To cope with the differences in object creation syntax used by these browsers, it’s best to use a try/catch structure to automatically provide you with the correct object, or return an error if the XMLHttpRequest object is not available:
try

{

  var requester = new XMLHttpRequest();

}

catch (error)

{

  try

  {

    var requester = new ActiveXObject("Microsoft.XMLHTTP");

  }

  catch (error)

  {

    return false;

  }

}
Thankfully, the difference between implementations ends there, and all subsequent method calls to the XMLHttpRequest object can be performed irrespective of which browser the script’s running in.
Transporting Data using an XMLHttpRequest Object
Once an XMLHttpRequest object has been created, we must call two separate methods in order to get it to retrieve data from a server.
open()initialises the connection we wish to make, and takes two arguments, with several optionals. The first argument is the type of request we want to send; the second argument identifies the location from which we wish to request data. For instance, if we wanted to use aGETrequest to access feed.xml at the root of our server, we'd initialise the XMLHttpRequest object like this:
requester.open("GET", "/feed.xml");The URL can be either relative or absolute, but due to cross-domain security concerns, the target must reside on the same domain as the page that requests it.
The open() method also takes an optional third boolean argument that specifies whether the request is made asynchronously (true, the default) or synchronously (false). With a synchronous request, the browser will freeze, disallowing any user interaction, until the object has completed. An asynchronous request occurs in the background, allowing other scripts to run and letting the user continue to access their browser. It’s recommended that you use asynchronous requests; otherwise, we run the risk of a user’s browser locking up while they wait for a request that went awry. open()‘s optional fourth and fifth arguments are a username and password for authentication when accessing a password-protected URL.
Once open() has been used to initialise a connection, the send() method activates the connection and makes the request. send() takes one argument, allowing us to send extra data, such as CGI variables, along with the call. Internet Explorer treats it as optional, but Mozilla will return an error if no value is passed, so it’s safest to call it using:
requester.send(null);To send CGI variables using the GET request method, we have to hardcode the variables into the open() URL:
requester.open("GET", "/query.cgi?name=Bob&email=bob@example.com");

requester.send(null);
To send CGI variables using the POST request method, the CGI variables can be passed to the send() method like so:
requester.open("POST", "/query.cgi");

requester.send("name=Bob&email=bob@example.com");
Once we’ve called send(), XMLHttpRequest will contact the server and retrieve the data we requested; however, this process takes an indeterminate amount of time. In order to find out when the object has finished retrieving data, we must use an event listener. In the case of an XMLHttpRequest object, we need to listen for changes in its readyState variable. This variable specifies the status of the object’s connection, and can be any of the following:
0– Uninitialised1– Loading2– Loaded3– Interactive4– Completed
Changes in the readyState variable can be monitored using a special onreadystatechange listener, so we’ll need to set up a function to handle the event when the readyState is changed:
requester.onreadystatechange = stateHandler;readyStateincrements from 0 to 4, and theonreadystatechangeevent is triggered for each increment, but we really only want to know when the connection has completed (4), so our handling function needs to realise this. Upon the connection's completion, we also have to check whether the XMLHttpRequest object successfully retrieved the data, or was given an error code, such as 404: "Page not found". This can be determined from the object's status property, which contains an integer code. "200" denotes a successful completion, but this value can be any of the HTTP codes that servers may return. If the request was not successful, we must specify a course of action for our program:
function stateHandler()

{

  if (requester.readyState == 4)

  {

  if (requester.status == 200)

  {

    success();

  }

  else

  {

    failure();

  }

}


return true;

}
Even though the XMLHttpRequest object allows us to call the open() method multiple times, each object can really only be used for one call, as the onreadystatechange event doesn’t update again once readyState changes to “4” (in Mozilla). Therefore, we have to create a new XMLHttpRequest object every time we want to make a remote call.
Parsing the Data in an XMLHttpRequest Object
If we’ve made a successful request, two properties of the XMLHttpRequest object may contain data:
responseXMLstores a DOM-structured object of any XML data that was retrieved by the object. This object is navigable using the standard JavaScript DOM access methods and properties, such asgetElementsByTagName(),childNodes[ ]andparentNode.responseTextstores the data as one complete string. If the content type of the data supplied by the server was text/plain or text/html, then this is the only property that will contain data. A copy of any text/xml data will be flattened and placed here as an alternative toresponseXML.
Depending upon the complexity of the data, it may be easier to return data simply as a plain text string, thereby making the XML in XMLHttpRequest redundant. However, for more complex data types, you’ll probably want to use an XML format, such as this:
<?xml version="1.0" ?>

<user>

        <name>John Smith</name>

        <email>john@smith.com</email>

</user>
We are able to access different parts of the data using standard DOM access methods. Remember that data contained between tags is considered to represent child text nodes of the parent, so we have to take that extra layer of structure into account when we retrieve the data:
var nameNode = requester.responseXML.getElementsByTagName("name")[0];

var nameTextNode = nameNode.childNodes[0];

var name = nameTextNode.nodeValue;
We must also be careful about whitespace: indenting values in the XML file may produce unwanted whitespace in the value, or add additional text nodes.
Once we’ve parsed the data from the XMLHttpRequest object, we’re free to change, delete and write it onto our Web page as we see fit!
An Example Remote Scripting Application
In order to demonstrate how to use the XMLHttpRequest protocol inside a remote scripting application, I’ve created a simple, one-page example. It assumes that JavaScript and XMLHttpRequest are available in order to make the code more readable, but in any real-world application, you should always check that XMLHttpRequest is available and have a fallback (i.e. normal form submission) where it is not.
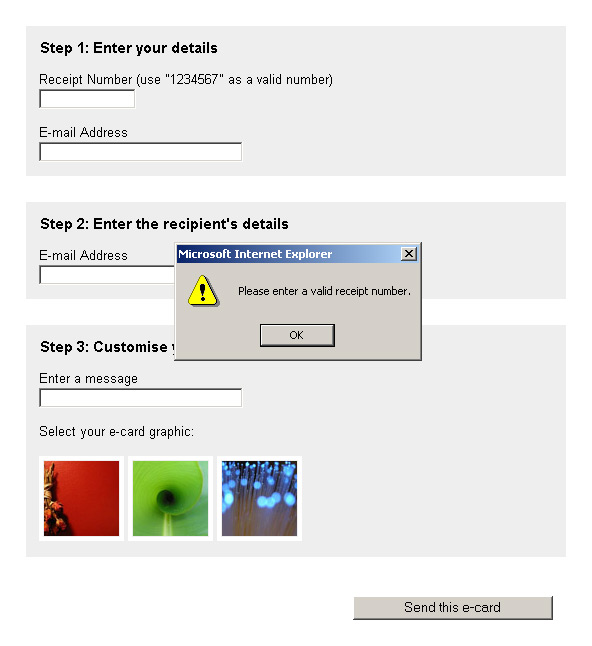
The example application will allow the user to send a free ecard to a friend’s email address. To do this, the user has first to enter a receipt number, which they received when they purchased goods previously, and which has since been stored in the database of ExampleCo. Then, the user must complete the remaining fields before the ecard is sent, entering the recipient’s email address, the message, and the graphic image that will be used for the card:
Remote scripting is used for three actions in this example, to:
- Minimise the waiting time for validation of the receipt number
- Automate the entry of retrieved data into the form once a receipt number has been validated
- Re-write the contents of the page once the ecard has been sent successfully
Along with these actions, the example contains JavaScript, which validates the other form fields before submission, and allows the user to select an ecard graphic.
The example has been created in two separate versions. The first of these versions demonstrates the implementation of the XMLHttpRequest protocol inside an application, but it contains several less-than-desirable usability problems. These problems are tackled in the second example, which aims to highlight some of the issues that can be encountered as you move from a page-based application model towards a more dynamic and interactive environment.
Example 1: Implement XMLHttpRequest
In a traditional server/client application, the entire ecard form would have to be submitted to the server, checked, and returned to the browser before the client could be made aware of whether their receipt number was valid or not. With the remote scripting model, we’re able to check the receipt number as soon as the user has finished dealing with that field. So, when a user submits the form, the browser has already identified whether or not the data is valid.
The first step in checking the data remotely is to know when the user has entered a value into the receipt number field. This can be detected using an onchange event handler for the field. A “change” on a text field is registered whenever the user modifies the value of the text field and then “blurs” away from that field (i.e. they tab or click away from it). This is normally a good indication that a user has finished filling out the field, and that the data it contains can be processed. By capturing this onchange event, we can tell our script to begin validating the field’s content:
receipt.onchange = onchangeReceipt;onchangeReceipt is a function that is called when the onchange event is triggered. It's inside this function that we initialise our XMLHttpRequest object and send off the relevant data to be checked:
var requester = null;


function onchangeReceipt()

{

  /* Check for running connections */

  if (requester != null && requester.readyState != 0 && requester.readyState != 4)

  {

    requester.abort();

  }


  try

  {

    requester = new XMLHttpRequest();

  }

  catch (error)

  {

    try

    {

      requester = new ActiveXObject("Microsoft.XMLHTTP");

    }

    catch (error)

    {

      requester = null;


      return false;

    }

  }


  requester.onreadystatechange = requesterExecuteAction;


  requester.open("GET", "receipt.php?receipt=" + this.value);

  requester.send(null);


  return true;

}
You might recognise some of that syntax from the first part of this article, namely the forked try/catch structure, and the open() and send() methods that control the XMLHttpRequest object.
The first if statement checks to see whether or not an XMLHttpRequest object already exists and is currently running; if so, it aborts that connection. This ensures that a number of conflicting XMLHttpRequest calls aren’t run simultaneously, which would clog up the network. The function then continues on, to create a new XMLHttpRequest object and open a connection to the server-side validation script, receipt.php.
In receipt.php, the CGI variable receipt is checked and, if its value is "1234567", some XML data is returned; otherwise, a plain text string of "empty" is returned, indicating that the receipt number is invalid:
if ($receipt == "1234567")

{

  header("Content-type: text/xml");


  $filePointer = fopen("example.xml", "r");

  $exampleXML = fread($filePointer, filesize("example.xml"));

  fclose($filePointer);


  print($exampleXML);

}

else

{

  header("Content-type: text/plain");

  print("empty");

}
Hard-coded values and data have been used in this example to simplify the code, but in the real world, this PHP script would check the receipt number against a database, and return the appropriate data for that number.
Note that if receipt number is invalid, the content-type header sent is "text/plain". This simplifies the message printing process somewhat, but it also means that, on the client side, the responseXML property of the XMLHttpRequest object will not contain anything. As such, you should always be aware of what your server-side scripts return, and keep an eye on responseXML or responseText appropriately.
As well as calling the server-side script, onchangeReceipt() also assigns onreadystatechangeReceipt() to monitor the status of the connection via the onreadystatechange event, and it is this function that determines when the connection is finished and further action should be taken. To do this, we use the previously discussed readyState/status condition nesting:
function onreadystatechangeReceipt()

{

  /* If XMLHR object has finished retrieving the data */

  if (requester.readyState == 4)

  {

    /* If the data was retrieved successfully */

    if (requester.status == 200)

    {

      writeDetails();

    }

    /* IE returns a status code of 0 on some occasions, so ignore this case */

    else if (requester.status != 0)

    {

      alert("There was an error while retrieving the URL: " + requester.statusText);

    }

  }


  return true;

}
When a successful status code is returned, writeDetails() is invoked. It is this function that parses the returned data and determines what to do to the Web page:
function writeDetails()

{

  var receipt = document.getElementById("receipt");


  if (requester.responseText.charAt(0) == "<")

  {

    var email = document.getElementById("email");

    var name = document.getElementById("name");


    receipt.valid = true;

    email.value = requester.responseXML.getElementsByTagName("email")[0].

childNodes[0].nodeValue;

  }

  else

  {

    receipt.valid = false;

  }


  return true;

}
This function firstly checks the responseText property of the XMLHttpRequest object, to see whether the receipt number was valid or not. If it is valid, the data will be in XML format and its first character will be an opening angled bracket (<); otherwise, it will be a plain string. In each case, the extended property valid is set appropriately on the receipt number field. Additionally, if the receipt number is valid, extra data is added to the email field, having been parsed from the responseXML property of the XMLHttpRequest object.
The execution of writeDetails() marks the end of the remote scripting process for receipt number validation. With the extended valid property set on the field, the browser knows whether or not the data is OK, and can alert users of any errors when they try to submit the form:
orderForm.onsubmit = checkForm;


function checkForm()

{

if (!receipt.valid)

{

  receipt.focus();

  alert("Please enter a valid receipt number.");


  return false;

}


...
If there is an error with the form, an alert() dialog appears when the submit button is clicked, asking the user to correct the error before the form is submitted:
checkForm()also handles the submission of the form data via remote scripting (though, in reality, normal form submission would probably suffice for an application like this). The remote scripting for the data submission uses the same code we used for validation, but a different server-side script is supplied to process the data, and instead ofonreadystatechangeReceipt()being called once the connection has finished,onreadystatechangeForm()is called.
onreadystatechangeForm()triggerssentForm()to re-write the Web page and inform the user that the ecard was either successfully or unsuccessfully sent, depending upon the data returned from the server:
function sentForm()

{

  var body = document.getElementsByTagName("body")[0];


  body.innerHTML = "<h1>Send someone an e-card from ExampleCo!</h1>";


  if (formRequester.responseText == "success")

  {

    body.innerHTML += "<h1>Send someone an e-card from ExampleCo!</h1><p>Your ExampleCo e-card has been sent!</p>";

  }

  else

  {

    body.innerHTML += "<p>There was an error while sending your ExampleCo e-card.</p>";

  }


  return true;

}
This removes the initial form presented to the user, and inserts a final status message:

While this application re-writes almost the whole page, it’s easy to see how specific parts of the DOM could be changed using remote scripting, which would enable separate parts of an application interface to update independently of the Web page itself.
Example 2: Create a Usable Remote Scripting Interface
The remote scripting model is quite different from the standard page-based interaction that permeates most of the Web, and with that difference comes new usability pitfalls that can too easily be introduced into your projects. These pitfalls typically arise either from the dynamic manipulation of the interface while the user is accessing it, or from the need to access data that’s external to the Web page.
Example 1 used remote scripting to validate the receipt number, and to automatically insert data that was retrieved from the database; however, none of this information was used particularly well, nor was it obvious to the user what was going on. Example 2 aims to correct this and other deficiencies in the first example, and make the experience a whole lot quicker, easier and more understandable for the user. The five tips below explain some of the changes that can be used to turn a bad experience into a good one.
Tip #1: Tell Users Why they’re Waiting
Remote scripting is not instantaneous. Regardless of the speed of your Web connection, communication time with an external source will vary. So, while communication with a server occurs, it’s imperative that you tell the user why they’re waiting. (The example PHP scripts use sleep() calls to highlight the waiting periods that can be caused by network traffic or other factors.)
Because remote scripting applications do not make calls using the normal browser interface, the status bar — which normally notifies the user of transfer status and activity — does not function as it normally does, Thus, we have to provide feedback to the user ourselves.
In example 2, while the receipt number is being verified, a label displays next to the receipt number field to explain the wait.

The label changes to indicate completion once the XMLHttpRequest connection has finished.

The status message is initialised just before the XMLHttpRequest connection, when the onchange event for the receipt number field is triggered:
receipt.onchange = onchangeReceipt;


function onchangeReceipt()

{

  message(this, "loadingMessage", "Verifying receipt number");


  /* Check for running connections */

  if (requester != null && requester.readyState != 0 && requester.readyState != 4)

  {

    requester.abort();

  }


...
Once the remote scripting operation has finished, the message is updated to tell the user whether the receipt number was valid or not:
function writeDetails()

{

  if (requester.responseText.charAt(0) == "<")

  {

    message(receipt, "statusMessage", "Your receipt details were retrieved");

...


  else

  {

    message(receipt, "errorMessage", "Please enter a valid receipt number");

...
Updating the message to indicate completion is important, as it provides closure for the user. If the loading message simply disappeared, users could not be certain that it had been successful.
In the two code samples above, the message function is a custom function that dynamically creates a status label for a form element, and positions it visually adjacent to the related element. It also accepts a class for the status label, which allows CSS styles to be applied differently for loading, error and completion messages:
function message(element, classString, errorMessage)

{

  var messageDiv = document.createElement("div");


  element.parentNode.insertBefore(messageDiv, element);

  messageDiv.className = classString;

  messageDiv.appendChild(document.createTextNode(errorMessage));


  return true;

}
While the XMLHttpRequest process is running, the label animates to indicate that the action is ongoing and still alive. In example 2, this is performed via CSS styling with an animated GIF, but it could also be effected using JavaScript animation.
The same feature is applied to the form submission button. Again, this alerts the user that some action is being undertaken, and also lets them know that they did click the button, which will help to discourage users from pressing the button more than once:

To achieve this, simply change the value and the CSS class of the submit button:
submit.className = "submit loading";

submit.value = "Contacting server";
Tip #2: Don’t Interfere with the User’s Interaction
Users become frustrated with interfaces that interfere with the completion of their task. In example 1, such interference might occur after users have entered a receipt number: if they begin to fill in their names and email addresses before the receipt number has been verified, those details will be overwritten once their user data is received from the server.
To rectify this, example 2 checks whether a user has changed the values of the text fields before the script enters any data into them. The default values of the text fields can be detected when the page loads, and recorded using custom DOM properties:
email.defaultValue = email.value;The default value of a field can then be checked against its current contents before the script attempts to write any data into it:
if (email.value == email.defaultValue)

{

  email.value = newValue;

}
This makes sure that the user — who probably knows his or her own name better than we do — doesn’t have any entries overwritten by over-zealous automation.
Some other common cases of interference that you should avoid include moving the cursor to a field while the user is filling out another field, and locking the user out of the interface (which is why XMLHttpRequest should be used asynchronously).
Tip #3: Catch Errors Early, but not Too Early
It’s best to catch errors as soon as they occur. Many forms that currently appear on the Web rely upon the user to submit the form before any form errors will be shown, either using server-side scripts or inelegant JavaScript alerts (as per example 1). These methods have several disadvantages for the user:
- The process of submitting the form takes up the user’s time.
- JavaScript alerts do not permanently mark all the fields that require correction.
- Indicating errors well after they have been committed requires the user to mentally recollect what the erroneous field asked of them.
- Even if users know which form elements to correct, they will have to re-submit the form to find out if those elements have been corrected properly.
For those reasons, it is much better to inform users of an error as soon as they have made it. In example 2, if users enter an invalid email address, the application tells them straight away. The notification is placed right next to the email field, using the message() function from tip #1:

However, you shouldn’t check for validity as soon as a user starts typing, as it is distracting — not to mention annoying — to be told that you’ve made an error before you’ve even finished entering the data. Field checking should only be done once a user has finalised the entry, i.e., when they move away from the input. For text fields, this type of action is best captured using the onchange event:
email.onchange = onchangeEmail;The function that is triggered by the event can then check the field and ensure that the data it contains is valid for that data type:
function onchangeEmail()

{

  if (!this.value.match(/^[w.-]+@([w-]+.)+[a-zA-Z]+$/))

  {

    field.valid = false;

    message(field, "errorMessage", "Please enter a valid e-mail address");

    field.className = "text error";

  }


  return true;

}
Tip #4: Let the User Know when an Error has been Fixed
Once a field has been found to be incorrect, and the user has been alerted to the error, it’s equally important to let the user know when he or she has changed it to be correct, otherwise the user will become trapped in the form submission cycle once again.
In these circumstances, it’s not good enough to wait for the browser’s onchange event to fire, as that usually occurs only when the user defocuses a form element. Therefore, it is best to use the onkeyup event to check the correctness of a field that was known to be incorrect:
email.onkeyup = onkeyupEmail;The onkeyupEmail() function checks whether the email field has an error message displayed alongside it before moving on to check whether the field is correct. Thus, as soon as a user makes appropriate corrections to the field, the error message will disappear; however, if the user is typing into the field for the first time, no message will appear:
function onkeyupEmail()

{

  /* If an error message is displayed */

  if (this.message != null && this.message.className == "errorMessage")

  {

    if (this.value.match(/^[w.-]+@([w-]+.)+[a-zA-Z]+$/))

    {

      this.valid = true;


      /* Remove error message */

message(this);


/* Remove error CSS class */

      this.className = "text";

    }

...
These scenarios don’t capture the case in which mandatory fields have been skipped, so it’s a good idea to allow the user to submit an incomplete form, as this allows the program to highlight exactly what needs to be completed, instead of searching for details that have not yet been filled out.
Tip #5: Provide Interface Feedback
Creating a seamless Web application can let you explore new functionality that hasn’t already been seen in a browser, but in doing so, we must still remember the foundations of usable interface design. One such foundation is the provision of interface feedback: letting the user know what they can do, and what they have done.
In example 1, it’s not entirely clear that users can click on the thumbnails of ecard graphics. This is easily counteracted if we give a grey outline to the image over which the cursor is positioned at any given time.

The :hover pseudo class will be familiar to anyone who has used CSS. It allows an object to change its an appearance when the cursor is moved over that object. Although mouseover effects can theoretically be achieved through CSS alone, current versions of Internet Explorer do not allow :hover effects on any element except the anchor tag. So, to achieve a hover effect on the image elements, example 2 attaches onmouseover and onmouseout event handlers:
var cards = document.getElementById("ecardSet").

getElementsByTagName("img");


for (var i = 0; i < cards.length; i++)

{

  cards[i].onmouseover = onmouseoverCard;

  cards[i].onmouseout = onmouseoutCard;

}
Those event handlers can then change the class of each image and allow us to provide visual feedback using CSS:
function onmouseoverCard()

{

  this.className = "hover";


  return true;

}


function onmouseoutCard()

{

  this.className = "";


  return true;

}
Changing the cursor to indicate its “clickability” can also help to provide feedback to the user. This can be done using a simple rule in CSS:
img.hover

{

  cursor: pointer;

}
Conclusion
After making all these changes to example 1, example 2 becomes a much more helpful and usable application.
The common theme among the tips offered here is always to make the user feel comfortable and in control. If users don’t possess the information they need in order to understand what’s going on, they will view your application with apprehension, and its performance will suffer as a result.
Although this article focussed primarily on the process of remote scripting and its usability concerns, there are also points of accessibility that should be taken into account as you create a seamless Web application. Example 3 is a much more complex version of the ecard application, which uses more powerful scripting and degrades accessibly for users without JavaScript or without XMLHttpRequest. Once you’ve mastered the techniques described above, you might want to have a look at this final example and start to make your applications really robust.
Frequently Asked Questions about Remote Scripting and AJAX
What is the main difference between AJAX and Remote Scripting?
AJAX (Asynchronous JavaScript and XML) and Remote Scripting are both techniques used to create interactive web applications. The main difference lies in how they handle data. AJAX uses XML to send and receive data, while Remote Scripting can use any data format, including XML, JSON, or plain text. AJAX is a specific implementation of Remote Scripting, which is a broader concept.
How does Remote Scripting improve user experience?
Remote Scripting enhances user experience by allowing web pages to communicate with the server in the background, without requiring a full page reload. This results in faster, smoother, and more responsive web applications, improving the overall user experience.
Can Remote Scripting be used with languages other than JavaScript?
Yes, while JavaScript is the most commonly used language for Remote Scripting due to its universal browser support, other languages like VBScript can also be used. However, the choice of language depends on the client-side capabilities of the user’s browser.
What are the security implications of using Remote Scripting?
Like any web technology, Remote Scripting can be vulnerable to various security threats, such as Cross-Site Scripting (XSS) and Cross-Site Request Forgery (CSRF). Therefore, it’s crucial to implement proper security measures, like input validation and output encoding, to protect against these threats.
How does Remote Scripting handle data transmission?
Remote Scripting handles data transmission using HTTP requests. It sends a request to the server, which processes the request and sends back a response. This response is then processed by the client-side script to update the web page without a full page reload.
What are the benefits of using AJAX over traditional Remote Scripting?
AJAX offers several benefits over traditional Remote Scripting. It allows for asynchronous data exchange, meaning the user can continue interacting with the page while the server processes the request. AJAX also supports XML data format, which is more structured and easier to handle than plain text.
Can Remote Scripting be used for mobile applications?
Yes, Remote Scripting can be used for mobile applications. However, due to the limited processing power and network bandwidth of mobile devices, it’s important to optimize the scripts for performance and efficiency.
What are some common use cases for Remote Scripting?
Remote Scripting is commonly used in web applications that require real-time data updates, such as live chat systems, online games, and interactive maps. It’s also used in applications that need to load large amounts of data without refreshing the page, like infinite scrolling.
How can I debug Remote Scripting code?
Debugging Remote Scripting code can be challenging due to its asynchronous nature. However, modern web browsers provide developer tools that can help. These tools allow you to inspect network requests, view console logs, and step through the code to identify and fix issues.
What are some best practices for implementing Remote Scripting?
Some best practices for implementing Remote Scripting include: using a well-structured data format like JSON or XML; handling errors gracefully; optimizing scripts for performance; implementing proper security measures; and testing the scripts in various browsers to ensure compatibility.

