In my previous posts I’ve referred to the notification system that comes with Windows Phone, specifically in reference to updating the Live Tiles on the Start screen. We’re going to jump in and take a closer look at how the push notification system works and the types of notifications that are available to you. Firstly, there are three types of notifications that your application can make use of:
Toast Notification
If you want to notify the user of an important event within your application you can send a Toast Notification. This notification is made up of two pieces of text that appear as an overlay across whatever application the user is currently in, as shown in Figure 1. The first text, in this case the word “Tile” is bold, whilst the second text is not. The notification area will only show a single line of text so be mindful when deciding what text to include in your toast notification. So that the user can identify which application the notification has come from it is accompanied by the application icon.
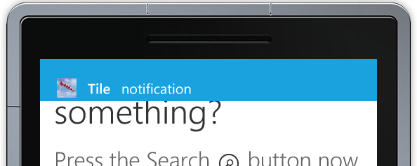
One exception to be aware of is that if the user is actually in the application that the toast notification belongs to, they will not see the notification. Instead an event is raised within the application and it is up to the application to handle the toast notification.
Tile Notification
One of the objectives of the Start screen is to present “glance and go” information to the user about the status of their applications. As discussed in a previous post you can do this with an update schedule for the tile. However, sometimes you want to dynamically update tiles based on an event, rather than being locked into a certain update frequency. To do this you can send a tile notification to the device. This can be used to update the background image, the text and the badge that appears on the tile. Figure 2 and 3 illustrate how the entire tile can be customised by sending through a tile notification.

In Figure 2 the background has been updated to a dynamically generated tile that shows wind direction and strength over the last two hours. Figure 3 the same tile has been reset back to the default background but the text has been changed and a badge of 5 has been set in the top right corner.

The badge is typically used to indicate the number of unread or unprocessed items within the application. Setting the badge to 0 will hide the badge completely. You can’t remove the text overlay completely but you can set it to a space (i.e. “ ”) which will achieve the same effect.
Raw Notification
The last type of notification that Windows Phone supports is a Raw Notification. Unlike a Tile or Toast notification there is no associated visual cue or indicator for a Raw Notification. Raw Notifications as you might imagine are used for sending a small amount of data directly into the application. Imagine the scenario where your Windows Phone application calls a web service to start a lengthy batch process. A couple of minutes later, the service sends a Raw Notification to the device indicating that the process has been completed. This is intercepted by the application, which could either trigger some other action within the application or be used to update a status to the user. In order for the Raw Notification to be received, the application does of course need to be running at the time the notification is sent. For this reason Raw Notifications have a somewhat limited value for most applications.
Before I sign off for this post let’s take a look at an overview of how the notification system works by walking through the steps in Figure 4. Everything starts with your application running on the Windows Phone. The application registers with the Microsoft hosted Push Notification Service, which returns a Channel URI. You can think of this as a) a unique identifier for your application running on a specific device and b) as the URI to which anyone can send a message in order for it to be routed as a notification to the specific device.
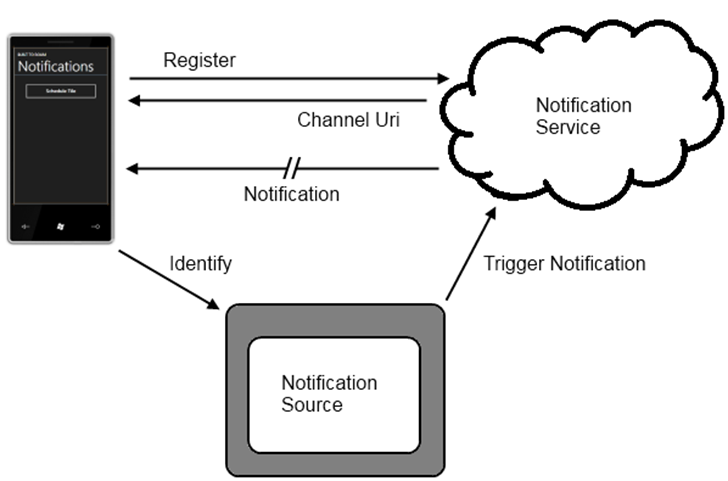
Once the Channel URI has been returned to the application running on the Windows Phone in most scenarios the application will need to send the Channel URI to whatever service or application will be generating the notifications. You can think of this as an identification process where the application is saying “Hi, I’m here, here is my Channel URI which you can used to send notifications to me.” What this Notification Source looks like is completely up to you. In most cases it will be a web service that receives the Channel URI and some other identifier (for example the Device ID) to associate with the Channel URI.
To send a notification (tile, toast or raw) to the device, the Notification Source simply has to do a HTTP Post to the corresponding Channel URI. The structure of the message determines what type of notification is sent to the device by the Push Notification Service.
In this post you’ve seen an overview of the Push Notification Service for Windows Phone and the types of notifications that can be sent to the phone. Next up, we’ll be diving in and showing how your application can register for notification and then how you can send notifications by curating the appropriate XML.
 Nick Randolph
Nick is a software architect and developer with experience across a range of technologies, and has a particular interest in the future of rich client and mobile device applications. Nick is a speaker, author, a Microsoft MVP and owner of Built To Roam.