
- Authenticating Firebase and Angular with Auth0: Part 2
- Displaying Dogs: Async and NgIfElse
- Dog Details with Route Parameters
- Comment Model Class
- Firebase Cloud Firestore and Rules
- Comments Component
- Comment Form Component
- Realtime Comments
- Conclusion
- Frequently Asked Questions (FAQs) on Authenticating Firebase with Angular and Auth0
This article was originally published on the Auth0.com blog, and is republished here with permission.
In this two-part tutorial series, we’ll learn how to build an application that secures a Node back end and an Angular front end with Auth0 authentication. Our server and app will also authenticate a Firebase Cloud Firestore database with custom tokens so that users can leave realtime comments in a secure manner after logging in with Auth0. The Angular application code can be found at the angular-firebase GitHub repo and the Node API can be found in the firebase-auth0-nodeserver repo.
The first part of our tutorial, Authenticating Firebase and Angular with Auth0: Part 1, covered:
- intro and setup for Auth0 and Firebase
- implementing a secure Node API that mints custom Firebase tokens and provides data for our app
- Angular application architecture with modules and lazy loading
- Angular authentication with Auth0 with service and route guard
- shared Angular components and API service.
Authenticating Firebase and Angular with Auth0: Part 2
Part 2 of our tutorial will cover:
- Displaying Dogs: Async and NgIfElse
- Dog Details with Route Parameters
- Comment Model Class
- Firebase Cloud Firestore and Rules
- Comments Component
- Comment Form Component
- Realtime Comments
- Conclusion
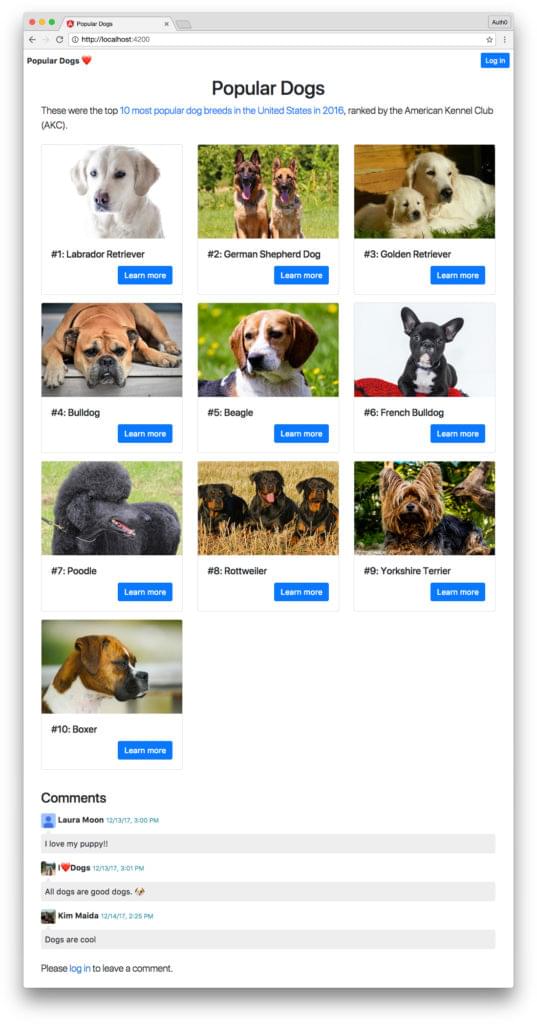
Our completed app will look something like this:
Let’s pick up right where we left off at the end of Authenticating Firebase and Angular with Auth0: Part 1.
Displaying Dogs: Async and NgIfElse
Let’s implement the home page of our app — the dogs listing. We created the scaffolding for this component when we set up our Angular app’s architecture.
Important Note: Make sure your Node.js API is running. If you need a refresher on the API, refer to How to Authenticate Firebase and Angular with Auth0: Part 1 – Node API.
Dogs Component Class
Open the dogs.component.ts class file now and implement this code:
// src/app/dogs/dogs/dogs.component.ts
import { Component, OnInit } from '@angular/core';
import { Title } from '@angular/platform-browser';
import { ApiService } from '../../core/api.service';
import { Dog } from './../../core/dog';
import { Observable } from 'rxjs/Observable';
import { tap, catchError } from 'rxjs/operators';

@Component({
  selector: 'app-dogs',
  templateUrl: './dogs.component.html'
})
export class DogsComponent implements OnInit {
  pageTitle = 'Popular Dogs';
  dogsList$: Observable<Dog[]>;
  loading = true;
  error: boolean;

  constructor(
    private title: Title,
    private api: ApiService
  ) {
    this.dogsList$ = api.getDogs$().pipe(
      tap(val => this._onNext(val)),
      catchError((err, caught) => this._onError(err, caught))
    );
  }

  ngOnInit() {
    this.title.setTitle(this.pageTitle);
  }

  private _onNext(val: Dog[]) {
    this.loading = false;
  }

  private _onError(err, caught): Observable<any> {
    this.loading = false;
    this.error = true;
    return Observable.throw('An error occurred fetching dogs data.');
  }

}
After our imports, we’ll set up some local properties:
pageTitle: to set our page’s<h1>and<title>dogsList$: the observable returned by our API HTTP request to fetch the dogs listing dataloading: to show a loading icon while the API request is being madeerror: to display an error if something goes wrong fetching data from the API.
We’re going to be using the declarative async pipe to respond to the dogsList$ observable returned by our API GET request. With the async pipe, we don’t need to subscribe or unsubscribe in our DogsComponent class: the subscription process will be managed automatically! We just need to set up our observable.
We’ll make Title and ApiService available to our class by passing them to the constructor, and then set up our dogsList$ observable. We’ll use RxJS operators tap (previously known as the do operator) and catchError to call handler functions. The tap operator executes side effects but does not affect the emitted data, so it’s ideal for setting other properties. The _onNext() function will set loading to false (since data has been successfully emitted). The _onError() function will set loading and error appropriately and throw an error. As mentioned before, we don’t need to subscribe or unsubscribe from the dogsList$ observable because the async pipe (which we’ll add in the template) will handle that for us.
On initialization of our component, we’ll use ngOnInit() to spy on the OnInit lifecycle hook to set the document <title>.
That’s it for our Dogs component class!
Dogs Component Template
Let’s move on to the template at dogs.component.html:
<!-- src/app/dogs/dogs/dogs.component.html -->
<h1 class="text-center">{{ pageTitle }}</h1>

<ng-template #noDogs>
  <app-loading *ngIf="loading"></app-loading>
  <app-error *ngIf="error"></app-error>
</ng-template>

<div *ngIf="dogsList$ | async as dogsList; else noDogs">
  <p class="lead">
    These were the top <a href="http://www.akc.org/content/news/articles/the-labrador-retriever-wins-top-breed-for-the-26th-year-in-a-row/">10 most popular dog breeds in the United States in 2016</a>, ranked by the American Kennel Club (AKC).
  </p>
  <div class="row mb-3">
    <div *ngFor="let dog of dogsList" class="col-xs-12 col-sm-6 col-md-4">
      <div class="card my-2">
        <img class="card-img-top" [src]="dog.image" [alt]="dog.breed">
        <div class="card-body">
          <h5 class="card-title">#{{ dog.rank }}: {{ dog.breed }}</h5>
          <p class="text-right mb-0">
            <a class="btn btn-primary" [routerLink]="['/dog', dog.rank]">Learn more</a>
          </p>
        </div>
      </div>
    </div>
  </div>
</div>

<app-comments></app-comments>
There are a couple things in this template that we’ll take a closer look at:
...
<ng-template #noDogs>
  <app-loading *ngIf="loading"></app-loading>
  <app-error *ngIf="error"></app-error>
</ng-template>

<div *ngIf="dogsList$ | async as dogsList; else noDogs">
  ...
    <div *ngFor="let dog of dogsList" ...>
      ...
This code does some very useful things declaratively. Let’s explore.
First we have an <ng-template> element with a template reference variable (#noDogs). The <ng-template> element is never rendered directly. It’s intended to be used with structural directives (such as NgIf). In this case, we’ve created an embedded view with <ng-template #noDogs> which contains both the loading and error components. Each of these components will render based on a condition. The noDogs embedded view itself will not render unless instructed to.
So how (and when) do we tell this view to render?
The next <div *ngIf="... is actually an NgIfElse using the asterisk prefix as syntactic sugar. We’re also using the async pipe with our dogsList$ observable and setting a variable so we can reference the stream’s emitted values in our template (as dogsList). If something goes wrong with the dogsList$ observable, we have an else noDogs statement that tells the template to render the <ng-template #noDogs> view. This would be true before the data has been successfully fetched from the API, or if an error was thrown by the observable.
If dogsList$ | async has successfully emitted a value, the div will render and we can iterate over our dogsList value (which is expected to be an array of Dogs, as specified in our component class) using the NgForOf (*ngFor) structural directive to display each dog’s information.
As you can see in the remaining HTML, each dog will be displayed with a picture, rank, breed, and a link to their individual detail page, which we’ll create next.
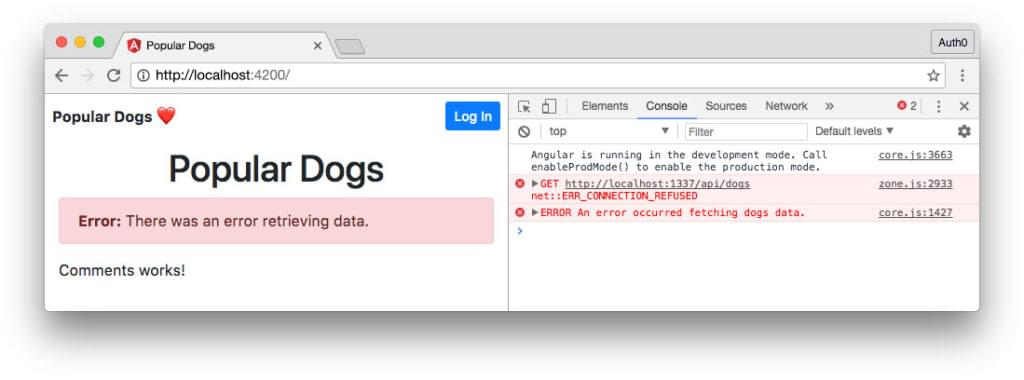
View the Dogs component in the browser by navigating to your app’s homepage at http://localhost:4200. The Angular app should make a request to the API to fetch the list of dogs and display them!
Note: We’ve also included the <app-comments> component. Since we’ve generated this component but haven’t implemented its functionality yet, it should show up in the UI as text that says “Comments works!”
To test error handling, you can stop the API server (Ctrl+c in the server’s command prompt or terminal). Then try reloading the page. The error component should display since the API cannot be reached, and we should see the appropriate errors in the browser console:
Dog Details with Route Parameters
Next we’ll implement our Dog component. This routed component serves as the details page for each dog. We already set up our Dog module architecture along with routing and lazy loading in the first part of this tutorial. All we need to do now is implement!
Reminder: You may recall from part 1 that the dog details page is protected by the AuthGuard route guard. This means that the visitor must be authenticated in order to access the page. In addition, the API call requires an access token to return data.
Dog Component Class
Open the dog.component.ts class file and add:
// src/app/dog/dog/dog.component.ts
import { Component, OnInit, OnDestroy } from '@angular/core';
import { ActivatedRoute } from '@angular/router';
import { Title } from '@angular/platform-browser';
import { ApiService } from '../../core/api.service';
import { DogDetail } from './../../core/dog-detail';
import { Subscription } from 'rxjs/Subscription';
import { Observable } from 'rxjs/Observable';
import { tap, catchError } from 'rxjs/operators';

@Component({
  selector: 'app-dog',
  templateUrl: './dog.component.html',
  styles: [`
    .dog-photo {
      background-repeat: no-repeat;
      background-position: 50% 50%;
      background-size: cover;
      min-height: 250px;
      width: 100%;
    }
  `]
})
export class DogComponent implements OnInit, OnDestroy {
  paramSub: Subscription;
  dog$: Observable<DogDetail>;
  loading = true;
  error: boolean;

  constructor(
    private route: ActivatedRoute,
    private api: ApiService,
    private title: Title
  ) { }

  ngOnInit() {
    this.paramSub = this.route.params
      .subscribe(
        params => {
          this.dog$ = this.api.getDogByRank$(params.rank).pipe(
            tap(val => this._onNext(val)),
            catchError((err, caught) => this._onError(err, caught))
          );
        }
      );
  }

  private _onNext(val: DogDetail) {
    this.loading = false;
  }

  private _onError(err, caught): Observable<any> {
    this.loading = false;
    this.error = true;
    return Observable.throw('An error occurred fetching detail data for this dog.');
  }

  getPageTitle(dog: DogDetail): string {
    const pageTitle = `#${dog.rank}: ${dog.breed}`;
    this.title.setTitle(pageTitle);
    return pageTitle;
  }

  getImgStyle(url: string) {
    return `url(${url})`;
  }

  ngOnDestroy() {
    this.paramSub.unsubscribe();
  }

}
This component is very similar to our Dogs listing component with just a few key differences.
We’ll import the necessary dependencies and privately use the ApiService and Title service in our class.
The Dog details component relies on a route parameter to determine which dog we need to fetch data for. The route parameter matches the desired dog’s rank in the list of ten most popular dogs, like so:
# URL for dog #2:
http://localhost:4200/dog/2
In order to access this parameter in the component class, we need to import the ActivatedRoute interface, pass it to the constructor, and subscribe to the activated route’s params observable.
We can then pass the rank parameter to our getDogByRank$() API service method. We should also unsubscribe from the route params observable when the component is destroyed. Our dog$ observable can use tap and catchError handlers similar to our Dogs listing component.
We’ll also need a couple of methods to help our template.
The getPageTitle() method uses the API data to generate a page title that includes the dog’s rank and breed.
The getImgStyle() method uses the API data to return a background image CSS value.
Dog Component Template
Now let’s use these methods in our dog.component.html template:
<!-- src/app/dog/dog/dog.component.html -->
<ng-template #noDog>
<app-loading *ngIf="loading"></app-loading>
<app-error *ngIf="error"></app-error>
</ng-template>
<div *ngIf="dog$ | async as dog; else noDog">
<h1 class="text-center">{{ getPageTitle(dog) }}</h1>
<div class="row align-items-center pt-2">
<div class="col-12 col-sm-6">
<div
class="dog-photo rounded mb-2 mb-sm-0"
[style.backgroundImage]="getImgStyle(dog.image)"></div>
</div>
<ul class="list-unstyled col-12 col-sm-6">
<li><strong>Group:</strong> {{ dog.group }}</li>
<li><strong>Personality:</strong> {{ dog.personality }}</li>
<li><strong>Energy Level:</strong> {{ dog.energy }}</li>
</ul>
</div>
<div class="row">
<div class="col">
<p class="lead mt-3" [innerHTML]="dog.description"></p>
<p class="clearfix">
<a routerLink="/" class="btn btn-link float-left">← Back</a>
<a
class="btn btn-primary float-right"
[href]="dog.link"
target="_blank">{{ dog.breed }} AKC Info</a>
</p>
</div>
</div>
</div>
Overall, this template looks and functions similar to our Dogs listing component template, except that we are not iterating over an array. Instead, we are showing information for only one dog, and the page title is dynamically generated instead of static. We’ll use the observable’s emitted dog data (from dog$ | async as dog) to display details with the help of Bootstrap CSS classes.
The component should look like this in the browser when finished:
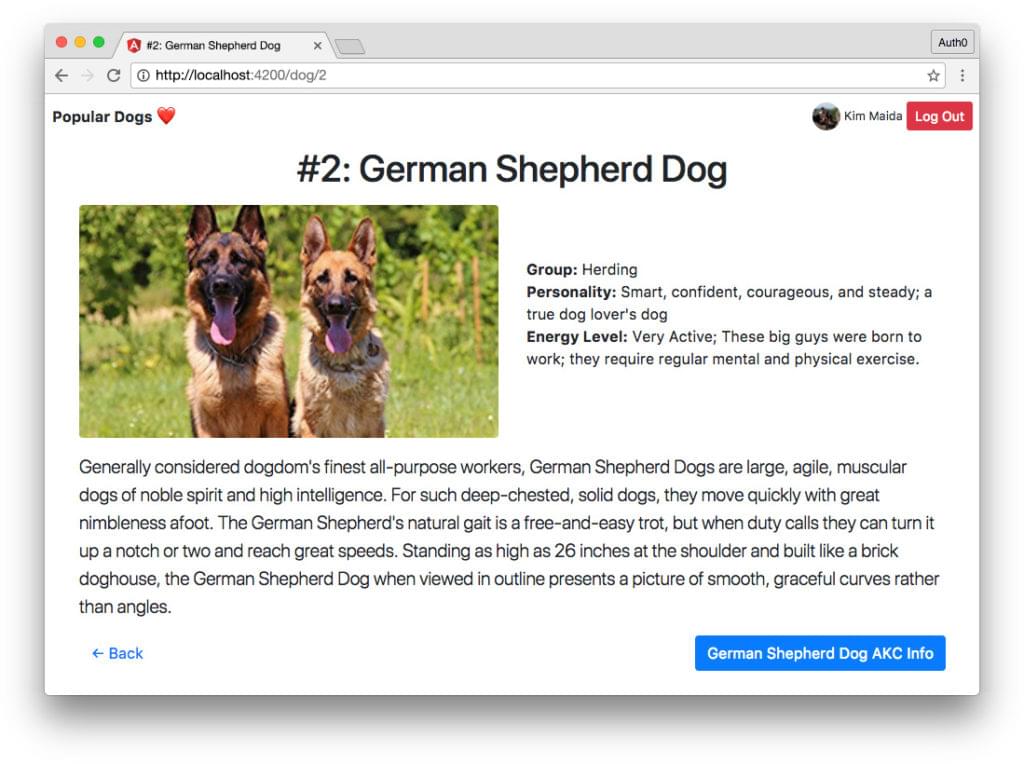
To get to any dog’s detail page, an unauthenticated user will be prompted by the AuthGuard to log in first. Once they’ve authenticated, they will be redirected to their requested details page. Try it out!
Comment Model Class
Now that our dog listing and detail pages are done, it’s time to work on adding realtime commenting!
The first thing we’ll do is establish the shape of our comments, along with a way to initialize new comment instances. Let’s implement the comment.ts class in our Angular app:
// src/app/comments/comment.ts
export class Comment {
  constructor(
    public user: string,
    public uid: string,
    public picture: string,
    public text: string,
    public timestamp: number
  ) {}

  // Workaround because Firestore won't accept class instances
  // as data when adding documents; must unwrap instance to save.
  // See: https://github.com/firebase/firebase-js-sdk/issues/311
  public get getObj(): object {
    const result = {};
    Object.keys(this).map(key => result[key] = this[key]);
    return result;
  }

}
Unlike our Dog and DogDetail models, our Comment model is a class, not an interface. We will eventually be initializing Comment instances in our comment form component, and to do so, a class is necessary. In addition, Firestore only accepts regular JS objects when adding documents to a collection, so we need to add a method to our class that unwraps the instance to an object. An interface, on the other hand, only supplies a description of an object. This sufficed for Dog and DogDetail, but would not be sufficient for Comment.
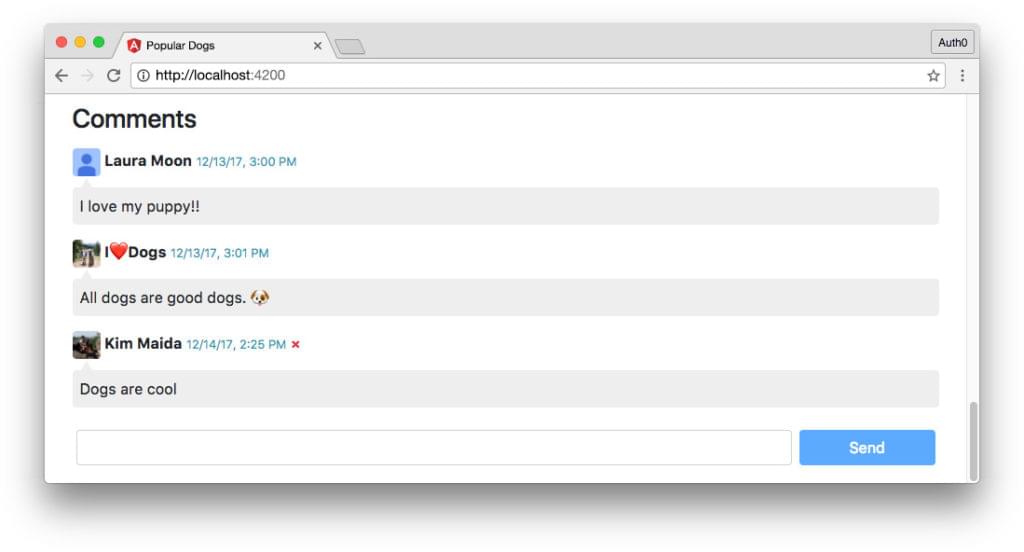
When rendered, we want comments to look something like this:
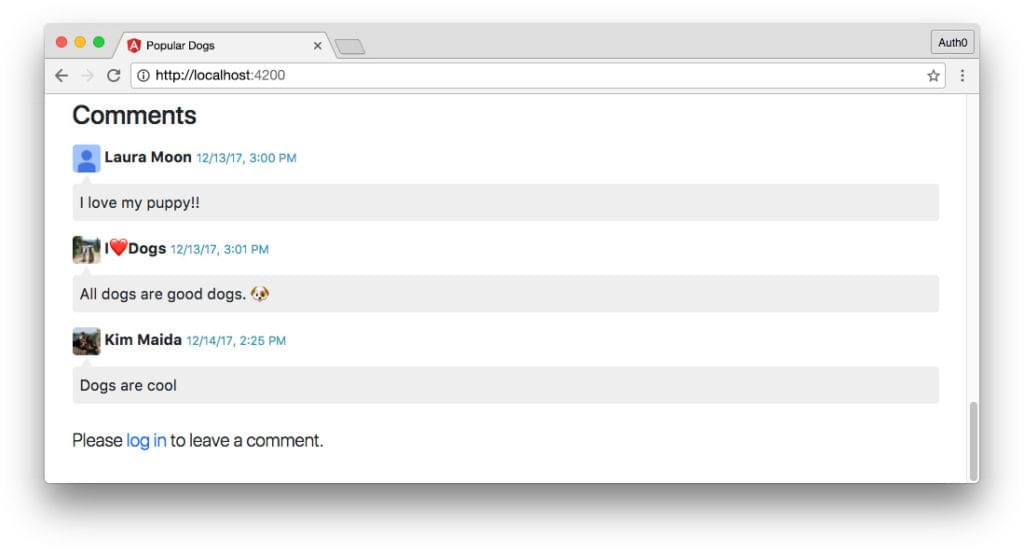
As you can see, each comment has a username, picture, comment text, and a date and time. Comments also need a unique identifier, provided in the data as uid. This unique ID ensures that users have appropriate access to delete their own comments, but not comments left by others.
Now that we have a shape in mind for what a comment should look like, let’s go set up our Firebase Firestore rules.
Firebase Cloud Firestore and Rules
We’ll be using Firebase’s Cloud Firestore database to store our app’s comments. Cloud Firestore is a NoSQL, flexible, scalable, cloud-hosted database that provides realtime capability. At the time of writing, Firestore is in beta, but it is the recommended database for all new mobile and web apps. You can read more about choosing between Realtime Database (RTDB) vs Cloud Firestore here.
Reminder: If you need a quick refresher on the Firebase product, re-read How To Authenticate Firebase and Angular with Auth0 – Part 1: Firebase and Auth0.
Firestore organizes data as documents in collections. This data model should be familiar if you have experience with document-oriented NoSQL databases like MongoDB. Let’s select Cloud Firestore as our database now.
- Log into the Firebase project that you created in Part 1 of this tutorial.
- Click on Database in the sidebar menu.
- In the dropdown next to the Database page heading, select Cloud Firestore.
Add Collection and First Document
The Data tab will be displayed by default and the database currently doesn’t have anything in it. Let’s add our collection and a document so that we can query our database in Angular and have something returned.
Click on + Add Collection. Name your collection comments, then click the Next button. You’ll be prompted to add your first document.
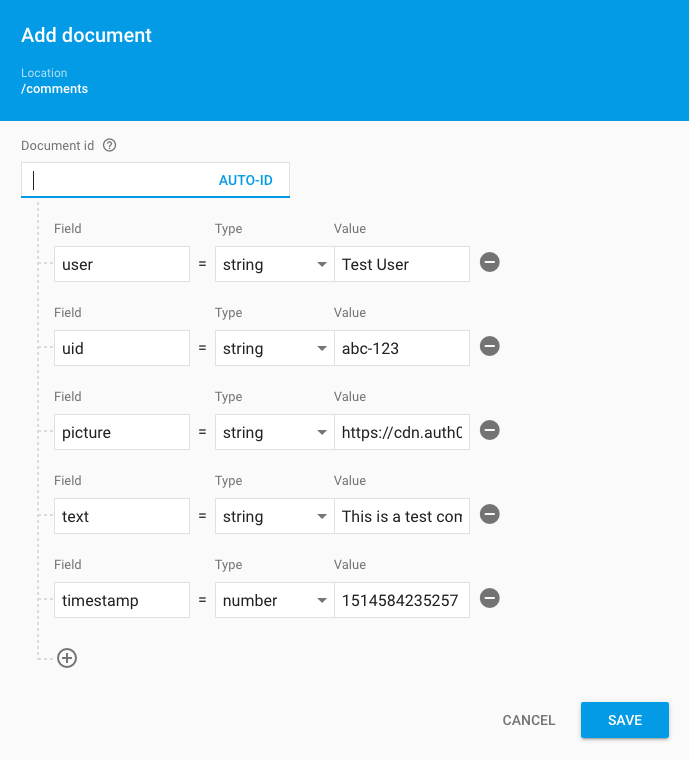
In the Document id field, click on Auto-ID. This will automatically populate an ID for you. Next add the fields we established earlier in the comment.ts model with the appropriate types and some placeholder data. We only need this seed document until we know that our listing renders properly in our Angular app, then we can delete it using the Firebase console and enter comments properly using a form in the front end.
However, since we don’t have a form built yet, the seed data will be helpful. Once you’ve entered the correct fields and types, you can populate the values however you like. Here is a suggestion:
user <string>: Test User
uid <string>: abc-123
picture <string>: https://cdn.auth0.com/avatars/tu.png
text <string>: This is a test comment from Firebase console.
timestamp <number>: 1514584235257
Note: A comment with a made-up uid value will not validate to any real authenticated user once we set up Firebase security rules. The seed document will need to be deleted using the Firebase console if we want to remove it later. We won’t have access to delete it using SDK methods in the Angular app, as you will see in the rules below.
Once you’ve entered your fake user’s comment, click the Save button. The new collection and document should populate in the database. This provides data that we can query for in our Angular app.
Firebase Rules
Next let’s set up our Firestore database’s security. Switch to the Rules tab now.
Firebase Security Rules provide back-end security and validation. In our app’s Node API, we verified that users were authorized to access endpoints using Auth0 and JWT authentication middleware. We’ve already set up Firebase authentication in our API and Angular app, and we’ll use the rules feature to authorize permissions on the database back end.
A rule is an expression that is evaluated to determine if a request is allowed to perform a desired action. — Cloud Firestore Security Rules Reference
Add the following code in your Firebase Database Rules editor. We’ll go over it in more detail below.
// Firebase Database Rules for Cloud Firestore
service cloud.firestore {
  match /databases/{database}/documents {
    match /comments/{document=**} {
      allow read: if true;
      allow create: if request.auth != null
        && request.auth.uid == request.resource.data.uid
        && request.resource.data.text is string
        && request.resource.data.text.size() <= 200;
      allow delete: if request.auth != null
        && request.auth.uid == resource.data.uid;
    }
  }
}
Firestore has rule request methods: read and write. Read includes get and list operations. Write includes create, update, and delete operations. We will implement read, create, and delete rules.
Note: We won’t add a comment editing feature in our app, so update is not included. However, feel free to add an update rule if you would like to add this functionality on your own!
Rules are executed when a user request matches a document path. Paths can be fully named, or they can use wildcards. Our rules apply to all documents in the comments collection we created.
We want everyone to be able to read comments, both anonymous and authenticated users alike. Therefore, the condition for allow read is simply if true.
We want only authenticated users to be able to create new comments. We’ll verify that the user is logged in and ensure the data that is being saved has a uid property that matches the user’s authentication uid (request.auth.uid in Firebase rules). In addition, we can do a bit of field validation here. We will check that the request’s data has a text property that is a string and is 200 characters or less (we’ll also add this validation in our Angular app shortly).
Finally, we only want users to be able to delete their own comments. We can allow delete if the authenticated user’s UID matches the existing comment’s uid property using resource.data.uid.
Note: You can learn more about the request and resource keywords in the Firebase docs.
Comments Component
Now that our database is prepared, it’s time to return to our Angular app and implement realtime commenting!
The first thing we’ll do is display comments. We want comments to update asynchronously in realtime, so let’s explore how to do that with our Cloud Firestore database and the angularfire2 SDK.
Comments Component Class
We already created the architecture for our Comments module, so let’s start by building out our comments.component.ts:
// src/app/comments/comments/comments.component.ts
import { Component } from '@angular/core';
import { AngularFirestore, AngularFirestoreCollection, AngularFirestoreDocument } from 'angularfire2/firestore';
import { Observable } from 'rxjs/Observable';
import { map, catchError } from 'rxjs/operators';
import { Comment } from './../comment';
import { AuthService } from '../../auth/auth.service';

@Component({
  selector: 'app-comments',
  templateUrl: './comments.component.html',
  styleUrls: ['./comments.component.css']
})
export class CommentsComponent {
  private _commentsCollection: AngularFirestoreCollection<Comment>;
  comments$: Observable<Comment[]>;
  loading = true;
  error: boolean;

  constructor(
    private afs: AngularFirestore,
    public auth: AuthService
  ) {
    // Get latest 15 comments from Firestore, ordered by timestamp
    this._commentsCollection = afs.collection<Comment>(
      'comments',
      ref => ref.orderBy('timestamp').limit(15)
    );
    // Set up observable of comments
    this.comments$ = this._commentsCollection.snapshotChanges()
      .pipe(
        map(res => this._onNext(res)),
        catchError((err, caught) => this._onError(err, caught))
      );
  }

  private _onNext(res) {
    this.loading = false;
    this.error = false;
    // Add Firestore ID to comments
    // The ID is necessary to delete specific comments
    return res.map(action => {
      const data = action.payload.doc.data() as Comment;
      const id = action.payload.doc.id;
      return { id, ...data };
    });
  }

  private _onError(err, caught): Observable<any> {
    this.loading = false;
    this.error = true;
    return Observable.throw('An error occurred while retrieving comments.');
  }

  onPostComment(comment: Comment) {
    // Unwrap the Comment instance to an object for Firestore
    // See https://github.com/firebase/firebase-js-sdk/issues/311
    const commentObj = <Comment>comment.getObj;
    this._commentsCollection.add(commentObj);
  }

  canDeleteComment(uid: string): boolean {
    if (!this.auth.loggedInFirebase || !this.auth.userProfile) {
      return false;
    }
    return uid === this.auth.userProfile.sub;
  }

  deleteComment(id: string) {
    // Delete comment with confirmation prompt first
    if (window.confirm('Are you sure you want to delete your comment?')) {
      const thisDoc: AngularFirestoreDocument<Comment> = this.afs.doc<Comment>(`comments/${id}`);
      thisDoc.delete();
    }
  }

}
First we’ll import the necessary angularfire2 dependencies to use Firestore, collections, and documents. We also need Observable, map, and catchError from RxJS, our Comment model, and AuthService.
We’ll declare members next. The private _commentsCollection is a Firestore collection containing items in the shape of Comment. The comments$ observable is a stream with values that take the shape of arrays of Comments. Then we have our usual loading and error properties.
After passing AngularFirestore and AuthService to the constructor function, we need to fetch our collection data from Cloud Firestore. We’ll use the angularfire2 method collection() to do so, specifying Comment as the type, passing the name of our collection (comments), ordering the results by timestamp, and limiting to the last 15 comments.
Next we’ll create our comments$ observable using the _commentsCollection. We’ll use map() and catchError() RxJS operators to handle emitted data and errors.
In our private _onNext() handler, we’ll set loading and error to false. We’ll also add the Firestore document ID to each item in arrays emitted by the comments$ stream. We need these IDs in order to allow users to delete individual comments. In order to add the ID to the emitted values, we’ll use the snapshotChanges() method to access metadata. We can then map() document ids into the returned data using the spread operator.
Note: You may notice that we did not set error to false in the success method in our dogs or dog observables, but we are doing so here. The comments stream emits a value each time any user adds a comment in realtime. Therefore, we may need to reset the error status asynchronously in response.
The private _onError() handler should look very familiar from our other components. It sets loading and error properties and throws an error.
The onPostComment() method will be run when the user submits a comment using the comment form component (which we will build shortly). The onPostComment() payload will contain a Comment instance containing the user’s comment data, which then needs to be unwrapped to a normal object in order to be saved in Firestore. We’ll save the unwrapped comment object using the Angular Firestore add() method.
The canDeleteComment() method checks whether the current user is the owner of any given comment. If they created the comment, they can also delete it. This method verifies that the logged in user’s userProfile.sub property matches the uid of the comment.
The deleteComment() method will run when the user clicks the icon to delete a comment. This method opens a confirmation dialog that confirms the action and if confirmed, uses the id argument to delete the correct comment document from the Firestore collection. (This is why we needed to add document ids to our data when we mapped values emitted by our comments$ observable.)
Note: Recall that our Firestore rules also prevent users from deleting comments they didn’t create. We should always ensure that access rights are enforced on both the front end and back end for proper security.
Comments Component Template
Now let’s put our class functionality to work in the UI. Open the comments.component.html file and add:
<!-- src/app/comments/comments/comments.component.html -->
<section class="comments py-3">
<h3>Comments</h3>
<ng-template #noComments>
<p class="lead" *ngIf="loading">
<app-loading [inline]="true"></app-loading>Loading comments...
</p>
<app-error *ngIf="error"></app-error>
</ng-template>
<div *ngIf="comments$ | async; let commentsList; else noComments">
<ul class="list-unstyled">
<li *ngFor="let comment of commentsList" class="pt-2">
<div class="row mb-1">
<div class="col">
<img [src]="comment.picture" class="avatar rounded">
<strong>{{ comment.user }}</strong>
<small class="text-info">{{ comment.timestamp | date:'short' }}</small>
<strong>
<a
*ngIf="canDeleteComment(comment.uid)"
class="text-danger"
title="Delete"
(click)="deleteComment(comment.id)">×</a>
</strong>
</div>
</div>
<div class="row">
<div class="col">
<p class="comment-text rounded p-2 my-2" [innerHTML]="comment.text"></p>
</div>
</div>
</li>
</ul>
<div *ngIf="auth.loggedInFirebase; else logInToComment">
<app-comment-form (postComment)="onPostComment($event)"></app-comment-form>
</div>
<ng-template #logInToComment>
<p class="lead" *ngIf="!auth.loggedIn">
Please <a class="text-primary" (click)="auth.login()">log in</a> to leave a comment.
</p>
</ng-template>
</div>
</section>
We’ll mostly use Bootstrap classes to style our comments, with a little bit of custom CSS that we’ll add next. Our comments template, like our dogs and dog component templates, has an <ng-template> and uses the async pipe with NgIfElse to display the appropriate UI.
The comments list should show the comment’s picture (the user avatar of its author), the user’s name, and the timestamp formatted with the DatePipe. We’ll pass the comment’s uid to the canDeleteComment() method to determine if a delete link should be shown. We’ll then display the comment text, using property binding to innerHTML.
Finally, we’ll create elements to show the comment form or a message instructing users to log in if they wish to leave a comment.
Note: Our <app-comment-form> will use event binding to emit an event called postComment when a user submits a comment. The CommentsComponent class listens for that event and handles it with the onPostComment() method that we created, using the $event payload to save the submitted comment to the Firestore database. We’ll hook up the (postComment) event when we create the form in the next section.
Comments Component CSS
Finally, open the comments.component.css file and let’s add a few styles to our comments list:
/* src/app/comments/comments/comments.component.css */
.avatar {
  display: inline-block;
  height: 30px;
}
.comment-text {
  background: #eee;
  position: relative;
}
.comment-text::before {
  border-bottom: 10px solid #eee;
  border-left: 6px solid transparent;
  border-right: 6px solid transparent;
  content: '';
  display: block;
  height: 1px;
  position: absolute;
    top: -10px; left: 9px;
  width: 1px;
}
Comment Form Component
Now that we have a listing of comments that updates in realtime, we need to be able to add new comments in our front end.
Comment Form Component Class
Open the comment-form.component.ts file and let’s get started:
// src/app/comments/comment-form/comment-form.component.ts
import { Component, OnInit, Output, EventEmitter } from '@angular/core';
import { Comment } from './../../comment';
import { AuthService } from '../../../auth/auth.service';

@Component({
  selector: 'app-comment-form',
  templateUrl: './comment-form.component.html'
})
export class CommentFormComponent implements OnInit {
  @Output() postComment = new EventEmitter<Comment>();
  commentForm: Comment;

  constructor(private auth: AuthService) { }

  ngOnInit() {
    this._newComment();
  }

  private _newComment() {
    this.commentForm = new Comment(
      this.auth.userProfile.name,
      this.auth.userProfile.sub,
      this.auth.userProfile.picture,
      '',
      null);
  }

  onSubmit() {
    this.commentForm.timestamp = new Date().getTime();
    this.postComment.emit(this.commentForm);
    this._newComment();
  }

}
As mentioned earlier, we will need to emit an event from this component to the parent CommentsComponent, which sends the new comment to Firestore. The CommentFormComponent is responsible for constructing the Comment instance with the appropriate information gathered from the authenticated user and their form input and sending that data to the parent. In order to emit the postComment event, we’ll import Output and EventEmitter. We’ll also need our Comment class and AuthService to get user data.
Our comment form component’s members include an Output decorator (postComment) that is an EventEmitter with type of Comment, and commentForm, which will be an instance of Comment to store form data.
In our ngOnInit() method, we’ll create a new Comment instance with the private _newComment() method. This method sets the local commentForm property to a new instance of Comment with the authenticated user’s name, sub, and picture. The comment text is an empty string and the timestamp is set to null (it will be added when the form is submitted).
The onSubmit() method will be executed when the comment form is submitted in the template. This method adds the timestamp and emits the postComment event with the commentForm data as its payload. It also calls the _newComment() method to reset the comment form.
Comment Form Component Template
Open the comment-form.component.html file and add this code:
<!-- src/app/comments/comment-form/comment-form.component.html -->
<form (ngSubmit)="onSubmit()" #tplForm="ngForm">
  <div class="row form-inline m-1">
    <input
      type="text"
      class="form-control col-sm-10 mb-2 mb-sm-0"
      name="text"
      [(ngModel)]="commentForm.text"
      maxlength="200"
      required>
    <button
      class="btn btn-primary col ml-sm-2"
      [disabled]="!tplForm.valid">Send</button>
  </div>
</form>
The comment form template is quite simple. The form’s only field is a text input, since all other comment data (like name, picture, UID, etc.) is added dynamically in the class. We’ll use a simple template-driven form to implement our comment form.
The <form> element listens for an (ngOnSubmit) event, which we’ll handle with our onSubmit() method. We’ll also add a template reference variable called #tplForm and set it to ngForm. This way, we can access the form’s properties in the template itself.
The <input> element should have an [(ngModel)] that binds to commentForm.text. This is the property we want to update when a user types in the form field. Recall that we set up our Firestore rules to accept comment text 200 characters or less, so we’ll add this maxlength to our front end, along with a required attribute so that users cannot submit empty comments.
Finally, the <button> to submit the form should be [disabled] if the form is not valid. We can reference the valid property using the tplForm reference variable we added to the <form> element.
Realtime Comments
Verify in the browser that the comments show up as expected. The only comment so far should be the seed comment that we added directly in Firebase. When fetched and rendered, our comments list should look like this:

The comment form should show up if the user is authenticated. Log in and try adding a comment.
Delete Seed Comment
Users can delete their own comments. A red x should appear next to the comment’s date and time if the user is the owner of a comment. Clicking this delete icon prompts for confirmation and then removes the comment in realtime.
Remember that the seed document we added in Firebase cannot be deleted in the Angular app because its uid property doesn’t match any real user’s data. Let’s delete it manually now.
Open your Firebase console and view your Firestore comments collection. Find the document that contains the seed comment. Using the menu dropdown in the upper right, select Delete document to remove it:
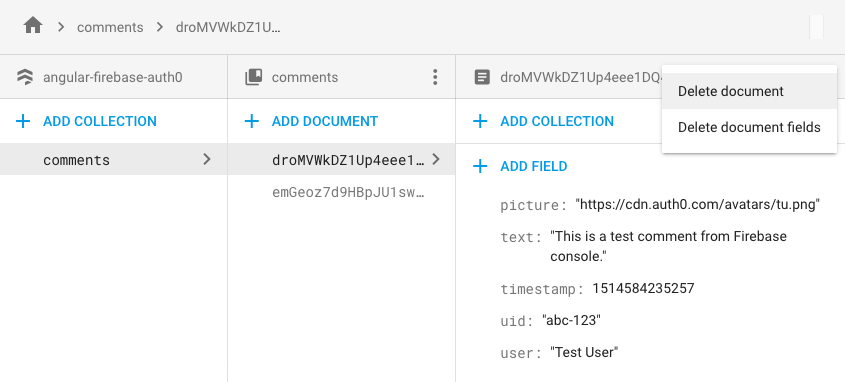
Now, any comments that are added to our database should be able to be deleted by their author in the back end.
Add Comments in Angular App
When comments are added, they should show up and that’s great, but it doesn’t really demonstrate the true realtime nature of our Firestore database. We could add comments in the UI without a refresh using a traditional server and database as well, simply by updating the view.
In order to truly see our realtime database at work, open the app in a second browser and authenticate using a different login. With both browsers in view, add a comment in one browser. It will appear in the second browser at the same time.
This is what Firebase’s realtime databases can do!
Conclusion
Congratulations! You now have an Angular app that authenticates Firebase with Auth0 and is built on a scalable architecture.
The first part of our tutorial, How to Authenticate Firebase and Angular with Auth0: Part 1, covered:
- intro and setup for Auth0 and Firebase
- implementing a secure Node API that mints custom Firebase tokens and provides data for our app
- Angular application architecture with modules and lazy loading
- Angular authentication with Auth0 with service and route guard
- shared Angular components and API service.
The second part of our tutorial covered:
- displaying data with the Async pipe and NgIfElse
- using route parameters
- modeling data with a class
- Firebase Cloud Firestore database and security rules
- implementing Firestore database in Angular with angularfire2
- simple template-driven form with component interaction.
Angular Testing Resources
If you’re interested in learning more about testing in Angular, which we did not cover in this tutorial, please check out some of the following resources:
- Angular – Testing
- Angular Testing In Depth: Services
- Angular Testing In Depth: HTTP Services
- Angular Testing In Depth: Components
- How to correctly test Angular 4 application with Auth0 integration
Additional Resources
You can find more resources on Firebase, Auth0, and Angular here:
- Firebase documentation
- Cloud Firestore documentation
- angularfire2 documentation
- Auth0 documentation
- Auth0 pricing and features
- Angular documentation
- Angular CLI
- Angular Cheatsheet
What’s Next?
Hopefully you learned a lot about building scalable apps with Angular and authenticating Firebase with custom tokens. If you’re looking for ideas to expand on what we’ve built, here are some suggestions:
- implement an inappropriate language filter for comments
- implement authorization roles to create an admin user with the rights to delete other peoples’ comments
- add functionality to support comment editing
- add comments to individual dog detail pages using additional Firestore collections
- add testing
- and much more!
Frequently Asked Questions (FAQs) on Authenticating Firebase with Angular and Auth0
How do I set up Firebase authentication with Angular and Auth0?
Setting up Firebase authentication with Angular and Auth0 involves several steps. First, you need to create a Firebase project and enable the sign-in method you want to use. Next, you need to install the necessary packages in your Angular project, such as Firebase and AngularFire. Then, you need to initialize Firebase in your Angular project and set up the Auth0 application. Finally, you need to implement the authentication flow in your Angular application, which includes signing in, signing out, and handling authentication state.
What are the benefits of using Firebase authentication with Angular and Auth0?
Firebase authentication with Angular and Auth0 offers several benefits. Firebase provides a secure and reliable back-end service for user authentication, while Angular provides a robust framework for building single-page applications. Auth0, on the other hand, offers a comprehensive identity platform with features like social login, multi-factor authentication, and passwordless login. By integrating these technologies, you can create a secure and user-friendly authentication system for your web application.
Can I use other authentication methods with Firebase and Angular?
Yes, Firebase supports various authentication methods, including email and password, phone number, and social login (Google, Facebook, Twitter, etc.). You can choose the authentication method that best suits your application’s needs. However, keep in mind that each method requires a different setup and configuration in both Firebase and your Angular application.
How do I handle authentication state in my Angular application?
Handling authentication state in your Angular application involves keeping track of whether a user is signed in or not. You can use Firebase’s onAuthStateChanged method to listen for changes in the user’s authentication state. This method returns a user object if the user is signed in, or null if the user is signed out. You can then use this information to update your application’s UI and restrict access to certain routes.
How do I secure my Firebase project?
Securing your Firebase project involves several steps. First, you should restrict access to your Firebase project in the Firebase console. This includes setting up database rules, storage rules, and cloud function rules. Second, you should use secure communication protocols (HTTPS) when interacting with Firebase services. Third, you should handle user authentication and authorization properly in your application, including validating user input and managing user sessions.
How do I troubleshoot issues with Firebase authentication?
Troubleshooting issues with Firebase authentication involves identifying the problem, understanding the cause, and applying the appropriate solution. Common issues include incorrect configuration, network errors, and user input errors. Firebase provides detailed error messages that can help you diagnose and fix these issues. Additionally, you can use Firebase’s debugging tools and logs to gain more insight into your application’s behavior.
Can I use Firebase authentication with other front-end frameworks?
Yes, Firebase authentication can be used with various front-end frameworks, including React, Vue.js, and Ember.js. The setup and implementation may vary depending on the framework, but the basic principles remain the same. You need to initialize Firebase, set up the authentication method, and handle the authentication flow in your application.
How do I test Firebase authentication in my Angular application?
Testing Firebase authentication in your Angular application involves creating test cases for different scenarios, such as signing in, signing out, and handling authentication state. You can use Angular’s testing tools, such as TestBed and ComponentFixture, to create and run these tests. Additionally, you can use Firebase’s emulator suite to test your application’s interaction with Firebase services in a controlled environment.
How do I handle user sessions in my Angular application?
Handling user sessions in your Angular application involves managing the user’s authentication state across multiple pages or routes. You can use Firebase’s onAuthStateChanged method to keep track of the user’s authentication state. Additionally, you can use Angular’s router to restrict access to certain routes based on the user’s authentication state.
How do I implement social login with Firebase and Angular?
Implementing social login with Firebase and Angular involves setting up the social login method in your Firebase project, installing the necessary packages in your Angular application, and implementing the social login flow. This includes creating a sign-in button, handling the sign-in process, and managing the user’s authentication state. You can use Firebase’s signInWithPopup or signInWithRedirect methods to sign in the user with a social account.
 Kim Maida
Technical Content Lead at @Auth0. Angular GDE. Angular Consultant. Formerly: Senior UI Engineer. Past life: Animal Behavior & Neurobiology.