This three-part series outlines a common sense, cost-effective approach to Website acceleration according to the two simple laws of Web performance:
- Send as little data as possible
- Send it as infrequently as possible
If used properly, these basic principles should result in:
- Faster Web page loads
- Reduction of server usage
- Improved bandwidth utilization
These techniques should not only improve user satisfaction with your site or Web-based application, but should also help you save money on site delivery costs.
The principles we will present in this series will not only be applied to developer-accessible Web page source including (X)HTML, CSS, and JavaScript, but will also address Web server configuration and modifications. Some suggestions may touch on structural site changes or modifications to server-side programming environments, but our primary focus will be on relatively easy changes that can be made to existing sites.
The techniques derived from the two principles mentioned above fall into three major categories:
- Client-side code optimization – dealt with in Part 1 of this series, which starts below.
- Optimal cache control – Part 2 of this series
- Server-side modifications – Part 3 of this series
In the first part of this series, we’ll focus on client-side code optimization — the easiest and generally cheapest to implement of the three site acceleration techniques. As linked above, the subsequent parts of the series will deal with chache control and server side modifications in turn.
Part 1 – Client Side Acceleration
Code for Yourself, Compile for Delivery
Any application programmer knows that there are good reasons why the code we work with is not the code we should deliver. It’s best to comment source code extensively, to format it for maximum readability, and to avoid overly terse, but convoluted syntax that makes maintenance difficult. Later, we use a compiler to translate that source code into some other form that’s optimized for performance and protected from reverse engineering.
This model can be applied to Web development as well. To do so, you would take the “source” version of your site and prepare it for delivery by “crunching” it down through simple techniques like white space reduction, image and script optimization, and file renaming. You would then take your delivery-ready site and post it.
Now, presumably, this isn’t too foreign a concept, as you’re probably at least working on a copy of your site, rather than posting changes directly to the live site. If not, please stop reading right now and make a copy of your site! This is the only proper way to develop, regardless of whether the site is a static brochure or a complex, CMS-driven application. If you don’t believe us now, you will some day in the very near future when you ruin some of your site files and can’t easily recover them.
As you build your site, you’re probably focused on the biggest culprits in site download speed reduction — images and binary files like Flash. While reducing the colors in GIF files, compressing JPEGs, and optimizing SWF files will certainly help a great deal, there are still plenty of other areas for improvement.
Remembering the first rule of Web performance, we should always strive to send as few bytes as possible, regardless of whether the file is markup, image, or script. Now, it might seem like wasted effort to focus on shaving bytes here and there in (X)HTML, CSS or JavaScript. However, this may be precisely where the greatest attention ought to be paid.
During a typical Web page fetch, an (X)HTML document is the first to be delivered to a browser. We can dub this the host document, as it determines the relationships among all other files. Once the XHTML document is received, the browser begins to parse the markup, and in doing so, often initiates a number of requests for dependent objects such as external scripts, linked style sheets, images, embedded Flash, and so on. These CSS and JavaScript files may, in turn, host additional calls for related image or script files.
The faster these requests for dependent files are queued up, the faster they will get back to the browser and start rendering in the page. Given the importance of the host document, it would seem critical to have it delivered to the browser and parsed as quickly as possible as, despite constituting a relatively small percentage of the overall page weight, it can dramatically impede the loading of the page. Remember: users doesn’t measure bytes, they measure time!
So what, specifically, do you need to do to fully prep your site for optimal delivery? The basic approach involves reducing white space, crunching CSS and JavaScript, renaming files, and similar strategies for making the delivered code as terse as possible (see Google for an example). These general techniques are well known and documented both on the Web and in books like Andy King’s Speed up Your Site: Website Optimization.
In this article, we present what we consider to be the top twenty markup and code optimization techniques. You can certainly perform some of these optimizations by hand, find some Web editors and utilities that perform a few of the features for you, or roll your own crunching utilities. We do also somewhat shamelessly point you to a tool developed at Port80 Software, called the w3compiler. This tool is the only one on the market today that provides a reference implementation for nearly all the optimizing features described here and that serves as a legitimate example of the “real world” value of code optimization. Now, on with the tips!
Markup Optimization
Typical markup is either very tight, hand-crafted and standards-focused, filled with comments and formatting white space, or it is bulky, editor-generated markup with excessive indenting, editor-specific comments often used as control structures, and even redundant or needless markup or code. Neither case is optimal for delivery. The following tips are safe and easy ways to decrease file size:
1. Remove white space wherever possible.
In general, multiple white space characters (spaces, tabs, newlines) can safely be eliminated, but of course avoid changing <pre>,<textarea>, and tags affected by the white-space CSS property.
2. Remove comments.
Almost all comments, other than client-side conditional comments for IE and DOCTYPE statements, can safely be removed.
3. Remap color values to their smallest forms.
Rather than using all hex values or all color names, use whichever form is shortest in each particular case. For example, a color attribute value like #ff0000 could be replaced with red, while lightgoldenrodyellow would become #fafad2.
4. Remap character entities to their smallest forms.
As with color substitution, you can substitute a numeric entity for a longer alpha-oriented entity. For example, È would become È. Occasionally, this works in reverse as well: ð saves a byte if referenced as ð. However, this is not quite as safe to do, and the potential savings are limited.
5. Remove useless tags.
Some “junk” markup, such as tags applied multiple times or certain <meta> tags used as advertisements for editors, can safely be eliminated from documents.
Questionable Markup Optimization Techniques
While the first five techniques can result in significant savings on the order of ten to fifteen percent, many tools and developers looking for maximum delivery compression employ some questionable techniques, including:
Quote removal on attributes
Doctype statement elimination
Optional close tag removal
Tag substitution like
<strong>to<b>
While it is true that most browsers will make sense of whatever “tag soup” they are handed, reasonable developers will not rely on this and will, instead, always attempt to deliver standards-compliant markup. Generally speaking, the problems associated with bypassing standards (for example, diminished portability and interoperability) outweigh the small gains in speed, and, in the case of missing closing tags, there may even be a performance penalty at page render. While sites like Google have consciously employed many of these techniques on their homepage markup, you probably don’t need to go that far. We suggest that you avoid them unless you have extreme performance requirements.
CSS Optimizations
CSS is also ripe for simple optimizations. In fact, most CSS created today tends to compress much more successfully than (X)HTML. The following techniques are all safe, except for the final one, the complexities of which demonstrate the extent to which client-side Web technologies can be intertwined.
6. Remove CSS white space.
As is the case with (X)HTML, CSS is not terribly sensitive to white space, and thus its removal is a good way to significantly reduce the size of both CSS files and <style> blocks.
7. Remove CSS comments.
Just like markup comments, CSS comments should be removed, as they provide no value to the typical end user. However, a CSS masking comment in a <style> tag probably should not be removed if you’re concerned about down-level browsers.
8. Remap colors in CSS to their smallest forms.
As in HTML, CSS colors can be remapped from word to hex format. However, the advantage gained by doing this in CSS is slightly greater. The main reason for this is that CSS supports three-hex color values like #fff for white.
9. Combine, reduce, and remove CSS rules.
CSS rules such as font-size, font-weight, and so on can often be expressed in a shorthand notation using the single property font. When employed properly, this technique allows you to take something like:
p {font-size: 36pt;

    font-family: Arial;

    line-height: 48pt;

    font-weight: bold;}
and rewrite it as:
p{font:bold 36pt/48pt Arial;}You also may find that some rules in style sheets can be significantly reduced or even completely eliminated if inheritance is used properly. So far, there are no automatic rule-reduction tools available, so CSS wizards will have to hand-tweak for these extra savings. However, the upcoming 2.0 release of the w3compiler will include this feature.
10. Rename class and id values.
The most dangerous optimization that can be performed on CSS is to rename class or id values. Consider a rule like this:
.superSpecial {color: red; font-size: 36pt;}It might seem appropriate to rename the class to sS. You might also take an id rule such as:
#firstParagraph {background-color: yellow;}Here, you could use #fp in place of #firstParagraph, changing the appropriate id values throughout the document. Of course, in doing this you start to run into the problem of markup-style-script dependency: if a tag has an id value, it is possible that this value is used not only for a style sheet, but also as a script reference, or even a link destination. If you modify this value, you need to make very sure that you modify all related script and link references as well. These references may even be located in other files, so be careful.
Changing class values is not quite as dangerous, since experience shows that most JavaScript developers tend not to manipulate class values as often as they do id values. However, class name reduction ultimately suffers from the same problem as id reduction, so, again, be careful.
Note: You should probably never remap name attributes, particularly on form fields, as these values are also operated on by server-side programs that would have to be altered as well. Though not impossible, calculating such dependencies would be difficult in many Website environments.
JavaScript Optimization
More and more sites rely on JavaScript to provide navigational menus, form validation, and a variety of other useful things. Not surprisingly, much of this code is quite bulky and begs for optimization. Many of the techniques for JavaScript optimization are similar to those used for markup and CSS. However, JavaScript optimization must be performed far more carefully because, if it’s done improperly, the result is not just a visual distortion, but potentially a broken page! Let’s start with the most obvious and easiest improvements, then move on to those that require greater care.
11. Remove JavaScript comments.
Except for the <!-- //--> masking comment, all JavaScript comments indicated by // or /* */ can safely be removed, as they offer no value to end users (except those who want to understand how your script works).
12. Remove white space in JavaScript.
Interestingly, white space removal in JavaScript is not nearly as beneficial as it might seem. On the one hand, code like this:
x = x + 1; can obviously be reduced to:
x=x+1;However, because of the common sloppy coding practice of JavaScript developers failing to terminate lines with semi-colons, white space reduction can cause problems. For example, consider the legal JavaScript below, which uses implied semi-colons:
x=x+1

y=y+1
A simple white space remover might produce the following:
x=x+1y=y+1This would obviously throw an error. If you add the needed semi-colons to produce:
x=x+1;y=y+1;you actually gain nothing in byte count. We still encourage this transformation, however, since Web developers who provided feedback on the Beta versions of w3compiler found the “visually compressed” script more satisfying (perhaps as visual confirmation that they are looking at transformed rather than original code). The also liked the side benefit of delivering more obfuscated code.
13. Perform code optimizations.
Simple ideas like removing implied semi-colons, var statements in certain cases, or empty return statements, can help to further reduce some script code. Shorthand can also be employed in a number of situations. For example:
x=x+1;can become:
x++;However, be careful, as it’s quite easy to break your code unless your optimizations are very conservative.
14. Rename user-defined variables and function names.
For good readability, any script should use variables like sumTotal instead of s.
However, for download speed, the lengthy variable sumTotal is a liability and it provides no user value, so s is a much better choice. Here, again, writing your source code in a readable fashion and then using a tool to prepare it for delivery shows its value, since remapping all user-defined variable and function names to short one- and two-letter identifiers can produce significant savings.
15. Remap built-in objects.
The bulkiness of JavaScript code, beyond long user variable names, comes from the use of built-in objects like Window, Document, Navigator and so on. For example, consider this code:
alert(window.navigator.appName);

alert(window.navigator.appVersion);

alert(window.navigator.userAgent);
You could rewrite the above as follows:
w=window;n=w.navigator;a=alert;

a(n.appName);

a(n.appVersion);

a(n.userAgent);
This type of remapping is quite valuable when objects are used repeatedly, which they generally are. Note, however, that if the window or navigator object were used only once, these substitutions would actually make the code bigger, so be careful if you are optimizing by hand. Fortunately, many JavaScript code optimizers will take this into account automatically.
This tip brings up a related issue regarding the performance of scripts with remapped objects: in addition to the benefit of size reduction, such remappings actually slightly improve script execution times because the objects are copied higher up into JavaScript’s scope chain. This technique has been used for years by developers who write JavaScript games, and while it can improve both download and execution performance, it does so at the expense of local browser memory usage.
The Obfuscation Side Effect of JavaScript Optimization
You’ll notice that, if you apply these various JavaScript optimizations, the source code becomes effectively unreadable or, some might even say, obfuscated. While it’s true that the reverse engineering of optimized JavaScript can be difficult, it is far from impossible. Real obfuscation would use variables like O1l1l1O0l1 and Ol11l001l, so that unraveling the code would be more confusing. Some may even go so far as to employ light encryption on the page. However, be aware that, in general, obfuscation and optimization can be at odds with each other, to the point that more obfuscated code may be larger than the original code. Fortunately, lightweight code obfuscation is generally enough to deter casual code thieves, while still offering performance improvements.
File-Related Optimization
The last set of optimization techniques is related to file and site organization. Some of the optimizations mentioned here might require server modifications or site restructuring.
16. Rename non-user accessed dependent files and directories.
Sites will often have file names such as SubHeaderAbout.gif or rollover.js for dependent objects that are never accessed by a user via the URL. Very often, these are kept in a standard directory like /images, so you may see markup like this:
<img src="/images/SubHeaderAbout.gif">


Or, worse:


<img src="../../../images/SubHeaderAbout.gif">
Given that these files will never be accessed directly, this readability provides no value to the user, only the developer. For delivery’s sake it would make more sense to use markup like
<img src="/0/a.gif">While manual file-and-directory remapping can be an intensive process, some content management systems can deploy content to target names, including shortened values.
Furthermore, the w3compiler has a feature that automatically copies and sets up these dependencies. If used properly, this can result in very noticeable savings in the (X)HTML files that reference these objects, and can also make reworking of stolen site markup much more difficult.
17. Shorten all page URLs using a URL rewriter.
Notice that the previous step does not suggest renaming the host files like products.html, which would change markup like this:
<a href="products.html">Products</a>to something like this:
<a href="p.html">Products</a>The main reason is that end users will see a URL like http://www.sitename.com/p.html, rather than the infinitely more usable http://www.sitename.com/products.html.
However, it is possible to reap the benefits of file name reduction in your source code without sacrificing meaningful page URLs if you combine the renaming technique with a change to your Web server’s configuration. For example, you could substitute p.html for products.html in your source code, but then set up a URL rewriting rule to be used by a server filter like mod_rewrite to expand the URL back into a user friendly value. Note that this trick will only put the new URL in the user’s address bar if the rewrite rule employs an “external” redirect, thereby forcing the browser to re-request the page. In this case, the files themselves are not renamed, as the short identifiers are only used in the source code URLs.
Because of the reliance on URL rewriting and the lack of widespread developer access to, and understanding of, such server-side tools as mod_rewrite, even an advanced tool like the w3compiler does not currently promote this technique. However, considering that sites like Yahoo! actively employ this technique for significant savings, it should not be ignored, as it does produce noticeable (X)HTML reduction when extremely descriptive directory and file names are used in a site.
18. Remove or reduce file extensions.
Interestingly, there really is little value to including file extensions such as .gif, .jpg, .js, and so on. The browser does not rely on these values to render a page; rather it uses the MIME type header in the response. Knowing this, we might take:
<img src="images/SubHeaderAbout.gif">and shorten it to:
<img src="images/SubHeaderAbout">If combined with file renaming, this might produce:
<img src="/0/sA">Don’t be scared by how strange this technique looks; your actual file will still be sA.gif. It’s just the end user who won’t see it that way!
In order to take advantage of this more advanced technique, however, you do need to make modifications to your server. The main thing you will have to do is to enable something called “content negotiation,” which may be native to your server or require an extension such as mod_negotation for Apache or Port80’s pageXchanger for IIS. The downside to this is that it may cause a slight performance hit on your server.
However, the benefits of adding content negotiation far outweigh the costs. Clean URLs improve both security and portability of your sites, and even allow for adaptive content delivery whereby you can send different image types or languages to users based upon their browser’s capabilities or system preferences! See “Towards Next Generation URLs” by the same authors for more information.
Note: Extension-less URLs will not hurt your search engine ranking. Port80 Software, as well as major sites like the W3C, use this technique and have suffered no ill effects.
19. Restructure <script> and <style> inclusions for optimal number of requests.
You will often find in the <head> of an HTML document markup such as:
<script src="/scripts/rollovers.js"></script>

<script src="/scripts/validation.js"></script>

<script src="/scripts/tracking.js"></script>
In most cases, this should have been reduced to:
<script src="/0/g.js"></script>Here, g.js contains all the globally used functions. While the break-up of the script files into three pieces makes sense for maintainability, for delivery, it does not. The single script download is far more efficient than three separate requests, and it even reduces the amount of needed markup. Interestingly, this approach mimics the concept of linking in a traditional programming language compiler.
20. Consider cacheability at the code level.
One of the most important improvements to site performance that can be made is to improve cacheability. Web developers may be very familiar with using the <meta> tag to set cache control, but (apart from the fact that meta has no effect on proxy caches) the true value of cacheability is in found in its application to dependent objects such as images and scripts.
To prepare your site for improved caching, you should consider segmenting your dependent objects according to frequency of change, storing your more cacheable items in a directory like /cache or /images/cache. Once you start organizing your site this way, it will be very easy to add cache control rules that will make your site clearly “pop” for users who are frequent visitors.
Conclusion
You now have twenty useful code optimization tips to make your site faster. One by one, they may not seem very powerful, but, apply them together, and you’ll see an obvious improvement in site delivery.
In the next installment of this series, we’ll focus primarily on caching, explaining how it is generally misused and how you can significantly improve performance with just a few simple changes. See you then!
Part 2 – Effective Cache Control
In Part I of this series, we introduced the two basic laws of Web performance:
- Send as little data as possible
- Send it as infrequently as possible
In the first installment, we focused on rule one and offered twenty tips to squeeze every byte out of delivered pages through code optimization, looking well beyond the obvious bandwidth-hogging images, to JavaScript, HTML, CSS, and even file name optimizations.
In this installment, we will focus primarily on rule number two, by means of better utilization of caching on the Web. Once you start to design your sites with an eye towards effective caching control, you will dramatically reduce page load times for your users — particularly your most loyal, repeat visitors — while lowering your overall bandwidth consumption and freeing up your server resources.
The Many Types of Caches on the Web
The basic idea behind caching is simple: instead of wasting efforts by re-downloading a resource every time it is needed, keep a local copy, and reuse it for as long as it is still valid. The most common example of Web caching is the browser cache, which stores copies of images and other page objects on an end user’s hard drive for repeated use.
Though there are many other caches on the Web — at origin Web servers, along the network path, and even on the end user’s local network — the purposes of all types of cache are essentially the same. Looking out from a local browser cache, you might next encounter a proxy cache on your local network, implemented so that other users on the LAN do not have to access the Web to fetch the same site as you. Next, your ISP or various transit ISPs further down the line might also employ a proxy cache to serve a site’s objects to visitor on their network. Finally, the actual Website may utilize a reverse proxy cache to hold generated pages in finished form, ready for delivery, in order to relieve the server of the burden of repeatedly generating and delivering frequently requested pages.
We can categorize all Web caches into two general varieties: private and public. A private cache, most commonly a Web browser, is unique to a single user agent and is used to store items that should only be available for reuse by an individual end user. On the other hand, proxy and reverse proxy caches are public caches. These are used for shared resources — those items that can safely be reused by more than one end user. The figure below shows the common cache types:

Cache Usage on the Web
This diagram illustrates a key point in our discussion: caches are found on the Web in many places and are constantly trying to hold your site content whenever possible. While it’s easy to remain ignorant and allow them to dictate caching behavior, from the standpoint of site performance, it is vital to engage the different forms of cache purposefully, dictating which objects should or should not be cached, and for how long.
Freshness and Validation
In order to make the best use of any cache, including browser cache, we need to provide some indication when a resource is no longer valid and should therefore be reacquired. More specifically, we need the ability to indicate caching rules for Web page objects, ranging from setting appropriate expiration times, to indicating when a particular object should not be cached at all. Fortunately, we have all these capabilities at our fingertips in the form of HTTP cache controls rules.
The key to cache awareness lies in understanding the two concepts that govern how caches behave: freshness and validation. Freshness refers to whether or not a cached object is up-to-date, or, in more technical terms, whether or not a cached resource is in the same state as that same resource on the origin server. If the browser or other Web cache lacks sufficient information to confirm that a cached object is fresh, it will always err on the side of caution and treat it as possibly out-of-date or stale. Validation is the process by which a cache checks with the origin server to see whether one of those potentially stale cached object is fresh or not. If the server confirms that the cached object is still fresh, the browser will use the local resource.
A Basic Example of Caching
The concepts of freshness and validation are best illustrated with an example (in this case using a browser cache, but the core principles hold true to public caches as well):
Step 1
A remote site contains a page called page1.html. This page references image1.gif, image2.gif, and image3.gif and has a link to page2.html. When we access this page for the first time, the HTML and the associated GIF images are downloaded one-by-one and stored in the local browser cache.
Initial Cache Load
Once the data is downloaded to the cache, it is “stamped” to indicate where it came from and at what time it was accessed. It may also be stamped with a third piece of information: when it needs to be reacquired. But, as most sites do not stamp their data with this explicit cache control information, we’ll assume that our example lacks this information.
Step 2
The user follows the link to page2.html, which has never been visited before, and which references image1.gif, image3.gif, and image4.gif. In this case, the browser downloads the markup for the new page, but the question is: should it re-download image1.gif and image3.gif even though it already has them cached? The obvious answer would be no, but, how can we be sure that the images have not changed since we downloaded page1.html? Without cache control information, the truth is that we can’t.
Therefore, the browser would need to revalidate the image by sending a request to the server in order to check whether each image has been modified. If it has not been changed, the server will send a quick “304 Not Modified” response that instructs the browser to go ahead and use the cached image. But, if it has been modified, a fresh copy of the image will have to be downloaded. This common Not Modified request-and-response cycle is shown here:
Cache Check
From this basic example, it is apparent that, even when CSS, images, and JavaScript are fresh, we may not get the caching benefit we expect, since the browser still has to make a round trip to the server before it can reuse the cached copy.
The default “Automatic” setting in Internet Explorer partially reduces this continual chatter between browser and server by skipping the revalidation of cached objects during a single browser session. You will notice that page load time is generally much quicker when you revisit the same page during the same browser session. To see the performance penalty that would otherwise be incurred by all those 304 Not Modified responses, instead select “Every visit to the page.”
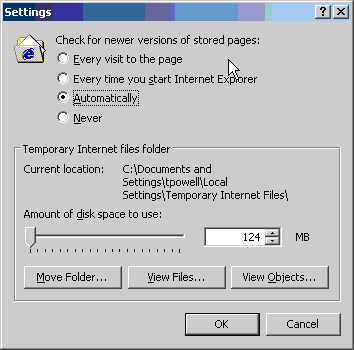
IE’s Cache Control Dialog
Note: While IE’s “smart caching” does cut down on unnecessary validation requests, it is also behind IE’s continual reminders to users to clear their caches in order to see new content. With caching, there is a trade-off for everything!
The Benefits of Caching
Minimizing round trips over the Web to revalidate cached items can make a huge difference in browser page load times. Perhaps the most dramatic illustration of this occurs when a user returns to a site for the second time, after an initial browser session. In this case, all page objects will have to be revalidated, each costing valuable fractions of a second (not to mention consuming bandwidth and server cycles). On the other hand, utilizing proper cache control allows each of these previously viewed objects to be served directly out of the browser’s cache without going back to the server.
The effect of adding cache rules to page objects is often visible at page load time, even with a high bandwidth connection, and users may note that your sites appear to paint faster and that “flashing” is reduced between subsequent page loads. Besides improved user perception, the Web server will be offloaded from responding to cache revalidation requests, and thus will be able to better serve new traffic.
However, in order to enjoy the benefits of caching, a developer needs to take time to write out a set of carefully crafted cache control policies that categorize a site’s objects according to their intended lifetimes. Here is an example of a complete set of cache control policies for a simple ecommerce Website:

As you can see, from the point of view of cache control, this site has six different types of objects. As the logo and other corporate branding is unlikely to change, navigational and logo images are treated as virtually permanent. Cascading Style Sheets and JavaScript files are given freshness lifetimes to support a regular, semi-annual update schedule. As fresh site content is important in terms of search engine optimization and user experience, the main header images are set up to be changed a bit more frequently. The monthly “special offer” image is, of course, designed to stay fresh for one month. There is also a personalized special offer image that remains fresh in a user’s cache for two weeks after the initial visit; note that this category is marked “private” to indicate that it is not to be cached by a shared/proxy cache. Finally, the default policy for everything else on the site states that nothing else should be cached, which guarantees that text and dynamic content is served fresh for each request.
You need to be very careful not to cache HTML pages, whether or not they are statically generated, unless you really know what you’re doing. If anything, you should use cache control to make sure these pages are not cached. If a user caches your HTML page, and you set a lengthy expiration time, they will not see any of the content changes you may make until the cached object expires. On the other hand, if you focus on caching dependent objects, such as images, Flash files, JavaScript, and style sheets, you can replace that cached content simply by renaming the objects.
For example, let’s say you have a policy to change your site’s logo files once a year, but in the middle of that year, your company makes a significant branding change that needs to be reflected on the site. Fortunately, if you have not set your HTML files to be cached, you can still serve the new logo by renaming the file from logo.gif to newlogo.gif and changing the associated HTML <img> references. As the HTML is parsed, the browser will note that it does not have the new image in its cache and will download it. Of course, the old image will still be in the user’s cache for quite some time, but it will no longer be used.
After you’ve considered carefully what site resources should and should not be cached, the next step is to implement those policies.
Taking Charge of Caching
There are three methods we can use to set cache control rules for the Web:
- Specify cache control headers via a
<meta>tag - Set HTTP headers programmatically
- Set HTTP headers through Web server settings
Each of these approaches has its pros and cons.
<meta> Tags for Basic Caching
The simplest way to implement cache control is to use the <meta> tag. For example, we could set the Expires header to a date in the future:
<meta http-equiv="Expires" content="Sun, 31 Oct 2004 23:59:00 GMT" />In this case, a browser parsing this HTML will assume that this page does not expire until October 2004 and will add it to its cache. Because the page will be stamped with this Expires header, the browser won’t re-request the page until after this date or until the user modifies the browser’s caching preferences or clears the cache manually.
Of course, while it is often advantageous to cache page data, as we mentioned above, there are instances in which you would not want to cache data at all. In these cases, you might set the Expires value to a date in the past:
<meta http-equiv="Expires" content="Sat, 13 Dec 2003 12:59:00 GMT" />You might be concerned about clock variations on the user’s system and therefore choose a date that has long since passed, but in reality, this is rarely an issue since it is the server’s Date response header response that matters for cache control.
The use of Expires with a past date in a <meta> tag should work for both HTTP 1.0- and 1.1-compliant browsers. There are two more <meta> tags that are often used to make sure that a page is not cached. The Pragma tag is used to talk to HTTP 1.0 browser caches, while the Cache-Control tag is used for HTTP 1.1 clients. It never hurts to include both of these if you want to make sure that a page is never cached, regardless of browser type or version:
<meta http-equiv="Pragma" content="no-cache" /><meta http-equiv="Cache-Control" content="no-cache" />
As easy as <meta> tags might appear, they suffer from one major problem — they are not able to be read by intermediary proxy caches, which generally do not parse HTML data, but instead rely directly on HTTP headers to control caching policy. Because of this lost potential value, and given the fact that browsers will readily use HTTP headers, <meta>-based cached control really should not be a developer’s primary approach to cache control.
Programming Cache Control
Most server-side programming environments, such as PHP, ASP, and ColdFusion, allow you to add or modify the HTTP headers that accompany a particular response. To do this in ASP, for example, you would use properties of the built-in Response object by including code such as this at the top of your page:
<%

Response.Expires = "1440"

Response.CacheControl = "max-age=86400,private"

%>
Here, you’re asking ASP to create both an Expires header (for HTTP 1.0-compliant caches) and a Cache-Control header (for HTTP 1.1 caches). You are also specifying a freshness lifetime for this cached object of twenty-four hours (note that the Expires property requires a value in minutes while CacheControl uses seconds). As a result, the following headers would be added to the HTTP response (assuming “now” is 8:46 PM on Friday, February 13th, 2004 Greenwich Mean Time):
Expires: Sat, 14 Feb 2004 20:46:04 GMT

Cache-control: max-age=86400,private
By and large, it’s much more efficient to rely on these kinds of server-side mechanisms, rather than <meta> tags, to communicate with caches. So, when you have a choice between implementing cache-control policies using the <Meta> element, and doing so using a server-side programming environment like ASP, always choose the latter.
However, there is a different issue about which the server-side programming environment can do nothing. Imagine that the ASP file for which we created the above code links to several images that, according to your cache control policies, have freshness lifetimes of a full year. How would you implement the HTTP headers to tell caches that they can store those images for that long? You could try to use a server-side script to return the images programmatically, but this is both complex and wasteful. A better approach to setting cache control information for static externals like CSS, JavaScript, and binary objects like images, is to set cache control information on the server itself.
Web Server-Based Cache Settings
Both Microsoft IIS and Apache provide a variety of facilities for cache control. Unfortunately, each has a different approach to caching, and delegation of cache control policies is not cleanly in the hands of those who are most familiar with a site’s resources — developers!
Apache Cache Control
When it comes to implementing cache control policies easily, users of the Apache Web server are somewhat better off than those running IIS, provided that the Apache module http://httpd.apache.org/docs-2.0/mod/mod_expires.html mod_expires is installed.
With mod_expires, a server administrator can set expiration lifetimes for the different objects on a site in the main server configuration file (usually httpd.conf). As is often the case for Apache modules, both the Virtual Host and Directory containers can be used to specify different directives for different sites, or even for different directories within a given site. This is much more convenient than having to use IIS’s graphical user interface or metabase scripting objects.
Even handier is mod_expires’s ExpiresByType directive, which allows you to set the expiration lifetime for all files of a given MIME type with a single line of code. This directive allows you to easily set cache policies for all the scripts, style sheets, or images in your site. Of course, you often need to craft more fine-grained policies based upon object type or directory. In this case, the settings specified in the primary configuration file can be overridden (at the server administrator’s discretion) by directives in a .htaccess file for a given directory and its children. In this way, developers can write and maintain their own cache control directives without requiring administrative access to the server, even in a shared hosting environment.
If your Apache server was not built with mod_expires, the best way to enable it is to build it as a shared object (using aspx is generally easiest) and then to include the following line in your httpd.conf file:
LoadModule expires_module modules/mod_expires.soYou can then put your configuration directives right into httpd.conf. However, many administrators will want to locate these in an external configuration file to keep things neat. We will follow this practice in our example, using Apache’s Include directive in httpd.conf (the IfModule container is an optional, but traditional, safety measure):
<IfModule mod_expires.c>

     Include conf/expires.conf

</IfModule>
We can now locate the directives that control how mod_expires behaves in a module-specific configuration file called expires.conf. Here is a sample set of such directives:
ExpiresActive On

ExpiresDefault "access 1 month"

ExpiresByType image/png "access 3 months"
The ExpiresActive directive simply enables mod_expires, while the ExpiresDefault directive sets up a default expiration lifetime that will be used to create Expires and Cache-Control headers for any files to which more specific rules do not apply. Note the syntax used for specifying the expiration lifetime; the time unit can be anything from seconds to years, while the base time can be specified as modification, as well as access.
Next is the very useful ExpiresByType directive mentioned earlier, here applied to all .png image files on the server:
<Directory "/usr/local/apache/htdocs/static">

AllowOverride Indexes

ExpiresDefault "access 6 months"

</Directory>
Finally, we have a Directory container that overrides all other rules for anything in the directory /static. This directory has its own ExpiresDefault directive, as well as an AllowOverride directive that allows the settings for itself and its children to be overridden by means of .htaccess files. The .htaccess file, in turn, might look like this:
ExpiresByType text/html "access 1 week"Note that this overrides any directives that would otherwise have applied to files in /static and its children that have the MIME type text/html. Using a combination of configuration file directives, and then overriding those directives using .htaccess, almost any set of cache control policies, no matter how complex, can be easily implemented by both administrators and, if properly delegated, developers.
IIS Cache Control
If you’re setting cache control rules on Microsoft’s Internet Information Service (IIS), you need access to the IIS Metabase. This is typically accessed via the Internet Service Manager (ISM), the Microsoft management console application that controls IIS administrative settings.
To set an expiration time in IIS, simply open the ISM, bring up the property sheet for the file or directory that you want to configure, and click on the “HTTP Headers” tab. Next, put a check in the box labeled “Enable Content Expiration” and, using the radio buttons, choose one of the options provided. You can choose to expire the content immediately, set a relative expiration time (in minutes, hours, or days), or set an absolute expiration time. Note that both Expires and Cache-Control headers will be inserted into the affected responses. The basic idea is shown here.
IIS Cache Control Settings
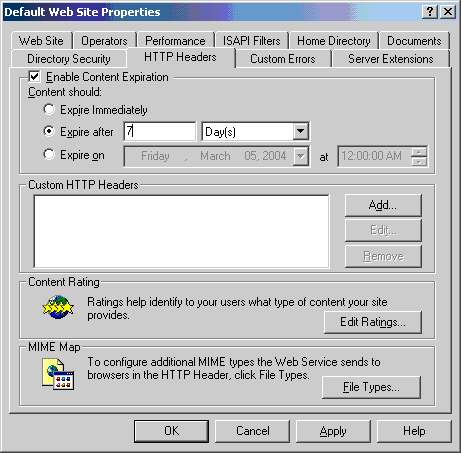
Despite the user-friendliness of the GUI, it is actually rather clumsy to set different cache control policies for different categories of files on IIS. It gets much worse if the site’s files are not neatly segregated into directories based on their desired freshness lifetimes. If you happen to have designed your site with caching in mind, and put different classes of files in different directories, such as /images/dynamic, images/static, images/navigation, and so on, it’s easy to set up caching policies via the MMC. But, if you haven’t designed your site this way, or you’re working to optimize an existing site, you may literally have to set the policy on each and every file, which would be quite a chore.
Even more troubling is that, unlike Apache, IIS offers no easy way to delegate to developers the authority to set cache policy, as modification of the required settings necessitates MMC access. Fortunately, these gaps in functionality between IIS and Apache with mod_expires enabled can be closed fairly easily with a third-party tool such as CacheRight from Port80 Software.
Modeled after mod_expires, CacheRight creates a single, text-based rules file that lives in each Website’s document root and allows both administrators and developers to set expiration directives for an entire site. In addition, CacheRight goes beyond mod_expires by adding an ExpiresByPath directive to complement the ExpiresByType directive. This functionality makes it trivially easy to set both a general cache control policy for files of a given type, and to override that rule with a more specific one for a subset of files of that type, as in this example:
ExpiresByType image/* : 6 months after access public

ExpiresByPath /navimgs/*, /logos/* : 1 year after modification public
Here, all images will have a freshness lifetime of six months, except those located in the navimgs and logos directories. Like mod_expires, CacheRight lets you set the expiration times relative to the modification time of the file(s), as well as to the user’s first access. This flexibility can be very useful when publication or update schedules are not set in stone, which is, of course, all too common in Web development.
Regardless of which server you use, it’s well worth the time to figure out how to manage cache control at the server level. As with programmatic cache control, the directives will be respected by well-behaved intermediary caches and not just by browser caches, as in the case of the <meta> tag approach. Furthermore, unlike programmatic or <meta> tag-based cache control, server-based cache control makes it easy to set caching policies for all the really heavy objects in a site, such as images or Flash files. It is in the caching of these objects that performance gains are most obvious.
Conclusion
While we’ve only scratched the surface of the complex topic of caching, hopefully we have shed some light on this under-appreciated facet of Website performance. In particular, we hope that you better understand why it is vital to have a set of cache control policies for your site, and that you have gained some ideas about how to go about effectively implementing those policies.
The results of properly applied cache rules will be obvious — dramatically faster page loads for your end users, especially repeat visitors. In addition, you will make more efficient use of your bandwidth and your server resources. The fact that all these enhancements can be achieved through little more than a heightened attention to HTTP headers makes effective, expiration-based cache-control one of the most cost-effective performance optimizations you will ever make to your site.
Next week, we’ll wrap up this series on cost-effective Website acceleration by focusing on Web server modifications, most notably standard HTTP compression. We’ll then present a case study that will illustrate the concrete performance gains that can be achieved by applying all the techniques together.
Part 3 – Server Side Modifications
In the first part of this series, we introduced the two basic laws of Web performance. To refresh your memory, these are:
- Send as little data as possible
- Send it as infrequently as possible
In that article, we focused on rule one and offered twenty tips to squeeze every byte out of delivered pages through code optimization, looking well beyond the obvious bandwidth-hogging images, to JavaScript, HTML, CSS, and even file name optimizations.
In the second installment, we turned to rule two and saw how to enhance site performance by using cache control headers. We discovered that the best approach to cache control was at the server level.
So, in this final installment, we’ll see what other server-side changes can be made in order to speed up site delivery, starting with HTTP compression.
What Exactly Is HTTP Compression?
HTTP compression is a long-established Web standard that is only now receiving the attention it deserves. The basic idea of HTTP compression is that a standard gzip or deflate encoding method is applied to the payload of an HTTP response, significantly compressing the resource before it is transported across the Web.
Interestingly, the technology has been supported in all major browser implementations since early in the 4.X generation (for Internet Explorer and Netscape), yet few sites actually use it. A study by Port80 Software showed that less than 4% of Fortune 1000 Websites employ HTTP compression on their servers. However, on leading Websites like Google, Amazon, and Yahoo!, HTTP content encoding is nearly ubiquitous. Given that it provides significant bandwidth savings to some of the biggest sites on the Web, progressive administrators owe it to themselves to explore the idea of HTTP compression.
The key to HTTP content encoding can be found in the Accept request headers sent by a browser. Consider the request from Mozilla Firefox below, and note in particular the Accept, Accept-Language, Accept-Encoding, and Accept-Charset headers:
GET / HTTP/1.1

Host: www.port80software.com

User-Agent: Mozilla/5.0 (Windows; U; Windows NT 5.1; en-US; rv:1.6) Gecko/20040206 Firefox/0.8

Accept:text/xml,application/xml,application/xhtml+xml,text/html;q=0.9,

text/plain;q=0.8,video/x-mng,image/png,image/jpeg,image/gif;q=0.2,*/*;q=0.1

Accept-Language: en-us,en;q=0.5

Accept-Encoding: gzip,deflate

Accept-Charset: ISO-8859-1,utf-8;q=0.7,*;q=0.7

Keep-Alive: 300

Connection: keep-alive
These “accept” values can be used by the server to determine the appropriate content to send back using Content Negotiation — a very powerful feature that allows Web servers to return different languages, character sets, and even technologies based on user characteristics. Content negotiation is a very broad topic, so we’ll focus solely on the element which relates to server-side compression. The Accept-Encoding header indicates the type of content encoding that the browser can accept beyond the standard plain text response, in this case gzip- and deflate-compressed content.
Looking at Internet Explorer’s request headers, we see similar Accept-Encoding values:
GET / HTTP/1.1

Host: www.google.com

User-Agent: Mozilla/4.0 (compatible; MSIE 6.0; Windows NT 5.1; .NET CLR 1.1.4322)

Accept:image/gif,image/x-xbitmap,image/jpeg,image/pjpeg,application/vnd.ms-excel,application/vnd.ms-powerpoint,application/msword,application/x-shockwave-flash,*/*

Accept-Encoding: gzip,deflate

Accept-Language: en-us

Connection: keep-alive
Given that nearly every major browser in use today supports gzip and deflate encoding (and that those few that don’t should not be sending the Accept-Encoding headers), we can easily modify Web servers to return compressed content to some browsers and standard content to others. As an example (illustrated below), if our browser tells Google that it does not accept content encoding, we get back 3,358 bytes of data; however, if we do send the Accept-Encoding header, we get back compressed data of just 1,213 bytes along with a response header saying Content-Encoding: gzip. You won’t see any differences between the pages if you “view source,” but if you have a network trace, you will notice that the response is different:
Google Compressed / Uncompressed Comparison
While, in this case, the files are small, you can see that the reduction is still significant — in this case, a 74% smaller file size. Through a combination of HTML, CSS, JavaScript code optimization (as discussed in Part I of this series) and HTTP content encoding, Google achieves an impressive feat — fitting its page into a single TCP response packet!
While Google may have bandwidth concerns far beyond those of the average Website, HTTP content encoding can decrease HTML, CSS, JavaScript, and plain text file size by 50% or more. Unfortunately, HTTP content encoding (the terms “compression” and “content encoding” are roughly synonymous) really only applies to text content, as compressing binary formats like image files generally provides no value. Even assuming that binary files make up the bulk of the payload of the average site, you should still see, on average, a 15-30% overall reduction in page size if HTTP content encoding is used.
Server Support for HTTP Content Encoding
If you’re already convinced of the value of HTTP compression, the next big question is: how do you employ it? In the case of the Apache Web server, it is possible to add HTTP content encoding using either mod_gzip or mod_deflate.
In the case of Microsoft IIS, things can get a little sticky. While IIS 5 includes native support for gzip encoding, it is a notoriously buggy implementation, especially considering the fine-grained configuration changes that must be made to overcome a wide variety of browser nuances. So, in the case of IIS 5, third party compression add-ons in the form of ISAPI filters, such as httpZip, PipeBoost, and XCompress, are most often the best way to go.
IIS 6 built-in compression is much faster and more flexible, but it is still difficult to configure in more than a basic manner without getting into the IIS Metabase. ZipEnable represents the first tool designed to allow for truly fine-grained management of IIS 6 built-in compression.
The Real Deal with Server-Side Content Encoding
There is an important trade-off to be considered when you implement HTTP compression; if you configure your server to compress content on the way out, you may reduce bandwidth usage, but at the same time, you’ll increase CPU load. In most cases, this is not a problem, especially given how little work Web servers actually do.
However, in the case of a very highly trafficked Website running a large amount of dynamic content on servers that are already at the limit of available CPU cycles, the downsides of compression may actually outweigh the advantages. Adding extra server hardware would, of course, alleviate the problem and allow you to enjoy the substantial bandwidth savings offered by compression. It’s up to you to determine whether the reduction in bandwidth expenses and other infrastructure costs (fewer routers, switches, and dedicated lines) outweighs the upfront investment in new hardware.
Ultimately though, the most interesting aspect of HTTP compression is what developers and administrators expect to see when rolling it out, versus what they actually see. While you will definitely find that bandwidth utilization decreases, all your users may not enjoy dramatically faster page loads. Because of the increased CPU load created by the compression and decompression process, time to first byte (TTFB) generally increases; thus, browser can’t start painting the page slightly later.
For a user with a slow (that is, a low bandwidth) connection, this is still a good trade-off; because the data is compressed into fewer, smaller packets, it will be delivered much faster, so the slight initial delay is far outweighed by the faster overall page paint. Broadband users, on the other hand, will probably not see a perceptible performance improvement with HTTP compression. In both cases, you will save money through bandwidth reduction. But if perceived response time is your primary goal and you serve a lot of dial-up traffic, you may want to first focus on caching (discussed in Part II) as a performance enhancement strategy.
Another potential problem with HTTP content encoding relates to server-load from script-generated pages, such as those in PHP or ASP. The challenge in this case is that the page content may have to be recompressed for every request (rather than being compressed once and then cached), which will add significant load to the server beyond that added by the compression of static content. If all your pages are generated at page load time, you should therefore be careful when adding HTTP content encoding. Fortunately, many commercial compression add-ons will know to cache generated content when possible, but be aware that some cheaper solutions lack this vital feature. However, this “problem” does point to a second, obvious server-side performance improvement — page pre-caching.
Dynamic Pages: Build Them Now or Build Them Later?
Interestingly, many developers dynamically build many or all of their sites’ pages at visit time. For example, the URL http://www.domain.com/article.php?id=5 suggests that the page is being built from a database query or template fill-in. The problem with this common practice is that, in many cases, building such a page at request time is pointless, because most of the time it is primarily static. So-called static dynamic pages, or scripted pages, whose contents don’t change for long periods of time, obviously do nothing to improve page delivery time. In fact, on a heavily trafficked site they can needlessly bog down your server.
One approach to addressing unnecessary dynamic page generation would be to pre-build the page into a static content page complete with a .html extension every time it changes. By preference, any such generated pages would not only be static HTML files, but would also be code optimized versions (as discussed in Part I). Not only does this make it easier for the server to deliver the page quickly, because it doesn’t have to do any work before it returns it, but the technique actually makes the site more search engine friendly.
Unfortunately, in many cases, simply generating pages to static HTML is not possible because the pages do indeed have dynamic content that must be executed at page view time. In this case, your best bet is to “bake” the page into a faster-to-execute form. In the case of ASP.NET, this would utilize the byte code format, which is much faster for the server to execute. Unfortunately, you need to force the byte code by executing pages first, before you let your users access them. Fortunately, upcoming versions of ASP.NET 2.0 are going to help mitigate the tiresome task some developers currently undertake of “touching” all of their pages once to ensure quick first downloads for users. In the case of PHP, you may find a product like the Zend optimization suite to be a wise investment.
Given the differing requirements of serving static and dynamic pages, or HTML and images, it seems wise to revisit the physical server and other hardware for additional acceleration ideas. One of the more intelligent impulses that can lead people to add or beef up hardware for the sake of Web acceleration is the idea of specialization — that different elements are required to do different jobs with maximum efficiency. Even though, in the name of cost-efficiency, our main focus through this series has been on the source code and the Web server (and related) software, let’s now take a quick look at these other elements.
Turbo Charging Your Web Server
A good place to turn in order to speed up your site is the server software and hardware itself. Starting with software, it is fairly unlikely that Web administrators are going to quickly dump IIS for Apache or Apache for IIS, even when security, ease of use, or performance are cited as reasons to leave one camp for another. Put simply, the Web server and its associated operating system are often so intertwined with the Website(s) that migration becomes an onerous and even risky task. If you do start thinking about dumping one platform for another, you should also seriously consider alternate platforms, such as Zeus, particularly if speed is a primary concern.
When it comes to hardware, carefully consider the main tasks that the server(s) performs. In the case of a static Website, it is primarily to marshal network connections and to copy files from disk to network. To accelerate such a site, you want to focus on building a Web server with very fast disk and network subsystems, as well as enough memory to handle simultaneous requests. You may, in fact, choose to get very aggressive in adding memory to your system and try to cache all heavily used objects in memory, in order to avoid disk access altogether. Interestingly, processor speed is not nearly as important as you might think in a site serving static files; it does help, but the disk will often prove to be a bigger bottleneck.
When the site is serving dynamic as well as static pages, obviously, processor speed becomes more important, but even in this case, having a fast drive or dual NICs can still be more important. On the other hand, the combination of a lot of dynamic page generation with other processor-intensive responsibilities like SSL and/or HTTP compression makes it more likely that the CPU is the resource in need of enhancing. In other words, what the server does will determine how it can most effectively be beefed up.
Even if you don’t have the budget to customize your server hardware or software, there might be some changes you can make fairly cheaply. For example, you might consider tuning your operating system’s TCP/IP settings for the most efficient use of those underlying TCP/IP resources on which HTTP is dependent. This might be a matter of adjusting the TCP receive window to a size best suited to your application and your server’s network connection. You might make sure that TCP features that can be toggled, such as delayed ACKs or TCP_NODELAY, are used or not used, depending again on the characteristics of the application and the network environment. Or it might simply be a matter of making sure your box is not suffering from port exhaustion due to excessive TIME_WAIT times or other causes.
However, before twisting the knobs on your network characteristics, both in the Web server and on the operating system, make sure to set up realistic load tests to verify that your improvements don’t actually slow users down or cause excessive retransmits on your network. In other words, don’t try to implement these types of fixes unless you understand how to measure their value.
Acceleration by Division of Labor
Another consideration when addressing site acceleration is that not every form of site content has the same delivery characteristics. Given that different content has different characteristics, we may find that dividing the specific serving duties of a site between several servers is better than simply duplicating site duties evenly across a server farm.
A simple example of acceleration via division of labor occurs when a site uses SSL encryption for a shopping cart or extranet. In the case of SSL, you might find that your server bogs down very rapidly when you have multiple users in the https sections of your site, due to the significant overhead introduced by the encryption. In this situation, it makes sense to offload this traffic to another server. For example, you might keep your main site on www.domain.com and, for the checkout portion of the site, link to shop.domain.com. The shop.domain.com server could be a special box equipped to handle the SSL traffic, potentially using an SSL acceleration card.
Segmentation allows you to focus the necessary resources on those users in checkout without bogging down those who are just browsing. You might even find that serving your images or other heavy binaries like PDF files or .EXE downloads from one server might make sense, since these connections take much longer to shut down than ordinary connections and, in the meantime, hold valuable TCP/IP resources hostage. Furthermore, you would not bother with HTTP content encoding on the media server, but would, of course, apply it to the primary text server for HTML, CSS, and JavaScript. In this way, you maximize the use of that server’s otherwise underutilized CPU for the sake of bandwidth optimization, while leaving the CPU of the media server free to do its job.
Segmentation can be further applied to generated pages. You might consider serving generated pages from a box built for that purpose, offloading your static content to a different machine. Already, many sites employ just such a scenario, using a reverse proxy cache such as Squid. In this setup, the proxy serves static content quickly, while the back-end server builds the content that truly must be generated at page view time. The cache control policies and rules discussed in Part II of this series become quite important in this type of setup; you will want to make sure that the proxy server’s cache stores everything that it is safe to store in a shared cache, and that it doesn’t retain anything that is intended only for a particular user.
Speed for Sale
We have focused primarily on low cost acceleration techniques in this series, but as we get towards the end, costs appear in the form of new software and new hardware. It is possible to spend quite a bit of money on Web acceleration by purchasing exotic acceleration appliances that perform connection offloading, compression, caching, and a variety of other functions for your site. If you have an extremely high bandwidth bill, these solutions can be very effective, but most sites can stick with the cheaper approaches we’ve discussed here, such as code optimization, caching, and HTTP encoding.
Yet, even if you did have a lot of money and were able to build out a specialized server farm and add exotic acceleration devices, you would eventually reach a limit to the benefits gained from compressing and caching content. To improve your speed now you’d have only one last option — to move the content closer to the user (and, if possible, apply all the same techniques again). You’ve probably noticed that sites that offer downloads often mirror content so that users can download from multiple locations. However, it is possible to provide content in a more geographically-sensitive manner, and to do so transparently.
Content distribution networks (CDNs) like Akamai allow us to move heavy content such as images and other binary downloads closer to users by taking advantage of thousands of edge caches located around the world. While this technique provides significant performance improvements and is widely used by the world’s largest sites, it certainly does not fit in the category of cost-effective, and thus we mention it only to follow our acceleration options to their logical conclusion.
Before you resort to these drastic and usually unnecessary measures, we conclude our series with a brief example of how the low cost ideas we have presented over the last three weeks can improve page load times, bandwidth usage, and server load for a real site, in this case, looking at the home page of SitePoint.com itself.
Applied Acceleration: SitePoint.com
Let’s grab the SitePoint.com homepage using Internet Explorer 6.0. When we request SitePoint.com for the first time, we see that the homepage is actually made up of about 37 distinct objects. But, we also notice right away several interesting things that SitePoint’s developers are doing to accelerate their home page:
- On the main or containing part of the page, the HTML content is compressed using HTTP content encoding (specifically, gzip). Without gzip, the original file size would be 28,218 bytes. With it, the transferred size is only 7,774 bytes — a saving of about 72%. SitePoint’s dial-up users will definitely thank them for that. A closer look at the response headers tells us that this same page is also sent using chunked transfer-encoding, which can help mitigate the time to first byte penalty associated with HTTP compression. This means that even broadband users might experience a faster page load.
Is there anything else that SitePoint.com could do, on the cheap, to optimize things even further? There are several possibilities, which we have summarized in the following table:
This table click here for the larger version shows the effects of file size reduction in two stages — first, the application of source optimization described in the first installment of this series (the byte count in the “Optimized” column), then the application of HTTP compression, which we covered in this article (the byte count in the “Gzipped” column). We’ve given the compressed (gzipped) size for the main page (index.php) just as we got it in IE, but we haven’t applied source code optimization to it, since it is dynamic.
In addition, however, there are eight static external text files (5 CSS and 3 JavaScript) that are not being compressed or code optimized at all, but that could definitely benefit from both. We’ve shown the results here, and as you can see in the Percentage Saved columns, the resulting overall savings are substantial — a 13% saving for the whole home page (all dependencies included) just with source code optimization, and a 50% saving with source code optimization plus HTTP compression. These percentages could go even higher if the index.php were source code-optimized as well (which would probably yield an additional 1000 bytes or so).
The last two columns focus on the topic of the second article in the series: cache control. Expiration-based cache control isn’t being used on the SitePoint.com home page, except for a few externally hosted or highly specialized resources. The “Reval?” column shows which of the files, as a consequence, need to be revalidated upon a return visit, even though they are present in the browser’s cache. SitePoint could consider making much wider use of explicit expiration times, especially for the plethora of relatively invariant images that make up the home page, as well as for the static external text files that contain CSS and JavaScript. Authoring and implementing a good set of cache control policies for such objects would help to avoid some or all of the 31 separate client-server round trips required to revalidate already cached objects when a user returns to the home page in a new browser session. That’s 31 fewer 304 Not Modified messages in the server logs for every return page view, but more importantly, would also reduce return visitor page load times.
The last column shows that these revalidation round trips take between one and seven tenths of a second each. Even though a number of them occur simultaneously when a user returns to the home page (and take up a bunch of TCP resources on the server-side in the process!), that’s still a substantial wait compared to essentially instantaneous serving of those same objects from the browser’s cache — which is where they wound up coming from in any case.
Conclusion
Our simple case study clearly demonstrates that, when used together, the techniques presented in this series can significantly improve the server load, bandwidth usage, and page load times of almost any Website. All are relatively simple to implement and none require large expenditures on new hardware or software.
Granted, no acceleration technique is without its downsides; code optimization requires a time investment from developers, caching requires increased coordination between development and administration, and compression can tax server resources in order to save bandwidth.
In conclusion, we hope we have provided you with a better understanding of the principles behind Website performance and a number of specific enhancement techniques that will help you to carefully put your foot on the gas.
About the Authors
 Thomas Powell is the founder of PINT, Inc., an instructor at the UCSD Computer Science department, and the author of Web development books including HTML & XHTML: The Complete Reference, and JavaScript: The Complete Reference.
 Joe Lima is a lead architect at Port80 Software, which makes IIS server modules such as CacheRight, httpZip and ZipEnable and Web developer tools such as the w3compiler. Joe also teaches Web Server technology for UCSD Extension.
 Thomas Powell & Joe Lima
Thomas is the founder of PINT, Inc. Joe is a lead architect at Port80 Software. They combined forces to produce this article.