- Part One – Setting up the Project.
- Step Two – Create the MediaPlayer Service
- Step Three – Constructing the MediaPlayer
- Step Four – Handling Audio Focus
- Step Five – Service Lifecycle Methods
- Step Six – Binding the Audio Player
- Step Seven – Activity Lifecycle Methods
- Extras – Loading Local Audio Files
- What is a BroadcastReceiver?
- Lets Get Back to the Audio Player App
- Change of audio outputs (headphone removed)
- Handling Incoming Calls
- Redefine Methods
- Play New Audio Broadcast
- Register BroadcastReceiverS
- User Interactions
- Finishing Up
- Fast Forward
- Frequently Asked Questions (FAQs) about Building an Android Audio Player App
This tutorial is a step by step guide to building an Android Audio app, using the best and most efficient methodologies and APIs. This is a long tutorials, so I have split it into two discrete parts if it’s too much to digest in one read:
- Building a media player in a service, important for playing media in the background.
- Interacting with the service through
BroadcastReceivers ( PLAY, PAUSE, NEXT, PREVIOUS). How to handle edge use-cases like incoming calls, change of audio outputs (e.g. removing headphones).
Part One – Setting up the Project.
Create a new Project in Android Studio and add the following permissions in the AndroidManifest.xml file.
<uses-permission android:name="android.permission.INTERNET" />
<permission android:name="android.permission.MEDIA_CONTENT_CONTROL" />
<uses-permission android:name="android.permission.READ_PHONE_STATE" />
The app needs these permissions to access media files over the internet when streaming media. Since the focus of this article is building a media player app, you need the MEDIA_CONTENT_CONTROL to control media playback. You use the READ_PHONE_STATE permission to access phone state to listen to events like incoming calls so you can stop the audio while a call is in progress.
Step Two – Create the MediaPlayer Service
The core of the Audio Player app is the media player service. The following class is an example of this service. The class has multiple MediaPlayer implementations to handle events that can happen while playing audio. The last implementation, from AudioManager.OnAudioFocusChangeListener is necessary to handle requests for AudioFocus from other apps that want to play media files.
public class MediaPlayerService extends Service implements MediaPlayer.OnCompletionListener,
      MediaPlayer.OnPreparedListener, MediaPlayer.OnErrorListener, MediaPlayer.OnSeekCompleteListener,
      MediaPlayer.OnInfoListener, MediaPlayer.OnBufferingUpdateListener,

      AudioManager.OnAudioFocusChangeListener {


  // Binder given to clients
  private final IBinder iBinder = new LocalBinder();

  @Override
  public IBinder onBind(Intent intent) {
      return iBinder;
  }

  @Override
  public void onBufferingUpdate(MediaPlayer mp, int percent) {
      //Invoked indicating buffering status of
      //a media resource being streamed over the network.
  }

  @Override
  public void onCompletion(MediaPlayer mp) {
      //Invoked when playback of a media source has completed.
  }

  //Handle errors
  @Override
  public boolean onError(MediaPlayer mp, int what, int extra) {
      //Invoked when there has been an error during an asynchronous operation.
      return false;
  }

  @Override
  public boolean onInfo(MediaPlayer mp, int what, int extra) {
      //Invoked to communicate some info.
      return false;
  }

  @Override
  public void onPrepared(MediaPlayer mp) {
      //Invoked when the media source is ready for playback.
  }

  @Override
  public void onSeekComplete(MediaPlayer mp) {
      //Invoked indicating the completion of a seek operation.
  }

  @Override
  public void onAudioFocusChange(int focusChange) {
      //Invoked when the audio focus of the system is updated.
  }

  public class LocalBinder extends Binder {
      public MediaPlayerService getService() {
          return MediaPlayerService.this;
      }
  }

}
The code above is a template of all the methods that will handle the MediaPlayer events. The only code that is complete is the binding of the Service. You need to bind this service because it interacts with the activity to get the audio files. You can lean more about bound services in the documentation.
Declare the Service in the AndroidManifest.xml file
<application
  <service android:name=".MediaPlayerService" />
  ...
</application>
Step Three – Constructing the MediaPlayer
The Android multimedia framework supports a variety of common media types. One key component of this framework is the MediaPlayer class, which with minimal setup you can use to play audio and video. You can find a basic example of the MediaPlayer implementation in the documentation, but you will need more than this example Service to play media. Next I will describe the necessary methods that need to be setup in the MediaPlayerService class.
Create the following global instances of MediaPlayer and the String path of the audio in the Service class.
private MediaPlayer mediaPlayer;
//path to the audio file
private String mediaFile;
Now initialize the mediaPlayer:
private void initMediaPlayer() {
    mediaPlayer = new MediaPlayer();
    //Set up MediaPlayer event listeners
    mediaPlayer.setOnCompletionListener(this);
    mediaPlayer.setOnErrorListener(this);
    mediaPlayer.setOnPreparedListener(this);
    mediaPlayer.setOnBufferingUpdateListener(this);
    mediaPlayer.setOnSeekCompleteListener(this);
    mediaPlayer.setOnInfoListener(this);
    //Reset so that the MediaPlayer is not pointing to another data source
    mediaPlayer.reset();

    mediaPlayer.setAudioStreamType(AudioManager.STREAM_MUSIC);
    try {
        // Set the data source to the mediaFile location
        mediaPlayer.setDataSource(mediaFile);
    } catch (IOException e) {
        e.printStackTrace();
        stopSelf();
    }
    mediaPlayer.prepareAsync();
}
When working with media, you need to implement some functions to handle basic action for playing media. These basic functions are Play, Stop, Pause, and Resume.
First add another global variable to store the pause/resume position.
//Used to pause/resume MediaPlayer
private int resumePosition;
Add if statements to make sure there are no problems while playing media.
private void playMedia() {
    if (!mediaPlayer.isPlaying()) {
        mediaPlayer.start();
    }
}

private void stopMedia() {
    if (mediaPlayer == null) return;
    if (mediaPlayer.isPlaying()) {
        mediaPlayer.stop();
    }
}

private void pauseMedia() {
    if (mediaPlayer.isPlaying()) {
        mediaPlayer.pause();
        resumePosition = mediaPlayer.getCurrentPosition();
    }
}

private void resumeMedia() {
    if (!mediaPlayer.isPlaying()) {
        mediaPlayer.seekTo(resumePosition);
        mediaPlayer.start();
    }
}
Now that you have created the initialization functions it’s time to implement the @Override methods constructed in the initial Service template. These methods are important to the MediaPlayer because all the key actions the player will perform will be called from these methods. Replace the original methods in the Service template with the following.
@Override
public void onCompletion(MediaPlayer mp) {
    //Invoked when playback of a media source has completed.
    stopMedia();
    //stop the service
    stopSelf();
}

//Handle errors
@Override
public boolean onError(MediaPlayer mp, int what, int extra) {
    //Invoked when there has been an error during an asynchronous operation
    switch (what) {
        case MediaPlayer.MEDIA_ERROR_NOT_VALID_FOR_PROGRESSIVE_PLAYBACK:
            Log.d("MediaPlayer Error", "MEDIA ERROR NOT VALID FOR PROGRESSIVE PLAYBACK " + extra);
            break;
        case MediaPlayer.MEDIA_ERROR_SERVER_DIED:
            Log.d("MediaPlayer Error", "MEDIA ERROR SERVER DIED " + extra);
            break;
        case MediaPlayer.MEDIA_ERROR_UNKNOWN:
            Log.d("MediaPlayer Error", "MEDIA ERROR UNKNOWN " + extra);
            break;
    }
    return false;
}

@Override
public void onPrepared(MediaPlayer mp) {
    //Invoked when the media source is ready for playback.
    playMedia();
}
Note: There are more @Override methods implemented in the initial Service template. These are useful in specific MediaPlayer events, but since the focus of this tutorial is building a general purpose media player I wont implement them.
Step Four – Handling Audio Focus
For a good user experience with audio in Android, you need to be careful that your app plays nicely with the system and other apps that also play media.
To ensure this good user experience the MediaPlayerService will have to handle AudioFocus events and these are handled in the last override method, onAudioFocusChange(). This method is a switch statement with the focus events as its case:s. Keep in mind that this override method is called after a request for AudioFocus has been made from the system or another media app.
What happens in each case:?
AudioManager.AUDIOFOCUS_GAIN– The service gained audio focus, so it needs to start playing.AudioManager.AUDIOFOCUS_LOSS– The service lost audio focus, the user probably moved to playing media on another app, so release the media player.AudioManager.AUDIOFOCUS_LOSS_TRANSIENT– Fucos lost for a short time, pause theMediaPlayer.AudioManager.AUDIOFOCUS_LOSS_TRANSIENT_CAN_DUCK– Lost focus for a short time, probably a notification arrived on the device, lower the playback volume.
In addition to the override methods, you need two other functions to request and release audio focus from the MediaPlayer. The following code block contains all the audio focus methods described above. I took the onAudioFocusChange()‘s code from the Android Developer documentation and made some changes, but this code gets the job done for this example.
First add a new global variable to the Service class.
private AudioManager audioManager;
Replace the Service‘s onAudioFocusChange() method with the following and add the functions it uses.
@Override
public void onAudioFocusChange(int focusState) {
    //Invoked when the audio focus of the system is updated.
    switch (focusState) {
        case AudioManager.AUDIOFOCUS_GAIN:
            // resume playback
            if (mediaPlayer == null) initMediaPlayer();
            else if (!mediaPlayer.isPlaying()) mediaPlayer.start();
            mediaPlayer.setVolume(1.0f, 1.0f);
            break;
        case AudioManager.AUDIOFOCUS_LOSS:
            // Lost focus for an unbounded amount of time: stop playback and release media player
            if (mediaPlayer.isPlaying()) mediaPlayer.stop();
            mediaPlayer.release();
            mediaPlayer = null;
            break;
        case AudioManager.AUDIOFOCUS_LOSS_TRANSIENT:
            // Lost focus for a short time, but we have to stop
            // playback. We don't release the media player because playback
            // is likely to resume
            if (mediaPlayer.isPlaying()) mediaPlayer.pause();
            break;
        case AudioManager.AUDIOFOCUS_LOSS_TRANSIENT_CAN_DUCK:
            // Lost focus for a short time, but it's ok to keep playing
            // at an attenuated level
            if (mediaPlayer.isPlaying()) mediaPlayer.setVolume(0.1f, 0.1f);
            break;
    }
}

private boolean requestAudioFocus() {
    audioManager = (AudioManager) getSystemService(Context.AUDIO_SERVICE);
    int result = audioManager.requestAudioFocus(this, AudioManager.STREAM_MUSIC, AudioManager.AUDIOFOCUS_GAIN);
    if (result == AudioManager.AUDIOFOCUS_REQUEST_GRANTED) {
        //Focus gained
        return true;
    }
    //Could not gain focus
    return false;
}

private boolean removeAudioFocus() {
    return AudioManager.AUDIOFOCUS_REQUEST_GRANTED ==
            audioManager.abandonAudioFocus(this);
}
If you want to learn more about audio focus then SitePoint article has a great tutorial.
Step Five – Service Lifecycle Methods
In this section I will focus on the Service lifecycle. These methods are crucial to the MediaPlayer because the Service lifecycle is closely connected to the MediaPlayers. These methods will handle the initialization and resource management for the MediaPlayer.
I have inline comments to make it easier to understand.
//The system calls this method when an activity, requests the service be started
@Override
public int onStartCommand(Intent intent, int flags, int startId) {
    try {
        //An audio file is passed to the service through putExtra();
        mediaFile = intent.getExtras().getString("media");
    } catch (NullPointerException e) {
        stopSelf();
    }

    //Request audio focus
    if (requestAudioFocus() == false) {
        //Could not gain focus
        stopSelf();
    }

    if (mediaFile != null && mediaFile != "")
        initMediaPlayer();

    return super.onStartCommand(intent, flags, startId);
}
The onStartCommand() handles the initialization of the MediaPlayer and the focus request to make sure there are no other apps playing media. In the onStartCommand() code I added an extra try-catch block to make sure the getExtras() method doesn’t throw a NullPointerException.
Another important method you need to implement is onDestroy(). In this method the MediaPlayer resources must be released, as this service is about to be destroyed and there is no need for the app to control the media resources.
@Override
public void onDestroy() {
    super.onDestroy();
    if (mediaPlayer != null) {
        stopMedia();
        mediaPlayer.release();
    }
    removeAudioFocus();
}
The onDestroy() method also releases audio focus, this is more of a personal choice. If you release the focus in this method the MediaPlayerService will have audio focus until destroyed, if there are no interruptions from other media apps for audio focus.
If you want a more dynamic focus control, you can request audio focus when new media starts playing and release it in the onCompletion() method, so the service will have focus control only while playing something.
Step Six – Binding the Audio Player
In this section I will cover the final steps to bind the MediaPlayerService class to the MainActivity and provide it with audio to play. You must bind the Service to the Activity so they can interact with each other.
Add the following global variables to the MainActivity class.
private MediaPlayerService player;
boolean serviceBound = false;
The first is an instance of the Service and the second Boolean value contains the status of the Service, bound or not to the activity.
To handle Service binding, add the following to the MainActivity class.
//Binding this Client to the AudioPlayer Service
private ServiceConnection serviceConnection = new ServiceConnection() {
    @Override
    public void onServiceConnected(ComponentName name, IBinder service) {
        // We've bound to LocalService, cast the IBinder and get LocalService instance
        MediaPlayerService.LocalBinder binder = (MediaPlayerService.LocalBinder) service;
        player = binder.getService();
        serviceBound = true;

        Toast.makeText(MainActivity.this, "Service Bound", Toast.LENGTH_SHORT).show();
    }

    @Override
    public void onServiceDisconnected(ComponentName name) {
        serviceBound = false;
    }
};
Now it’s time to play some audio. The following function creates a new instance of the MediaPlayerService and sends a media file to play, so add it to the MainActivity.
private void playAudio(String media) {
    //Check is service is active
    if (!serviceBound) {
        Intent playerIntent = new Intent(this, MediaPlayerService.class);
        playerIntent.putExtra("media", media);
        startService(playerIntent);
        bindService(playerIntent, serviceConnection, Context.BIND_AUTO_CREATE);
    } else {
        //Service is active
        //Send media with BroadcastReceiver
    }
}
The playAudio() function is not complete. I will return to this later when sending media files to the Service with a BroadcastReceiver.
Call the playAudio() function from the Activitys onCreate() method and reference an audio file.
playAudio("https://upload.wikimedia.org/wikipedia/commons/6/6c/Grieg_Lyric_Pieces_Kobold.ogg");
Step Seven – Activity Lifecycle Methods
In this section I will cover basic, but crucial implementations of the MainActivitys life-cycle methods. If you call the playAudio() function from the Activitys onCreate() method the Service will start playing, but the app can easily crash.
Add the following methods to MainActivity to fix it. All these methods do is save and restore the state of the serviceBound variable and unbind the Service when a user closes the app.
@Override
public void onSaveInstanceState(Bundle savedInstanceState) {
    savedInstanceState.putBoolean("ServiceState", serviceBound);
    super.onSaveInstanceState(savedInstanceState);
}

@Override
public void onRestoreInstanceState(Bundle savedInstanceState) {
    super.onRestoreInstanceState(savedInstanceState);
    serviceBound = savedInstanceState.getBoolean("ServiceState");
}

@Override
protected void onDestroy() {
    super.onDestroy();
    if (serviceBound) {
        unbindService(serviceConnection);
        //service is active
        player.stopSelf();
    }
}
Extras – Loading Local Audio Files
A user will likely want to load audio from the actual device instead of streaming them online. You can load audio files from the device by using ContentResolver.
Create a new Java class used as an audio object. The following class contains the crucial information an audio file needs, but you can add more if necessary.
public class Audio implements Serializable {

    private String data;
    private String title;
    private String album;
    private String artist;

    public Audio(String data, String title, String album, String artist) {
        this.data = data;
        this.title = title;
        this.album = album;
        this.artist = artist;
    }

    public String getData() {
        return data;
    }

    public void setData(String data) {
        this.data = data;
    }

    public String getTitle() {
        return title;
    }

    public void setTitle(String title) {
        this.title = title;
    }

    public String getAlbum() {
        return album;
    }

    public void setAlbum(String album) {
        this.album = album;
    }

    public String getArtist() {
        return artist;
    }

    public void setArtist(String artist) {
        this.artist = artist;
    }
}
Add the permission to AndroidManifest.xml.
<uses-permission android:name="android.permission.READ_EXTERNAL_STORAGE" />
This is necessary to load local media files from the Android device.
In the MainActivity class create a global ArrayList of Audio objects.
ArrayList<Audio> audioList;
To get data from the device add the following function to MainActivity. It retrieves the data from the device in ascending order.
private void loadAudio() {
  ContentResolver contentResolver = getContentResolver();

  Uri uri = MediaStore.Audio.Media.EXTERNAL_CONTENT_URI;
  String selection = MediaStore.Audio.Media.IS_MUSIC + "!= 0";
  String sortOrder = MediaStore.Audio.Media.TITLE + " ASC";
  Cursor cursor = contentResolver.query(uri, null, selection, null, sortOrder);

  if (cursor != null && cursor.getCount() > 0) {
      audioList = new ArrayList<>();
      while (cursor.moveToNext()) {
          String data = cursor.getString(cursor.getColumnIndex(MediaStore.Audio.Media.DATA));
          String title = cursor.getString(cursor.getColumnIndex(MediaStore.Audio.Media.TITLE));
          String album = cursor.getString(cursor.getColumnIndex(MediaStore.Audio.Media.ALBUM));
          String artist = cursor.getString(cursor.getColumnIndex(MediaStore.Audio.Media.ARTIST));

          // Save to audioList
          audioList.add(new Audio(data, title, album, artist));
      }
  }
  cursor.close();
}
After retrieving data from the device the playAudio() function can play it on the Service.
In MainActivity‘s onCreate() method add the following code. Be sure to have at least one audio track the service can play or the app will crash.
loadAudio();
//play the first audio in the ArrayList
playAudio(audioList.get(0).getData());
If you’re ready for more, then keep reading, or this is also a good opportunity to take a quick break before continuing.
Next I will focus on user interaction with the MediaPlayerService and handling interruptions that occur while playing media like incoming calls, change of audio outputs and other functionality needed to build a complete Audio Player app.
The key component for interacting with background services is BroadcastReceiver.
What is a BroadcastReceiver?
Android system components and apps make system wide calls through intents with the help of sendBroadcast(), sendStickyBroadcast() or sendOrderedBroadcast() methods to notify interested applications. Broadcast intents can be useful for providing a messaging and event system between application components or used by the Android system to notify interested applications about key system events. Registered BroadcastReceivers intercept these events broadcast to the whole Android system. The BroadcastReceivers purpose is to wait for certain events to happen and to react to these events, but a BroadcastReceiver does not react to all the incoming events, only specific events. When a BroadcastReceiver detects a matching intent it will call its onReceive() method to handle it.
You can register a BroadcastReceiver in two ways, statically in AndroidManifest.xml or dynamically by using the registerReceiver() method at runtime.
For this tutorial, the BroadcastReceivers are dynamically created since it’s important that the MediaPlayerService listens for events only when the player is active. It’s not a good user experience if the app starts playing audio unexpectedly after an event was triggered. If you register a receiver, you must unregister it when it’s no longer needed.
Lets Get Back to the Audio Player App
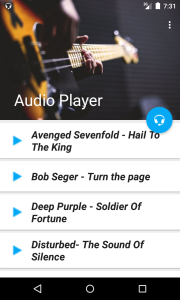
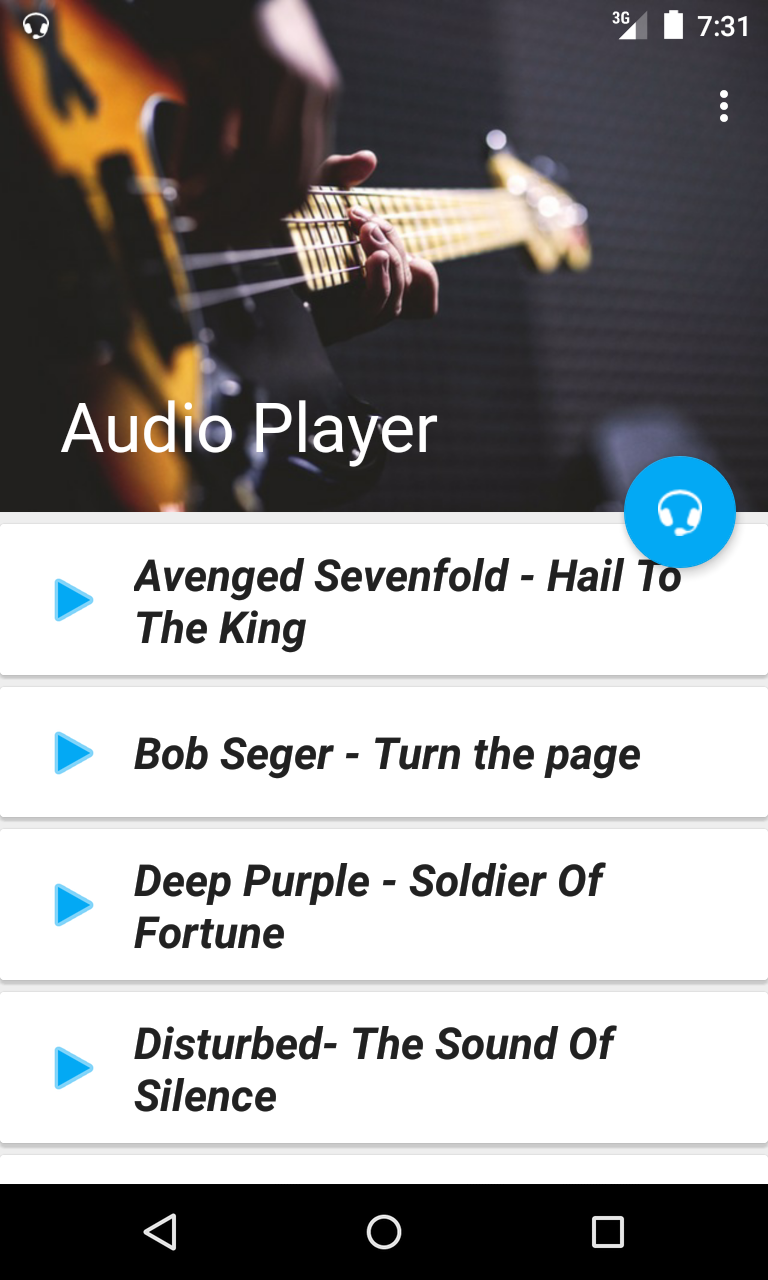
For a more complete audio app I added a RecyclerView, and with the help of the loadAudio() function, loaded local audio files to the RecyclerView. I also made changes to the color scheme and layout. I wont go into detail describing the process of adding the RecyclerView to the app, but you can see the end result on GitHub.
If you want to learn more about RecyclerView, then read my article.
Another change is the playAudio() function and the Services onStartCommand() method, but I will return to these changes later and focus on the BroadcastReceivers events and user interaction with the Service.
Change of audio outputs (headphone removed)
In media apps it’s common that when a user removes their headphones from the jack the media stops playing.
In the MediaPlayerService class create a BroadcastReceiver that listens to ACTION_AUDIO_BECOMING_NOISY, which means that the audio is about to become ‘noisy’ due to a change in audio outputs. Add the following functions in the service class.
//Becoming noisy
private BroadcastReceiver becomingNoisyReceiver = new BroadcastReceiver() {
    @Override
    public void onReceive(Context context, Intent intent) {
        //pause audio on ACTION_AUDIO_BECOMING_NOISY
        pauseMedia();
        buildNotification(PlaybackStatus.PAUSED);
    }
};

private void registerBecomingNoisyReceiver() {
    //register after getting audio focus
    IntentFilter intentFilter = new IntentFilter(AudioManager.ACTION_AUDIO_BECOMING_NOISY);
    registerReceiver(becomingNoisyReceiver, intentFilter);
}
The BroadcastReceiver instance will pause the MediaPlayer when the system makes an ACTION_AUDIO_BECOMING_NOISY call. To make the BroadcastReceiver available you must register it. The registerBecomingNoisyReceiver() function handles this and specifies the intent action BECOMING_NOISY which will trigger this BroadcastReceiver.
You have not yet implemented the buildNotification(), so don’t worry when it shows an error.
Handling Incoming Calls
The next functions avoid audio playing during calls, which would be a terrible user experience.
First create the following global variables in the MediaPlayerService class.
//Handle incoming phone calls
private boolean ongoingCall = false;
private PhoneStateListener phoneStateListener;
private TelephonyManager telephonyManager;
Add the following function.
//Handle incoming phone calls
private void callStateListener() {
  // Get the telephony manager
  telephonyManager = (TelephonyManager) getSystemService(Context.TELEPHONY_SERVICE);
  //Starting listening for PhoneState changes
  phoneStateListener = new PhoneStateListener() {
      @Override
      public void onCallStateChanged(int state, String incomingNumber) {
          switch (state) {
              //if at least one call exists or the phone is ringing
              //pause the MediaPlayer
              case TelephonyManager.CALL_STATE_OFFHOOK:
              case TelephonyManager.CALL_STATE_RINGING:
                  if (mediaPlayer != null) {
                      pauseMedia();
                      ongoingCall = true;
                  }
                  break;
              case TelephonyManager.CALL_STATE_IDLE:
                  // Phone idle. Start playing.
                  if (mediaPlayer != null) {
                      if (ongoingCall) {
                          ongoingCall = false;
                          resumeMedia();
                      }
                  }
                  break;
          }
      }
  };
  // Register the listener with the telephony manager
  // Listen for changes to the device call state.
  telephonyManager.listen(phoneStateListener,
          PhoneStateListener.LISTEN_CALL_STATE);
}
The callStateListener() function is an implementation of the PhoneStateListener that listens to TelephonyManagers state changes. TelephonyManager provides access to information about the telephony services on the device and listens for changes to the device call state and reacts to these changes.
Redefine Methods
I mentioned that I changed the methods described earlier in this article. I also made changes to the way audio files are passed to the Service. The audio files are loaded from the device with the help of the loadAudio() function. When the user wants to play audio, call the playAudio(int audioIndex) function with an index of the wanted audio from the ArrayList of loaded audio files.
When calling the playAudio() function for the first time, the ArrayList is stored in SharedPreferences together with the audio index number and when the MediaPlayerService wants to play new audio it loads it from SharedPreferences. This is one way to load the Audio array to the Service, but there are others.
Open build.gradle (app) and add dependencies for the Gson library.
dependencies {
  ...
  compile group: 'com.google.code.gson', name: 'gson', version: '2.7', changing: true
}
The following class handles Data storage.
public class StorageUtil {

    private final String STORAGE = " com.valdioveliu.valdio.audioplayer.STORAGE";
    private SharedPreferences preferences;
    private Context context;

    public StorageUtil(Context context) {
        this.context = context;
    }

    public void storeAudio(ArrayList<Audio> arrayList) {
        preferences = context.getSharedPreferences(STORAGE, Context.MODE_PRIVATE);

        SharedPreferences.Editor editor = preferences.edit();
        Gson gson = new Gson();
        String json = gson.toJson(arrayList);
        editor.putString("audioArrayList", json);
        editor.apply();
    }

    public ArrayList<Audio> loadAudio() {
        preferences = context.getSharedPreferences(STORAGE, Context.MODE_PRIVATE);
        Gson gson = new Gson();
        String json = preferences.getString("audioArrayList", null);
        Type type = new TypeToken<ArrayList<Audio>>() {
        }.getType();
        return gson.fromJson(json, type);
    }

    public void storeAudioIndex(int index) {
        preferences = context.getSharedPreferences(STORAGE, Context.MODE_PRIVATE);
        SharedPreferences.Editor editor = preferences.edit();
        editor.putInt("audioIndex", index);
        editor.apply();
    }

    public int loadAudioIndex() {
        preferences = context.getSharedPreferences(STORAGE, Context.MODE_PRIVATE);
        return preferences.getInt("audioIndex", -1);//return -1 if no data found
    }

    public void clearCachedAudioPlaylist() {
        preferences = context.getSharedPreferences(STORAGE, Context.MODE_PRIVATE);
        SharedPreferences.Editor editor = preferences.edit();
        editor.clear();
        editor.commit();
    }
}
Now it’s time to change the playAudio() function. First in the MainActivity class create a global static String.
public static final String Broadcast_PLAY_NEW_AUDIO = "com.valdioveliu.valdio.audioplayer.PlayNewAudio";
// Change to your package name
This string sends broadcast intents to the MediaPlayerService that the user wants to play new audio and has updated the cached index of the audio they want to play. The BroadcastReceiver that handles this intent is not created yet, for now replace your old playAudio() function in the MainActivity with the following.
private void playAudio(int audioIndex) {
    //Check is service is active
    if (!serviceBound) {
        //Store Serializable audioList to SharedPreferences
        StorageUtil storage = new StorageUtil(getApplicationContext());
        storage.storeAudio(audioList);
        storage.storeAudioIndex(audioIndex);

        Intent playerIntent = new Intent(this, MediaPlayerService.class);
        startService(playerIntent);
        bindService(playerIntent, serviceConnection, Context.BIND_AUTO_CREATE);
    } else {
        //Store the new audioIndex to SharedPreferences
        StorageUtil storage = new StorageUtil(getApplicationContext());
        storage.storeAudioIndex(audioIndex);

        //Service is active
        //Send a broadcast to the service -> PLAY_NEW_AUDIO
        Intent broadcastIntent = new Intent(Broadcast_PLAY_NEW_AUDIO);
        sendBroadcast(broadcastIntent);
    }
}
The audio is not passed to the Service through putExtra(), so the Service has to load the data from the SharedPreferences and this is why the onStartCommand() method needs to be rewritten. I will return to this method at the end of this tutorial to give the complete onStartCommand() implementation. For now, add the following global variables to the MediaPlayerService class.
//List of available Audio files
private ArrayList<Audio> audioList;
private int audioIndex = -1;
private Audio activeAudio; //an object of the currently playing audio
Play New Audio Broadcast
When the MediaPlayerService is playing something and the user wants to play a new track, you must notify the service that it needs to move to new audio. You need a way for the Service to listen to these “play new Audio” calls and act on them. How? Another BroadcastReceiver. I mentioned these “play new Audio” calls in the Redefine methods section when calling the playAudio() function.
In the MediaPlayerService class add the following functions.
private BroadcastReceiver playNewAudio = new BroadcastReceiver() {
    @Override
    public void onReceive(Context context, Intent intent) {

        //Get the new media index form SharedPreferences
        audioIndex = new StorageUtil(getApplicationContext()).loadAudioIndex();
        if (audioIndex != -1 && audioIndex < audioList.size()) {
            //index is in a valid range
            activeAudio = audioList.get(audioIndex);
        } else {
            stopSelf();
        }

        //A PLAY_NEW_AUDIO action received
        //reset mediaPlayer to play the new Audio
        stopMedia();
        mediaPlayer.reset();
        initMediaPlayer();
        updateMetaData();
        buildNotification(PlaybackStatus.PLAYING);
    }
};

private void register_playNewAudio() {
    //Register playNewMedia receiver
    IntentFilter filter = new IntentFilter(MainActivity.Broadcast_PLAY_NEW_AUDIO);
    registerReceiver(playNewAudio, filter);
}
When intercepting a PLAY_NEW_AUDIO intent, this BroadcastReceiver loads the updated index and updates the activeAudio object to the new media and the MediaPlayer is reset to play the new audio. The buildNotification() function is not yet implemented so it shows an error.
Register BroadcastReceiverS
In the Services onCreate() method add the registration calls for the BroadcastReceivers.
@Override
public void onCreate() {
    super.onCreate();
    // Perform one-time setup procedures

    // Manage incoming phone calls during playback.
    // Pause MediaPlayer on incoming call,
    // Resume on hangup.
    callStateListener();
    //ACTION_AUDIO_BECOMING_NOISY -- change in audio outputs -- BroadcastReceiver
    registerBecomingNoisyReceiver();
    //Listen for new Audio to play -- BroadcastReceiver
    register_playNewAudio();
}
You must unregister all the registered BroadcastReceivers when they are not needed anymore. This happens in the Services onDestroy() method. Replace your current onDestroy() method with the following. Again, don’t worry about the removeNotification(), it’s implemented later.
@Override
public void onDestroy() {
    super.onDestroy();
    if (mediaPlayer != null) {
        stopMedia();
        mediaPlayer.release();
    }
    removeAudioFocus();
    //Disable the PhoneStateListener
    if (phoneStateListener != null) {
        telephonyManager.listen(phoneStateListener, PhoneStateListener.LISTEN_NONE);
    }

    removeNotification();

    //unregister BroadcastReceivers
    unregisterReceiver(becomingNoisyReceiver);
    unregisterReceiver(playNewAudio);

    //clear cached playlist
    new StorageUtil(getApplicationContext()).clearCachedAudioPlaylist();
}
When the Service is destroyed it must stop listening to incoming calls and release the TelephonyManager resources. Another final thing the Service handles before it’s destroyed is clearing the data stored in the SharedPreferences.
User Interactions
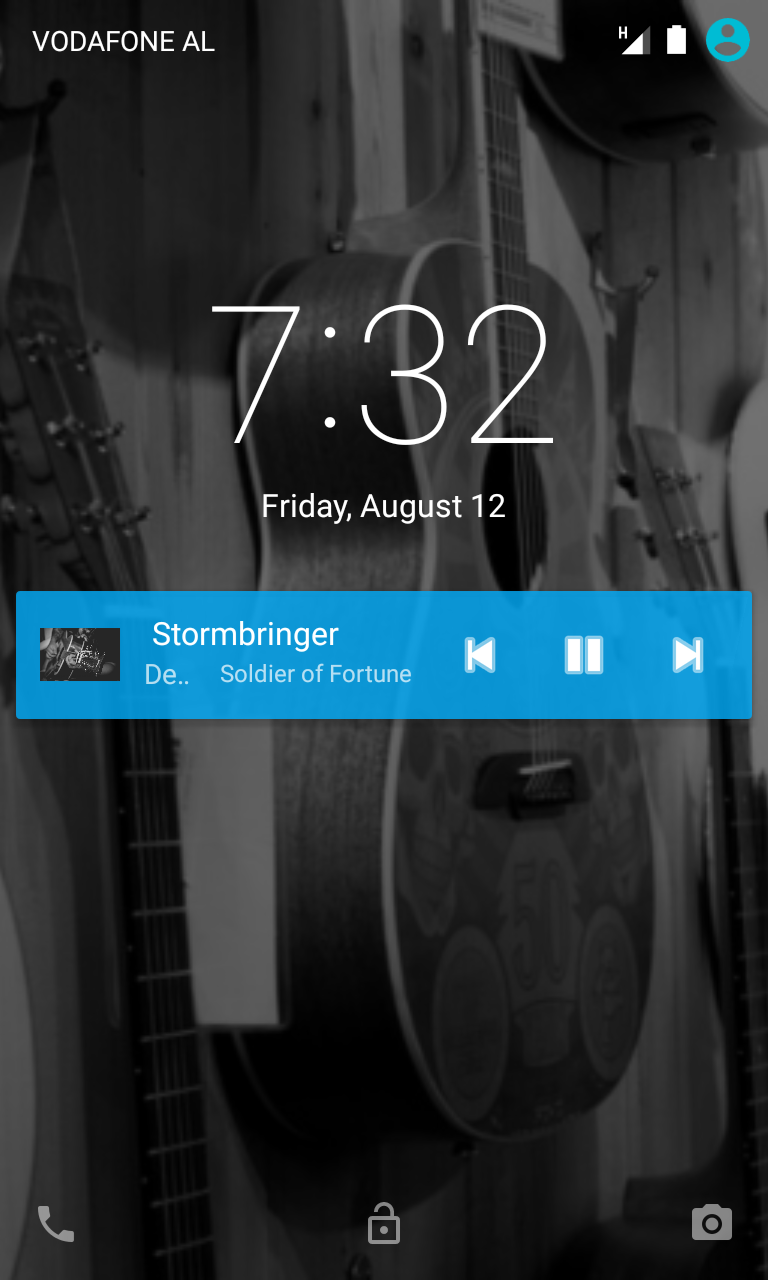
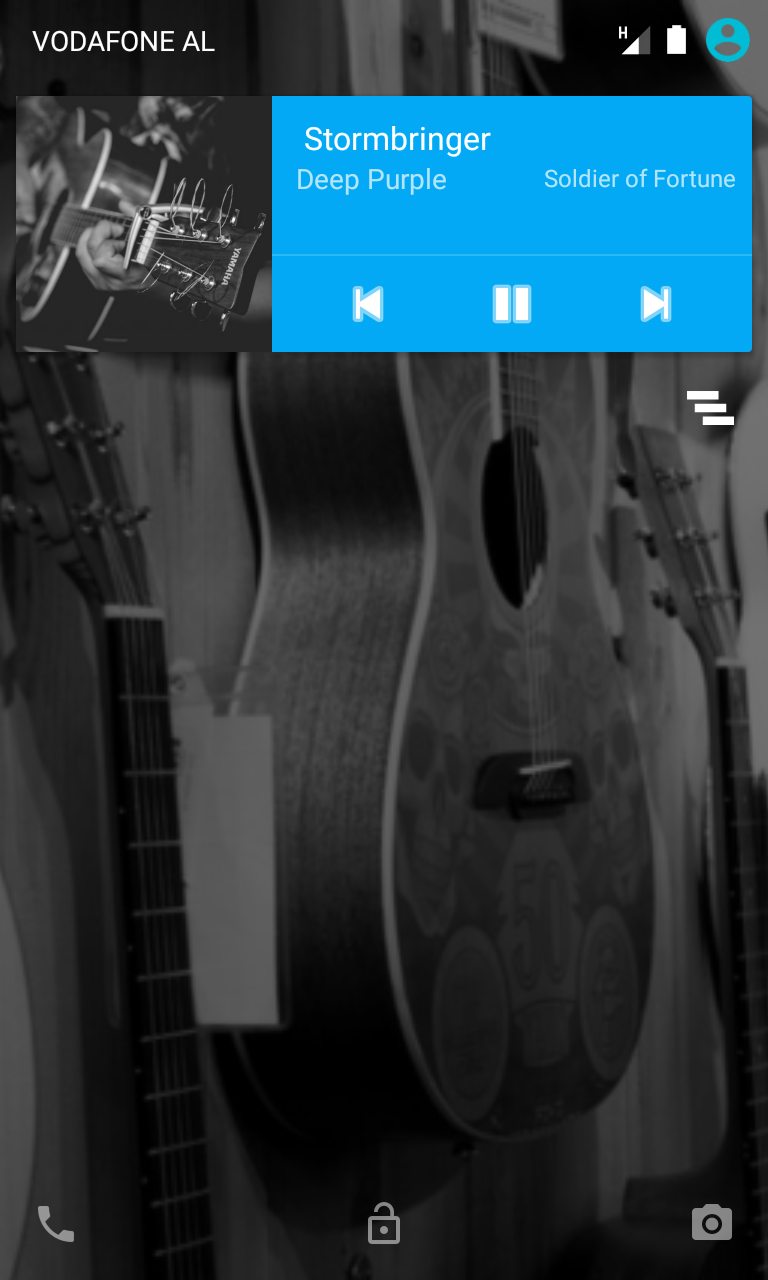
Interacting with the MediaPlayerService is one of the key features of an audio player app, because users don’t need to play media, but also need to have control over the app. This is not as easy as it looks when working with background services because there is no user interface in background threads. Android Lollipop introduced new features, including Android MediaStyle notifications.
Notification.MediaStyle allows you to add media buttons without having to create custom notifications. In this example I will use the MediaStyles support library, NotificationCompat.MediaStyle to support older Android versions.
To have full control over media playback in the MediaPlayerService you need to create an instance of MediaSession. MediaSession allows interaction with media controllers, volume keys, media buttons, and transport controls. An app creates an instance of MediaSession when it wants to publish media playback information or handle media keys.
To build a MediaStyle notification for this example, the MediaPlayerService will make use of MediaSessions transport controls to add notification controls and publish MetaData so the Android system know that it’s playing audio.
Before moving on, add the following variables in the MediaPlayerService class.
public static final String ACTION_PLAY = "com.valdioveliu.valdio.audioplayer.ACTION_PLAY";
public static final String ACTION_PAUSE = "com.valdioveliu.valdio.audioplayer.ACTION_PAUSE";
public static final String ACTION_PREVIOUS = "com.valdioveliu.valdio.audioplayer.ACTION_PREVIOUS";
public static final String ACTION_NEXT = "com.valdioveliu.valdio.audioplayer.ACTION_NEXT";
public static final String ACTION_STOP = "com.valdioveliu.valdio.audioplayer.ACTION_STOP";

//MediaSession
private MediaSessionManager mediaSessionManager;
private MediaSessionCompat mediaSession;
private MediaControllerCompat.TransportControls transportControls;

//AudioPlayer notification ID
private static final int NOTIFICATION_ID = 101;
The String variables are used to notify which action is triggered from the MediaSession callback listener. The rest of the instances relate to the MediaSession and a notification ID to uniquely identify the MediaStyle notification.
The following functions handle the initialization of the MediaSession and setting the MetaData to an active session. An important part of the following initMediaSession() function is setting the MediaSession callbacks to handle events coming from the notification buttons.
Add the following functions in the MediaPlayerService class.
private void initMediaSession() throws RemoteException {
  if (mediaSessionManager != null) return; //mediaSessionManager exists

  mediaSessionManager = (MediaSessionManager) getSystemService(Context.MEDIA_SESSION_SERVICE);
  // Create a new MediaSession
  mediaSession = new MediaSessionCompat(getApplicationContext(), "AudioPlayer");
  //Get MediaSessions transport controls
  transportControls = mediaSession.getController().getTransportControls();
  //set MediaSession -> ready to receive media commands
  mediaSession.setActive(true);
  //indicate that the MediaSession handles transport control commands
  // through its MediaSessionCompat.Callback.
  mediaSession.setFlags(MediaSessionCompat.FLAG_HANDLES_TRANSPORT_CONTROLS);

  //Set mediaSession's MetaData
  updateMetaData();

  // Attach Callback to receive MediaSession updates
  mediaSession.setCallback(new MediaSessionCompat.Callback() {
      // Implement callbacks
      @Override
      public void onPlay() {
          super.onPlay();
          resumeMedia();
          buildNotification(PlaybackStatus.PLAYING);
      }

      @Override
      public void onPause() {
          super.onPause();
          pauseMedia();
          buildNotification(PlaybackStatus.PAUSED);
      }

      @Override
      public void onSkipToNext() {
          super.onSkipToNext();
          skipToNext();
          updateMetaData();
          buildNotification(PlaybackStatus.PLAYING);
      }

      @Override
      public void onSkipToPrevious() {
          super.onSkipToPrevious();
          skipToPrevious();
          updateMetaData();
          buildNotification(PlaybackStatus.PLAYING);
      }

      @Override
      public void onStop() {
          super.onStop();
          removeNotification();
          //Stop the service
          stopSelf();
      }

      @Override
      public void onSeekTo(long position) {
          super.onSeekTo(position);
      }
  });
}

private void updateMetaData() {
  Bitmap albumArt = BitmapFactory.decodeResource(getResources(),
          R.drawable.image); //replace with medias albumArt
  // Update the current metadata
  mediaSession.setMetadata(new MediaMetadataCompat.Builder()
          .putBitmap(MediaMetadataCompat.METADATA_KEY_ALBUM_ART, albumArt)
          .putString(MediaMetadataCompat.METADATA_KEY_ARTIST, activeAudio.getArtist())
          .putString(MediaMetadataCompat.METADATA_KEY_ALBUM, activeAudio.getAlbum())
          .putString(MediaMetadataCompat.METADATA_KEY_TITLE, activeAudio.getTitle())
          .build());
}
The updateMetaData() method has a Bitmap image that you need to create, so add an image to the drawable folder of the project. The Callback() override methods make use of the media player key functions described earlier. Next add the media player functions mentioned earlier to the Service.
private void skipToNext() {

    if (audioIndex == audioList.size() - 1) {
        //if last in playlist
        audioIndex = 0;
        activeAudio = audioList.get(audioIndex);
    } else {
        //get next in playlist
        activeAudio = audioList.get(++audioIndex);
    }

    //Update stored index
    new StorageUtil(getApplicationContext()).storeAudioIndex(audioIndex);

    stopMedia();
    //reset mediaPlayer
    mediaPlayer.reset();
    initMediaPlayer();
}

private void skipToPrevious() {

    if (audioIndex == 0) {
        //if first in playlist
        //set index to the last of audioList
        audioIndex = audioList.size() - 1;
        activeAudio = audioList.get(audioIndex);
    } else {
        //get previous in playlist
        activeAudio = audioList.get(--audioIndex);
    }

    //Update stored index
    new StorageUtil(getApplicationContext()).storeAudioIndex(audioIndex);

    stopMedia();
    //reset mediaPlayer
    mediaPlayer.reset();
    initMediaPlayer();
}
Now the service needs a way to build the MediaStyle notification, but the service needs a way to keep track of its playback status. For this create a new enumeration.
In your project create the following class.
public enum PlaybackStatus {
    PLAYING,
    PAUSED
}
Now the service has a way to keep track of its playback status add the following function for building the notifications.
private void buildNotification(PlaybackStatus playbackStatus) {

    int notificationAction = android.R.drawable.ic_media_pause;//needs to be initialized
    PendingIntent play_pauseAction = null;

    //Build a new notification according to the current state of the MediaPlayer
    if (playbackStatus == PlaybackStatus.PLAYING) {
        notificationAction = android.R.drawable.ic_media_pause;
        //create the pause action
        play_pauseAction = playbackAction(1);
    } else if (playbackStatus == PlaybackStatus.PAUSED) {
        notificationAction = android.R.drawable.ic_media_play;
        //create the play action
        play_pauseAction = playbackAction(0);
    }

    Bitmap largeIcon = BitmapFactory.decodeResource(getResources(),
            R.drawable.image); //replace with your own image

    // Create a new Notification
    NotificationCompat.Builder notificationBuilder = (NotificationCompat.Builder) new NotificationCompat.Builder(this)
            .setShowWhen(false)
            // Set the Notification style
            .setStyle(new NotificationCompat.MediaStyle()
                    // Attach our MediaSession token
                    .setMediaSession(mediaSession.getSessionToken())
                    // Show our playback controls in the compact notification view.
                    .setShowActionsInCompactView(0, 1, 2))
            // Set the Notification color
            .setColor(getResources().getColor(R.color.colorPrimary))
            // Set the large and small icons
            .setLargeIcon(largeIcon)
            .setSmallIcon(android.R.drawable.stat_sys_headset)
            // Set Notification content information
            .setContentText(activeAudio.getArtist())
            .setContentTitle(activeAudio.getAlbum())
            .setContentInfo(activeAudio.getTitle())
            // Add playback actions
            .addAction(android.R.drawable.ic_media_previous, "previous", playbackAction(3))
            .addAction(notificationAction, "pause", play_pauseAction)
            .addAction(android.R.drawable.ic_media_next, "next", playbackAction(2));

    ((NotificationManager) getSystemService(Context.NOTIFICATION_SERVICE)).notify(NOTIFICATION_ID, notificationBuilder.build());
}

private void removeNotification() {
    NotificationManager notificationManager = (NotificationManager) getSystemService(Context.NOTIFICATION_SERVICE);
    notificationManager.cancel(NOTIFICATION_ID);
}
When called, this function will build the notification according to the PlaybackStatus.
The main purpose of the buildNotification() function is building the notification UI and setting up all the events that will trigger when a user clicks a notification button. You generate the actions through PendingIntents from the playbackAction() function. Add it to the MediaPlayerService.
private PendingIntent playbackAction(int actionNumber) {
  Intent playbackAction = new Intent(this, MediaPlayerService.class);
  switch (actionNumber) {
      case 0:
          // Play
          playbackAction.setAction(ACTION_PLAY);
          return PendingIntent.getService(this, actionNumber, playbackAction, 0);
      case 1:
          // Pause
          playbackAction.setAction(ACTION_PAUSE);
          return PendingIntent.getService(this, actionNumber, playbackAction, 0);
      case 2:
          // Next track
          playbackAction.setAction(ACTION_NEXT);
          return PendingIntent.getService(this, actionNumber, playbackAction, 0);
      case 3:
          // Previous track
          playbackAction.setAction(ACTION_PREVIOUS);
          return PendingIntent.getService(this, actionNumber, playbackAction, 0);
      default:
          break;
  }
  return null;
}
Now that the service generates actions when the user clicks on the notification buttons it needs a way to handle these actions. Add the following action to the service.
private void handleIncomingActions(Intent playbackAction) {
  if (playbackAction == null || playbackAction.getAction() == null) return;

  String actionString = playbackAction.getAction();
  if (actionString.equalsIgnoreCase(ACTION_PLAY)) {
      transportControls.play();
  } else if (actionString.equalsIgnoreCase(ACTION_PAUSE)) {
      transportControls.pause();
  } else if (actionString.equalsIgnoreCase(ACTION_NEXT)) {
      transportControls.skipToNext();
  } else if (actionString.equalsIgnoreCase(ACTION_PREVIOUS)) {
      transportControls.skipToPrevious();
  } else if (actionString.equalsIgnoreCase(ACTION_STOP)) {
      transportControls.stop();
  }
}
This function figures out which of the playback actions is triggered and executes one of the MediaSession callback methods through its transport controls. The callback methods, implemented in the initMediaSession() function handle all the MediaPlayer actions.
Finishing Up
All that is left is to define the services onStartCommand() method. This method will handle the initialization of the MediaSession, the MediaPlayer, loading the cached audio playlist and building the MediaStyle notification. In the service class replace the old onStartCommand() method with the following.
@Override
public int onStartCommand(Intent intent, int flags, int startId) {
  try {
      //Load data from SharedPreferences
      StorageUtil storage = new StorageUtil(getApplicationContext());
      audioList = storage.loadAudio();
      audioIndex = storage.loadAudioIndex();

      if (audioIndex != -1 && audioIndex < audioList.size()) {
          //index is in a valid range
          activeAudio = audioList.get(audioIndex);
      } else {
          stopSelf();
      }
  } catch (NullPointerException e) {
      stopSelf();
  }

  //Request audio focus
  if (requestAudioFocus() == false) {
      //Could not gain focus
      stopSelf();
  }

  if (mediaSessionManager == null) {
      try {
          initMediaSession();
          initMediaPlayer();
      } catch (RemoteException e) {
          e.printStackTrace();
          stopSelf();
      }
      buildNotification(PlaybackStatus.PLAYING);
  }

  //Handle Intent action from MediaSession.TransportControls
  handleIncomingActions(intent);
  return super.onStartCommand(intent, flags, startId);
}
In the initMediaPlayer() function replace the setDataSource() call with the following line
mediaPlayer.setDataSource(activeAudio.getData());
That sums it up for playing audio in a background service in Android. Now run the app and play audio the right way. Here is an example how my sample app looks. I added a RecyclerView to the app and the layout might look different, but the notification view and controls are the same.
Fast Forward
And that’s it! I understand there was a lot to absorb and understand in this tutorial, so if you have any questions or comments, please let me know below.
Frequently Asked Questions (FAQs) about Building an Android Audio Player App
How can I create a playlist feature in my Android audio player app?
Creating a playlist feature in your Android audio player app involves a few steps. First, you need to create a new activity for the playlist. This activity will display a list of songs that the user can add to their playlist. You can use a RecyclerView to display the list of songs. Each song should have an ‘Add to Playlist’ button. When this button is clicked, the song should be added to the user’s playlist. You can store the playlist in a local database or shared preferences.
How can I add a shuffle and repeat feature to my Android audio player app?
To add a shuffle feature, you can randomize the order of the songs in your playlist. You can use the Collections.shuffle() method to do this. For the repeat feature, you can set a flag when the repeat button is clicked. If this flag is true, when a song finishes playing, instead of moving to the next song, the same song should start playing again.
How can I add a search feature to my Android audio player app?
Adding a search feature involves creating a search bar where users can input their search queries. You can use the SearchView widget for this. When a search query is submitted, you should filter your list of songs based on the query. Only songs that match the query should be displayed.
How can I add album art to my Android audio player app?
Album art can be retrieved from the media files themselves using the MediaMetadataRetriever class. You can use the extractMetadata() method of this class to extract the album art. Once you have the album art, you can display it using an ImageView.
How can I handle audio focus in my Android audio player app?
Handling audio focus is important to ensure that your app behaves well when other apps are also playing audio. You can use the AudioManager class to request and abandon audio focus. When your app gains audio focus, it can start playing audio. When it loses audio focus, it should either pause or lower its volume, depending on the type of audio focus loss.
How can I add a sleep timer to my Android audio player app?
A sleep timer can be implemented using a CountDownTimer. When the user sets a sleep timer, start the CountDownTimer with the specified time. When the timer finishes, stop the audio playback.
How can I add a equalizer to my Android audio player app?
Android provides the Equalizer class for modifying the audio output. You can create an instance of this class and use its methods to adjust the audio frequencies. You can provide a user interface for the equalizer using SeekBars.
How can I add lyrics display to my Android audio player app?
Displaying lyrics can be a bit complex as it involves synchronizing the lyrics with the audio playback. You can use the LyricsExtractor class to extract lyrics from the audio file. Then, you can display the lyrics in a TextView and update it as the audio playback progresses.
How can I add a dark mode to my Android audio player app?
Dark mode can be added by defining a dark theme in your styles.xml file. You can then allow the user to switch between the light and dark themes using a switch or checkbox in your settings activity.
How can I optimize my Android audio player app for different screen sizes?
You can use Android’s resource qualifiers to provide different layouts for different screen sizes. For example, you can create a layout-sw600dp folder for devices with a screen width of 600dp or more. You can also use the ConstraintLayout to create flexible layouts that adapt to different screen sizes.
 Valdio Veliu
Valdio recently graduated in Computer Engineering. He is a mobile developer, who is passionate about mobile technologies and learning new things. He has worked with languages such as C, Java, php and is currently focused on Java, mobile and web development