Powering Raspberry Pi Projects with PHP

Key Takeaways
- Raspberry Pi, a compact computer, can run Raspbian Linux, allowing users to install PHP and create websites, as well as control electronic outputs and respond to electronic inputs.
- The General Purpose Input Output (GPIO) pins on the Raspberry Pi board can be used to connect electronic circuits, enabling the control of voltage and detection of voltage changes. The PiPHP: GPIO library allows control of these pins and can be installed via composer.
- PHP is particularly suitable for Raspberry Pi projects due to its flexibility, simplicity, and the large developer community that provides support and resources. It is efficient and lightweight, making it a good choice for the limited resources of a Raspberry Pi.
A Raspberry Pi is a brilliant tiny computer that you can power off of a micro USB cable. The most recent model has WiFi, an ethernet port, 4 USB ports and an HDMI port. There’s also a micro SD card slot, which is where the “hard drive” goes.

It’s capable of running Raspbian Linux, which is a Debian based Linux distribution. This makes it familiar to Ubuntu users who can then just sudo apt-get install all the things.
Like with any Linux machine, you can install PHP on it and make a website – but we can do so much more than that!
Equipment
Firstly, we will need a Raspberry Pi. The most recent model has onboard WiFi, which is very useful for easy SSH access. We will also need some electronics equipment. It is a really good idea to obtain a starter kit containing a breadboard, jumper wires, resistors, LEDs and push buttons. You can buy these sorts of kits on adafruit and similar packs can be found much cheaper on Amazon and eBay.
Setup
The Raspberry Pi official website has an excellent quick start guide to help you get up and running. Once you have Raspbian Linux running on your machine, you can use this command to install PHP:
sudo apt-get install php5
Alternatively, install PHP7. It’s a bit more complicated, but performs better. This guide explains it well.
General Purpose Input Output (GPIO) Pins
On the corner of a Raspberry Pi board are two rows of metal pins that we can connect electronic circuits to. Some of the pins are grounded, some are 5V, some are 3.3V and most of them are GPIO pins.
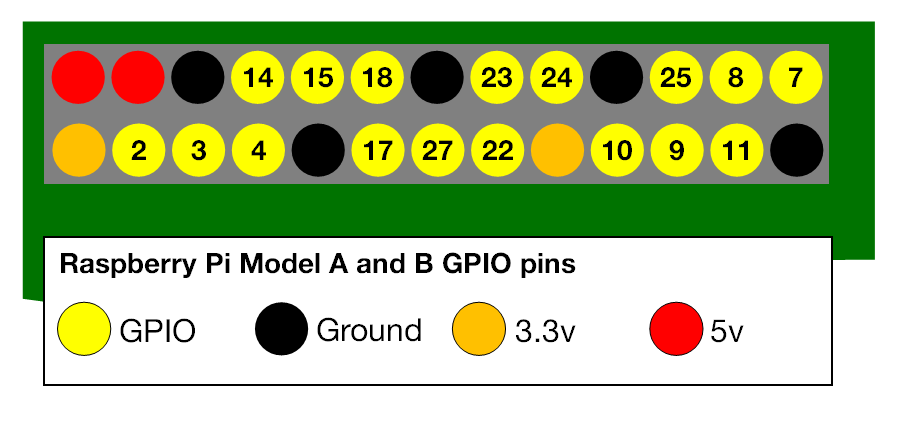
Credit: www.raspberrypi.org
When a GPIO pin is configured as an output pin, we can tell the Pi to set its voltage to be high (3.3V) or low (0V). This allows us to turn things on and off.
When a GPIO pin is configured as an input pin, we can check to see the voltage on that pin and also detect when that voltage changes. This allows us to read sensors and also detect things like button presses.
There is plenty more that we can use these pins for, such as communication via Serial, i2c or SPI – but for now, this is all we are required to know.
Getting Started with PiPHP
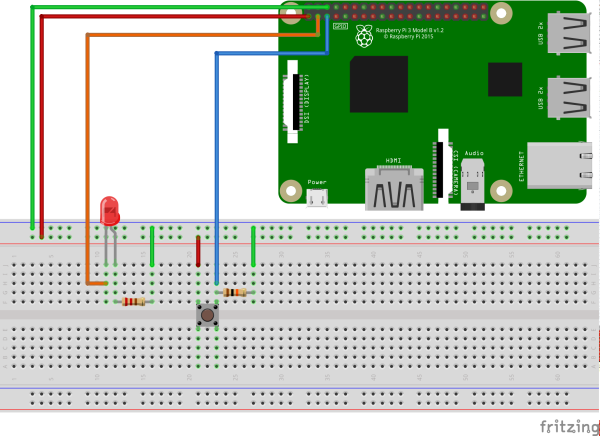
PiPHP: GPIO is a PHP library that can be installed via composer that allows you to control these GPIO pins. Here is an example of how we might use the library to blink an LED a few times when a button press is detected. The diagram below shows how you could connect an LED to GPIO pin 2 and a push button to GPIO pin 3 using a breadboard. A breadboard is a reusable base for making electronic circuits. The rows are electronically connected, as are the two rails that span the length of the board on each of its sides. We connect the first two rails to the ground and 3.3V pins in the Raspberry Pi.
The two resistors are important. The first resistor (~220 Ω) limits the current to the LED. The second resistor (~10 kΩ) is a pull-up resistor for the button.
Note: Some of the pins on the Raspberry Pi have internal pull-up resistors, so this is not always required (but it does not harm).
Back on the Raspberry Pi, make yourself a project directory and then use composer to install piphp/gpio:
composer require piphp/gpio
If you place the file below inside your project directory and then execute it (php led-blink.php) you should find that pressing the button causes the LED to blink 5 times, as it does in the video.
<?php // led-blink.php

require_once 'vendor/autoload.php';

use PiPHP\GPIO\GPIO;
use PiPHP\GPIO\Pin\InputPinInterface;
use PiPHP\GPIO\Pin\OutputPinInterface;

// This GPIO object can be used to retrieve pins and create interrupt watchers
$gpio = new GPIO();

// Configure pin 2 as an output pin and retrieve an object that we can use to change it
$ledPin = $gpio->getOutputPin(2);

// Configure pin 3 as an input pin and retrieve an object that we can use to observe it
$buttonPin = $gpio->getInputPin(3);

// Configure this pin to trigger interrupts when the voltage rises.
// ::EDGE_FALLING and ::EDGE_BOTH are also valid.
$buttonPin->setEdge(InputPinInterface::EDGE_RISING);

// Create an interrupt watcher (this is a type of event loop)
$interruptWatcher = $gpio->createWatcher();

// Register a callback for handling interrupts on the button pin
$interruptWatcher->register($buttonPin, function () use ($ledPin) {
    echo 'Blinking LED...' . PHP_EOL;

    // Toggle the value of the LED five times
    for ($i = 0; $i < 5; $i++) {
        $ledPin->setValue(OutputPinInterface::VALUE_HIGH);
        usleep(100000);
        $ledPin->setValue(OutputPinInterface::VALUE_LOW);
        usleep(100000);
    }

    // Returning false would cause the loop below to exit
    return true;
});

// Loop until an interrupt callback returns false, this code will iterate every 5 seconds
while ($interruptWatcher->watch(5000));
Going Further
We have seen how we can use PHP to respond to electronic inputs and control electronic outputs. Once we have this understanding, we can get more and more adventurous with our inputs and outputs to create more and more awesome projects.
Speaking personally, I had great fun making a drinks machine using a flow sensor and a windscreen washer fluid pump.
Talk preparation for @phpday could be going better. pic.twitter.com/Z9IWGEQftq
— Andrew Carter (@AndrewCarterUK) May 13, 2016
I used some nifty electronics with a TIP120 transistor so that I could control the higher voltage and current that the pump needed from the Raspberry Pi. The flow sensor outputs a pulse after a specific volume of fluid has flown through it. All my code had to do was count the interrupts from the flow sensor and then turn the pump off. The gardeners amongst us could use a similar arrangement to automate the watering of plants!
Have any Raspberry PI + PHP projects you’d like to share? Let us know!
Frequently Asked Questions (FAQs) about Powering Raspberry Pi Projects with PHP
What are the benefits of using PHP for Raspberry Pi projects?
PHP is a popular scripting language that is especially suited for web development. It is flexible, easy to learn, and has a large community of developers who can provide support and resources. When used with Raspberry Pi, PHP can help create dynamic web pages that interact with the hardware of the Raspberry Pi. This allows for a wide range of applications, from home automation systems to data servers and beyond. Furthermore, PHP is lightweight and efficient, making it a good choice for the limited resources of a Raspberry Pi.
How can I install PHP on my Raspberry Pi?
Installing PHP on your Raspberry Pi is a straightforward process. You can use the apt package manager that comes with the Raspberry Pi’s operating system. First, update your package list by running the command sudo apt update. Then, install PHP by running sudo apt install php. This will install the latest version of PHP available in the package repository.
Can I use PHP to interact with the GPIO pins on the Raspberry Pi?
Yes, you can use PHP to interact with the General Purpose Input/Output (GPIO) pins on the Raspberry Pi. This allows you to control and monitor physical devices directly from your PHP scripts. There are several libraries available that provide a PHP interface to the GPIO pins, such as php-gpio and WiringPi PHP.
What are some examples of Raspberry Pi projects that use PHP?
There are many creative projects that use PHP with Raspberry Pi. For example, you could create a home automation system that controls lights, heating, and other appliances based on web inputs. Another idea is to build a data server that collects and displays sensor data in real-time. You could also create a media server that streams music and video to devices on your network.
How can I debug PHP scripts on my Raspberry Pi?
Debugging PHP scripts on a Raspberry Pi is similar to debugging on any other platform. You can use echo statements to output variable values and program flow information. PHP also has a built-in error reporting feature that can display detailed error messages. For more advanced debugging, you can use tools like Xdebug, which provides features like breakpoints and stack traces.
Can I use PHP with other programming languages on the Raspberry Pi?
Yes, PHP can be used alongside other programming languages on the Raspberry Pi. For example, you might use Python or C for low-level hardware interaction, and then use PHP for the web interface. This allows you to leverage the strengths of each language for different parts of your project.
How can I secure my PHP scripts on the Raspberry Pi?
Securing your PHP scripts involves several steps. First, always validate and sanitize user input to prevent SQL injection and other attacks. Second, use secure session management to protect user data. Third, keep your PHP installation and scripts up-to-date to benefit from the latest security patches. Finally, consider using a web application firewall to block malicious requests.
Can I use PHP frameworks on the Raspberry Pi?
Yes, you can use PHP frameworks on the Raspberry Pi. These frameworks provide a structured way to build web applications and can save you time and effort. Some popular PHP frameworks, like Laravel and Symfony, may require additional resources, but lighter frameworks like Slim or Lumen can run efficiently on the Raspberry Pi.
How can I optimize PHP performance on the Raspberry Pi?
Optimizing PHP performance on the Raspberry Pi involves several strategies. First, use efficient coding practices, like avoiding unnecessary loops and using built-in functions whenever possible. Second, consider using a PHP accelerator, like OPcache, which can significantly speed up PHP execution. Finally, keep your Raspberry Pi’s operating system and PHP installation up-to-date to benefit from the latest performance improvements.
Can I use PHP to create a web server on the Raspberry Pi?
Yes, you can use PHP to create a web server on the Raspberry Pi. This can be done using the built-in PHP server, or by installing a dedicated web server software like Apache or Nginx. Once your server is set up, you can use PHP to create dynamic web pages that interact with the Raspberry Pi’s hardware.
Andrew is a software developer from the United Kingdom with a Master's Degree in Physics. He's the Head of Technical Development at MoneyMaxim, a developer of open source software and an up-and-coming speaker. In his spare time he dabbles in photography and practices Muay Thai.


Published in
·APIs·automation·Cloud·Development Environment·Installation·Miscellaneous·PHP·July 4, 2016