Ghost is a new, free and open source blogging platform with a very simple and easy to use interface. Ghost focuses on one thing: Publishing. If you haven’t read Joe Hewitson’s recent article, you should.
PHP is the world’s most popular and widely supported programming language. Some of the most popular CMS like WordPress, Joomla, Drupal – and even Facebook – use PHP as their core language, but Ghost has been built with Node.Js, not with PHP.
Ghost claims to be a simple blogging platform, but unfortunately the first step to get started with Ghost is not simple. Installation process of Ghost is not simple and easy. It is complicated and might be confusing for some users. Installation on a live server and a local PC is not simple.
Node.js is a software platform that is used to build server-side applications. Node.js utilizes JavaScript as its scripting language. Ghost is Node.Js based, so it means many of you won’t be able to install it on shared web hosting, a very popular hosting plan for beginners. You need a cloud (Amazon EC2, DigitalOcean, Windows Azure etc) that supports Node.Js but not everyone uses the cloud.
If you install Ghost on a local PC, you will have to install additional programs like Node.Js and fire up the command line. No doubt, using the command line can be confusing if you’re not used to it.
Currently available installers
There are a couple of installers available at the moment for local and live web server installation.
Installation on Live Servers
Here are some options to deploy to the cloud.
- Deploy to the cloud with Bitnami.
- Launch Ghost with Rackspace deployments.
- Get up and running with a DigitalOcean Droplet.
Local installation on Windows, Mac or Linux
Bitnami ghost installer is the easiest way to install Ghost on Windows, Mac or Linux. You can download it from http://bitnami.com/stack/ghost/installer.
If Bitnami Ghost installer does not work for you and you see any errors then you can install Ghost manually. In this tutorial I am going to share my experience of installing Ghost on a Windows PC.
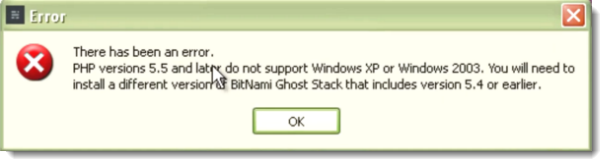
I downloaded Bitnami Ghost installer for Windows, it worked fine on Windows 7 (the most widely used Operating System with 46.42% market share) but it gave me a PHP 5.5 error on Windows XP (the second most popular Operating System with 31.24% market share).
I decided to install Ghost manually on Windows XP. Here is a screenshot of the error message in Windows XP.
How to install Ghost manually?
For manual installation you need to install Node.Js and the Ghost source files.
Step 1 : Download and install Node.JsGo to nodejs.org, download the Node installer and install it.
Step 2 : Download and Extract Ghost filesVisit Ghost.org, sign up for an account or log in if you already have an account and download the Ghost zipped archive. Next we need to extract the Ghost files. Go to the root of your C drive, create a new folder, name it ghost-#.#.# ( replace # with the version of ghost) and extract all the files from the zipped archive to this new folder.
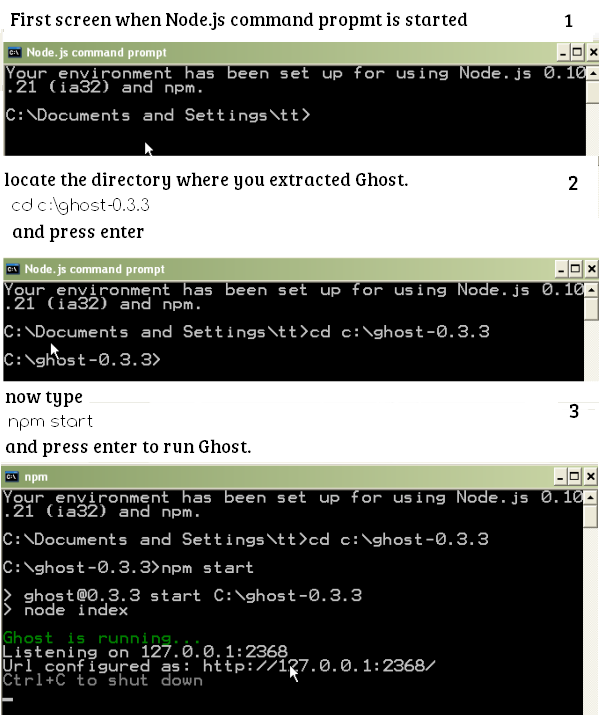
Start Node.js Command Prompt
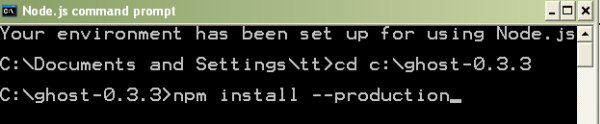
In your Start Menu go to All Programs, find ‘Node.js’ and then choose ‘Node.js Command Prompt’. Now we need to change the directory to c:\ghost-0.3.3, where we extracted Ghost.
- Type
cd c:\ghost-#.#.#(replace # with Ghost version number) and press Enter - Next type
npm install --productionand press the Enter key
Here is a screenshot of the Node command prompt.
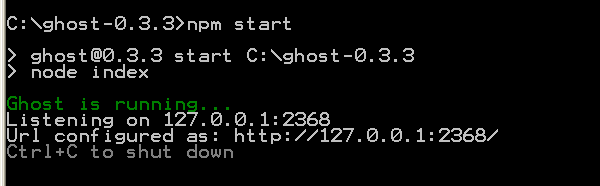
Now you need to wait for a minute or two. When npm has finished installing, type npm start to start Ghost.
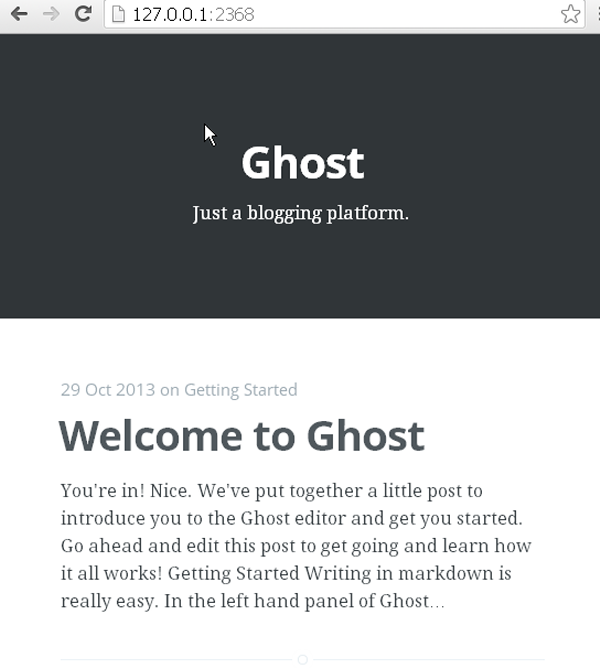
Open your browser (Firefox, Chrome, Safari) and navigate to 127.0.0.1:2368 to see your newly setup Ghost blog home page.
Now just change the URL to 127.0.0.1:2368/ghost and create your admin user to log in to the Ghost admin. Enter your full name, email and password (must be 8 characters long) and click sign up, and you will be logged in to your Ghost Dashboard.
Step 3: Change Ghost URL in config.js file
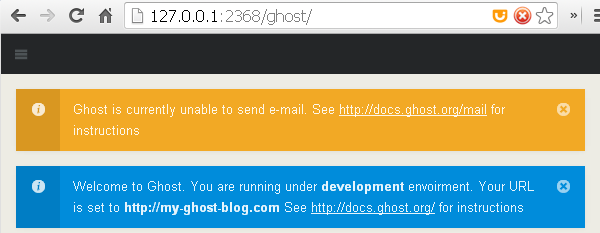
When you visit 127.0.0.1:2368/ghost you will see two notifications. The first one is for mail and another one is about Ghost URL. You will have to change the URL in config.js file. You can find config.js in the root directory of Ghost. (C:\ghost-0.3.3)
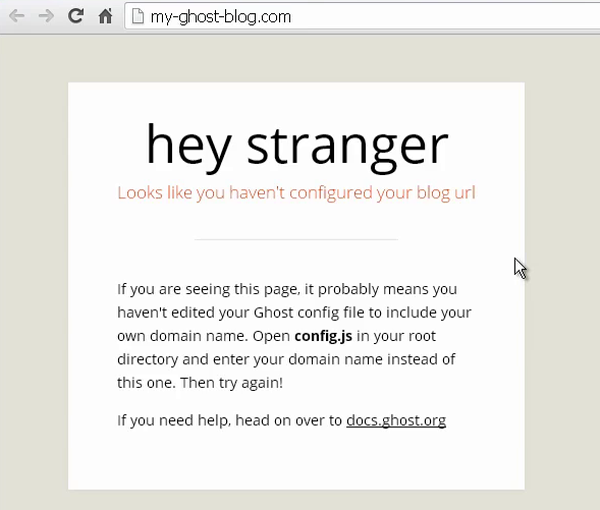
Open config.js file in any text editor (SublimeText, Brackets etc) or you can use NotePad in Windows. Find http://my-ghost-blog.com and replace it with http://127.0.0.1:2368/ around line 11 and line 47.
Step 4: Restart Node.js Command Prompt
Now close Node.js Command Prompt and start it again, so changes can take effect. If you don’t restart Node.js Comamand Prompt, you will see following screen.
After restarting Node Command Prompt, change the directory to where you have extracted Ghost and type npm start to start Ghost blog.
Congratulations! You have installed Ghost successfully.
Keep in mind if you close Node.js Command Propmt or restart your PC, your Ghost blog won’t work. You will have to restart it via Node.js Command Prompt.
Now you know how to install Ghost, give it a try and share your experience in the comments.
Frequently Asked Questions (FAQs) about Installing Ghost on Windows
What are the prerequisites for installing Ghost on Windows?
Before you start the installation process, ensure that you have Node.js and Git installed on your Windows system. Node.js is a JavaScript runtime that Ghost runs on, while Git is a version control system that will help you manage and update your Ghost installation. You can download Node.js from the official website and Git from its official website. After downloading, follow the installation instructions provided on their respective websites.
How do I install Ghost-CLI on Windows?
Ghost-CLI is a command-line tool that helps you install and manage your Ghost site. To install Ghost-CLI, open your command prompt and type the following command: npm install ghost-cli@latest -g. This command installs the latest version of Ghost-CLI globally on your system. After the installation is complete, you can use the ghost command to manage your Ghost site.
How do I create a new Ghost site on my local machine?
To create a new Ghost site, navigate to the directory where you want to install your site using the command prompt. Then, type the following command: ghost install local. This command installs a local version of Ghost in the current directory. After the installation is complete, you can start your Ghost site by typing ghost start.
How do I update my Ghost site?
To update your Ghost site, navigate to your site’s directory using the command prompt. Then, type the following command: ghost update. This command updates your Ghost site to the latest version. Always ensure to backup your site before updating to prevent any data loss.
How do I troubleshoot installation errors?
If you encounter any errors during the installation process, you can use the ghost doctor command to diagnose the issue. This command checks your system for any potential issues that might prevent Ghost from installing or running correctly. If any issues are found, the ghost doctor command provides suggestions on how to fix them.
How do I uninstall Ghost from my system?
To uninstall Ghost, navigate to your site’s directory using the command prompt. Then, type the following command: ghost uninstall. This command removes Ghost from your system. Remember to backup your site before uninstalling to prevent any data loss.
How do I backup my Ghost site?
To backup your Ghost site, you need to export your site’s content and copy your site’s files. To export your site’s content, go to the Ghost admin panel, navigate to the “Labs” section, and click on the “Export” button. To copy your site’s files, navigate to your site’s directory and copy all the files.
How do I restore my Ghost site from a backup?
To restore your Ghost site from a backup, you need to import your site’s content and replace your site’s files with the backup files. To import your site’s content, go to the Ghost admin panel, navigate to the “Labs” section, and click on the “Import” button. To replace your site’s files, navigate to your site’s directory and replace the files with the backup files.
How do I customize my Ghost site?
To customize your Ghost site, you can use themes. Ghost supports a wide range of themes that you can use to change the look and feel of your site. To install a theme, download the theme, go to the Ghost admin panel, navigate to the “Design” section, and upload the theme.
How do I add users to my Ghost site?
To add users to your Ghost site, go to the Ghost admin panel, navigate to the “Staff” section, and click on the “Invite People” button. Then, enter the email address of the person you want to invite and select a role for them. The person will receive an email invitation to join your site.
 Tahir Taous
Tahir Taous is founder of Just Learn WordPress, a training site where you can learn how to create and manage websites with WordPress, WordPress essential training, theme development courses free video tutorials and articles.