I’m going to buck the trend and say that writing games for the iPad is easy and fun. The big touch screen, the beautiful display, and the accuracy of the touch sensors are just a few of the reasons why gaming on the iPad is so popular. Add in the accelerometer and wireless networking and you have one heck of a gaming machine.
In this article I’m going to use some of the very basic features of the iOS platform to create a simple 2D asteroids game that I’ll call ‘Padsteroids’. Through this tutorial you will learn a bunch of different skills that will help you in your own game development. These include:
- How to build an iOS application and navigate the Xcode IDE
- How to implement custom drawing in views: views are the basic building block of iOS controls, in this game we will build several views that draw graphics and respond to touch.
- Dynamically generating views: the asteroids in the game are created dynamically and randomly.
- Timer driven gameplay: in this example we will use a timer to move the ship and the asteroids around the screen.
- Graphics primitives, opacity, clipping, and gradients: we will use all of these through the course of the example.
And of course, all along you will be learning about iOS and the Objective-C programming language. So let’s dig right in.
Building the Application
Creating the iPad app starts with downloading the Xcode development environment from the Apple Developer site. If you don’t already have a developer account you are going to need to buy one which will set you back some money. Of course, if you develop a hit game it will all be worth it.
After a very lengthy download, installation and probably a restart of your computer it’s time to start building an application. The first thing you will see when you start up Xcode is the welcome dialog shown in Figure 1.

There is lots of good stuff in here to learn and explore. But for the purposes of this tutorial the thing to do is click on the ‘Create a new Xcode project’. This brings up the wizard shown in Figure 2.

In this wizard we want to select Application from the iOS section and View-Based Application from within that. The iPhone, iPad and iPod Touch are all iOS platforms. You can use Xcode to build applications for either iOS or Mac OS X, both of which share a lot of similarities. For now we want to build an iPad application so iOS it is.
If you are interested in building for Mac OS X you will be able to reuse a lot of the skills you will learn in this tutorial. The frameworks for the two platforms differ, but besides some different controls with different names the basic premise of the UI development is largely the same.
The next thing to do is click ‘Next’ and specify a name for the application as shown in Figure 3.

I recommend calling the application Padsteroids as it will help you follow along with the tutorial. You can give it whatever company identifier you please. But be sure to select iPad as the Device Family before clicking ‘Next’. If you select iPhone and then go back and add iPad functionality it can get a little bit complicated.
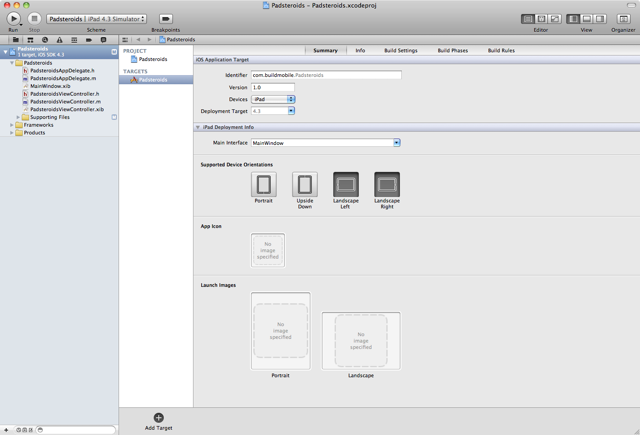
Clicking ‘Next’ will build the project and open up the IDE window as shown in Figure 4.

This is the window where you are going to be doing the bulk of your work, so get used to looking at it. The view here is of the ‘Target’ settings for the Padsteroids project. And there is a tweak we want to do here to the Supported Device Orientations as shown in Figure 5. This is telling iOS that the only orientations this application supports is landscape mode.
From here the next step is to launch the application for the first time just to make sure everything is hunky dory. We do that by pressing the ‘Run’ button at the top left of the window. This will bring up the emulator with one big white screen as shown in Figure 6.
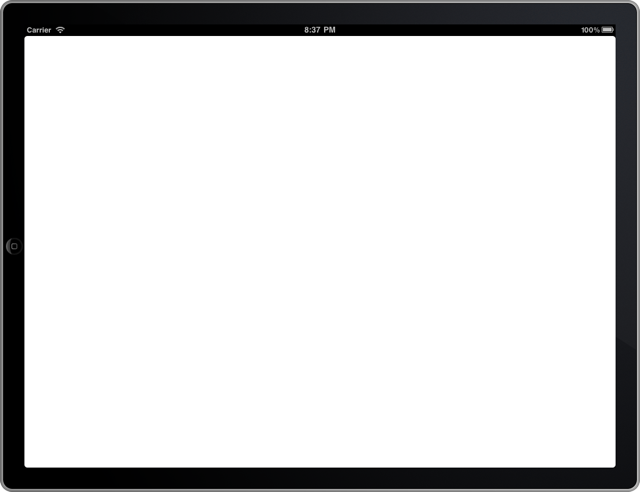
Awesome, everything looks great. At this point you could probably say you have made your first iPad application, if what you are building is a flashlight. But this is certainly not the end point for our little Padsteroids game. So the next thing to do is to build a view that will act as the game surface.
Building the Game Surface
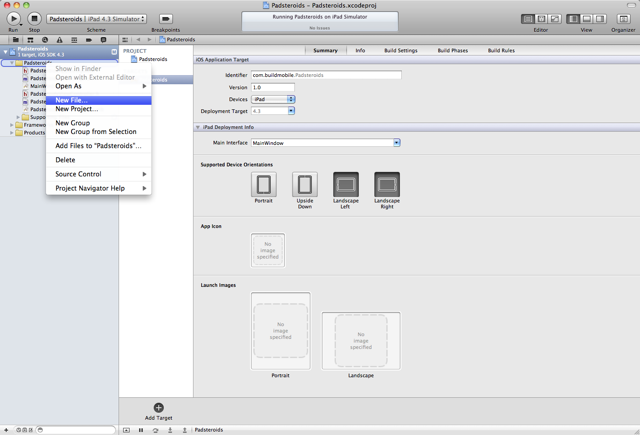
The game surface will hold the spaceship, the asteroids, and the controls that the player will use to steer the ship and shoot the laser. The game surface itself is a subclass of UIView. We create it by right clicking on the Padsteroids folder and selecting ‘New File’ as shown in Figure 7.
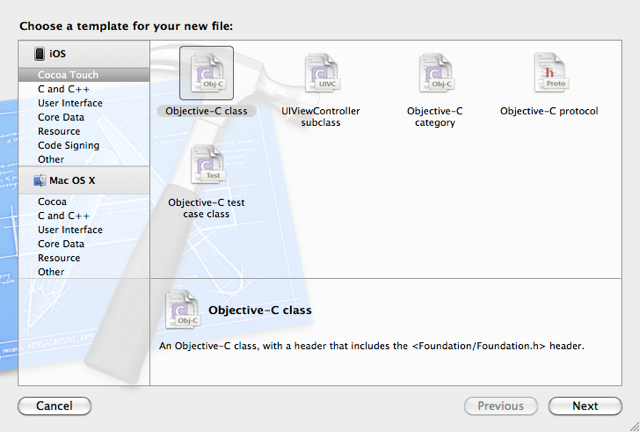
This will bring up a wizard where we can select Objective-C class as shown in Figure 8.
From there we press ‘Next’, and then specify that we want a subclass of UIView as you can see in Figure 9.
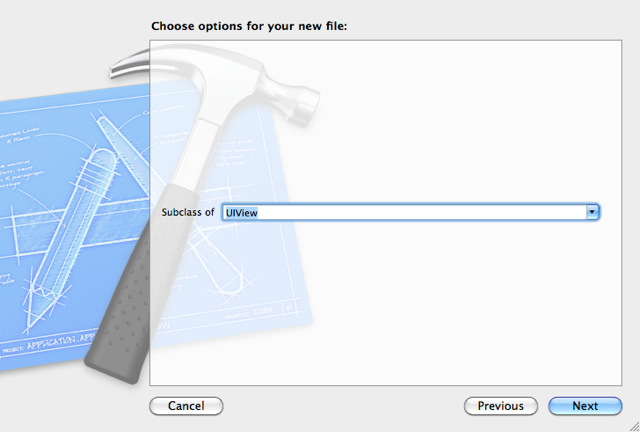
UIView is the default value, so we can probably just press ‘Next’. If it’s not the current value you can just start typing UIView and the text input will auto-complete after a few characters.
Once we have defined the type of class we want we then specify the name of the class as shown in Figure 10.

Name the class ‘GameSurface’ and press ‘Save’. The dialog will disappear and you will see two new files added to the project; ‘GameSurface.h’ and ‘GameSurface.m’ as you can see in Figure 11.
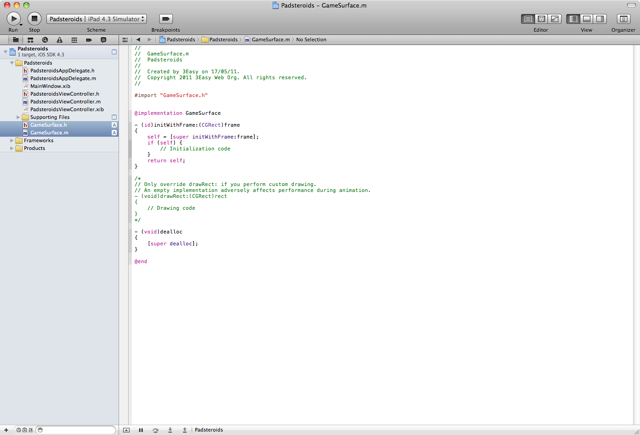
For the moment we are just going to let these files stand as they are. We will come back to them later and implement them with the drawing mechanics. As it stands we can now reference them when we are tweaking the ‘PadsteroidsViewController.xib’ file.
Adding the Game Surface to the View
XIB files are handy way of laying out controls for an iOS interface. They define the layout of a view, what controls are on it, how they are connected, their sizing parameters, colors, fonts, and all of that good stuff. By default the project creation wizard has created two XIB files. The ‘MainWindow.xib’ we can safely ignore as it’s just the container for the main view. It’s this second XIB called ‘PadsteroidsViewController.xib’ that we will modify over the next few steps.
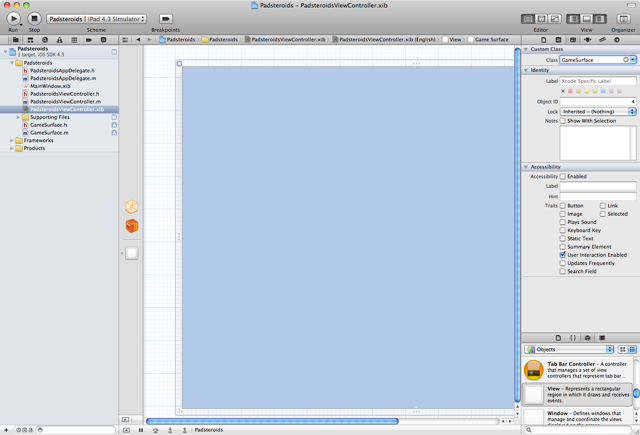
The first thing to do is open it and have a look as shown in Figure 12.
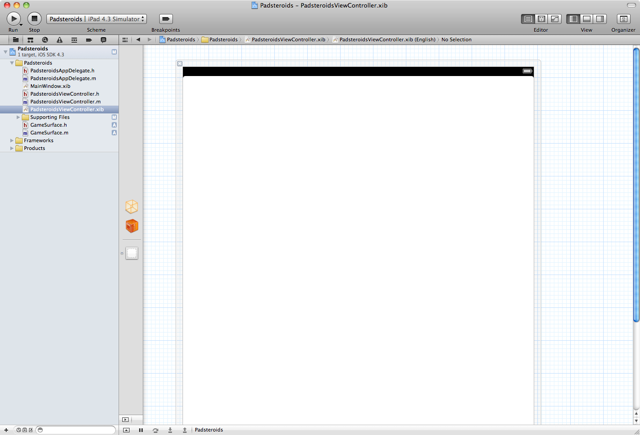
As you can see this brings up as second very thin column with reasonably large icons, showing the contents of the XIB file, then the layout area represented by a grid. Since we want to mess with the primary view let’s select that by clicking on the ‘View’ item.

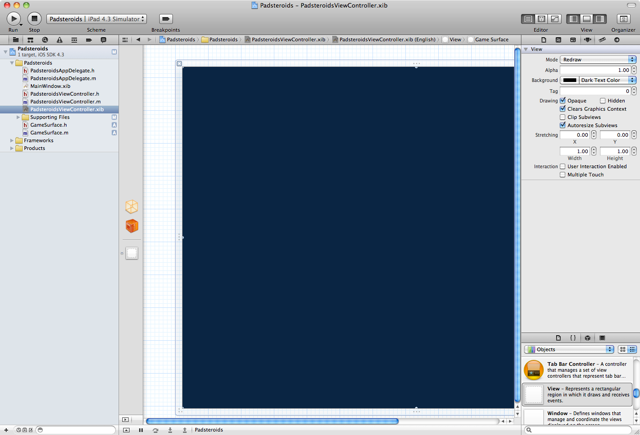
The display should be similar to Figure 13. We should also select the Attributes Inspector panel from the ‘View > Utilities’ menu. That brings up the panel on the right hand side, which has lots of controls for adjusting the colors, the interactivity and so on. The adjustments that need to be made are shown in Figure 14.
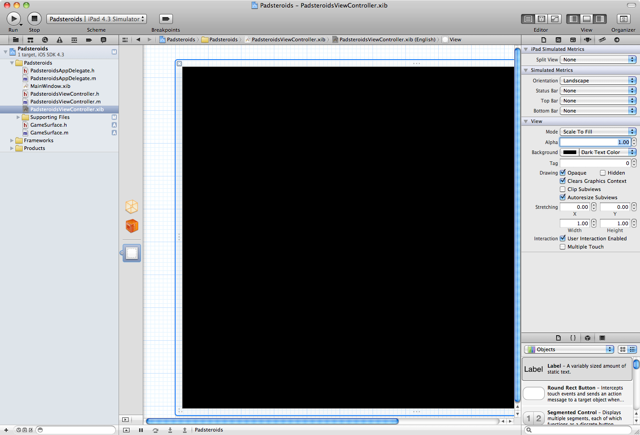
The background needs to be changed to ‘Dark Text Color’, ‘Orientation’ to ‘Landscape’ and ‘Status Bar’ to ‘None’. This will make the background black and orient it correctly. We also need to have a look at the sizing parameters by clicking on the Size Inspector icon or by using the ‘View > Utilities > Size Inspector’ menu. You can see the correct sizing selections shown in Figure 15.

View sizing is a really neat aspect of iOS interface layout. The two arrows in the middle are ‘springs’. If they are solid red it indicates that this view will grow or shrink horizontally and vertically was the parent view changes size. The I-bars around the box are ‘struts’. If these are solid then the view is locked to the corresponding side. If not then the view moves as the parent container resizes. The example area next to the editor shows a little movie of how the control will be have given the current settings.
The next thing to do is add the Game Surface view to the main view. Look towards the bottom of the panel to the Objects area. Scroll down until you find the View item as shown in Figure 16.

Now drag that off the panel and onto the main view. Try and move it so that the upper left is in the upper left corner of the parent as shown in Figure 17.

Don’t worry too much if you don’t get it exactly right. You can always tweak it in the Size Inspector. Now edit the Class attribute of the new View to read ‘GameSurface’ as shown in Figure 18. This is in the ‘Identity Inspector’ which you can bring up with the icons at the top of the column or the ‘View > Utilities > Size Inspector’ menu.
The input will auto-complete, so the moment you start typing ‘Game’ it will fill in the rest. Just press return when you have the right name to lock in the view type.
There are a few more tweaks to make. Go to the Attributes Inspector and set the ‘Mode’ to ‘Redraw’, and the ‘Background’ to ‘Dark Text Color’. Also make sure that ‘User Interaction’ is disabled. The user will be able to interact with the game, just not through touching on this view. There will be some controls that we add later.
The correct settings are shown in Figure 19.
Now head on over to the Size Inspector and make sure that the top left coordinates are 0 for X and 0 for Y, the width is 1024, and the height is 748. Also make sure all of the springs and struts are enabled as shown in Figure 20. These are the defaults, so you should be okay, but it’s worth double checking.

Now that we have a GameSurface to play on let’s start the application up again and see what we have. We should have a perfectly black screen as shown in Figure 21.

Up until this point it’s been point-and-click this and drag-and-drop that. Now the really fun part begins. We get to write some Objective-C code.
Coding the Game Surface
Now we get to start messing with the graphics stuff and programming in Objective-C. Open up the GameSurface.h file and add the member variables shown in Listing 1.
Listing 1. GameSurface.h
#import <UIKit/UIKit.h>

@interface GameSurface : UIView {
    CGPoint shipLocation;
    double shipDirection;
}

@end
The CGPoint structure maintains the position of the player’s spaceship. And the double value represents the direction the ship is facing.
Now to draw the ship go to the GameSurface.m file and make the modifications shown in Listing 2.
Listing 2. GameSurface.m
#import "GameSurface.h"

@implementation GameSurface

- (id)initWithFrame:(CGRect)frame
{
    self = [super initWithFrame:frame];
    if (self) {
        shipLocation.x = 0;
        shipLocation.y = 0;
        shipDirection = 0;
    }
    return self;
}

- (void)drawRect:(CGRect)rect
{
    CGContextRef context = UIGraphicsGetCurrentContext();
    CGContextSetFillColorWithColor(context, [UIColor redColor].CGColor);

    CGContextTranslateCTM( context, ( self.bounds.size.width / 2 ) + shipLocation.x, ( self.bounds.size.height / 2 ) + shipLocation.y );

    CGContextSaveGState(context);
    CGContextRotateCTM(context, shipDirection * 0.0174532925 );

    CGContextMoveToPoint(context, 0.0, -15.0);
    CGContextAddLineToPoint(context, 15.0, 30.0);
    CGContextAddLineToPoint(context, 0.0, 15.0);
    CGContextAddLineToPoint(context, -15.0, 30.0);
    CGContextAddLineToPoint(context, 0.0, -15.0);
    CGContextFillPath(context);

    CGContextRestoreGState(context);
}

- (void)dealloc
{
    [super dealloc];
}

@end
There are three methods here; initWithFrame, which is the constructor, drawRect, which does the drawing, and dealloc which is the destructor. The initWithFrame code simply sets the coordinates to 0, 0 which is the center of the screen. The ship coordinates are all relative to the center of the screen to keep it simple. And the ship starts point up at 0 degrees.
The drawRect method is where the fun really happens. All of the work is done through the Core Graphics library (CG). It starts by getting a context for the drawing. It then uses translations and rotations to move the center point to the middle of the screen and enable the rotation. Then the code draws the ship by creating a path using move-to and line-to functions. Finally it fills the path with a red fill color defined at the top of the function.
You can start to see in this code the nature of programming in Objective-C. The methods are all Objective-C syntax. But the Core Graphics invocations are all straight old fashioned C. Objective-C is built on C, so if you know C then all you need to learn is the funny square brackets invocation and class definition extensions to the language that add the objective functionality.
Is Objective-C easy or intuitive, not really. But after you get the hang of it you might even get to like it. And besides with Apple’s market share in the mobile space it makes zero sense not to learn the tools no matter how bizarre they seem at first glance.
So, what does the project look like at this point? Let’s fire it up and have a look. If everything works we should have something like the screen shot in Figure 22.

Sure, it’s not an amazing video game yet. But a step by step tutorial to get you to a video game will take a little bit of time.
What’s Been So Far And What’s Next
What we have learned so far is actually quite a bit. We have learned how to create an application, how to define new classes, how to use the Interface Builder, how to do some basic level Objective-C coding, and how to draw graphics onto views.
The next article in this Padsteroids series will start adding interactivity as well as adding additional views for the asteroids that will act as targets for your erstwhile space adventurers.
 Jack Herrington
Jack Herrington is an engineer, author, and presenter who lives and works in the San Francisco Bay Area. He lives with his wife, daughter and two adopted dogs. When he's not writing software, books, or articles you can find him cycling, running, or in the pool training for triathlons. You can keep up with Jack's work and his writing at http://jackherrington.com.