This article was peer reviewed by Marc Towler. Thanks to all of SitePoint’s peer reviewers for making SitePoint content the best it can be!
People like to take their mobile devices everywhere and use them constantly. Some apps take advantage of this and change their behaviour according to the users location and/or current activity to provide a better individualized service.
To get the user’s current location on Android, you can use the Location API that has been part of the Android framework since API level 1, or you can use the Google Location Services API, which is part of Google Play Services. The latter is the recommended method for accessing Android location.
The Google Location Services API, part of Google Play Services, provides a more powerful, high-level framework that automates tasks such as location provider choice and power management. Location Services provides new features such as activity detection that aren’t available in the framework API.
Developers using the framework API, as well as those now adding location-awareness to their apps, are strongly advised to use the Location Services API and this is what we will look at in this article. We will create different apps that show how to get a users current location, update it periodically and detecting the user’s current activity. For example, are they walking, running, on a bicycle, in a vehicle, etc.
Note: The device you use for testing during this tutorial must have support for Google Play Services. You should have a device that runs Android 2.3 or higher and includes the Google Play Store. If you are using an emulator, you need an emulator image with the Google APIs platform based on Android 4.2.2 or higher.
Getting the Last Known Location
The Google Play Services Location API can request the last known location of the user’s device, this is equivalent to the user’s current location.
To get the device’s last known location, use the FusedLocationProviderApi which allows you to specify requirements such as the location accuracy required. High accuracy means more battery power used.
Create a new Android project, name it Example01, set the Minimum SDK version to 2.3.3 (Gingerbread) and select Empty Activity on the next window, leave the default settings in the last window and click on Finish.
Note: I’m assuming that you are using Android Studio 1.4 or later, where the Activity templates have changed. The Blank Activity template in previous versions resulted in an app with an almost empty view, but it now includes a Floating Action Button. We’ll use the Empty Activity for our project, if you are using a previous version, then select Blank Activity.
Include the following dependency in the build.gradle (Module: app) file and sync the gradle files.
compile 'com.google.android.gms:play-services:8.1.0'To use location services, the app must request permission to do so. Android offers two location permissions: ACCESS_COARSE_LOCATION and ACCESS_FINE_LOCATION. The permission you choose determines the accuracy of the location returned by the API. Fine Location uses the device GPS, cellular data and WiFi to get the most accurate position but it costs battery life. Coarse Location uses the device cellular data and WiFi to get the location. It wont be as accurate as Fine but uses a lot less battery power, returning a location with an accuracy equivalent to a city block.
Add the following permission to the AndroidManifest.xml file as a child of the manifest tag.
<uses-permission android:name="android.permission.ACCESS_COARSE_LOCATION"/>Note: If you have used Google Play Services in an app before, you might be used to adding the following to the manifest file which sets the version number of Google Play Services your app uses.
<meta-data android:name="com.google.android.gms.version" android:value="@integer/google_play_services_version"/>As of version 7.0 of Google Play Services, if you are using Gradle, it’s included automatically..
We’ll be using the fused location provider to get the device’s location. This information will be presented as a Location object from which you can retrieve the latitude, longitude, timestamp, and other information such as bearing, altitude and velocity of a location.
The apps we’ll create, will display the raw latitude and longitude data of the retrieved Location. In a real app, you might use this information to, for instance, get the location Address, plot the location on a map, change the UI or fire a notification.
Let’s create the UI that will display the latitude and longitude values. Change activity_main.xml as shown.
<?xml version="1.0" encoding="utf-8"?>
<RelativeLayout
    xmlns:android="http://schemas.android.com/apk/res/android"
    xmlns:tools="http://schemas.android.com/tools"
    android:layout_width="match_parent"
    android:layout_height="match_parent"
    android:paddingLeft="@dimen/activity_horizontal_margin"
    android:paddingRight="@dimen/activity_horizontal_margin"
    android:paddingTop="@dimen/activity_vertical_margin"
    android:paddingBottom="@dimen/activity_vertical_margin"
    tools:context=".MainActivity">

    <TextView
        android:id="@+id/latitude"
        android:layout_width="wrap_content"
        android:layout_height="wrap_content"
        android:layout_alignParentLeft="true"
        android:layout_alignParentTop="true"
        android:text="Latitude:"
        android:textSize="18sp" />
    <TextView
        android:id="@+id/latitude_textview"
        android:layout_width="wrap_content"
        android:layout_height="wrap_content"
        android:layout_alignBaseline="@+id/latitude"
        android:layout_marginLeft="10dp"
        android:layout_toRightOf="@+id/latitude"
        android:textSize="16sp" />
    <TextView
        android:id="@+id/longitude"
        android:layout_width="wrap_content"
        android:layout_height="wrap_content"
        android:layout_alignParentLeft="true"
        android:layout_alignParentTop="true"
        android:text="Longitude:"
        android:layout_marginTop="24dp"
        android:textSize="18sp" />
    <TextView
        android:id="@+id/longitude_textview"
        android:layout_width="wrap_content"
        android:layout_height="wrap_content"
        android:layout_alignBaseline="@+id/longitude"
        android:layout_marginLeft="10dp"
        android:layout_toRightOf="@+id/longitude"
        android:textSize="16sp"/>

</RelativeLayout>
Add the following in MainActivity.java.
private static final String TAG = "MainActivity";
private TextView mLatitudeTextView;
private TextView mLongitudeTextView;
Instantiate the two TextViews by adding the following at the end of onCreate(Bundle).
mLatitudeTextView = (TextView) findViewById((R.id.latitude_textview));
mLongitudeTextView = (TextView) findViewById((R.id.longitude_textview));
When you want to connect to one of the Google APIs provided in the Google Play services library, you need to create an instance of GoogleApiClient. The Google API Client provides a common entry point to all Google Play services and manages the network connection between the user’s device and each Google service.
Before making the connection, you must always check for a compatible Google Play services APK. To do this either use the isGooglePlayServicesAvailable() method or attach a GoogleApiClient.OnConnectionFailedListener object to your client and implement its onConnectionFailed() callback method. We’ll use the latter approach.
If the connection fails due to a missing or out-of-date version of the Google Play APK, the callback receives an error code such as SERVICE_MISSING, SERVICE_VERSION_UPDATE_REQUIRED or SERVICE_DISABLED.
Change the class definition as shown.
public class MainActivity extends AppCompatActivity implements ConnectionCallbacks, OnConnectionFailedListenerAdd the necessary imports and implement the following methods from the two interfaces.
@Override
public void onConnected(Bundle bundle) {

}

@Override
public void onConnectionSuspended(int i) {

}

@Override
public void onConnectionFailed(ConnectionResult connectionResult) {

}
The ConnectionCallbacks interface provides callbacks that called when the client connects or disconnects from the service (onConnected() and onConnectionSuspended()) and the OnConnectionFailedListener interface provides callbacks for scenarios that result in a failed attempt to connect the client to the service (onConnectionFailed()).
Before any operation executes, the GoogleApiClient must connect using the connect() method. The client is not considered connected until the onConnected(Bundle) callback has been called.
When your app finishes using this client, call disconnect() to free up resources.
You should instantiate the client object in your Activity’s onCreate(Bundle) method and then call connect() in onStart() and disconnect() in onStop().
Add the following class variables that will hold the GoogleApiClient and Location objects.
private GoogleApiClient mGoogleApiClient;
private Location mLocation;
At the end of onCreate() method, create an instance of the Google API Client using GoogleApiClient.Builder. Use the builder to add the LocationServices API.
mGoogleApiClient = new GoogleApiClient.Builder(this)
            .addConnectionCallbacks(this)
            .addOnConnectionFailedListener(this)
            .addApi(LocationServices.API)
            .build();
Change the previously added callback methods as shown.
@Override
public void onConnected(Bundle bundle) {
mLocation = LocationServices.FusedLocationApi.getLastLocation(mGoogleApiClient);
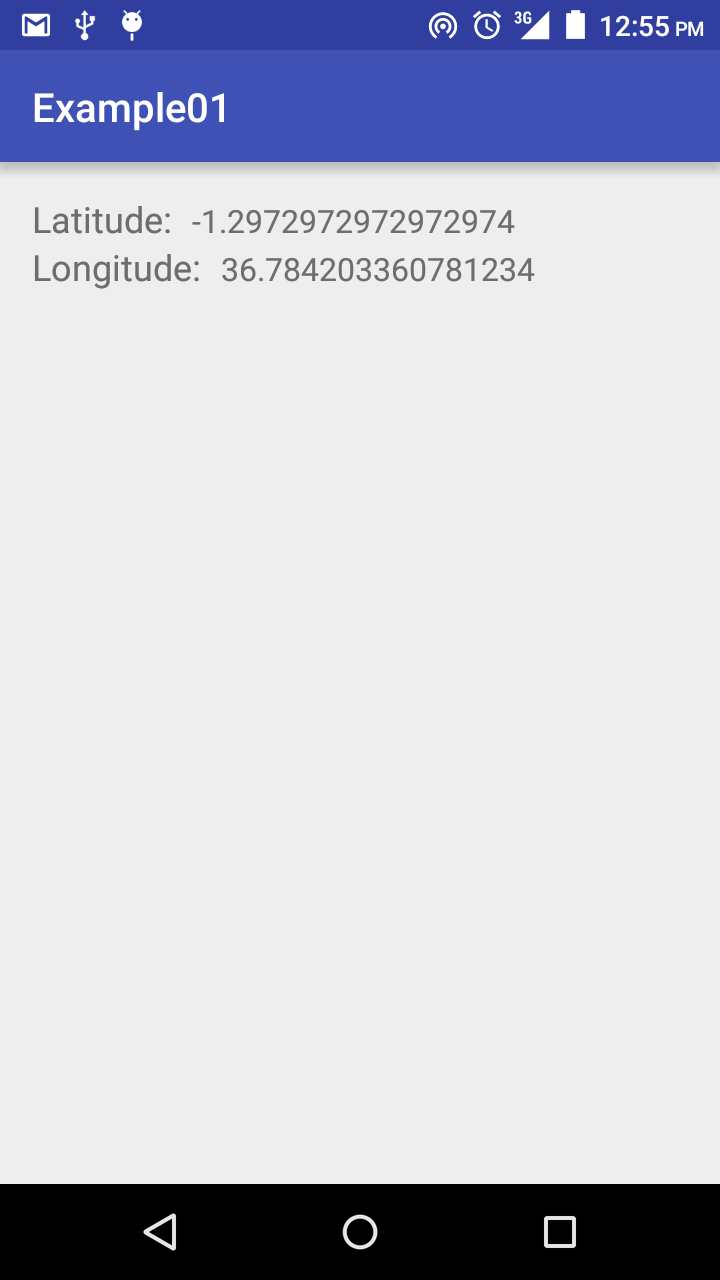
if (mLocation != null) {
mLatitudeTextView.setText(String.valueOf(mLocation.getLatitude()));
mLongitudeTextView.setText(String.valueOf(mLocation.getLongitude()));
} else {
Toast.makeText(this, "Location not Detected", Toast.LENGTH_SHORT).show();
}
}
@Override
public void onConnectionSuspended(int i) {
Log.i(TAG, "Connection Suspended");
mGoogleApiClient.connect();
}
@Override
public void onConnectionFailed(ConnectionResult connectionResult) {
Log.i(TAG, "Connection failed. Error: " + connectionResult.getErrorCode());
}In the onConnected() method, we get the Location object by calling getLastLocation() and then update the UI with the latitude and longitude values from the object. The Location object returned may in rare cases be null when the location is not available, so we check for this.
onConnectionSuspended() is called if the connection is lost for whatever reason and here we attempt to re-establish the connection. If the connection fails, onConnectionFailed() is called and we just log the error code. You can view the available error codes here.
Override the onStart() and onStop() methods as shown.
@Override
protected void onStart() {
    super.onStart();
    mGoogleApiClient.connect();
}

@Override
protected void onStop() {
    super.onStop();
    if (mGoogleApiClient.isConnected()) {
        mGoogleApiClient.disconnect();
    }
}
These start and disconnect the connection to the service when appropriate.
Run the app and you should see the latitude and longitude displayed.
You can download the completed Example01 project here.
Getting Periodic Location Updates
Some apps, for example fitness or navigation apps, might need to continuously track location data. While you can get a device’s location with getLastLocation(), a more direct approach is to request periodic updates from the fused location provider. The API will then update your app periodically with the best available location, based on the currently-available location providers such as WiFi and GPS. The accuracy of the location is determined by the providers, the location permissions you’ve requested, and the options you set in the location request.
Create another project with similar settings to the last projects and name it Example02.
Add the play services dependency to the build.gradle(Module: app) file.
compile 'com.google.android.gms:play-services:8.1.0'Add the permission to the manifest file.
<uses-permission android:name="android.permission.ACCESS_FINE_LOCATION"/>Change activity_main.xml as below.
<?xml version="1.0" encoding="utf-8"?>
<RelativeLayout
    xmlns:android="http://schemas.android.com/apk/res/android"
    xmlns:tools="http://schemas.android.com/tools"
    android:layout_width="match_parent"
    android:layout_height="match_parent"
    android:paddingLeft="@dimen/activity_horizontal_margin"
    android:paddingRight="@dimen/activity_horizontal_margin"
    android:paddingTop="@dimen/activity_vertical_margin"
    android:paddingBottom="@dimen/activity_vertical_margin"
    tools:context=".MainActivity">

    <TextView
        android:id="@+id/latitude"
        android:layout_width="wrap_content"
        android:layout_height="wrap_content"
        android:layout_alignParentLeft="true"
        android:layout_alignParentTop="true"
        android:text="Latitude:"
        android:textSize="18sp" />
    <TextView
        android:id="@+id/latitude_textview"
        android:layout_width="wrap_content"
        android:layout_height="wrap_content"
        android:layout_alignBaseline="@+id/latitude"
        android:layout_marginLeft="10dp"
        android:layout_toRightOf="@+id/latitude"
        android:textSize="16sp" />
    <TextView
        android:id="@+id/longitude"
        android:layout_width="wrap_content"
        android:layout_height="wrap_content"
        android:layout_alignParentLeft="true"
        android:layout_alignParentTop="true"
        android:text="Longitude:"
        android:layout_marginTop="24dp"
        android:textSize="18sp" />
    <TextView
        android:id="@+id/longitude_textview"
        android:layout_width="wrap_content"
        android:layout_height="wrap_content"
        android:layout_alignBaseline="@+id/longitude"
        android:layout_marginLeft="10dp"
        android:layout_toRightOf="@+id/longitude"
        android:textSize="16sp"/>

</RelativeLayout>
Change the class definition of MainActivity.
public class MainActivity extends AppCompatActivity implements ConnectionCallbacks, OnConnectionFailedListener, LocationListenerMake the necessary imports. For the LocationListener import import com.google.android.gms.location.LocationListener and not the other suggested import.
LocationListener is used for receiving notifications from the FusedLocationProviderApi when the location has changed.
Implement the methods from the three interfaces.
@Override
public void onConnected(Bundle bundle) {

}

@Override
public void onConnectionSuspended(int i) {

}

@Override
public void onLocationChanged(Location location) {

}

@Override
public void onConnectionFailed(ConnectionResult connectionResult) {

}
The onLocationChanged() method is called when the location changes.
Add the following class variables.
private static final String TAG = "MainActivity";
private GoogleApiClient mGoogleApiClient;
private LocationRequest mLocationRequest;
private String mLastUpdateTime;
private TextView mLatitudeTextView;
private TextView mLongitudeTextView;
LocationRequest is a data object that contains quality of service parameters for requests to the FusedLocationProviderApi. We’ll see its use soon.
Change onCreate() as shown below to override the onStart() and onPause() methods.
@Override
protected void onCreate(Bundle savedInstanceState) {
    super.onCreate(savedInstanceState);
    setContentView(R.layout.activity_main);

    mLatitudeTextView = (TextView) findViewById((R.id.latitude_textview));
    mLongitudeTextView = (TextView) findViewById((R.id.longitude_textview));

    mGoogleApiClient = new GoogleApiClient.Builder(this)
            .addConnectionCallbacks(this)
            .addOnConnectionFailedListener(this)
            .addApi(LocationServices.API)
            .build();
}

@Override
protected void onStart() {
    super.onStart();
    mGoogleApiClient.connect();
}
@Override
protected void onStop() {
    super.onStop();
    if (mGoogleApiClient.isConnected()) {
        mGoogleApiClient.disconnect();
    }
}
This is similar to what we did in the previous example, so there is no need for explanation.
Change the previously implemented interface methods as below.
@Override
public void onConnected(Bundle bundle) {
mLocationRequest = LocationRequest.create();
mLocationRequest.setPriority(LocationRequest.PRIORITY_HIGH_ACCURACY);
mLocationRequest.setInterval(5000);
mLocationRequest.setFastestInterval(3000);
LocationServices.FusedLocationApi.requestLocationUpdates(mGoogleApiClient, mLocationRequest, this);
}
@Override
public void onConnectionSuspended(int i) {
Log.i(TAG, "Connection Suspended");
mGoogleApiClient.connect();
}
@Override
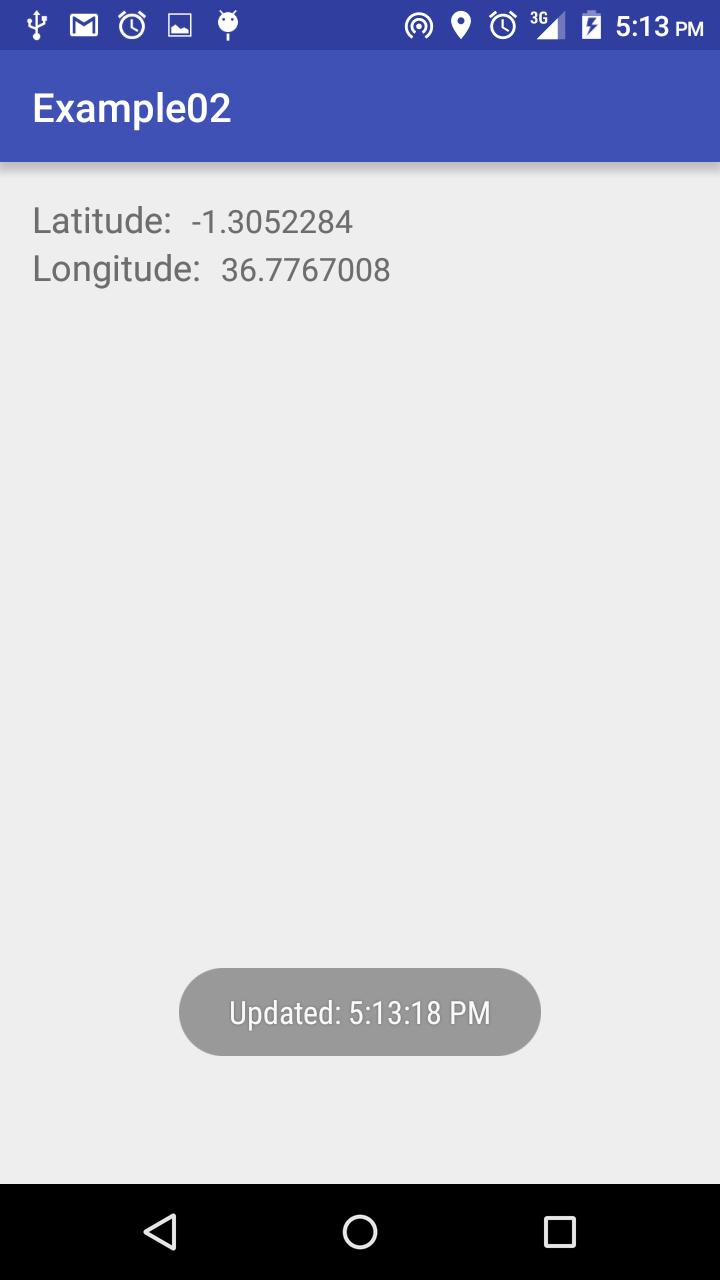
public void onLocationChanged(Location location) {
mLastUpdateTime = DateFormat.getTimeInstance().format(new Date());
mLatitudeTextView.setText(String.valueOf(location.getLatitude()));
mLongitudeTextView.setText(String.valueOf(location.getLongitude()));
Toast.makeText(this, "Updated: " + mLastUpdateTime, Toast.LENGTH_SHORT).show();
}
@Override
public void onConnectionFailed(ConnectionResult connectionResult) {
Log.i(TAG, "Connection failed. Error: " + connectionResult.getErrorCode());
}In onConnected() we create the LocationRequest object which stores parameters for requests to the fused location provider. The parameters determine the levels of accuracy requested. To find out about all the options available in the location request, see the LocationRequest class reference. In our example, we set the priority, update interval and the fastest update interval.
setPriority() sets the priority of the request, which gives the Google Play services location services a strong hint about which location sources to use. The following values are supported:
PRIORITY_BALANCED_POWER_ACCURACY: Use this setting to request location precision to within a city block, which is an accuracy of approximately 100 meters. This is considered a coarse level of accuracy, and is likely to consume less power. With this setting, the location services will probably use WiFi and cell tower positioning. Note that the choice of location provider depends on other factors, such as which sources are available.PRIORITY_HIGH_ACCURACY: Use this setting to request the most precise location possible. With this setting, the location services are more likely to use GPS to determine the location.PRIORITY_LOW_POWER: Use this setting to request city-level precision, which is an accuracy of approximately 10 kilometers. This is considered a coarse level of accuracy, and is likely to consume less power.PRIORITY_NO_POWER: Use this setting if you need negligible impact on power consumption but want to receive location updates when available. With this setting, your app does not trigger any location updates, but receives locations triggered by other apps.
The setInterval() method sets the desired interval in milliseconds for active location updates. This interval is inexact. You may not receive updates at all if no location sources are available, or you may receive them slower than requested. You may receive updates faster than requested if other applications are requesting locations at a faster interval.
The setFastestInterval() method sets the fastest rate for active location updates. This interval is exact, and your application will never receive updates faster than this value. You need to set this rate because other apps will affect the rate at which updates are sent. The Google Play services location APIs send out updates at the fastest rate that any app has requested with setInterval(). If this rate is faster than your app can handle, you may encounter problems with UI flicker or data overflow. To prevent this, you set an upper limit to the update rate.
With the location request set up, we call requestLocationUpdates() to start the regular updates.
The onLocationChanged() method is called with the updated location. Here, we update the UI with the location information. We also set off a Toast message showing the time of update.
Run the app and you should see the updating location data if you move far enough for the readings to change.
The completed Example02 project can be downloaded here.
Activity Recognition
Other than detecting the location of your Android device, the Google Location Services API can also be used to detect the activities that the device, and thus the user, might be undertaking. It can detect activities such as the user being on foot, in a vehicle, on a bicycle or still. It doesn’t give definite data, just the probability of the possibility that an activity is happening. It’s up to the programmer to read this data and decide what to do with it.
To get started, create a new project named Example03 with the same settings as the previous two projects.
Include the dependency in build.gradle (Module: app) file and sync the gradle files.
compile 'com.google.android.gms:play-services:8.1.0'In the manifest file, include the following activity recognition permission as a child of the manifest tag.
<uses-permission android:name="com.google.android.gms.permission.ACTIVITY_RECOGNITION" />Change activity_main.xml as below.
<?xml version="1.0" encoding="utf-8"?>
<LinearLayout
xmlns:android="http://schemas.android.com/apk/res/android"
xmlns:tools="http://schemas.android.com/tools"
android:layout_width="match_parent"
android:layout_height="match_parent"
android:paddingLeft="@dimen/activity_horizontal_margin"
android:paddingRight="@dimen/activity_horizontal_margin"
android:paddingTop="@dimen/activity_vertical_margin"
android:paddingBottom="@dimen/activity_vertical_margin"
android:orientation="vertical"
tools:context=".MainActivity">
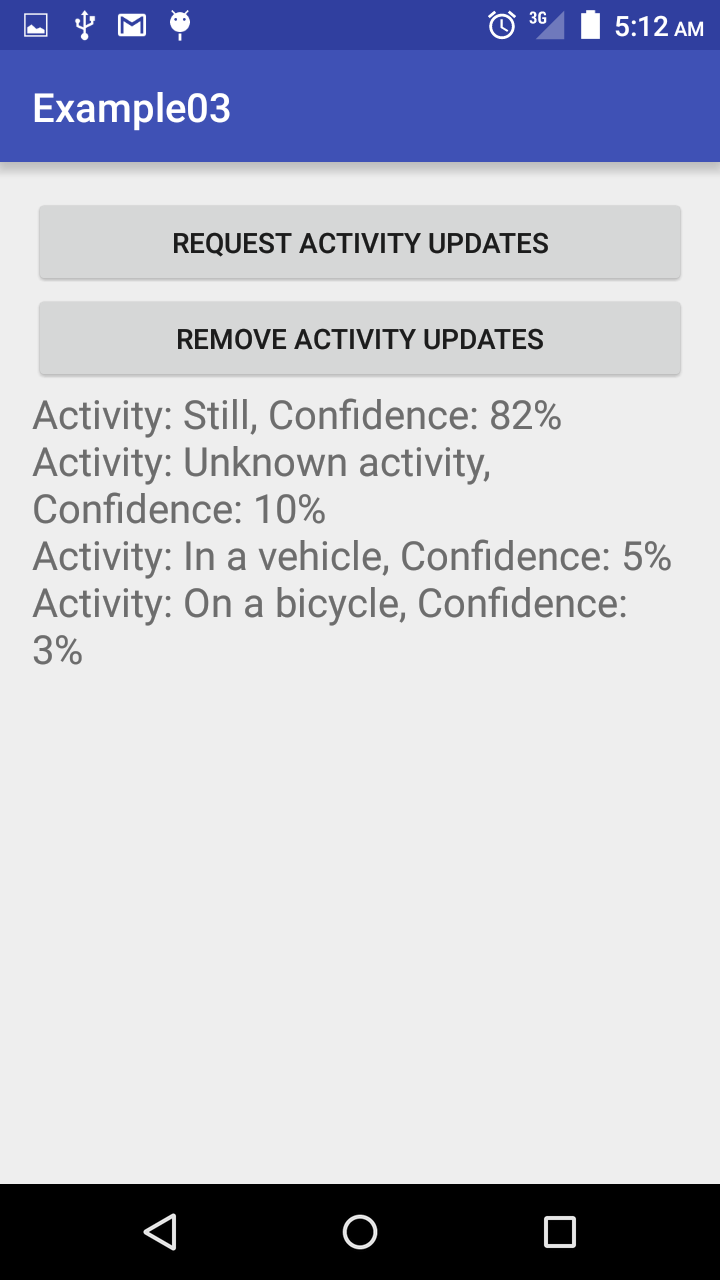
<Button
android:id="@+id/request_updates_button"
android:layout_width="match_parent"
android:layout_height="wrap_content"
android:onClick="requestActivityUpdates"
android:text="Request Activity Updates" />
<Button
android:id="@+id/remove_updates_button"
android:layout_width="match_parent"
android:layout_height="wrap_content"
android:onClick="removeActivityUpdates"
android:text="Remove Activity Updates" />
<TextView
android:id="@+id/detected_activities_textview"
android:layout_width="match_parent"
android:layout_height="wrap_content"
android:textSize="20sp"/>
</LinearLayout>Usually, applications that make use of Activity Recognition monitor activities in the background and perform an action when a specific activity is detected. To do this without needing a service that is always running in the background consuming resources, detected activities are delivered via an Intent. The application specifies a PendingIntent callback (typically an IntentService) which will be called with an intent when activities are detected. The intent recipient can extract the ActivityRecognitionResult using extractResult(android.content.Intent).
Before the IntentService class, create a class called Constants and change it as shown. It will hold some constant values we’ll use later.
package com.echessa.example03; // Change as appropriate

/**
 * Created by echessa on 10/14/15.
 */
public class Constants {

    private Constants(){

    }

    public static final String PACKAGE_NAME = "com.echessa.activityexample"; // Change as appropriate

    public static final String STRING_ACTION = PACKAGE_NAME + ".STRING_ACTION";

    public static final String STRING_EXTRA = PACKAGE_NAME + ".STRING_EXTRA";

}
Next we create an IntentService. Create a class called ActivitiesIntentService and make it extend IntentService. Change the contents as shown.
package com.echessa.example03; // Change as appropriate

import android.app.IntentService;
import android.content.Intent;
import android.support.v4.content.LocalBroadcastManager;

import com.google.android.gms.location.ActivityRecognitionResult;
import com.google.android.gms.location.DetectedActivity;

import java.util.ArrayList;

/**
 * Created by echessa on 10/14/15.
 */
public class ActivitiesIntentService extends IntentService {

    private static final String TAG = "ActivitiesIntentService";

    public ActivitiesIntentService() {
        super(TAG);
    }

    @Override
    protected void onHandleIntent(Intent intent) {
        ActivityRecognitionResult result = ActivityRecognitionResult.extractResult(intent);
        Intent i = new Intent(Constants.STRING_ACTION);

        ArrayList<DetectedActivity> detectedActivities = (ArrayList) result.getProbableActivities();

        i.putExtra(Constants.STRING_EXTRA, detectedActivities);
        LocalBroadcastManager.getInstance(this).sendBroadcast(i);
    }
}
In the above class, the constructor is required. It calls the super IntentService(String) constructor with the name of a worker thread.
In onHandleIntent(), we get the ActivityRecognitionResult from the Intent by using extractResult(). We then use this result to get an array list of DetectedActivity objects. Each activity is associated with a confidence level, which is an int between 0 and 100. Then we create a new Intent on which we are going to send the detected activities. Finally we broadcast the Intent so that it can be picked up.
Paste the following into the manifest file so that the Android system knows about the service. It should be a child of the application tag.
<service
        android:name=".ActivitiesIntentService"
        android:exported="false" />
In MainActivity implement the ConnectionCallbacks and OnConnectionFailedListener interfaces.
public class MainActivity extends AppCompatActivity implements ConnectionCallbacks, OnConnectionFailedListenerMake the necessary imports and implement their methods.
@Override
public void onConnected(Bundle bundle) {
    Log.i(TAG, "Connected");
}

@Override
public void onConnectionSuspended(int i) {
    Log.i(TAG, "Connection suspended");
    mGoogleApiClient.connect();
}

@Override
public void onConnectionFailed(ConnectionResult connectionResult) {
    Log.i(TAG, "Connection failed. Error: " + connectionResult.getErrorCode());
}
You will see an error as we haven’t created the mGoogleApiClient variable yet.
Add the following variables to MainActivity.
private static final String TAG = "MainActivity";
private GoogleApiClient mGoogleApiClient;
private TextView mDetectedActivityTextView;
Paste the following at the end of onCreate().
mDetectedActivityTextView = (TextView) findViewById(R.id.detected_activities_textview);

mGoogleApiClient = new GoogleApiClient.Builder(this)
            .addConnectionCallbacks(this)
            .addOnConnectionFailedListener(this)
            .addApi(ActivityRecognition.API)
            .build();
Note that we add the ActivityRecognition.API when creating the Google Api Client and not the location API as we did in the previous examples.
Include the onStart() and onStop() methods to connect and disconnect the client.
@Override
protected void onStart() {
    super.onStart();
    mGoogleApiClient.connect();
}

@Override
protected void onStop() {
    super.onStop();
    if (mGoogleApiClient.isConnected()) {
        mGoogleApiClient.disconnect();
    }
}
In the ActivitiesIntentService class, we broadcast an Intent that has an array of detected activities and we need a receiver class to receive this. Before we create that, Include the following strings in the strings.xml. file.
<string name="in_vehicle">In a vehicle</string>
<string name="on_bicycle">On a bicycle</string>
<string name="on_foot">On foot</string>
<string name="running">Running</string>
<string name="walking">Walking</string>
<string name="still">Still</string>
<string name="tilting">Tilting</string>
<string name="unknown">Unknown activity</string>
<string name="unidentifiable_activity">Unidentifiable activity: %1$d</string>
In MainActivity, add the following method which we’ll use later in our BroadcastReciever. This takes the code for the detected activity type and returns a relevant string related to the activity.
public String getDetectedActivity(int detectedActivityType) {
    Resources resources = this.getResources();
    switch(detectedActivityType) {
        case DetectedActivity.IN_VEHICLE:
            return resources.getString(R.string.in_vehicle);
        case DetectedActivity.ON_BICYCLE:
            return resources.getString(R.string.on_bicycle);
        case DetectedActivity.ON_FOOT:
            return resources.getString(R.string.on_foot);
        case DetectedActivity.RUNNING:
            return resources.getString(R.string.running);
        case DetectedActivity.WALKING:
            return resources.getString(R.string.walking);
        case DetectedActivity.STILL:
            return resources.getString(R.string.still);
        case DetectedActivity.TILTING:
            return resources.getString(R.string.tilting);
        case DetectedActivity.UNKNOWN:
            return resources.getString(R.string.unknown);
        default:
            return resources.getString(R.string.unidentifiable_activity, detectedActivityType);
    }
}
Add the following subclass to MainActivity that extends BroadcastReceiver.
public class ActivityDetectionBroadcastReceiver extends BroadcastReceiver {

    @Override
    public void onReceive(Context context, Intent intent) {
        ArrayList<DetectedActivity> detectedActivities = intent.getParcelableArrayListExtra(Constants.STRING_EXTRA);
        String activityString = "";
        for(DetectedActivity activity: detectedActivities){
            activityString +=  "Activity: " + getDetectedActivity(activity.getType()) + ", Confidence: " + activity.getConfidence() + "%\n";
        }
        mDetectedActivityTextView.setText(activityString);
    }
}
Above, we get the array of detected activities and iterate through them getting the type and confidence of each. We then append this to a string and update the UI with the string.
In MainActivity add the following variable.
private ActivityDetectionBroadcastReceiver mBroadcastReceiver;Then instantiate it in onCreate() after the statement that instantiates mDetectedActivityTextView
mBroadcastReceiver = new ActivityDetectionBroadcastReceiver();Add the following methods to MainActivity.
public void requestActivityUpdates(View view) {
    if (!mGoogleApiClient.isConnected()) {
        Toast.makeText(this, "GoogleApiClient not yet connected", Toast.LENGTH_SHORT).show();
    } else {
        ActivityRecognition.ActivityRecognitionApi.requestActivityUpdates(mGoogleApiClient, 0, getActivityDetectionPendingIntent()).setResultCallback(this);
    }
}

public void removeActivityUpdates(View view) {
    ActivityRecognition.ActivityRecognitionApi.removeActivityUpdates(mGoogleApiClient, getActivityDetectionPendingIntent()).setResultCallback(this);
}

private PendingIntent getActivityDetectionPendingIntent() {
    Intent intent = new Intent(this, ActivitiesIntentService.class);

    return PendingIntent.getService(this, 0, intent, PendingIntent.FLAG_UPDATE_CURRENT);
}
Then change the class definition to implement ResultCallback since in the code above we set the result callback to this.
public class MainActivity extends AppCompatActivity implements ConnectionCallbacks, OnConnectionFailedListener, ResultCallback<Status>The first method above uses requestActivityUpdates() to register for activity recognition updates, while the second unregisters. The activities are detected by periodically waking up the device and reading short bursts of sensor data. It makes use of low power sensors to keep the power usage to a minimum. The activity detection update interval can be controlled with the second parameter. Larger values will result in fewer activity detections while improving battery life. Smaller values will result in more frequent activity detections but will consume more power since the device must be woken more frequently. Activities may arrive several seconds after the requested interval if the activity detection service requires more samples to make a more accurate prediction.
Implement the following ResultCallback method which takes the status and logs out different messages depending on it.
public void onResult(Status status) {
    if (status.isSuccess()) {
        Log.e(TAG, "Successfully added activity detection.");

    } else {
        Log.e(TAG, "Error: " + status.getStatusMessage());
    }
}
Add the following to MainActivity.
@Override
protected void onResume() {
    super.onResume();
    LocalBroadcastManager.getInstance(this).registerReceiver(mBroadcastReceiver, new IntentFilter(Constants.STRING_ACTION));
}

@Override
protected void onPause() {
    LocalBroadcastManager.getInstance(this).unregisterReceiver(mBroadcastReceiver);
    super.onPause();
}
This registers and unregisters the broadcast receiver when the activity resumes and pauses respectively.
Run the app, and on pressing the Request Activity Updates button, you should start getting activity updates. You might need to wait a few seconds for the updates to start showing.
The completed Example03 project can be downloaded here.
Conclusion
We have not exhausted all the capabilities of the Google Play Services Location APIs, there are some topics we haven’t covered such as Geofencing, getting the address of the Location and mapping the Location on a map. We’ll look into the topic in the Maps article that will be part of this Google Play Services series.
Please let me know if you have any questions or comments below.
Frequently Asked Questions (FAQs) about Google Play Services Location and Activity Recognition
What is Google Play Services Location and Activity Recognition?
Google Play Services Location and Activity Recognition is a set of APIs provided by Google that allows developers to add location awareness and activity recognition features to their Android applications. These APIs provide a way for applications to obtain the device’s current location, track its movement, and even determine the type of physical activity the user is performing, such as walking, running, or driving. This can be used to provide personalized experiences based on the user’s location and activity.
How do I set up Google Play Services Location and Activity Recognition in my Android application?
To set up Google Play Services Location and Activity Recognition in your Android application, you first need to add the necessary dependencies to your project. You can do this by adding the following line to your app’s build.gradle file:implementation 'com.google.android.gms:play-services-location:18.0.0'
After adding the dependency, you can start using the APIs in your application. For example, to get the device’s current location, you can use the FusedLocationProviderClient class.
How do I migrate from the old Location API to the new one?
Google provides a detailed guide on how to migrate from the old Location API to the new one. The main steps involve replacing the old API classes with the new ones, and updating your code to use the new API methods. For example, the old LocationClient class is replaced with the new FusedLocationProviderClient class.
What are the benefits of using Google Play Services Location and Activity Recognition?
Using Google Play Services Location and Activity Recognition provides several benefits. First, it simplifies the process of adding location awareness and activity recognition features to your application. Second, it provides a high level of accuracy in determining the device’s location and the user’s activity. Third, it allows you to provide personalized experiences to your users based on their location and activity.
How do I handle location permissions in my application?
Handling location permissions in your application is crucial for respecting user privacy. You need to request the necessary permissions from the user before you can access their location. This can be done using the ActivityCompat.requestPermissions method. You also need to handle the case where the user denies the permission request.
How do I test my application’s location and activity recognition features?
You can test your application’s location and activity recognition features using the Android Emulator. The emulator allows you to simulate different locations and activities, which can be useful for testing your application’s behavior in different scenarios.
How do I handle location updates in my application?
Handling location updates in your application involves setting up a LocationCallback that gets called whenever the device’s location changes. You can set up the callback using the FusedLocationProviderClient.requestLocationUpdates method.
How do I determine the user’s current activity?
You can determine the user’s current activity using the ActivityRecognitionClient class. This class provides a method called requestActivityUpdates that allows you to receive updates about the user’s activity.
What are the limitations of Google Play Services Location and Activity Recognition?
While Google Play Services Location and Activity Recognition provides a powerful set of features, it does have some limitations. For example, it requires the device to have Google Play Services installed, which may not be the case on some devices. Additionally, the accuracy of the location and activity recognition can be affected by various factors, such as the device’s hardware and the user’s environment.
How do I troubleshoot issues with Google Play Services Location and Activity Recognition?
Troubleshooting issues with Google Play Services Location and Activity Recognition can involve several steps, depending on the nature of the issue. Some common troubleshooting steps include checking the device’s location settings, ensuring that the necessary permissions are granted, and checking the device’s Google Play Services version.
 Joyce Echessa
I am a web developer who dabbles in mobile development from time to time. You can find me on Twitter @joyceechessa to see what I’m up to.