- Why Use the WordPress Filesystem API?
- How Does the Filesystem API work?
- Creating Our Plugin Files and Directory
- Creating an Admin Page
- Writing to a File
- Reading a File
- Other Methods of the $wp_filesystem Object
- Storing Credentials Permanently
- Conclusion
- Frequently Asked Questions (FAQs) about WordPress Filesystem API
Writing to local files is one of the functionalities many plugins and themes need for various purposes. Security is the most important issue plugins and themes have to take care of while writing to local file systems. WordPress runs across various hosting services and configurations, therefore it becomes difficult for developers to create plugins and themes which access local file systems to work across all different kinds of environments without compromising security.
In this tutorial, we’ll learn how to use the WordPress Filesystem API to access local file systems which takes care of proper file permissions. In the process, we’ll create a plugin which displays a form with a textarea in an admin page that saves the content of the textarea to a file.
Why Use the WordPress Filesystem API?
You might be wondering why we don’t just use PHP’s file system functions to read and write local files instead of learning and using a whole new set of APIs?
The issue of using PHP file system APIs is that it doesn’t take care of file permissions automatically. Suppose you’re using a shared hosting service to host your WordPress site and your hosting web server is running as the “admin” operating system account. Whenever you create files using PHP, they’re owned as the “admin” user. Therefore, any other website hosted in the same shared hosting can also access your website files as they’re also running as the “admin” user, posing a security issue to your site. To protect us from this issue, you need to change the file owner and permissions manually using PHP.
But when you login using SSH or FTP/SFTP to create files then they are owned by the operating system user account that you are logged in as. If the FTP server is running as the “admin” user and you’re logged in as the “narayanprusty” user, then newly created files will have an owner as “narayanprusty”, not “admin”.
WordPress introduced the Filesystem API which can automatically takes care of file permissions. The Filesystem API was released in WordPress 2.6. WordPress actually released it to support its plugin, theme and core update system, but later on plugins and themes starting using it for their own purposes.
How Does the Filesystem API work?
The Filesystem API can write to file systems using system calls (i.e. direct, ftp, ftp socket or ssh2). It chooses one of the methods based on whichever method creates files with proper file permissions and which PHP extension is available. The Filesystem API first checks the direct method, then ftp and finally ssh2.
While using FTP or SSH, you’ll need to get the credentials from your user. The Filesystem API provides function makes it easier to display a form to take credentials and store them.
Creating Our Plugin Files and Directory
Now let’s create our plugin which displays a textarea in a page, where submitting the form saves the contents of the textarea to a local file.
Here’s the directory structure of our plugin:
--filesystem
	--filesystem.php
	--filesystem-demo
		--demo.txt
Create these files and directories in the wp-content/plugins directory of your WordPress installation.
To make the plugin installable, put this code in the filesystem.php file:
<?php

/*
Plugin Name: Filesystem API
Plugin URI: http://www.sitepoint.com
Description: A sample plugin to demonstrate Filesystem API
Version: 1.0
Author: Narayan Prusty
*/
Now visit your admin panel and install the plugin.
Creating an Admin Page
Next we need a page in our admin where our example will reside. Here’s the code to create this page and display the textarea. Just place this code in the filesystem.php file:
function menu_item()
{
  add_submenu_page("options-general.php", "Demo", "Demo", "manage_options", "demo", "demo_page");
}

add_action("admin_menu", "menu_item");

function demo_page()
{
  ?>
      <div class="wrap">
         <h1>Demo</h1>
         <form method="post">
          <?php
            $output = "";

            if(isset($_POST["file-data"]))
            {
              $output = write_file_demo($_POST["file-data"]);
            }
            else
            {
              $output = read_file_demo();
            }

            if(!is_wp_error($output))
            {
            	?>
            		<textarea name="file-data"><?php echo $output; ?></textarea>
		          	<?php wp_nonce_field("filesystem-nonce"); ?>
		          	<br>
		          	<input type="submit">
            	<?php
            }
            else
            {
              echo $output->get_error_message();
            }
          ?>
         </form>
      </div>
   <?php
}
Here’s how the code works:
- First we added a page to the “Settings” menu.
demo_pageis the callback for displaying the page content. - Inside the page we’re displaying a HTML form with a textarea and nonce field. There’s also a submit button to submit the form. The textarea name is
file-data. The nonce is added to prevent a CSRF attack. - When the page is open, then we’re retrieving the stored file data using the
read_file_demofunction. When the form is submitted, we’re storing the content of the textarea into a file using thewrite_file_demofunction. - If
read_file_demoorwrite_file_demoreturns an instance of theWP_Errorobject, then we’ll display an error message instead.
Note, the above code will break your WordPress site, as we haven’t yet created the read_file_demo and write_file_demo functions. Let’s create them now!
Writing to a File
Here’s the implementation of our write_file_demo function:
function connect_fs($url, $method, $context, $fields = null)
{
  global $wp_filesystem;
  if(false === ($credentials = request_filesystem_credentials($url, $method, false, $context, $fields)))
  {
    return false;
  }

  //check if credentials are correct or not.
  if(!WP_Filesystem($credentials))
  {
    request_filesystem_credentials($url, $method, true, $context);
    return false;
  }

  return true;
}

function write_file_demo($text)
{
  global $wp_filesystem;

  $url = wp_nonce_url("options-general.php?page=demo", "filesystem-nonce");
  $form_fields = array("file-data");

  if(connect_fs($url, "", WP_PLUGIN_DIR . "/filesystem/filesystem-demo", $form_fields))
  {
    $dir = $wp_filesystem->find_folder(WP_PLUGIN_DIR . "/filesystem/filesystem-demo");
    $file = trailingslashit($dir) . "demo.txt";
    $wp_filesystem->put_contents($file, $text, FS_CHMOD_FILE);

    return $text;
  }
  else
  {
    return new WP_Error("filesystem_error", "Cannot initialize filesystem");
  }
}
Here’s how the code works:
- First we referenced the global
$wp_filesystemobject inside the function. This object is an instance of theWP_Filesystemclass. It’s responsible for exposing various methods for reading, creating, writing and deleting files. - Next, we’re creating a nonce URL of our form page and an array with the field names of our form.
- Finally, we connect to the filesystem using the
connect_fsfunction. connect_fsuses the request_filesystem_credentials function provided by WordPress to find an appropriate method to connect to the file system (direct, FTP or SSH). In case of FTP or SSH it will echo a form to ask for the credentials from the user. In the case of direct method, it simply returns true.- When the textarea form is submitted and the
request_filesystem_credentialschooses FTP or SSH method then we display the credentials form and hides thefile-datafield in the credentials form. request_filesystem_credentialsfunction’s first parameter takes an URL where to redirect once it has got the correct credentials. The redirect is of type POST request. Therequest_filesystem_credentialslast parameter is an array of the field names to post to the redirect URL.- Once the credentials form is submitted, then it redirects back to the original form submit URL with proper field names and the values that were entered by the user.
- Again, the whole process starts and we execute the
write_file_demo. This timerequest_filesystem_credentialshas the credentials therefore it will simply return true. - Then we use
$wp_filesystem->find_folderto reference to the folder. Then we build the complete path of thedemo.txtfile. - We used
$wp_filesystem->put_contentsto write data to the file.
Note: If you try to use the $wp_filesystem object’s methods without requesting and verifying credentials then they will not work.
Reading a File
Here is the implementation of the read_file_demo function.
function read_file_demo()
{
  global $wp_filesystem;

  $url = wp_nonce_url("options-general.php?page=demo", "filesystem-nonce");

  if(connect_fs($url, "", WP_PLUGIN_DIR . "/filesystem/filesystem-demo"))
  {
    $dir = $wp_filesystem->find_folder(WP_PLUGIN_DIR . "/filesystem/filesystem-demo");
    $file = trailingslashit($dir) . "demo.txt";

    if($wp_filesystem->exists($file))
    {
      $text = $wp_filesystem->get_contents($file);
      if(!$text)
      {
        return "";
      }
      else
      {
        return $text;
      }
    }
    else
    {
      return new WP_Error("filesystem_error", "File doesn't exist");
    }
  }
  else
  {
    return new WP_Error("filesystem_error", "Cannot initialize filesystem");
  }
}
Here is how the code works:
- While reading the
demo.txtfile, we first connect to the file system using therequest_filesystem_credentialsfunction. - This time we aren’t passing any form fields in the last parameter because the form is not submitted. We’re just passing the redirect URL so that it’s redirected once the credentials are retrieved.
- We’re then checking if the file exists using the
$wp_filesystem->existsfunction. It file doesn’t exist we display an error. Otherwise we’re reading the file using the$wp_filesystem->get_contentsfunction and returning the content.
Assuming WordPress has chosen FTP as the suitable method for creating files, here are the screenshots of the whole process:
First when we open the demo page we will see this form:
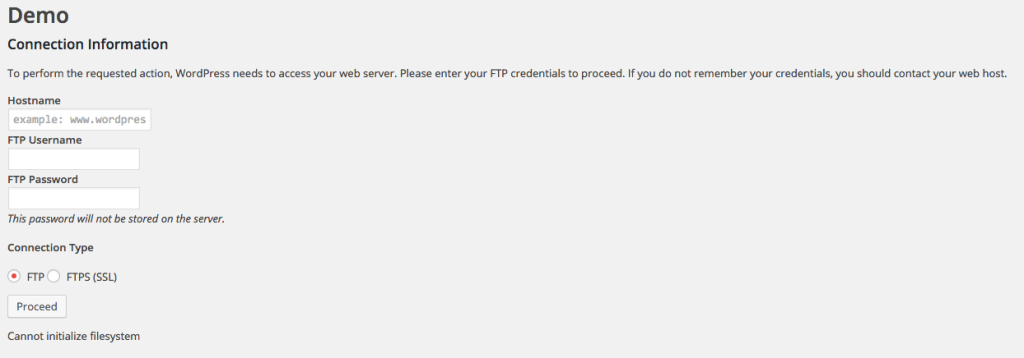
Here, we need to enter FTP or FTPS credentials and submit it. Once we submit it, we’ll see this form:
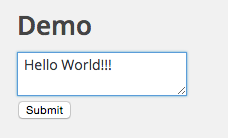
An empty textarea was displayed. Enter the text “Hello World!!!” submit the form. You will again see the credentials form.

You have to fill it again because WordPress doesn’t store the FTP password by default (you can do this in wp-config.php, more on that later). So every time your plugin needs to work with a file system, it must ask credentials. Now submitting it will redirect back to the redirect URL with field names and values submitted earlier. Here is how the textarea appears:
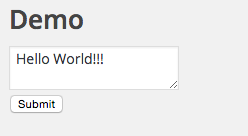
Here, we read the contents of the file and display it.
Other Methods of the $wp_filesystem Object
The $wp_filesystem object provides many other methods to perform various other operations on files and directories. We just saw writing and reading n file. You can find the whole list of what you can do at the WP_Filesystem_Base () documentation page.
Let’s check out some of the important ones:
- $wp_filesystem->delete:
deleteis used to delete a file or directory. You need to pass a string representing the path. - $wp_filesystem->mkdir:
mkdiris used to create a directory. It takes a string representing the parent directory. - $wp_filesystem->move:
moveis used to move file It takes two parameters i.e., the first one is the path of the file and second one is the directory where to move it to. - $wp_filesystem->size:
sizereturns the size of a file in bytes. You need to pass path of a file. - $wp_filesystem->chmod:
chmodis used to change permissions of a file. It takes three arguments i.e., path of the file, the permission octal number and boolean representing recursion.
You can find which method of connection is used by WordPress to access filesystem using $wp_filesystem->method public property.
Storing Credentials Permanently
We saw that WordPress doesn’t store the FTP or SSH credentials permanently. It’s not user friendly to ask for details again and again. There is a way to store the credentials permanently using the wp-config.php file.
Use these options to store the FTP and SSH credentials:
- FTP_HOST: The host name of the server.
- FTP_USER: The username to use while connecting.
- FTP_PASS: The password to use while connecting
- FTP_PUBKEY: The path of the public key which will be used while using SSH2 connection.
- FTP_PRIKEY: The path of the private key which will be used while using SSH2 connection.
Conclusion
In this article we saw the process of designing an admin page that accesses our file system using the WordPress Filesystem API. In case you’re trying to access a file system in a background process (such as using a cron job), then its not possible to display the credentials form if required, in that case you’ll need to make sure you notify your user to place the credential constants in the wp-config.php file. You can go ahead and experiment further with this API and share your experiences with us below.
Frequently Asked Questions (FAQs) about WordPress Filesystem API
What is the WordPress Filesystem API and why is it important?
The WordPress Filesystem API is a set of functions provided by WordPress that allows developers to read, write, and modify files and directories in a standardized way. It is important because it provides a secure and reliable way to interact with the file system on your server. This is crucial for tasks such as creating, modifying, or deleting files and directories, uploading media files, or updating your WordPress installation.
How does the WordPress Filesystem API work?
The WordPress Filesystem API works by providing a set of functions that you can use to interact with the file system on your server. These functions abstract the underlying file system operations, providing a consistent interface regardless of the server’s operating system or file system. This means that you can use the same functions to interact with the file system on a Linux server as you would on a Windows server.
How can I use the WordPress Filesystem API in my own plugins or themes?
To use the WordPress Filesystem API in your own plugins or themes, you first need to include the file ‘wp-admin/includes/file.php’ which contains the API’s functions. After that, you can use the API’s functions to interact with the file system. For example, you can use the ‘WP_Filesystem()’ function to initialize the file system, and then use other functions such as ‘get_contents()’, ‘put_contents()’, or ‘delete()’ to read, write, or delete files.
What are the benefits of using the WordPress Filesystem API over traditional PHP file system functions?
The main benefit of using the WordPress Filesystem API over traditional PHP file system functions is that the API provides a consistent interface regardless of the server’s operating system or file system. This means that you can write code that works on any server, without having to worry about the differences between different file systems. Additionally, the API provides a higher level of security by ensuring that all file operations are performed with the correct permissions.
Can I use the WordPress Filesystem API to upload files?
Yes, you can use the WordPress Filesystem API to upload files. The API provides a function called ‘wp_handle_upload()’ that handles the entire upload process, including checking the file type, ensuring the file is not too large, and moving the file to the correct directory. This makes it easy to handle file uploads in a secure and reliable way.
How can I handle errors when using the WordPress Filesystem API?
The WordPress Filesystem API provides a function called ‘is_wp_error()’ that you can use to check if a function has returned an error. If an error has occurred, you can use the ‘get_error_message()’ function to get a human-readable error message. This makes it easy to handle errors and provide useful feedback to the user.
Can I use the WordPress Filesystem API to modify the .htaccess file?
Yes, you can use the WordPress Filesystem API to modify the .htaccess file. The API provides a function called ‘insert_with_markers()’ that allows you to insert lines into the .htaccess file between specific markers. This makes it easy to add custom rules to the .htaccess file in a safe and reliable way.
Is the WordPress Filesystem API secure?
Yes, the WordPress Filesystem API is secure. It ensures that all file operations are performed with the correct permissions, and it provides functions to sanitize file names and paths. This helps to prevent common security issues such as directory traversal attacks.
Can I use the WordPress Filesystem API to create directories?
Yes, you can use the WordPress Filesystem API to create directories. The API provides a function called ‘wp_mkdir_p()’ that creates a directory and all necessary parent directories. This makes it easy to create complex directory structures in a reliable way.
Can I use the WordPress Filesystem API to delete files and directories?
Yes, you can use the WordPress Filesystem API to delete files and directories. The API provides a function called ‘delete()’ that can delete both files and directories. This makes it easy to clean up after yourself and ensure that your plugin or theme does not leave unnecessary files on the server.
 Narayan Prusty
Narayan is a web astronaut. He is the founder of QNimate. He loves teaching. He loves to share ideas. When not coding he enjoys playing football. You will often find him at QScutter classes.