Bluetooth beacons are an incredibly valuable way to set up location based triggers for apps. Estimote have a range of Bluetooth beacons that are quite easy to set up and experiment with.
One of the tough parts of testing out Bluetooth beacons is that device simulators aren’t able to access Bluetooth devices, so you need to use physical smartphones to test. This is where Evothings comes in really handy! Evothings is a neat simple way to prototype mobile web apps using HTML5 and JavaScript. Within Evothings, you can make changes to your code and have them automatically appear on your smartphone ready with access to your Bluetooth beacons.
In this article, we’ll look at combining the power of Evothings with Estimote Beacons to prototype a beacon enabled mobile app. In particular, we’ll be building an app that turns a LIFX light on and off via IFTTT if you get close to a beacon. Don’t have a LIFX light? Not a problem! You could replace this functionality with any other HTTP requests you’d like to toggle when nearby.
What You’ll Need
- An Estimote Beacon
- Evothings Studio – This will need to be installed and running on your computer. It is available for Windows, Mac OSX and Linux!
- Evothings Viewer app – This will need to be installed on the iPhone or Android device you will be testing on.
- IFTTT and a knowledge of how to use their Maker channel – I’ve got a guide on that here!
- Some basic HTML and JavaScript knowledge.
The Code
All code for this is available on GitHub for you to use as you wish!
Setting Up Your Estimote Beacons
Go to Estimote Cloud and log into your account (or sign up for one if you don’t have any beacons yet!).
From there, your “Beacons” section should already be loaded. If you don’t have any beacons assigned to your account yet, you’ll need to either buy some via the “Buy Beacons” button, transfer them from another account via the “Transfer Beacons” button or activate your dev kit if it came with an activation code:
If you do have beacons, they’ll appear in a list. Choose the one you’d like to use in this demo and click its “Settings” button:
In here, you will want to take note of the beacon’s MAC address as we will be using it later:
That should be all you need in terms of Estimote beacon set up – it is quite easy at a prototyping level.
Getting Evothings Running
To set up your Evothings workflow ready for our coding, head to the Evothings download page and download the Evothings Studio and Evothings Viewer mobile app. This gives us a really easy way to build our app and test the changes on a smartphone instantly.
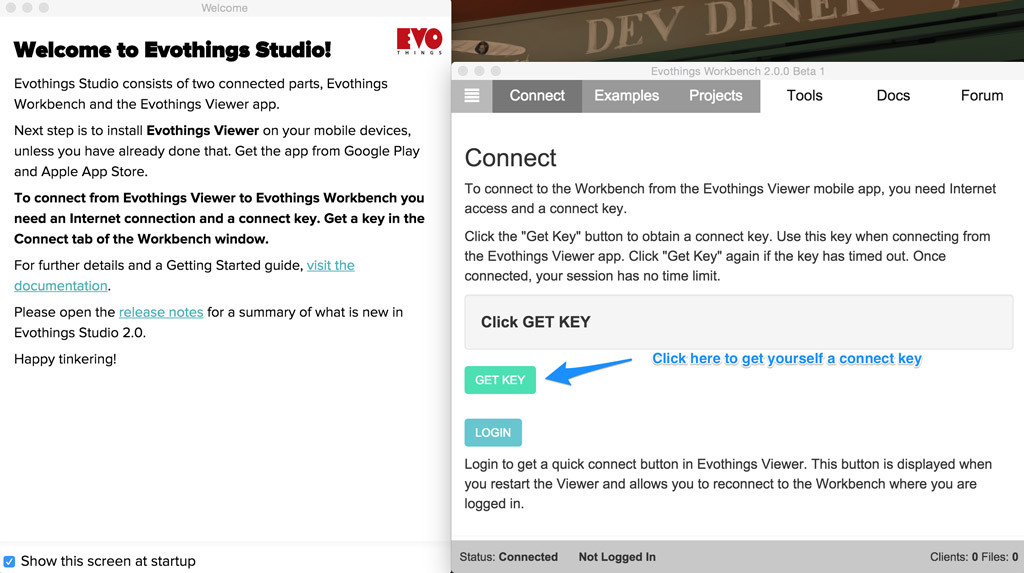
When you first open Evothings Studio, you’ll be prompted to connect by getting a connect key. Click “Get Key” to generate the key you’ll use to pair up your workbench with your mobile app:
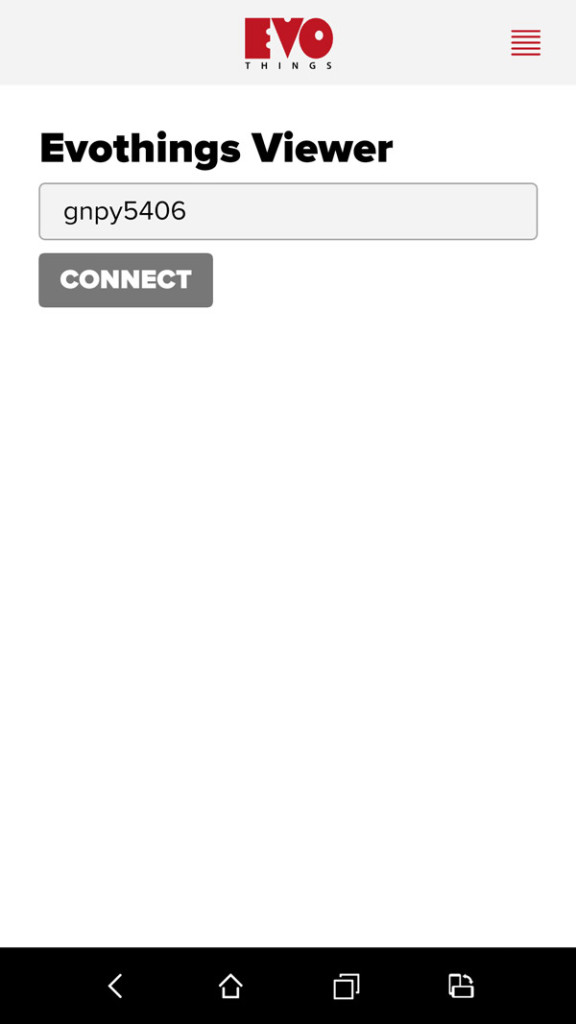
Then open up Evothings on your smartphone, you’ll be greeted with a screen that asks for that connect key. Type it in and click “Connect”:
When you are connected and ready to go, you will see this screen:
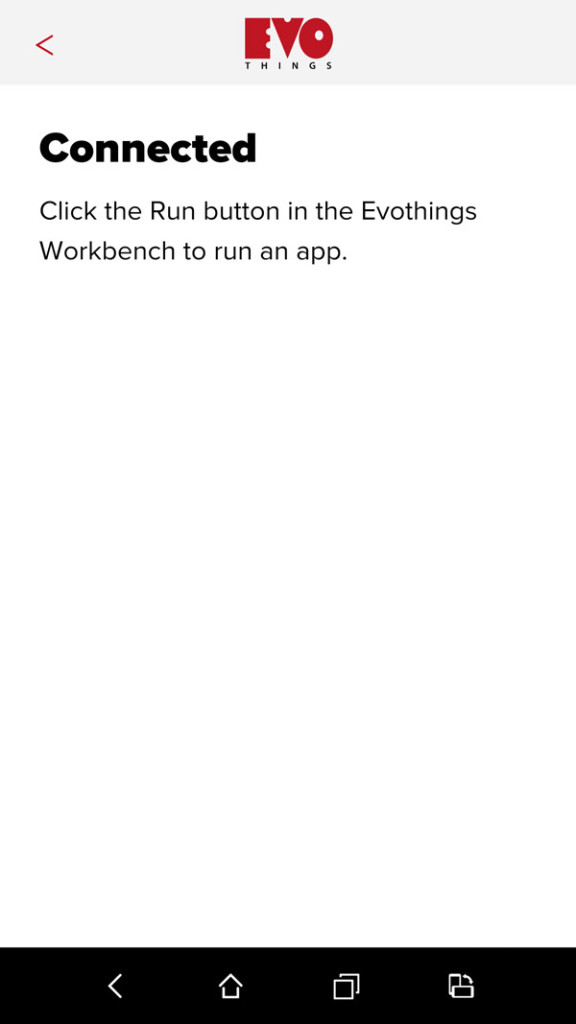
You are now ready to get into coding the app.
Our HTML
The HTML for this app is mostly from Evothings templates they’ve publically provided, just with the title and headings changed, along with the addition of a <div id="in-room"></div> for some basic status messages to appear on screen.
<!DOCTYPE html>
<html>
  <head>
    <meta charset="utf-8" />
    <meta name="viewport" content="width=device-width, user-scalable=no
      initial-scale=1.0, minimum-scale=1.0, maximum-scale=1.0" />
    <title>Magical room light automation</title>
    <style>
      @import 'ui/css/evothings-app.css';
      @import 'ui/css/patcat.css';
    </style>
    <script>
    // Redirect console.log to Evothings Workbench.
    if (window.hyper && window.hyper.log) { console.log = hyper.log }
    </script>

    <script src="cordova.js"></script>
    <script src="libs/jquery/jquery.js"></script>
    <script src="libs/evothings/evothings.js"></script>
    <script src="libs/evothings/ui/ui.js"></script>
    <script src="app.js"></script>
  </head>
  <body>
    <header>
      <button class="back" onclick="history.back()">
        <img src="ui/images/arrow-left.svg" />
      </button>

      <img class="logotype" src="ui/images/logo.svg" alt="Evothings" />
    </header>
    <h1>Magical room light automation</h1>
    <div id="in-room"></div>
  </body>
</html>
I’ve also put my custom CSS within ui/css/patcat.css:
html,
body,
section,
main footer {
  background: #390066;
  color: #fff;
  text-align: center;
}

header {
  background: #EACFF3;
}

.in-room,
.in-room body,
.in-room section,
.in-room main footer {
  background: #F3EC97;
  color: #333;
}

.in-room h1 {
  color: #333;
}

.in-room header {
  background: #F3EDE6;
}

h1 {
  padding: 0 0 1em;
}
Our JavaScript Code
Our app.js file looks like so:
var app = (function() {
  var app = {},
    roomBeacon,
    updateTimer = null,
    inRoom = false;

  app.initialize = function() {
    document.addEventListener("deviceready", function() {
      evothings.scriptsLoaded(onDeviceReady);
    }, false);
  };

  function onDeviceReady() {
    startScan();

    $("#in-room").html("Out of room!");

    updateTimer = setInterval(checkForBeacon, 1000);
  }

  function startScan() {
    function onBeaconsRanged(beaconInfo) {
      for (var i in beaconInfo.beacons) {
        var beacon = beaconInfo.beacons[i];

        if (beacon.rssi < 0 && beacon.macAddress == "CE:95:71:43:C9:DD") {
          console.log("Found room beacon");
          roomBeacon = beacon;
        }
      }
    }

    function onError(errorMessage) {
      console.log("Ranging beacons did fail: " + errorMessage);
    }

    estimote.beacons.requestAlwaysAuthorization();

    estimote.beacons.startRangingBeaconsInRegion(
      {},
      onBeaconsRanged,
      onError);
  }

  function checkForBeacon() {
    if (roomBeacon) {
      console.log("Checking beacon distance");

      if (roomBeacon.distance < 2 && !inRoom) {
        console.log("Entered the room");
        inRoom = true;
        $("html").addClass("in-room");
        $("#in-room").html("In room!");

        turnOnBulb();

        setTimeout(turnOnBulb, 1000);
      } else if (roomBeacon.distance >= 2 && inRoom) {
        console.log("Exited the room");
        inRoom = false;
        $("html").removeClass("in-room");
        $("#in-room").html("Out of room!");

        turnOffBulb();
        setTimeout(turnOnBulb, 1000);
      }
    }
  }

  function turnOnBulb() {
    $.getJSON("https://maker.ifttt.com/trigger/entered_room/with/key/{YOURKEYHERE}?jsoncallback=?", {
      format: "json"
    }, function() {
      console.log("Entered room and told IFTTT about it!");
    })
    .done(function(data) {
      console.log("Done");
    })
    .fail(function(data) {
      console.log(JSON.stringify(data));
    })
    .always(function(data) {
      console.log("Finished");
    });
    console.log("Turn on bulb");
  }

  function turnOffBulb() {
    $.getJSON("https://maker.ifttt.com/trigger/left_room/with/key/{YOURKEYHERE}?jsoncallback=?", {
      format: "json"
    }, function() {
      console.log("Left room and told IFTTT about it!");
    })
    .done(function(data) {
      console.log("Done");
    })
    .fail(function(data) {
      console.log(JSON.stringify(data));
    })
    .always(function(data) {
      console.log("Finished");
    });
    console.log("Turn off bulb");
  }

  return app;
})();

app.initialize();
Our JavaScript Code Explained
Let’s simplify it down a bit to step through. Our initial skeleton for the code looks like so:
var app = (function() {
  var app = {},
    roomBeacon,
    updateTimer = null,
    inRoom = false;

  app.initialize = function() {
    document.addEventListener("deviceready",
      function() {
        // What we'll want to do when our app is ready!
      }, false);
  };

  // Other code will be here!

  return app;
})();

app.initialize();
In the code above we namespace everything within app. The roomBeacon variable stores our beacon once we have seen it, updateTimer will store our regular JavaScript interval to check for beacons and inRoom will remember whether or not the app believes we are in the room (depending on whether it sees the beacon in range or not).
When our JavaScript runs, we direct it to the app.initialize() function. However, we don’t run any of the functionality until the deviceReady event and the evothings.scriptsLoaded event fires. That way we know the app has loaded and Evothings is ready to watch and reload upon any changes.
function onDeviceReady() {
  startScan();

  $("#in-room").html("Out of room!");

  updateTimer = setInterval(checkForBeacon, 1000);
}
Within onDeviceReady(), we start scanning for beacons (we’ll cover the startScan() function soon). Then we set our #in-room element in our HTML to say “Out of room!” as our default.
We then run checkForBeacon() every second, which assesses how far away our beacon is and decides if we are in the room or not.
Our startScan() function looks like so:
function startScan() {
  function onBeaconsRanged(beaconInfo) {
    // Will explain this soon!
  }

  function onError(errorMessage) {
    console.log("Ranging beacons did fail: " + errorMessage);
  }

  estimote.beacons.requestAlwaysAuthorization();

  estimote.beacons.startRangingBeaconsInRegion(
    {},
    onBeaconsRanged,
    onError);
}
All of the functionality of the startScan() function start with estimote.beacons.startRangingBeaconsInRegion(). This starts our app scanning for Estimote beacons. We pass in three things:
- A blank object (
{}) to represent that we want all beacons. We could instead pass in a region we’ve defined in our Estimote beacon options like so:{identifier:'MyRegion'}. - Our success function we want to run when we’ve successfully looked for beacons in range (
onBeaconsRanged()). - Our failure function if something goes wrong (
onError()– a relatively simple function that logs the error).
The inside of our onBeaconsRanged() function looks like so:
function onBeaconsRanged(beaconInfo) {
  for (var i in beaconInfo.beacons) {
    var beacon = beaconInfo.beacons[i];

    if (beacon.rssi < 0 && beacon.macAddress == "CE:95:71:43:C9:DD") {
      console.log("Found room beacon");
      roomBeacon = beacon;
    }
  }
}
This receives an array called beaconInfo with details of all the beacons that are visible to the device. Our beacons are specifically found within beaconInfo.beacons, so we iterate through them all and check their RSSI (Recieved Signal Strength Indication) and MAC address. If their RSSI is a negative value, our app has spotted the beacon. We then check to see whether our beacon’s MAC address is the same as the beacon we are looking for. If so, we log the event into our console and set our roomBeacon variable to this beacon.
For iOS 8, your app is required to ask for permission to use location services (on other platforms, this function will gracefully degrade and do nothing):
estimote.beacons.requestAlwaysAuthorization();You’ll remember we ran the function checkForBeacon() every second. That function looks like so:
function checkForBeacon() {
  if (roomBeacon) {
    console.log("Checking beacon distance");

    if (roomBeacon.distance < 2 && !inRoom) {
      console.log("Entered the room");
      inRoom = true;
      $("html").addClass("in-room");
      $("#in-room").html("In room!");

      turnOnBulb();

      setTimeout(turnOnBulb, 1000);
    } else if (roomBeacon.distance >= 2 && inRoom) {
      console.log("Exited the room");
      inRoom = false;
      $("html").removeClass("in-room");
      $("#in-room").html("Out of room!");

      turnOffBulb();
      setTimeout(turnOnBulb, 1000);
    }
  }
}
If we have a roomBeacon, then we run our tests on how far away that beacon is. If you are within two meters of the beacon and we haven’t set inRoom to true, then we have just entered the room. We set inRoom to true, log a message to the console, show the message “In room!” on our app and change the class on our <html> tag so we can restyle our app depending on if we’re inside the room or not. We also run turnOnBulb() which will do just that – turn on our LIFX bulb using IFTTT.
If we are further than two meters away from the beacon but the app still thinks we are in the room, we set inRoom to false and set everything to be the opposite of the above. We run turnOffBulb() to turn off the LIFX bulb.
One thing you might be wondering – why do we have a setTimeout() re-running turnOnBulb() and turnoffBulb()? I’ve found sometimes with IFTTT (or possibly the LIFX connectivity in my home), it doesn’t always receive the request the first time. Running it twice seems to fix this nicely!
To actually turn the LIFX bulbs on and off, we make a JSON request to an IFTTT’s action via https://maker.ifttt.com/trigger/entered_room/with/key/{YOURKEYHERE}?jsoncallback=?. Turning them off is the same idea, just with left_room as the trigger name instead of entered_room. If this all sounds like gibberish to you, have a read of my “Connecting the IoT and Node.js to IFTTT” tutorial first!
function turnOnBulb() {
  $.getJSON("https://maker.ifttt.com/trigger/entered_room/with/key/{YOURKEYHERE}?jsoncallback=?", {
    format: "json"
  }, function() {
    console.log("Entered room and told IFTTT about it!");
  })
  .done(function(data) {
    console.log("Done");
  })
  .fail(function(data) {
    console.log(JSON.stringify(data));
  })
  .always(function(data) {
    console.log("Finished");
  });
  console.log("Turn on bulb");
}
Testing On Your Device
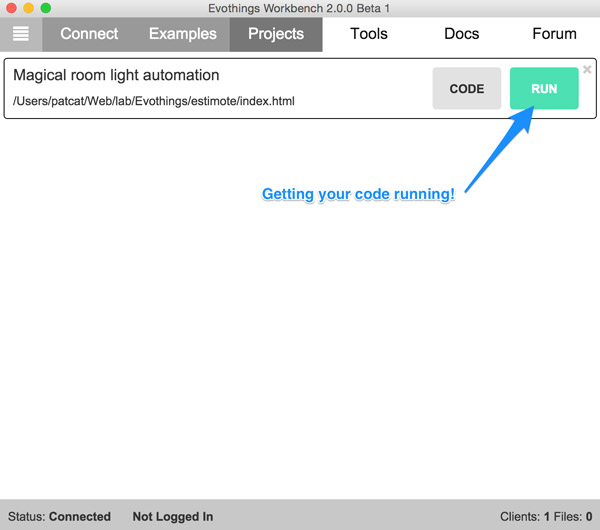
To test the app, click the “Projects” tab and drag your index.html into Evothings Studio to add it to the projects to watch. Then click “Run” to run it:
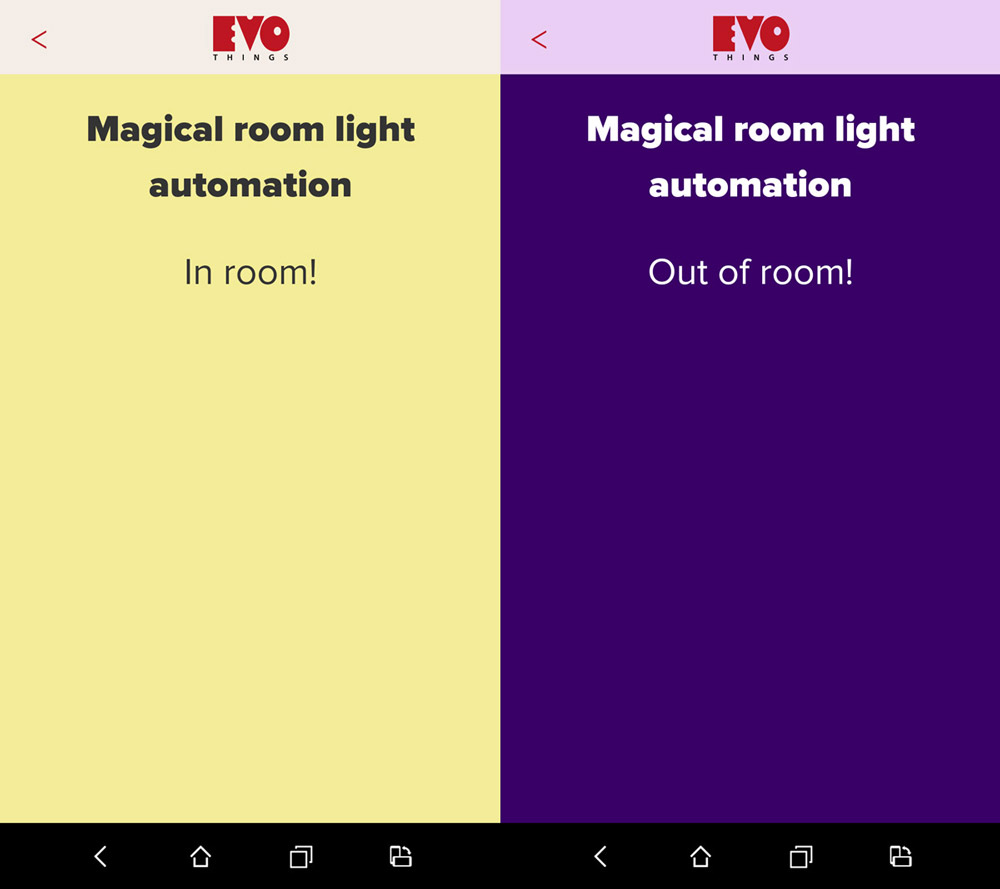
If you’ve got the Evothings Viewer open on your smartphone, you should have the app appear and run as intended! If you enter the room with the beacon, your light should turn on (and the app should visually show you’ve entered the room) and if you exit the room, the light should turn off (and the app should show you have left).
Conclusion
Prototyping with Estimote beacons and Evothings is just the start, from here you can create a Cordova or Phonegap app, copy over the files from this one and export it into an app you can submit to app stores. You’d just need to add in a way for custom beacons to be added into settings (as you won’t want everyone relying on your beacon unless it is for a public place like a cafe).
If you create a Bluetooth beacon powered prototype with Estimote beacons and Evothings, please share it in the comments or get in touch with me on Twitter (@thatpatrickguy). I’d love to see what you come up with and share it around!
Frequently Asked Questions (FAQs) about Prototyping Beacon Apps with Estimote and Evothings
What is the primary function of Estimote and Evothings in beacon app development?
Estimote and Evothings are two powerful tools that are used in the development of beacon apps. Estimote provides the hardware, i.e., the beacons, and the software SDKs that allow developers to interact with these beacons. On the other hand, Evothings is a mobile application development platform that provides a rapid development environment for creating apps that interact with IoT devices, including beacons. Together, they provide a comprehensive solution for developing beacon-based applications.
How does the Evothings Studio work?
Evothings Studio is a set of development tools for creating mobile applications. It provides a fast and flexible environment for developing, testing, and deploying IoT applications. It works by allowing developers to write their code in HTML, CSS, and JavaScript, and then run it directly on their mobile devices. This makes it possible to develop and test applications in real-time, significantly speeding up the development process.
What are the key features of Estimote beacons?
Estimote beacons are small, wireless sensors that you can attach to any location or object. They broadcast tiny radio signals which your smartphone can receive and interpret, unlocking micro-location and contextual awareness. Some of the key features of Estimote beacons include long battery life, adjustable broadcasting power, and a robust API for custom development.
Can I use other programming languages with Evothings?
Evothings primarily supports HTML, CSS, and JavaScript for app development. However, it also provides support for Cordova plugins, which means you can use any programming language that can be compiled to a Cordova plugin, such as C or C++.
How secure are Estimote beacons?
Estimote beacons come with several security features to prevent unauthorized access and misuse. These include secure UUID rotation, which prevents tracking of the beacons, and Estimote Secure Monitoring, which ensures that only authorized devices can access the beacon’s data.
How can I debug my app in Evothings?
Evothings Studio includes a live reload feature, which allows you to see the changes you make in your code in real-time on your device. This makes it easy to spot and fix any issues with your app.
What kind of apps can I build with Estimote and Evothings?
With Estimote and Evothings, you can build a wide range of apps that leverage beacon technology. This includes retail apps that provide personalized offers to customers, museum apps that provide information about exhibits, event apps that provide navigation assistance, and many more.
How do I get started with Estimote and Evothings?
To get started with Estimote and Evothings, you first need to purchase some Estimote beacons. Then, download and install the Evothings Studio on your computer. From there, you can start developing your app using the Estimote SDK and the Evothings API.
Can I use Estimote and Evothings for large-scale applications?
Yes, both Estimote and Evothings are designed to scale and can be used for large-scale applications. Estimote beacons are robust and reliable, and Evothings provides a powerful and flexible development environment that can handle complex app development projects.
What support is available for Estimote and Evothings?
Both Estimote and Evothings provide extensive documentation and community support. Estimote has a comprehensive developer portal with guides, tutorials, and API references. Evothings also has a detailed documentation section, and a community forum where you can ask questions and share your experiences with other developers.
 Patrick Catanzariti
PatCat is the founder of Dev Diner, a site that explores developing for emerging tech such as virtual and augmented reality, the Internet of Things, artificial intelligence and wearables. He is a SitePoint contributing editor for emerging tech, an instructor at SitePoint Premium and O'Reilly, a Meta Pioneer and freelance developer who loves every opportunity to tinker with something new in a tech demo.