Today, we are learning how to get in the cloud with CloudFoundry, a cloud platform by VMWare. On the way, we are going to setup a whole bunch of things that are reusable assets for some future adventures! So without further ado, let’s take a dive.
Get up and running with Spring Roo Example
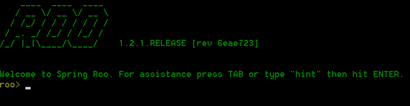
Spring roo is a rapid application development (RAD) tool for Java. It offers a wide variety of capabilities, and integrates with various frameworks. What we are interested in, is getting a project up and running which we can use in this tutorial. You can download Roo from here and then extract in an appropriate directory. Modify the PATH variable to include the “bin” subdirectory of Roo. To check if we are all set properly, type “roo” at command prompt and it should show a screen like following:
If Roo is running fine, then we are just one step away from our project being ready. Go to the samples directory in the Roo directory and copy the “clinic.roo” file to where you want your project to be located. Navigate to directory where you have placed clinic.roo file. Now enter “roo” which will take you to roo command prompt, and then run following command.
[sourcecode]
script –file clinic.roo
[/sourcecode]
This will generate the code for a sample pet clinic project. You can see what commands are fired to roo by checking the clinic.roo file in any text editor. Once the project is generated, you can quit the roo prompt with “exit” command. To test if the project we have created, run the command “mvn tomcat:run” from the directory where project and pom.xml file is located. The command will invoke an embedded container and host project within it. When the command execution finishes you will notice the port and project host:
[sourcecode]
2012-04-11 09:29:11,657 [main] INFO org.springframework.web.servlet.DispatcherServlet – FrameworkServlet ‘petclinic’: initialization completed in 1918 ms
Apr 11, 2012 9:29:11 AM org.apache.coyote.http11.Http11Protocol init INFO: Initializing Coyote HTTP/1.1 on http-8080
Apr 11, 2012 9:29:11 AM org.apache.coyote.http11.Http11Protocol start INFO: Starting Coyote HTTP/1.1 on http-8080
[/sourcecode]
To check the application hit the URL “http://127.0.0.1:8080/petclinic/“. You can play around the application to understand the functionality that it offers. If all looks good, we have created a project from scratch in less than ten minutes!

Go back to roo command prompt and fire command
[sourcecode]
$perform package
[/sourcecode]
This command takes some time and will package our application with needed dependencies and in web-application format. If you check target directory, it will have a snapshot directory of the build for example in my case: “petclinic-0.1.0.BUILD-SNAPSHOT”. This will be ready for deployment when we have our cloud server ready.
Install Ruby and CloudFoundry VMC
Install the supported versions of ruby (1.8.7 & 1.9.2) from here suitable for your platform, and check the correctness of installation with “ruby -v”. We will install the command line interface (CLI) – “vmc” which is a ruby gem. We will be using vmc cli for all operations on CloudFoundry. Our interface is going to be same irrespective of if we are firing commands for a PaaS instance, or a micro instance hosted on our machine. For installing vmc gem, fire the command (For linux/unix based systems you will have to prefix with “sudo” and have appropriate permissions):
[sourcecode]
$ gem install vmc
[/sourcecode]
For testing our installation quickly, use the command “vmc info” which will give output similar to the following text. We will test with an application in later sections.
[sourcecode]
VMware’s Cloud Application Platform
For support visit http://support.cloudfoundry.com
Target: http://api.cloudfoundry.com (v0.999)
Client: v0.3.15
[/sourcecode]
For getting a complete list of commands:
[sourcecode]
$ vmc help
[/sourcecode]
Install VM Player and start CloudFoundry Micro
You can skip this section and jump to “Deploy your app to Cloudfoundry cloud” if you want to skip CloudFoundry micro instance installation etc, or just quickly want to test cloud instance before going into details of setting up a micro instance.
Before we install CloudFoundry micro, go ahead and sign up for an account at http://cloudfoundry.com/ this will help us later. After creating account, go to https:// cloudfoundry.com/micro/dns and create a domain name for your micro CloudFoundry & note down the configuration token created. As soon as you create domain, there will be links to download “Micro CloudFoundry VM” and a “VM player”, start downloading those while we understand what exactly is happening.
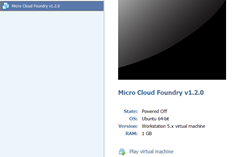
The CloudFoundry micro is a virtual machine & we need a player which can run the virtual machine. You can use one of “VMWare fusion”, “VMWare workstation” or “VMWare player”. The easiest and of course free option is to use VMWare player. Install the VMWare player and extract CloudFoundry micro into desired destination. Start VMWare Player open the “micro.vmx” in VMWare Player. You will see the “micro CloudFoundry vm” in a powered off state, turn it on.
Turning on the virtual machine will take you to a configuration menu; let’s choose 1 to do the configuration. After password configuration is done, the next step is to configure network, I chose DHCP and no proxy, you can make configuration as per your settings. After this the menu you will be asked for CloudFoundry configuration token which we generated online at CloudFoundry.com. It will take couple of minutes before the VM contacts servers and CloudFoundry micro is ready to use. The console will show current configuration, i.e. the URL at which your local CloudFoundry micro instance is available etc. For example in my case it shows configuration on information like below:
[sourcecode]
Current configuration:
Identity: cf-hostname.cloudfoundry.me (ok)
Admin: <a href=”mailto:email_addd@gmail.com”>email_addd@gmail.com</a>
IP Address: 122.156.80.122 (network up)
To access your Micro Cloud Foundry instance, use:
vmc target http://api.cf-hostname.cloudfoundry.me
[/sourcecode]
Deploy your app to CloudFoundry micro
We are all set! Assuming all previous steps have been done successfully, open the Ruby vmc command prompt, let’s try to register the CloudFoundry micro instance in vmc, for this let’s first set target and then do registration.
[sourcecode]
$vmc target http://api.cf-hostname.cloudfoundry.me
$vmc register
[/sourcecode]
This registration will create a username for CloudFoundry micro Ubuntu VM, and will use password we supplied when creating virtual machine in previous section. Provide an appropriate username and previously used password. Now navigate to directory where we had our snapshot of the project built and fire command
[sourcecode]
$vmc push
Would you like to deploy from the current directory? [Yn]: y
Application Deployed URL [petclinic.vishalbiyani.cloudfoundry.me]:
Detected a Java SpringSource Spring Application, is this correct? [Yn]: y
Memory Reservation (64M, 128M, 256M, 512M, 1G) [512M]:
Creating Application: OK
Would you like to bind any services to ‘petclinic’? [yN]: y
The following system services are available
1: mongodb
2: mysql
3: postgresql
4: rabbitmq
5: redis
Please select one you wish to provision: 2
Specify the name of the service [mysql-e3d94]: vb-test
Creating Service: OK
Binding Service [vb-test]: OK
Uploading Application:
Checking for available resources: OK
Processing resources: OK
Packing application: OK
Uploading (18M): OK
Push Status: OK
Staging Application: OK
Starting Application: OK
[/sourcecode]
Now the application is successfully hosted at http://petclinic.cf-hostname.cloudfoundry.me and you will see a screen similar to when we ran Roo application using embedded container.
Deploy your app to CloudFoundry cloud
If you have your app up and running on CloudFoundry, simply change your target to point to CloudFoundry
[sourcecode]
$vmc target api.cloudfoundry.com
[/sourcecode]
Your cloud application is just a “vmc push” away J refer to previous section, and same prompts are going to repeat to configure your app for cloud.
Scaling & managing in cloud
Let’s look at some handy commands to configure and scale your application.
To look at services you have currently available and provisioned:
[sourcecode]
$vmc services
============== System Services ==============
+————+———+—————————————+
| Service | Version | Description |
+————+———+—————————————+
| mongodb | 1.8 | MongoDB NoSQL store |
| mysql | 5.1 | MySQL database service |
| postgresql | 9.0 | PostgreSQL database service (vFabric) |
| rabbitmq | 2.4 | RabbitMQ message queue |
| redis | 2.2 | Redis key-value store service |
+————+———+—————————————+
=========== Provisioned Services ============
+—————–+————+
| Name | Service |
+—————–+————+
| mongodb-7fb72 | mongodb |
| mysql-4cd0 | mysql |
| vb-postgres | postgresql |
| vbtest-postgres | postgresql |
+—————–+————+
[/sourcecode]
To look at applications deployed in your instance:
[sourcecode]
$vmc apps
+———————–+—-+———+—————————————————-+————-+
| Application | # | Health | URLS | Services |
+———————–+—-+———+—————————————————-+————-+
| cloudspring-petclinic | 1 | RUNNING | cloudspring-petclinic.vishalbiyani.cloudfoundry.me | mysql-bf5bd |
| petclinic | 1 | RUNNING | petclinic.vishalbiyani.cloudfoundry.me | vb-test |
+———————–+—-+———+—————————————————-+————-+
[/sourcecode]
To scale your application to two instances and looking at instances running
[sourcecode]
$vmc instances petclinic 2
Scaling Application instances up to 2: OK
$vmc instances petclinic
+——-+———-+——————–+
| Index | State | Start Time |
+——-+———-+——————–+
| 0 | RUNNING | 04/15/2012 11:50AM |
| 1 | STARTING | 04/15/2012 03:33PM |
+——-+———-+——————–+
[/sourcecode]
Finally!
We developed an application using RAD techniques. We installed Ruby which is going to be extremely useful tool in our cloud journey. We created a CloudFoundry micro instance and ran an application locally within it. We also deployed the same app to cloud, all this quite quickly! Although what we did with CloudFoundry today is just a small pice of the cake! Explore and enjoy your journey in this open source PAAS and in cloud.
Foundry image via Shutterstock
 Vishal Biyani
My name is Vishal Biyani! I am an avid developer and a cloud enthusiast! I am lucky enough to witness some very exciting changes in technology and data landscape.