Flex 2: Rich Internet Applications in a Flash!

Key Takeaways
- Flex 2 provides a robust framework for building Rich Internet Applications (RIAs) without the need for reloading pages, enhancing user responsiveness akin to AJAX but without its complexities.
- The release of Flash Player 9, integral to Flex 2, offers a performance boost up to ten times faster than its predecessors, supporting a more efficient development environment.
- Flex 2 simplifies the creation of complex user interfaces with its extensive library of pre-built components and the new MXML markup language, designed specifically for application layout.
- Developers can access Flex 2 tools for free, including the framework, compiler, and a command-line debugger, significantly lowering the entry barrier for new developers.
- For advanced development, Flex Builder offers a powerful environment with a drag-and-drop visual editor and enhanced debugging capabilities, though it comes with a cost.
- Flex 2 supports data binding and automatic UI updates, making it easier to create dynamic, data-driven applications without extensive coding for event handling and updates.
You may have heard some buzz recently about Adobe’s release of Flex 2. Flex is a collection of technologies that combine to give developers a strong framework for building Rich Internet Applications. You may already be familiar with one of those technologies: Flash.
RIAs are lightweight online programs that provide users with a more dynamic and interactive experience than they might find in a normal web page. Like web applications built with AJAX, Flex applications feel much more responsive, because a new web page doesn’t need to be loaded every time the user takes action. However, unlike working with AJAX, Flex developers don’t need to worry about dealing with differing browser implementations of JavaScript or CSS — you can focus all of your time on the application’s development, because the framework runs on Adobe’s cross-platform Flash Player.
Flex hit the ground running with the release of Flash Player 9 in June of this year. Thanks to a new internal architecture, Flash Player 9 runs up to ten times faster than previous releases. ActionScript, Flash’s programming language, also received an extensive update that will help developers migrating from other languages feel more at home. New features include strong typing, regular expressions, and native support for XML thanks to ECMAScript for XML (E4X). Flash 9 runs on Windows and Mac OS X, and a Linux player is currently in development.
At its core, the Flex Framework comes with dozens of components, from basic lists and data grids to charts, layout systems, and media players.
Additionally, Flex Data Services (FDS) allows your Flex application to interact with Java libraries on a server. It also provides facilities for data synchronization, messaging, and collaboration. And, unlike previous releases of Flex that required the developers to have the full version of Flex Data Services and cost thousands of dollars, the Flex 2 framework, compiler, and a command-line debugger can all be downloaded for free. Yes, you heard that right: the basic developer tools can be downloaded at no cost! It’s even possible to access a limited version of Flex Data Services for free.
For serious Flex development, you’ll probably want to use Flex Builder. This powerful development environment includes a drag-and-drop visual editor, enhanced debugging capabilities, and a full-featured code editor. It leverages the open source Eclipse IDE, which should be very familiar to Java developers. A healthy community has grown around Eclipse, resulting in the development of many cool plug-ins, including some that allow integration with version control systems like CVS or SourceSafe and others that provide support for many other programming languages. Despite being based on an open source tool, Flex Builder is not free, nor is it cheap (US $499, or US $749 if you include data visualization components). However, you can download a 30-day free trial version (or the Flex Builder plug-in, if you already have Eclipse installed), or use your own IDE instead.
Before we start building our own application in this environment, let’s step back and take a look at what’s involved.
How Flex Development Works
Flex provides developers with more than one way to build an application or component. Our first foray into Flex will introduce MXML, a special markup language that was designed with application layout in mind. Creating an instance of a component in your application couldn’t get any easier than declaring it in MXML:
<mx:Button id="myButton" label="Press Me!"/>As you can see, the Button‘s properties are set right inside the tag. We’ve named this instance "myButton" and given it a label that says, “Press Me!” Setting the id allows us to reference this Button elsewhere in our code. Styles, such as colors or skins, and event handlers can be set in a similar way. For example, if you wanted to listen for a button click, you could call functions and run snippets of ActionScript code right inside the click property of the Button. We’ll see an example of this later, when we create our first Flex application.
Thanks to the inherent hierarchy of XML, we can place components inside one another. Let’s put our Button inside a layout container — in this case, a Panel.
<mx:Panel>

  <mx:Button id="myButton" label="Press Me!"/>

</mx:Panel>
We’ve declared the Panel component with two tags this time. Containers in MXML work in the same way as they function in XHTML, where an element such as a paragraph includes an opening tag and a closing tag. Other components that appear inside these two tags will become children of the container.
As you become more experienced with Flex, you’ll want to get down and dirty with pure ActionScript 3. Flex’s core components are written in this language, and the Flex documentation includes all sorts of information to help you write solid code that uses the same architecture. You’ll even discover that the source code for the core components comes with the Flex 2 compiler. What better place could there be to look for best practices in component development than within the very components provided by Adobe?
Interestingly enough, the Flex 2 compiler actually converts MXML into ActionScript 3 as it compiles your applications. It handles all the special application bootstrapping code behind the scenes to make developers’ lives easier. Our partial MXML example from above can therefore easily be translated to ActionScript:
var myPanel:Panel = new Panel();

addChild(myPanel);

var myButton:Button = new Button();

myButton.label = "Press Me!";

myPanel.addChild(myButton);
While our MXML example appears on three lines, the ActionScript equivalent takes five lines. It would grow much larger if we wanted to set more than a couple of additional properties on the components. As you build more complex applications, you’ll experience the beauty of using MXML for layout and initialization. Not only will you find it easier to visualize the hierarchy of components, you’ll actually fit more information into fewer lines of code.
Get your Feet Wet
Let’s get things started and put together a simple application that shows off some of Flex’s cool features. To play along at home, you might like to download the free 30-day trial version of Flex Builder from Adobe, which includes the Flex 2 SDK (Flex Builder is currently only available for Windows, but a Mac version is due out at the end of the year). If you’re feeling especially adventurous (or you’re on a Mac and can’t wait until then), you could of course use your own text editor (the SDK is available as a separate, free download from the same page, complete with command-line compiler). I’ll assume that you’re using Flex Builder for this tutorial.
I’d also recommend that you download the source code and other files I’ve provided for this tutorial. I’ll explain many of the main sections and concepts that we’ll meet along the way, but I won’t be covering every single line of code, so you’ll need the source code download in order to follow along.
Launch Flex Builder and select File > New > Flex Project. The new project wizard starts by asking how we intend to access data in our application. Choose Basic, since we won’t be using Flex Data Services or ColdFusion, then click the Next button. The Basic option is appropriate in cases where you don’t need data connectivity, or you plan to access data through custom sources written in server-side languages such as PHP or ASP.NET.
Next, we need to enter the name of our application. We’re going to build a small page that lets us view and edit the biographies of some managers at a growing software company. This page might be a single module of a larger content management system (CMS) that the company uses. Let’s call our project “Company Leaders”. You don’t need to change the default location — these files will be saved in a special Flex Builder 2 folder inside your user directory (that’s My Documents on Windows).
Click Finish to exit. If you were to continue with the wizard by clicking the Next button, you could enter more advanced options such as additional source code and library paths (Flex libraries allow developers to include custom components that they may have purchased or downloaded). We don’t need any of these options for this project, so we’ll skip them.
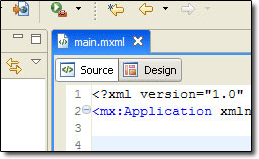
A new project is created in Flex Builder
Flex should have created a blank application, and you should see the Source view with a couple of lines of MXML code. Click on the Design button above the source code view — we’ll start by trying out the design editor.
Like Dreamweaver or other WYSIWYG editors, Flex’s Design View lets us drag and drop components into our application and manipulate them visually. We can also set properties of the components without needing to edit any code.
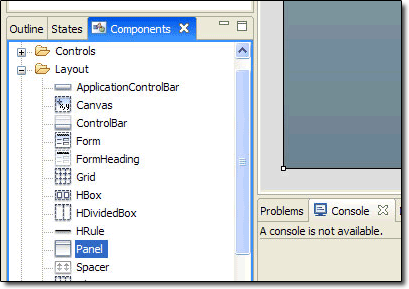
The UI components available in the Design View
In the bottom-left corner of Flex Builder, you should see a Components pane — click on it if it isn’t selected. Inside, you should see several different categories, including Custom, Controls, Layout, and Navigators. A Charts category might be in there, too — the Flex Builder trial version also comes with a trial application that contains some robust charting components. Expand the Layout category and drag a Panel component into the design view of your application.
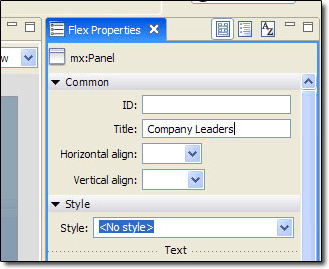
Changing the properties of a component with the Properties pane
Now, on the right side of Flex Builder, you should see the Flex Properties pane. We’ll use this to edit the Panel component we just dragged into the design view. Click on the Panel component — the Properties pane will show a series of items that you can edit, such as the Panel’s id, title, alignment options, styles, position, and dimensions. Type “Company Leaders” in the Title field. You should see it appear on the title bar of your Panel.
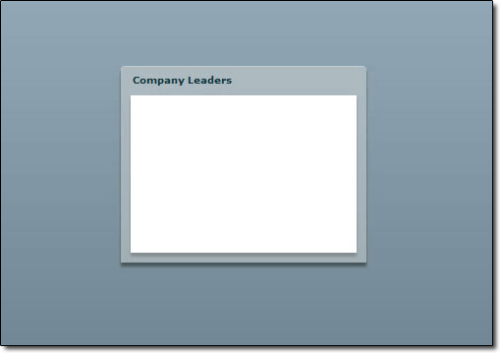
The panel for our first Flex application
The design view is a great way to get a simple application layout started. Click on the Source button above the design view, and we’ll jump right into editing a little MXML. In the source view, you’ll see some markup for our main application and the Panel component that it contains:
<?xml version="1.0" encoding="utf-8"?>

<mx:Application xmlns:mx="http://www.adobe.com/2006/mxml" layout="absolute">

  <mx:Panel x="140" y="100" width="250" height="200" layout="absolute" title="Company Leaders">

  </mx:Panel>

</mx:Application>
As you can see, the Application acts as a container just like the Panel component. A few extra properties have been added for us already. The Panel is positioned at the point to which you dragged it into the design view, and it has default dimensions of 250 pixels by 200 pixels. Both the Panel and the Application use “absolute” layout. We’ll learn a bit more about other layout modes in a moment.
From here, we could add components to the main application, or we could work with components inside our Panel. Let’s add a List of our leader’s names and a Form that allows us to edit their information inside the Panel tags.
<mx:List id="names"/>

<mx:Form id="details">

  <mx:FormItem label="Name:">

    <mx:TextInput id="nameInput"/>

  </mx:FormItem>

  <mx:FormItem label="Title:">

    <mx:TextInput id="titleInput"/>

  </mx:FormItem>

  <mx:FormItem label="Description">

    <mx:TextArea id="descInput"/>

  </mx:FormItem>

  <mx:Button label="Save Changes"/>

</mx:Form>
If you take a look at the design view, you’ll discover a bit of a mess. The Form looks alright, but our List is hidden behind it. We can use Flex’s layout system to correct this problem. Let’s alter the layout property of our Panel:
<mx:Panel layout="horizontal" title="Company Leaders">Now the Form appears to the right of our List, and the elements no longer overlap. You’ll notice that I removed the position and sizing parameters. The Panel should be able to determine a good size for itself automatically, on the basis of its content. However, the Panel now appears in the upper left-hand corner of the application. Let’s change the layout parameters of the application to position the Panel in a better place:
<mx:Application xmlns:mx="http://www.adobe.com/2006/mxml" horizontalAlign="center" verticalAlign="middle">That looks better, doesn’t it? We’ve removed the absolute layout, and the application will position the Panel right in the middle of the screen. Even better, Flex will always keep the Panel centered — even when the application changes size.
Getting Wild with Data
We’ve finished the general layout of our Flex application. Now, let’s move on to one of the coolest features Flex provides — we’re going to bind a data source to our form, and watch Flex automatically handle all the details for us.
In the finished example code, under the main form markup that we’ve already covered, you’ll find an ArrayCollection element. Copy and paste this section into the MXML code. The ArrayCollection contains all the data that we need to show about the company leaders. It’s pretty long, so here’s a shorter version that only contains the details of a single person, Darron Bryant.
<mx:ArrayCollection id="people">

  <mx:Object>

    <mx:image>images/darron.jpg</mx:image>

    <mx:name>Darron Bryant</mx:name>

    <mx:title>Chief Technology Officer</mx:title>

    <mx:description>Darron leads the charge when it comes to developing new products. He's passionate about riding the bleeding edge of technology to take advantage of every new development.</mx:description>

  </mx:Object>

</mx:ArrayCollection>
MXML features a native ability to bind data sources to the properties of components. Let’s start out by binding the names of the ArrayCollection we just added to our List component:
<mx:List id="names" dataProvider="{people}" labelField="name" selectedIndex="0"/>You’ll notice that the dataProvider property contains curly brackets, which sit around the “people” collection. This is how Flex discovers that we want to bind the data source to our List. When Flex binds data, it automatically generates all of the boring event-handling code that would be such a hassle for us to write in ActionScript. Flex can determine when the data in the “people” collection changes, and it will notify every event listener that’s listening for those changes. With just those two brackets, we get dozens of lines of code for free.
The next property, labelField, tells the List which property from our data source it should show when displaying text on the List. In this case, we’re looking for the name of the person whose details we’re displaying. Our first person’s name is Darron Bryant, so his name will appear as the first item in the List. I’ve also set the selectedIndex to 0. This means that Darron’s name will be selected by default.
For the first time so far, a change to the code will not be reflected in the design view — to see data binding in action, we need to run our application. Click the Run button on the main toolbar (it’s the green circle with the white arrow in it).
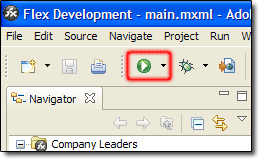
Running the application in Flex Builder
When you click the Run button, Flex Builder opens your default web browser and displays your application. Unlike the design view, this display lists a series of names that we can click on.
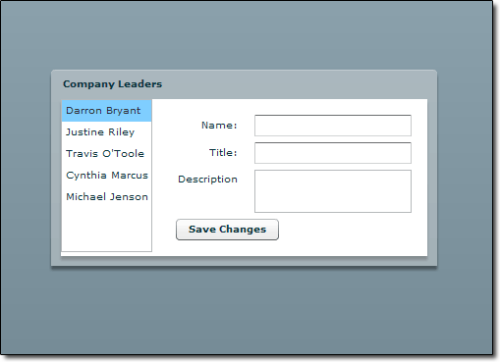
The sample application with simple data binding in play
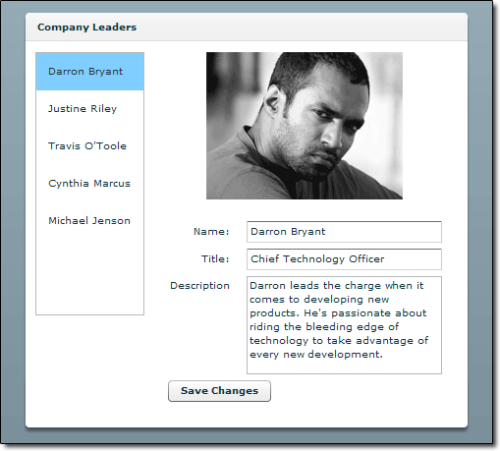
Let’s take our binding a step further so that something actually happens when we choose a name from the list. When the user clicks on a name, we want additional information about that person to appear in the Form to the right. Data binding is pretty flexible, so let’s use a little inline ActionScript to populate the Form.
<mx:TextInput id="nameInput" text="{people.getItemAt(names.selectedIndex).name}"/>We’ve taken the selectedIndex from the List and used it to retrieve an object from the data source. This object represents one of the people we’re dealing with; we can access the name property based on this index. Run the application again, and click on a couple of the names. Thanks to Flex, the data changes with almost no effort on our part! Alter the two other TextInput boxes — titleInput and descInput — to display a person’s title and a short description of him or her. The code to do this should be almost identical to the code that retrieved the person’s name.
Let’s look at one last example of data binding. Since we’re recognizing this group of people for their leadership ability, we probably want to show users of the application what they look like. You may have noticed the first property in our data source that makes reference to an image. We’re going to bind this image property to an Image component, in order to display a picture when a person is selected. Start by adding a few elements around the Form:
<mx:VBox horizontalAlign="center" width="100%">

  <mx:Image id="picture"                         source="{people.getItemAt(names.selectedIndex).image}"/>

  <mx:Form id="details">

    // removed Form code for brevity //

  </mx:Form>

</mx:VBox>
Directly above the Form, we’ve added the Image component. I’ve already bound its source property to the data source in the same way I bound the TextInput boxes to the data source previously. Around the image and Form, you’ll see a component called a VBox. Boxes are special layout components that help keep our application organized. You’ll remember that we set the Panel’s layout property to “horizontal”. We want the Image to appear directly above our Form; the VBox gives us the vertical alignment we need, and it affects only the components that are inside the box. The HBox does the same, except it aligns its children horizontally.
Look for the images you’ll need in the downloadable source archive. Once you’ve included them with your project, and run it, you’ll see that the images change with the rest of the data whenever you click on a name in the List component.
We just need to do one more thing to make our application fully functional. You may have noticed the button on the form that says Save Changes. After a user changes a person’s data, he or she should be able to save the updated profile. The next time the person is selected, the modified data will be displayed.
We want this to happen after the user clicks on the Save Changes button. We’ll use the click event property to trigger a function call:
<mx:Button label="Save Changes" click="this.saveChanges();"/>We’re going to get a little more advanced at this point. We used a small amount of ActionScript to handle the event binding; now, we’re going to write a short function right inside our MXML document that will let us save the data. Let’s add a Script element to the application and put our function inside:
<mx:Script>

  <![CDATA[

    private function saveChanges():void

    {

      var updatedPerson:Object =                       this.people.getItemAt(this.names.selectedIndex);

      updatedPerson.name = this.nameInput.text;

      updatedPerson.title = this.titleInput.text;

      updatedPerson.description = this.descInput.text;

      this.people.setItemAt(updatedPerson, this.names.selectedIndex);

      this.people.refresh();

    }

  ]]>

</mx:Script>
When the saveChanges function is called, we use getItemAt to access the profile from our data source, and we set each of its properties manually. Next, the setItemAt function overwrites the previous data. Finally, we call the refresh function to inform the ArrayCollection that we altered some of the data, and Flex will take care of the rest.
Congratulations! You’ve run your very first working Flex application. The appropriate data will display whenever you click on a person’s name in the list, and you can save any changes you make to the data back to the data source. With a little data binding and some ActionScript for the more advanced functionality, building a web application couldn’t be simpler.
Enhancements … and More!
If you’re looking to do more, you might want to add a Reset button, which users could click to restore the person’s data to its previous state (if for example, they decided not to save the changes they’d made to a profile). You could also create a custom item renderer for the names list, to display a thumbnail of each person’s picture next to his or her name. You might even pull the data from a different source.
Adding an image to each of our fearless leaders
Take a look at some styling code I added to my final version of the application (if you’ve coded any CSS before, this will look familiar):
    Panel

    {

      borderStyle: solid;

      headerColors: #e7e7e7, #d9d9d9;

      backgroundAlpha: 100;

      paddingTop: 10;

    }

    List

    {

      paddingLeft: 10;

      paddingRight: 10;

      paddingTop: 10;

      paddingBottom: 10;

    }
Flex’s style system includes many different properties, and by creating your own assets inside Flash or Photoshop, you can change the appearance of your application entirely. Imagine changing the skin to match your company’s branding and marketing materials. With a little work, you could even create a skin to match the default theme of Windows or Mac OS X. The possibilities are endless!
Resources
The resources available to teach you about developing with Flex are growing quickly, with most of the information provided by Adobe. If you’re interested in learning more about Flex, I’d encourage you to check out some of the following resources:
The FlexCoders mailing list is worth subscribing to.
For some more introductory material, look no further than the Flex Quick Start guide.
You’ll also want to visit Adobe’s new development community site, Flex.org. It just launched with the release of Flex 2, and Adobe has plans to expand it to include all sorts of great community interaction related to Flex.
Adobe has put a great demo app online to showcase most of what is possible in Flex called JamJar.
Finally, you should check out Adobe’s listing for Flex blogs. These folks share all sorts of information about their own discoveries.
Summary
In this article, we’ve barely scraped the surface of a whole new way to build Rich Internet Applications. We took a brief look at the Flex development cycle for building web applications using MXML and ActionScript, then looked at using the Design View of Flex Builder to create a simple page layout. We added some data binding to populate a list on this page, and we then went one step further by writing a small amount of ActionScript that saved the changes a user made to the data. Finally, I pointed you in the direction of some other resources that you can use to expand your Flex development skills.
I hope this has given you a taste for just what’s possible with the Flex 2 framework. Now it’s up to you to get out there and start flexing your muscles!
Frequently Asked Questions about Flex 2 Internet Applications
What is Flex 2 and how is it used in creating Internet applications?
Flex 2 is a software development kit (SDK) from Adobe Systems Incorporated. It is used for the development and deployment of cross-platform rich Internet applications based on the Adobe Flash platform. Flex 2 allows developers to create expressive, interactive web applications that can reach virtually anyone on any platform. It includes a powerful set of libraries and a compiler for generating SWF files.
How does Flex 2 compare to other rich web application frameworks?
Flex 2 stands out for its robustness and versatility. It is designed to create rich, expressive web applications that can run consistently across major browsers, desktops, and operating systems. Unlike some other frameworks, Flex 2 allows for a high degree of customization and control over the user interface, making it a popular choice for complex, interactive web applications.
What are the main features of Flex 2?
Flex 2 offers a range of features designed to facilitate the development of rich Internet applications. These include a powerful programming model, integrated development environment (IDE), and rich class library. Flex 2 also supports data binding, making it easier to create data-driven applications.
How does Flex 2 support the development of rich Internet applications?
Flex 2 provides a comprehensive set of tools and libraries for building rich Internet applications. It includes a powerful programming model that supports common design patterns and a rich class library that provides reusable components for creating user interfaces. Flex 2 also includes an integrated development environment (IDE) that simplifies the development process.
Can I use Flex 2 to develop mobile applications?
While Flex 2 was primarily designed for developing web applications, it can also be used to create applications for mobile devices. However, it’s important to note that mobile development with Flex 2 may require additional tools and libraries, and the resulting applications may not perform as well as those developed with platforms specifically designed for mobile development.
What are the system requirements for using Flex 2?
Flex 2 requires a system with a Pentium 4 or faster processor, 512MB of RAM (1GB recommended), and 500MB of available hard-disk space. It also requires a DVD-ROM drive and a 1024×768 display with a 16-bit video card.
How can I learn to use Flex 2?
There are many resources available for learning Flex 2. Adobe offers documentation and tutorials on its website, and there are numerous books and online courses available. Additionally, the Flex community is active and supportive, and there are many forums and blogs where you can find help and advice.
What are the alternatives to Flex 2 for developing rich Internet applications?
There are many alternatives to Flex 2 for developing rich Internet applications. These include other frameworks like AngularJS, React, and Vue.js, as well as languages like JavaScript and TypeScript. The best choice depends on your specific needs and preferences.
Is Flex 2 still supported by Adobe?
Adobe officially discontinued support for Flex in 2015. However, the Flex SDK is now maintained by the Apache Software Foundation as Apache Flex. Apache Flex continues to be actively developed and supported by the community.
What is the future of Flex 2 and rich Internet applications?
While Flex 2 itself is no longer supported by Adobe, the concepts and techniques it introduced continue to influence the development of rich Internet applications. Today, many of the ideas pioneered by Flex 2 can be seen in modern web development frameworks and libraries. As for the future, it’s likely that we’ll continue to see the development of tools and technologies that make it easier to create rich, interactive web applications.
Josh rides the cutting edge of Flash technologies. Whether writing about Flash, Flex, or straight web design, he shares his discoveries and insights on his blog, Zeus Labs. He believes that any development challenge can be overcome with a keyboard, a mouse, and his iPod.


Published in
·Cloud·Community·Open Source·Performance & Scaling·PHP·Programming·Web·December 28, 2013