Imagine you’re driving down a back country road, and you see two apple stands. They both look the same, yet one charges a few dollars more than its competitor. You decide to buy some apples, and stop at the cheaper stand. When you peer into their bins, you see that they’re half-full of bruised, rotten apples. You decide to try the other stand, which offers bags overflowing with ripe, shiny red apples that look juicy enough to sink your teeth into.
As a consumer, if you truly wanted fresh apples, you would have paid the extra money for the healthier looking apples at the second stand. The old, bruised apples at the first stand wouldn’t have prompted you to reach for your wallet and take them home.
Similarly, a consumer who knows he wants to purchase a specific product online may be torn between two different online retailers. Both may have spent much of their marketing budget on search engine optimization and site design, in an effort to capture this specific product-buying market. The difference between the two may well lie in product photography.
This is where most sites turn to stock photography. And, if you have a service business (tech support, design) or a community site, stock photography may well be the way to go. But, if you sell a product, you need great product shots.
So, how do you get from a plain old digital photo to a great product shot that will entice your customers to buy? There are several elements that you should consider. Let’s look at each in turn, in the context of a real-world example.
Quality
If you’re working from a digital camera, it’s imperative to use the highest possible quality and resolution settings. A camera with at least 3 megapixels is best, as most pictures for the Web will stay fairly small — they won’t need the quality provided by high-end digital cameras.
If you’re starting with a photo from film, you’ll need to use a scanner. If you have access to a drum scanner, that’s great; if not, just scan it on a flatbed with a high DPI –- around 300 dpi is usually optimal. Photos that begin blurry, scratched and/or dusty before scanning will be more difficult to turn into a product shot that really compels people to make a purchase. The image below shows the photo I’m beginning with — a shot of a guitar, taken with a 3.1megapixel Kodak digital camera without any special lighting applied.
Lighting
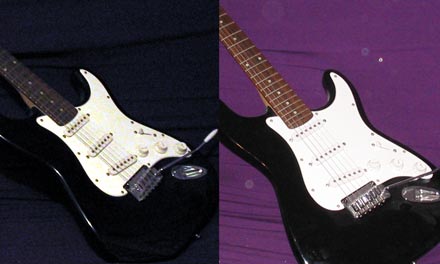
No matter how good your product is, if your original photo is overexposed or poorly lit, no amount of editing will save it. To end up with a truly great product shot, you need to start with something good. Subtle, natural front lighting against a contrasting plain background color is the best way to begin. If you’re selling green peppers, don’t photograph them on a green piece of fabric. Try red or orange -– not only will the color pop the product if you decide to keep the background, it will also be much easier to remove later on.
In the image above, the guitar contrasts well with the purple fabric — much more so than the black. The contrast makes it much easier to see the colors of the product itself — the product is more vivid, more alive, and more real to the customer.
Backgrounds
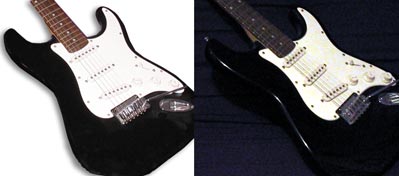
Ever wonder why products in catalogs are always shown without backgrounds? Even clothing models are typically shown on plain white.
Without distracting elements hovering behind the product, a customer is free to see the product itself. Notice how the guitar on the left in the image below is more compelling than the one on the right? Your customers’ eyes will instantly be drawn straight to the product — exactly where you want it to go. The product looks cleaner, especially without the distracting noise of the background. Also, notice the slight drop shadow (read more about this in Final Image Enhancements).
Details
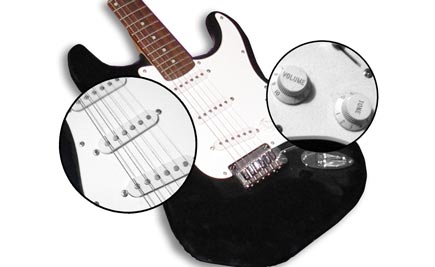
Too often, a customer will opt for offline purchase because they cannot see a product as clearly as they could in a retail store. Allowing multiple views is one way to solve this problem, but it forces the customer to continue to load images. An alternative is to use close-up bubbles, which allow the customer to get "up close and personal" with the product, even though they’re only viewing it in 2D. The image below shows exactly what a close-up bubble can do.
Coloration
Using Photoshop, or a similar editing tool, you can enhance the colors of your product to compensate for the minor inadequacies of the original photo. One important thing to remember is to be honest with your colors -– don’t change your sweaters to green just because you have a Hue/Saturation toolbar (Photoshop: Image > Adjustments > Hue/Saturation) if you only sell purple. Doing so will only confuse your customers. Also, for finer color adjustments, the Color Balance palette is a much more precise tool (Image > Adjustments > Color Balance).
Final Image Enhancements
Tools such as Brightness & Contrast and Auto Levels are really convenient for quick-and-dirty product shots. Not only can they achieve instantly what it could take some time to do manually, but they also make it easy for Photoshop amateurs to enhance their photos.
Tools to keep in mind:
- Brightness/Contrast: Be careful not to change the lighting too much, especially if you started with good lighting to begin with. Not only will it be obvious that you edited your photos, it could easily cross the line into over-editing. You can access this palette in Photoshop by Image > Adjustments > Brightness/Contrast
- Auto Levels: Use of this tool alludes to one of the more advanced topics of Photoshop use, but fortunately, anyone familiar with Photoshop can access this tool (Image > Adjustments > Auto Levels)
To bring your image out from the background, you may also wish to try adding a subtle drop shadow. This not only adds depth to your image, it creates the illusion that the two-dimensional product photo is actually a three-dimensional image, and, in turn, that it’s a real product similar to something they could experience in a retail store. You can see what a subtle drop shadow can do in the above figure.
Web Optimization
To bring your product shots to your customers, you should take a final step and optimize them for the Web. Remembering the bandwidth limitation of many customers and the limited patience of others who don’t wish to wait for images to load, resizing and optimizing should be your final — and perhaps most important — step.
Image dimensions should usually stay under 400 pixels by 400 pixels. If a customer wants a larger image, and thereby agrees to wait for the image, you can offer a link to a larger version. This allows investigation of your products in depth by very interested or high-bandwidth customers, without impeding other customers who may be on slower connections. While this really has nothing to do with the product shots themselves, it can be a critical ingredient to increased sales.
Conclusion
Always keep in mind that you’re trying to sell product. If you wouldn’t purchase something from your own Website because of the image quality (or lack thereof), something needs to change.
What’s visually attractive to you may be just as attractive to your customers — or may indeed be the exact opposite. Always test product shots on friends, family, or co-workers to see what they think. If you happen to run out of ideas about how to display your products, look around at other successful retail Websites to see how they do it. An overlooked reason for their success may be their product shots.
Just remember, no one wants old, bruised apples, so make sure yours are shiny, new, and worth buying.
 Heather Conary
Heather is majoring in New Media at the University of Maine, and has been designing Websites and graphics personally and professionally for seven years. She also co-owns Illumination Design, a small design firm in Maine.