Photoshop Blending Sliders: Remove Solid Backgrounds
Today I have a fairly quick Photoshop tip on how to remove white or black backgrounds from images in Photoshop to create areas of transparency. There are several ways to do this. You could use the magic eraser, or just make a selection of the white or black background and then delete it, but I want to show you how to use a blending slider to do it. As well as the blending modes available in the Layers palette, you can play around with blending sliders in the Layer Style dialog box. Let’s get started.
For more complex backgrounds, this method won’t work — it’s an easy option when the background in your image is already a solid color. You can find out how to use Photoshop to eliminate more complex imagery in our guide covering five remove background techniques.
Key Takeaways
- Blending sliders in Photoshop are a powerful tool for removing solid white or black backgrounds from images, creating areas of transparency. They work by adjusting the visibility of layers based on their brightness.
- To use blending sliders, open the Layer Style dialog box and locate the sliders in the “Blend If” section. Dragging the right slider (highlights) towards the middle will make the white areas transparent, and dragging the left slider (shadows) will do the same for black areas.
- While blending sliders are most effective for removing white or black backgrounds, they can also be used to remove other color backgrounds to some extent. However, for more precise removal of other color backgrounds, other Photoshop tools like the Magic Wand or Quick Selection tool may be more suitable.
1. Open an image in Photoshop with a predominantly white or black background.
Toy photo by levisz
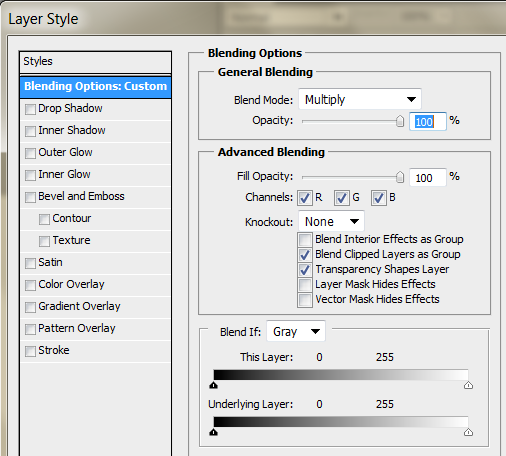
2. Open the Layer Style dialog box by doing one of the following:
- Click the little fx button at the bottom of the Layers panel and choose Blending Options.
- Double-click its layer thumbnail in the Layers panel.
- Choose Layer > Layer Style > Blending Options.
Note: The Blending sliders won’t work on a locked Background layer; you have to double-click the layer first to make it editable.
At the bottom of the resulting dialog box, you’ll see two pairs of sliders-one set for the This Layer bar and another for the Underlying Layer bar. Each of these sliders lets you make parts of your image transparent based on the brightness value of the pixels. The left slider represents the shadows (blacks) in your image and the right one represents the highlights (whites). If you want to change the background of the currently active layer, then tweak the This Layer slider.
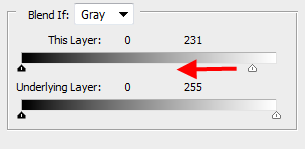
3. If you want to hide a white background, drag the highlight slider (the one on the right) toward the middle until the white part is transparent.
As you drag, you’ll see the white areas of the image disappear and the checkerboard pattern (or underlying layer) will appear. Note that any white area will disappear so you need to be careful how far you drag.
Likewise, if the background of your currently active layer is black and the subject (or object in the foreground) is much brighter, you can hide the black part by dragging the shadow slider (the one on the left) toward the middle until the black part is transparent. Very easy and quick.
If you enjoyed reading this post, you’ll love Learnable; the place to learn fresh skills and techniques from the masters. Members get instant access to all of SitePoint’s ebooks and interactive online courses, like Foundations of Photoshop.
Pick up plenty of Photoshop design skills with our Photoshop for Web Design course, available on SitePoint Premium.
Comments on this article are closed. Have a question about Photoshop? Why not ask it on our forums?
FAQs on How to Remove Solid Backgrounds via Photoshop Blending Sliders
What are the blending sliders in Photoshop and how do they work?
Blending sliders in Photoshop are a powerful tool that allows you to adjust the visibility of layers based on their brightness. They are located in the Layer Style dialog box under the “Blend If” section. You can access this by right-clicking on a layer and selecting “Blending Options”. There are two sliders, “This Layer” and “Underlying Layer”. By dragging these sliders, you can make the darker or lighter areas of your layer become transparent, allowing the layers beneath to show through. This is particularly useful for removing white or black backgrounds from images.
Can I use blending sliders to remove other color backgrounds?
While blending sliders are most effective for removing white or black backgrounds, they can also be used to remove other color backgrounds to some extent. However, the results may not be as clean and may require additional adjustments. For more precise removal of other color backgrounds, other Photoshop tools like the Magic Wand or Quick Selection tool may be more suitable.
How can I fine-tune the blending sliders for better results?
To fine-tune the blending sliders, you can split them into two by holding down the Alt key (Option key on Mac) and dragging. This creates a smoother transition and can help to avoid harsh edges or artifacts. Experiment with different positions of the sliders to achieve the best result.
What should I do if the blending sliders don’t completely remove the background?
If the blending sliders don’t completely remove the background, you can try adjusting the sliders further or use other Photoshop tools to clean up the remaining areas. Tools like the Eraser, Clone Stamp, or Healing Brush can be useful for this purpose.
Can I use blending sliders to remove backgrounds in batch?
Unfortunately, Photoshop does not support batch processing with blending sliders. Each image needs to be processed individually. However, for batch background removal, you can consider using Photoshop’s Actions feature to record and replay a series of steps, or use other specialized batch processing software.
Are blending sliders available in all versions of Photoshop?
Blending sliders have been a feature in Photoshop for many versions and should be available in all recent versions of Photoshop. However, the exact location and appearance of the sliders may vary slightly between different versions.
Can I use blending sliders on text layers?
Yes, blending sliders can be used on text layers in Photoshop. This can be useful for creating interesting text effects by blending the text with the underlying layers.
What are some alternatives to blending sliders for background removal?
Besides blending sliders, there are many other tools in Photoshop for background removal. These include the Magic Wand, Quick Selection, Lasso, and Pen tools, as well as the Background Eraser and Select and Mask workspace. Each tool has its own strengths and is suitable for different types of images and backgrounds.
Can I save my blending slider settings for future use?
Unfortunately, Photoshop does not provide a way to save blending slider settings directly. However, you can save your settings as a Layer Style, which can then be applied to other layers. To do this, after adjusting the sliders, click on the “New Style” button in the Layer Style dialog box, give your style a name, and click OK.
How can I learn more about using blending sliders in Photoshop?
There are many resources available for learning more about blending sliders and other Photoshop tools. These include online tutorials, video courses, and books. Adobe’s official website also provides comprehensive documentation and tutorials on all features of Photoshop.
Jennifer Farley is a designer, illustrator and design instructor based in Ireland. She writes about design and illustration on her blog at Laughing Lion Design.
Published in
·Android·App Development·Frameworks·iOS·JavaScript·Mobile·Mobile Web Development·Tools & Libraries·October 10, 2014


