Deploying a Django App with mod_wsgi on Ubuntu 14.04

 Django is a free, open-source, Python-based web framework. Django follows the MVC architectural pattern, with special emphasis on creating your applications rapidly. In recent times, Django has become a popular choice for creating web applications. Popular services like Instagram, Bitbucket and Pinterest were developed using Django.
In development mode, Django has a development server, which is sufficient for testing purposes. Once you complete a web application and it’s ready for production, the process of setting up the application on a server might be overwhelming for some, especially if you’re doing it for the first time. This article provides a step-by-step guide on how to deploy Django-based web applications using mod_wsgi.
Key Takeaways
- Django is a popular Python-based web framework that follows the MVC architectural pattern and is used in the development of web applications such as Instagram, Bitbucket, and Pinterest.
- The Web Server Gateway Interface (WSGI) is a Python standard that enables web applications in Python to interact with web servers. mod_wsgi is an Apache module that hosts Python applications on Apache and is a simple way to deploy a Django application.
- The process of deploying a Django application using mod_wsgi involves creating a Django application, installing the necessary packages, and setting up the application to be served by mod_wsgi. The tutorial provides detailed instructions for each of these steps.
- Once the Django application is ready for production, it can be served through Apache and mod_wsgi, which involves installing Apache and mod_wsgi, modifying the directory structure, creating a WSGI script, and configuring Apache settings.
mod_wsgi
WSGI, or Web Server Gateway Interface, is a Python standard for web servers. Python was traditionally developed as a programming language, so WSGI provides a way for web servers to serve applications developed in Python. It enables web applications in Python to interact with web servers, acting as a link between the two.
Apache is one of the most popular web servers, and mod_wsgi is an Apache module that’s used to host Python applications on Apache. It’s also a relatively simple way of deploying a Django application.
Python comes installed by default in Ubuntu 14.04. Let us now look at the step by step guide to deploy a Django application using mod_wsgi.
1. Creating a Django Application
 In this section, we’re going to install the required packages and set up a hello world Django application to be served by
 mod_wsgi. We’ll assume that you’ve logged in to a newly created virtual machine.
1.1 Create a New User (Optional)
If you create a VM using AWS or Microsoft Azure, you’re logged in as a user that you specified while creating the VM, so you can skip this step.
There are some extra steps if you’re first logged in as a root user (if you create a new VM with Digital Ocean). Although you can perform all functions using the same user, it’s generally advised to create a new user. Here are detailed instructions for creating users and adding them to the sudoers list on Ubuntu 14.04.
1.2 Install a Python Package Manager
In this tutorial, we’re going to use the Ubuntu package manager, apt-get, for installing packages. However, on a fresh VM, you must update packages first by running the following command:
sudo apt-get updatePip is a Python package manager that helps us install, modify or remove Python packages. The easiest way to install pip in Ubuntu is by using the Ubuntu package manager apt-get:
sudo apt-get install python-pipapt-get installs the latest stable version of pip. Alternatively, if you require a specific version of pip, you can install it from the source code. However, for the purposes of deploying a Django application, installing it through the package manager should suffice.
You can also use easy_install as an alternative to pip. However, in this tutorial, we’ll use pip to install packages.
1.3 Install Django
If you’re creating a project form scratch, you just need the Django package. In this example, we wouldn’t require any further packages:
sudo pip install DjangoIf you want to install a specific version of the package, you can specify it in the command as shown below (in case your application was coded in an older version of Django):
sudo pip install Django==1.5.5You can also install Django through the package manager apt-get. Caution must be exercised when following this step as apt-get might not be updated with the latest stable version as compared to pip.
1.4 Install and Freeze Other Requirements (Optional)
If you’re deploying an existing project, you can recursively run pip to install the dependencies in the project. Generally, there’s a file requirements.txt in the source directory of the project, which contains the packages required to run the project:
pip install -r requirements.txtIf your system has other Python projects, the versions of different Python packages might interfere with one another. A solution to this is to use virtualenv and keep every project in its own virtual Python environment. Here’s a tutorial on getting started with virtualenv. Since we’re deploying an application on a server, we aren’t going to work with virtualenv in this tutorial.
If you’re working on a Django application and you want to create or update the requirements file, you could just run the following:
pip freeze > requirements.txtpip freeze prints a list of installed Python packages in your current environment, and the > stores the output of the command pip freeze into the file requirements.txt.
1.5 Create Hello World
Application
To create a new project in Django named helloworld
, run the following:
django-admin.py startproject helloworldYou’ll notice that a new directory helloworld
has been created. Change your directory to helloworld
and run the following to start a new app helloapp
within the Django project:
cd helloworld/
django-admin.py startapp helloapp
We can now create a sample view that prints Hello World
in our browser. First, add the new app to your project’s settings.py. Search for
in the file, and add the name of our new app to it. It should look something like the following:INSTALLED_APPS
INSTALLED_APPS = (
    'django.contrib.auth',
    'django.contrib.contenttypes',
    'django.contrib.sessions',
    'django.contrib.sites',
    'django.contrib.messages',
    'django.contrib.staticfiles',
    'helloapp'
)
Next, we add a URL pattern to the urls.py of the project. It looks something like this:
urlpatterns = patterns('',
    # Examples:
    # url(r'^$', 'helloworld.views.home', name='home'),
    url(r'^', 'helloapp.views.home_view'),
)
This instructs Django to look for the function home_view within the views.py of the app helloapp
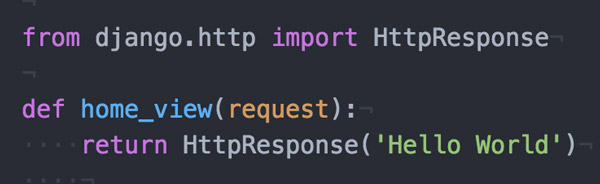
. Therefore, we edit the views.py file to look like the following:
from django.http import HttpResponse

def home_view(request):
    return HttpResponse('Hello World')
Next, we run the development server by running the following:
python manage.py runserverThe code for the hello world Django application is available on GitHub.
2. Serving a Django Application Through Apache and mod_wsgi
 Now that we’ve created a hello world application, this section explores how you can configure different settings in order to serve the application through Apache and mod_wsgi.
2.1 Install Apache2
Using the apt-get command, installing Apache is also a one step process. Run the following command:
sudo apt-get install apache22.2 Install mod_wsgi
The mod_wsgi module for Apache can be installed on Ubuntu 14.04 using apt-get:
sudo apt-get install libapache2-mod-wsgiIf you’re using Python 3 instead of Python 2, run the following:
sudo apt-get install libapache2-mod-wsgi-py3Here’s a tutorial with detailed instructions on installing mod_wsgi on Ubuntu.
2.3 Modifying Directory Structure
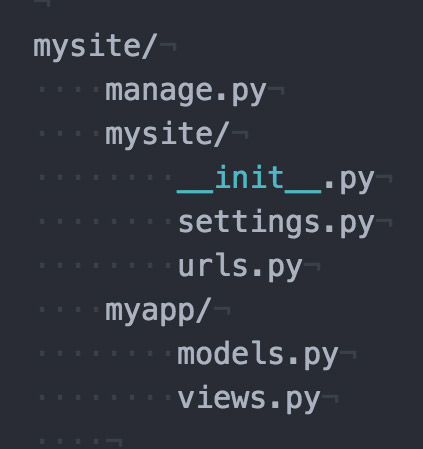
To serve the Django application through mod_wsgi, we need to write a WSGI script that serves as a connection between Apache and Django. The Django file structure by default is something like this:
mysite/
    manage.py
    mysite/
        __init__.py
        settings.py
        urls.py
    myapp/
        models.py
        views.py
We’re going to change it a bit and add an apache directory within mysite to contain three files:
mysite/
    manage.py
    mysite/
        __init__.py
        settings.py
        urls.py
        apache/
            __init__.py
            override.py
            wsgi.py
    myapp/
        models.py
        views.py
This helps separate the logic, and you could also ignore the directory as a whole in your version control system.
Note: if you’re using a version control software (VCS) like Git, you can add the apache directory to the ignore list of the VCS.
2.4 Create WSGI Script
The empty __init__.py file tells Python to treat the directory as a package. The override.py imports all settings and overrides any settings for production. For instance, databases and debug settings for production might be different from those of development, and you may want to separate them from the source code:
# override.py

from mysite.settings import *

DEBUG = True
ALLOWED_HOSTS = ['www.mydomain.com', 'mydomain.com']
Finally, the wsgi.py file contains the WSGI settings. We’re assuming that the root directory shown above is contained in the home directory of the user (/home/myuser/):
#wsgi.py
import os, sys
# Calculate the path based on the location of the WSGI script.
apache_configuration= os.path.dirname(__file__)
project = os.path.dirname(apache_configuration)
workspace = os.path.dirname(project)
sys.path.append(workspace)
sys.path.append(project)

# Add the path to 3rd party django application and to django itself.
sys.path.append('/home/myuser')
os.environ['DJANGO_SETTINGS_MODULE'] = 'mysite.apache.override'
import django.core.handlers.wsgi
application = django.core.handlers.wsgi.WSGIHandler()
You also need to transfer the ownership of the apache directory to Apache’s default user www-data in order to allow it to access the directory:
sudo chown www-data:www-data apache/Note: Thanks to Scott Taggart in the comments for pointing out that
the wsgi.py script shown above will throw an error in Django 1.8 (Django 1.7 was used for this article). As noted by Scott, for the script to work with Django 1.8, the last two lines need to be replaced with:
from django.core.wsgi import get_wsgi_application
application = get_wsgi_application()
2.5 Configure Apache Settings
To configure Apache to use your WSGI script, you need to edit the configuration file as shown below (using a text editor, in this case VIM):
sudo vi /etc/apache2/sites-enabled/000-default.confAdd the following lines to the file:
<VirtualHost *:80>
    WSGIScriptAlias /mypath/ /home/myuser/mysite/apache/wsgi.py
    <Directory "/home/myuser/mysite/apache/">
      Require all granted
    </Directory>
</VirtualHost>
The first line adds an alias of /mypath to the root of your web application. Your web application would now run on your domain—http://www.mydomain.com/mypath/. Replace /mypath/ above with / if you want your domain, http://www.mydomain.com/ , to directly point to the Django application. The <Directory> block is to allow requests to the directory that contains the WSGI script.
If you have a custom robots.txt and favicon, you may add an alias as follows:
Alias /robots.txt /home/myuser/mysite/robots.txt
Alias /favicon.ico /home/myuser/mysite/favicon.ico
In each of the lines above, the first argument after the keyword Alias signifies the URL pattern, and the second argument shows the path to the file to be served. This example assumes that your files robots.txt and favicon.ico are saved in the mysite directory.
To serve static and media files, you need to create their alias entries separately:
Alias /media/ /home/myuser/mysite/media/
Alias /static/ /home/myuser/mysite/static/

<Directory /path/to/mysite.com/static>
Require all granted
</Directory>

<Directory /path/to/mysite.com/media>
Require all granted
</Directory>
Finally, save and close the file and restart Apache to see the changes:
sudo service apache2 restartNote for older versions of Apache
For Apache versions older than 2.4 (like the one in Ubuntu 12.04), you need to replace Require all granted by Allow from all after adding the line Order deny,allow above it.
Note for static files being served by Django packages
Some Django packages have their own static and media files. In the development version, it’s taken care of by Django, but it doesn’t work that way when serving through Apache (including the Django admin static files). The static files are usually located in the same place where packages are installed.
An easy way to override them is to copy their static files to your static directory (and commit them), which is a rather messy solution. A better way would be to create an alias for the particular set of static files, just like you created alias entries for static and media roots.
A discussion on StackOverflow gives an example of how to take care of the Django admin static and media files. You need to follow the same pattern for every other package that uses static and media files.
Conclusion
In recent years, Django has become the first choice among many programmers. Although many accuse Python of being slow, websites like Instagram and Disqus—which run on Django—have scaled to millions of users. If you’re interested, you may want to read how HackerEarth scaled their Django-based web application using mod_wsgi.
I hope this tutorial has helped you in deploying your Django-based web application on the server using Apache and mod_wsgi. If you faced any difficulties, let me know in the comments below.
Frequently Asked Questions (FAQs) about Deploying a Django App with Mod_WSGI on Ubuntu 14.04
What is Django and why should I use it for my web development project?
Django is a high-level Python web framework that encourages rapid development and clean, pragmatic design. It’s built by experienced developers and takes care of much of the hassle of web development, so you can focus on writing your app without needing to reinvent the wheel. It’s free and open source, has a thriving and active community, great documentation, and many options for free and paid-for support.
What is Mod_WSGI and how does it work with Django?
Mod_WSGI is an Apache module that provides a WSGI compliant interface for hosting Python based web applications under Apache. It is used for serving Python web applications from Apache server. This includes Django applications, which are WSGI compliant.
How do I install Django on Ubuntu?
Django can be installed on Ubuntu using the Python package manager pip. First, you need to install pip. Once pip is installed, you can install Django by running the command ‘pip install Django’ in your terminal. This will download and install the latest Django release.
How do I deploy a Django app with Mod_WSGI on Ubuntu?
Deploying a Django app with Mod_WSGI on Ubuntu involves several steps. First, you need to install Apache and Mod_WSGI. Then, you need to configure Apache to use Mod_WSGI. After that, you can deploy your Django app by creating a WSGI application script file and configuring Apache to use this file.
What are the benefits of using Mod_WSGI for deploying Django apps?
Mod_WSGI is one of the recommended ways to deploy Django applications. It is a stable, reliable, and efficient solution. It also provides good integration with Apache, a popular web server, which can provide additional features such as SSL, rewriting, and other HTTP features.
Can I use Mod_WSGI with other Python web frameworks?
Yes, Mod_WSGI is not specific to Django. It can be used with any Python web application that supports the WSGI specification.
How do I troubleshoot issues with Django and Mod_WSGI?
Troubleshooting issues with Django and Mod_WSGI can be done by checking the Apache error logs. The error logs will contain details about any issues that occur when running your Django application with Mod_WSGI.
How do I update my Django application when it’s deployed with Mod_WSGI?
To update your Django application when it’s deployed with Mod_WSGI, you need to restart the Apache server. This can be done by running the command ‘sudo service apache2 restart’ in your terminal.
How do I secure my Django application when it’s deployed with Mod_WSGI?
Securing your Django application involves several steps. This includes configuring Apache to use HTTPS, using Django’s built-in security features, and keeping your Django and Python packages up to date.
Can I use Mod_WSGI to deploy Django applications on other operating systems?
Yes, Mod_WSGI is not specific to Ubuntu. It can be used to deploy Django applications on any operating system that supports Apache, including other Linux distributions, macOS, and Windows.
Shaumik is a data analyst by day, and a comic book enthusiast by night (or maybe, he's Batman?) Shaumik has been writing tutorials and creating screencasts for over five years. When not working, he's busy automating mundane daily tasks through meticulously written scripts!