Creating an Image Gallery with the Flickr API — Requirements and Markup

Key Takeaways
- The Flickr API can be used to create a simple service that enables users to search for images using a text field, displaying a gallery of images whose titles or descriptions match the search text.
- The service will consist of a single HTML page with three main components: a header with the page title and search form, a gallery to display the chosen image, and a list of thumbnails beneath the gallery.
- The BEM methodology will be used for class naming, with a js- prefix added to class names that need to be retrieved by JavaScript functions, separating styling and JavaScript hooks.
- The service will be developed with attention to accessibility, employing the relevant role attribute where necessary and ensuring navigation and action triggering through the TAB and ENTER keys.
Without any doubt, APIs play a very important role today. Web services from small to big are required to expose their data through an API that developers can use to create a new service on top of them. Think of big companies like Google, Yahoo!, Twitter and Microsoft: all of them offer APIs for their services. Example uses of the data provided by these APIs are SnapBird, a tool offering extended search options on Twitter, and JoindIn.js, a library I developed that creates widgets based on the data provided by JoindIn.
In this two-part article, I’ll show you how to use the Flickr API to develop a simple service that allows a user to enter text in a search field, and which then displays a gallery of images from Flickr whose title or description match that text. This will be a great chance both to play with a third-party API and to study some nice techniques along the way.
The source code of the project is accessible on my GitHub account in the repository named Flickr gallery demo.
The Requirements
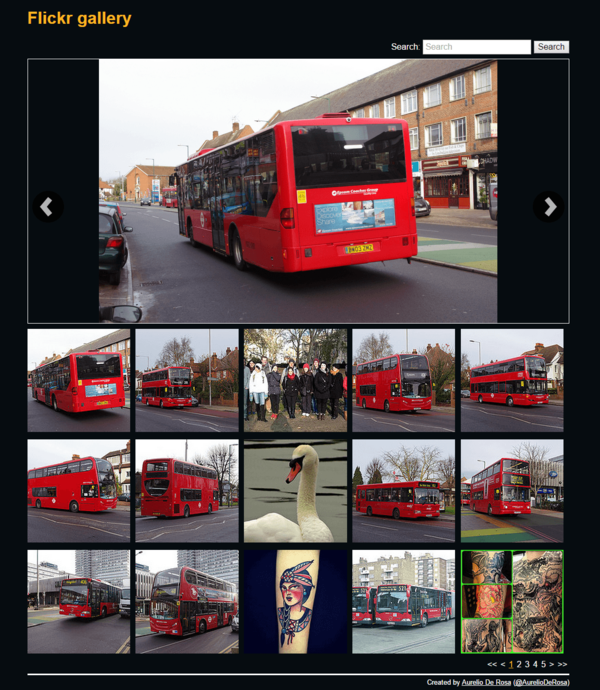
Before we write any code, it’s important to understand how the service will be developed. First of all, our project will be made of a single HTML page comprising three main components: a header, a gallery, and a list of thumbnails.
The header will contain the page’s title and a search form that the user can employ to find the photos matching the given text.
The gallery will sit beneath the header and will show the image chosen in its natural size, up to a fixed width and height (we don’t want the image to overflow our layout, do we?). The gallery will also feature left and right buttons to show the previous and next images respectively.
Finally, we’ll have a list of thumbnails of the photos below the gallery. We don’t want the list to become too long, so we’ll paginate the photos matched and show up to 15 photos on each page, displayed in three rows. (In this project, clicking on the right arrow won’t cause the next page of thumbnails to load. However, after reading this series, you can update to code to trigger this action if you wish.)
The whole service will be developed paying attention to accessibility, so along the way we’ll employ the relevant role attribute where it makes sense and also ensure that it’s possible to navigate the website and trigger the various actions through the use of the TAB and ENTER keys.
The result of our efforts is shown in the image below:
Class Name Conventions
Although the project on its own isn’t complex, I’ll use the BEM methodology to name the classes used in addition to some helpers. Some might think that it’s overkill, but I think this is a nice opportunity to learn a new methodology you might not be familiar with. The class names used for styling purposes won’t be used as JavaScript hooks. So, if a piece of JavaScript needs to retrieve one or more elements, instead of using the existing class names, I’ll add a specific class name to the elements, prefixed with js-. This is a common technique used by many developers to separate class names and JavaScript hooks. To reinforce the concept, let’s briefly discuss an example.
Let’s say we have defined the gallery element as such:
<div class="gallery"><!-- other code goes here --></div>The gallery class name is used to style the element, but the latter needs to be retrieved by a JavaScript function to perform some actions. Instead of retrieving the element using the gallery class name as shown below:
var gallery = document.getElementsByClassName('gallery')[0];I’ll add another class named js-gallery:
<div class="js-gallery gallery"><!-- other code goes here --></div>Then I’ll retrieve the elements like so:
var gallery = document.getElementsByClassName('js-gallery')[0];Doing it this way ensures that, even if later in the project the gallery class name is renamed or removed, the JavaScript code will still work. In case you don’t like the js- prefix, I’ve read that some developers use the do- prefix to highlight the fact that the element is used to perform an action. Both conventions are equivalent and you can choose the one you like the most.
Having established the goals, components and conventions of our project, let’s start the fun!
The Markup
The first step in creating our service is to write the markup of the page, and we’ll start with the header.
The Header
The HTML needed for the header is very simple. We’ll wrap both the elements described in the previous section – the title and the form – with a header element. The title of the page is defined by an h1 element and the form by a form element. The form is made of a label, an input where the user can write the text to search, and a button to submit the request. The label is tied to the input by using the for attribute.
The form will also have a role="search" attribute, because we want to highlight that it’s a search form, and the type of the input will be search. Finally, we’ll add a class named form-search for styling purposes and a js-form-search class that will be used by JavaScript to retrieve the text entered by the user.
The full code of the header is presented below:
<header class="island">
   <h1>Flickr gallery</h1>
   <form class="js-form-search form-search" action="/search" method="get" role="search">
      <label for="query">Search:</label>
      <input type="search" name="query" id="query" placeholder="Search" required />
      <input type="submit" value="Search" />
   </form>
</header>
Let’s now discuss the most important element of the markup – the gallery.
The Gallery
The gallery is composed of three different small elements: the img element used to show the selected image in its natural size, and the left and right arrows for changing the image displayed. Both arrows will be created using a button element. It’s the right choice because we want to perform an action when they are clicked. Visually, the buttons will look like arrows, but this is only meaningful for a sighted person. From the perspective of a visually impaired user, the arrows are completely useless. For this reason we have to enhance these buttons by providing an indication of their role. We’ll do that by adding text as the content of the buttons – text that is visually hidden but accessible to a screen reader. The technique employed below is taken from the HTML5 Boilerplate project and uses a class named visually-hidden.
The complete HTML code of the gallery is as follows:
<div class="island">
   <div class="js-gallery gallery">
      <img src="" class="js-gallery__image" />
      <button class="js-gallery__arrow--left gallery__arrow gallery__arrow--left">
         <span class="visually-hidden">Previous photo</span>
      </button>
      <button class="js-gallery__arrow--right gallery__arrow gallery__arrow--right">
         <span class="visually-hidden">Next photo</span>
      </button>
   </div>
</div>
Before we’re done with the markup, there’s one last component to discuss – the thumbnails list.
The Thumbnail Images List
The last component is made of two very simple sub-components: the list of thumbnail images of the current page and the pager. Both are defined as a list, but the first is an unordered list while the second is an ordered list. Both these lists need to be generated on the fly using JavaScript, so we’ll add a js- prefixed class name on them.
The code of this last component is presented below:
<div class="island thumbnails">
   <ul class="js-thumbnails__list thumbnails__list"></ul>
   <ol class="js-thumbnails__pager thumbnails__pager"></ol>
</div>
With this last snippet, we’ve completed our discussion of the markup of the page, so it’s time to give it some style.
The Styles
The visual styles of the project will be organized into small modules, each of which will deal with a specific aspect. As a base, we’ll employ normalize.css, the well-known style sheet that makes browsers render all elements more consistently and in line with modern standards. It precisely targets only the styles that need normalizing.
Then we’ll have a module for the helper classes, a module for the gallery, a module for the thumbnails, and so on.
In this section, we’ll discuss every module used in the project except normalize.css.
The Layout Module
This module is the one that groups the default styles of the elements, which means how the elements should look without any class defined. For example, here is where we’ll define the default color of the a elements and the body. The only exception is the island class that you’ve seen used in the markup and that I’ve employed to create isolated blocks. This class is inspired by the article The ‘island’ object by Harry Roberts, so if you want to learn more about it I suggest you to read the cited article.
The only declaration block worth a mention in this module is the following:
*,
*:before,
*:after {
   -moz-box-sizing: border-box;
   box-sizing: border-box;
}
It defines that all the elements of the page must use the CSS border-box box model value. If you want to learn more about this topic, I suggest you read the articles * { Box-sizing: Border-box } FTW by Paul Irish and Box Sizing by Chris Coyier.
The full code of the layout.css file is shown below:
*,
*:before,
*:after {
   -moz-box-sizing: border-box;
   box-sizing: border-box;
}
.island {
   display: block;
   max-width: 1024px;
   margin: 0 auto;
}
body {
   background-color: #060C10;
   color: #FFFFFF;
   font-family: Arial, Calibri, Helvetica, sans-serif;
}
h1 {
   display: block;
   color: #FCB720;
}
a {
   color: #FFFFFF;
}
Helper Classes
This is probably the simplest module of the service and defines three well-known helper classes that most, if not all, of you are well accustomed to. The classes are: visually-hidden, hidden and clearfix.
The first, visually-hidden, is used to visually hide an element. This means that the element is not displayed on the page but is still accessible to a screen reader, which is very important for accessibility purposes. hidden is a single-declaration class that is used to hide an element both visually and for screen readers. The last class, clearfix, is used to contain floats without resorting to using presentational markup. If want to learn more about this topic, you can take a look at the article A new micro clearfix hack by Nicolas Gallagher.
The full code of this module is shown below:
.visually-hidden {
   border: 0;
   clip: rect(0 0 0 0);
   height: 1px;
   margin: -1px;
   overflow: hidden;
   padding: 0;
   position: absolute;
   width: 1px;
}
.hidden {
   display: none !important;
}
.clearfix:before,
.clearfix:after {
   content: " ";
   display: table;
}
.clearfix:after {
   clear: both;
}
Conclusion
In this first part of the article, we discussed the details of the service we’re building and what you’ll learn by following this mini-series. We then covered the conventions I’m employing during the creation of the project so you know why class names are defined in a certain way.
With the goal and the components of the service specified, we then discussed all the markup that makes up the service we’re developing, highlighting some choices such as why I chose button elements for the arrows of the gallery. Finally, in the last part of this article, we started to examine some CSS modules for the project.
In the second and final part of this series, you’ll see the remaining CSS modules and also learn about the JavaScript code that powers the service.
Frequently Asked Questions about Creating an Image Gallery Using Flickr API
How can I get the API key from Flickr?
To get the API key from Flickr, you need to create an app on the Flickr App Garden. Click on the “Create an App” button and choose the type of app you want to create. Fill in the necessary details and submit the form. Once your app is created, you will be provided with an API key and secret. Keep these details safe as they will be used to authenticate your requests to the Flickr API.
What is the purpose of the Flickr.photos.search method?
The Flickr.photos.search method is used to search through the photos in the Flickr database. You can specify various parameters such as tags, text, user_id, etc., to filter the search results. The method returns a list of photos that match the search criteria.
How can I display the images returned by the Flickr API on my webpage?
Once you have the list of photos from the Flickr API, you can use the photo id, server id, secret, and farm id to construct the URL of each photo. The URL can then be used in an img tag to display the photo on your webpage.
How can I handle errors when using the Flickr API?
The Flickr API returns a status code and a message with each response. If the status code is not ‘ok’, it means that an error has occurred. You can check the message to see what the error is and handle it accordingly in your code.
Can I use the Flickr API to upload photos to Flickr?
Yes, the Flickr API provides a method called flickr.photos.upload for uploading photos. You need to authenticate your request using OAuth and provide the necessary parameters such as the photo file, title, description, tags, etc.
How can I paginate the results returned by the Flickr API?
The Flickr API provides parameters such as ‘page’ and ‘per_page’ that you can use to paginate the results. The ‘page’ parameter specifies the page number and the ‘per_page’ parameter specifies the number of photos per page.
Can I search for photos based on their location using the Flickr API?
Yes, the Flickr API provides several parameters such as ‘lat’, ‘lon’, ‘radius’, etc., that you can use to search for photos based on their location.
How can I sort the photos returned by the Flickr API?
The Flickr API provides a ‘sort’ parameter that you can use to sort the photos. You can sort the photos by date posted, date taken, interestingness, etc.
Can I get the EXIF data of a photo using the Flickr API?
Yes, the Flickr API provides a method called flickr.photos.getExif that you can use to get the EXIF data of a photo. You need to provide the photo id as a parameter to this method.
How can I get the user comments for a photo using the Flickr API?
The Flickr API provides a method called flickr.photos.comments.getList that you can use to get the user comments for a photo. You need to provide the photo id as a parameter to this method.
I'm a (full-stack) web and app developer with more than 5 years' experience programming for the web using HTML, CSS, Sass, JavaScript, and PHP. I'm an expert of JavaScript and HTML5 APIs but my interests include web security, accessibility, performance, and SEO. I'm also a regular writer for several networks, speaker, and author of the books jQuery in Action, third edition and Instant jQuery Selectors.