The choice of gadgets available to interface with the Internet of Things, the web of interconnected devices that allows developers to write code to interact with sensors, seems to grow every day.
If you have any magpie tendencies, an impulse purchase of a Raspberry Pi can quickly turn into a large collection of tiny machines, including Arduinos and all the cables, breadboards, resistors, diodes, buzzers, buttons and LED lights to make them perform their tricks.
Soon you are creating fascinating projects straight out of MAKE magazine such as the Raspberry Pi-powered weather balloon carrying a toy bear into the stratosphere or the Arduino-powered smart-phone enabled garage door opener.
Simple projects are a great way to teach kids how to program in Python (using a Raspberry Pi to blink LEDS in patterns, for example) or wire circuitry to create useful real-life life hacks using small machines like the Arduino. In this article, I’m going to introduce a relative newcomer to the IoT scene: the Spark Core, a “tiny wi-fi development kit” originally a successful Kickstarter project. To paraphrase Spark’s marketing blurb, “when the internet spills over into the real world, exciting things happen”.
The Spark Core, a wifi-enabled Arduino that comes packaged with its own breadboard, is all about connectivity and ease of use. Instead of writing code locally to power your Arduino or Pi, you can use the Cloud code solution offered by Spark to update the Sparks stashed around your house or office as long as they are connected to your wifi.
For example, you might have several Sparks connected to your house in a hacked-together ‘Nest-like’ system. From the web tools provided at Spark.io or from your local command line, you can ‘flash’ content to the Spark to make all the parts play together seamlessly.
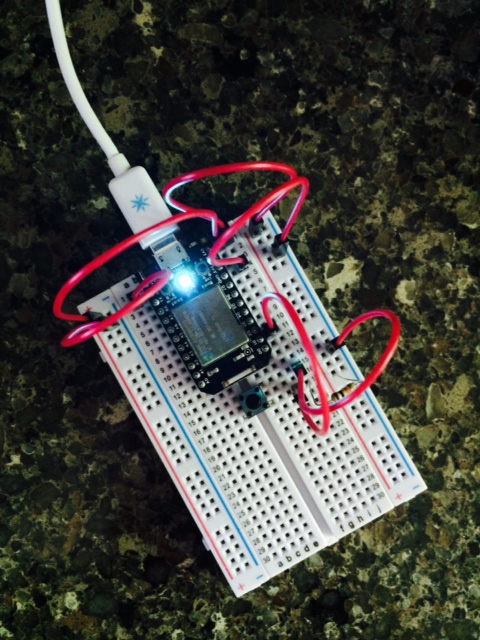
Even with just one Spark Core, you can undertake a lot of fun projects. Using the breadboard on which the Spark is housed, a few connecting cables, a resistor, and a pushbutton, you can make a tool that many parents could use right away: a “kid-summoner”. I’m going to demonstrate how to wire up your Spark to make it interface with the Pushingbox service to send a Tweet to your kids when you want them to come downstairs, perhaps for lunch. It beats yelling up the stairs or wishing you had an intercom!
What you need
- A Spark Core, available for $39 from spark.io
- An Arduino Sidekick Basic Kit for male-to-male cables, a button, and a resistor. You can buy this kit for $34.99 at Radio Shack, and is a useful kit to have on hand
- A Twitter account via which you can reach the third party person whom you want to summon
- A Pushingbox account (pushingbox.com) — an easy way to create notification ‘scenarios’ for your IoT-enabled devices
Step 1: Create a Scenario on Pushingbox
Login to Pushingbox and ensure that your Spark Core’s Twitter account authorizes Pushingbox to send tweets on its behalf. Pushingbox has a lot of great services integrated; you can enable voice notification, emails, browser and mobile push notifications. For our purposes, we simply need Twitter enabled.
Next, create a Pushingbox “Scenario” called “Send a Tweet”. Write a message that you want your Spark Core to send, referencing your child’s Twitter account.
For example
“@thing_one @thing_two Soup’s on, please come to the kitchen!.”
Test your Scenario by clicking test on the Scenarios screen. Your dashboard will log all instances where the Scenario is called:

Step 2: Get your Spark Core up and running
Following the instructions on Spark.io, ensure that your Spark is enabled on your local wifi. Using Spark’s mobile app helps with the ‘claiming’ process so you can associate your Spark Core with your wifi. I found that my sometimes shaky home wifi caused a few issues, but with a little patience the Spark Core will run reliably. Install the command-line tool belt for fine-grained control of your cores: docs.spark.io/cli/. You can ‘claim’ or reclaim your Core via the CLI. Full instructions on installation and troubleshooting can be found at docs.spark.io.
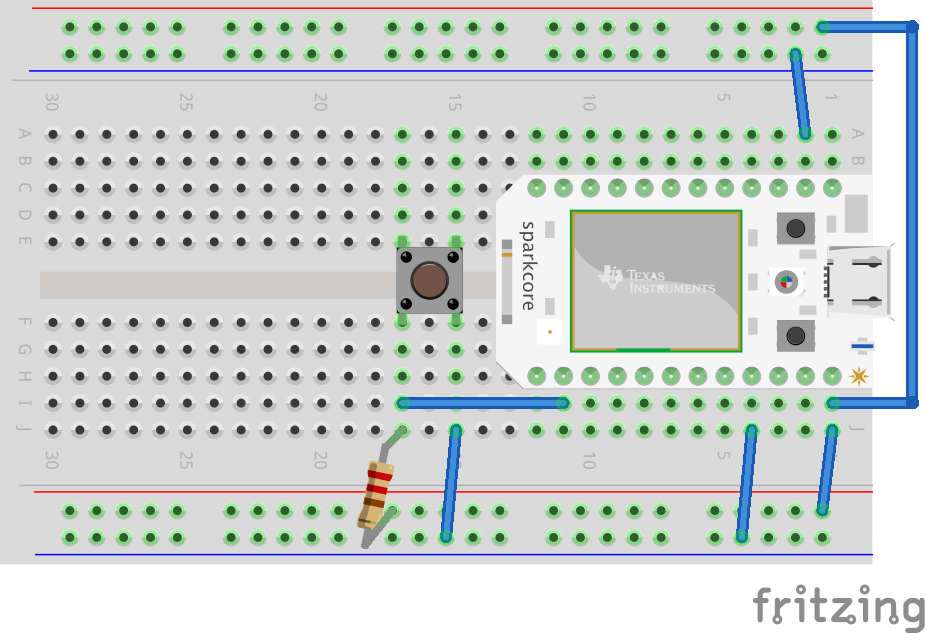
Step 3: Wire up your device
Now, you need to get your circuitry configured. Using the diagram below, use the Spark Core’s breadboard, a push-button, six male-to-male cables, and a 10K ohm resistor to produce a switch with which your Spark can interact.
To test whether your circuitry works, open your terminal and while the Core is still connected to your computer, and after ensuring that the CLI tool belt is installed on your computer, type:
spark cloud loginto send your credentials to Spark.io. Once you are logged in, verify that your Core is available:
spark listStep 4: Author and flash the code to the Core
Now, navigate to the web-based build tool. Here, you will write code in the cloud that can be flashed to your Core.
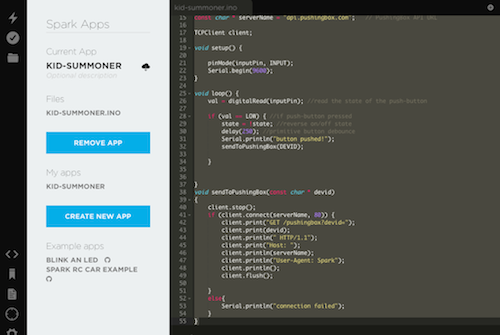
In the Web IDE or Build area of the Spark.io website (spark.io/build), login and create a new app. I called this one “kid-summoner”. If you are familiar with Arduino, you will be at home here as the language used for these devices is the same. Since our app is simple, we only need one .ino file:
/*
  kid-summoner.ino

    On pressing a button, a tweet is sent via Pushingbox
    Written for the Spark Core
*/

int inputPin = D1; //push-button pin
int val = 0; //variable for push-button status
int state = 1; //variable for on/off state

const char * DEVID = “the-devid-created-in-pushingbox";         // Scenario: "Tweet"
const char * serverName = "[api.pushingbox.com](http://api.pushingbox.com)";   // Pushingbox API URL

TCPClient client;

void setup() {

    pinMode(inputPin, INPUT);
    Serial.begin(9600);
}


void loop() {
    val = digitalRead(inputPin); //read the state of the push-button

    if (val == LOW) { //if push-button pressed
        state = !state; //reverse on/off state
        delay(250); //primitive button debounce
        Serial.println("button pushed!");
        sendToPushingBox(DEVID);

    }
}

void sendToPushingBox(const char * devid)
{
    client.stop();
    if (client.connect(serverName, 80)) {
        client.print("GET /pushingbox?devid=");
        client.print(devid);
        client.println(" HTTP/1.1");
        client.print("Host: ");
        client.println(serverName);
        client.println("User-Agent: Spark");
        client.println();
        client.flush();

    }
    else{
        Serial.println("connection failed");
    }
}
Save and ‘verify’ your code in the IDE. Add the ‘DEVID’ from the Pusherbox scenario you created earlier on.
Make sure your Core is live, connected to wifi, and ‘breathing’ cyan (the central light on the Core has several color states; when it is ‘breathing’ cyan color everything is fine). When ready, click the ‘lightning’ icon on the IDE. Your Core should start flashing in a series of color changes. When it is ‘breathing’ again you can start testing your installation.
Go ahead and push the button! You should send a tweet to your child’s account. To troubleshoot, check Pushingbox – the tweet should show up in its dashboard. In addition, you can set up debugging code and monitor its execution in the terminal:
spark serial monitorAny debug code will be visible as printed lines. You can untether your Core once everything is working and install it in your house somewhere. I put mine in my kitchen so that when I am ready to serve a meal, I can push the button and the kids will receive a tweet. Since the device is on wifi, you can make any edits to your code and flash it again to refresh your Core. It is pretty magical. Here’s a video showing it working:
Extending this project
Pushing a button to send a Tweet, of course, is a simple, beginner-level project.
Options to extend the project could include:
- Passing variables to customize the messages
- Adding location coordinates to invite people to different areas of your house
- Create an array of buttons that would summon different third parties or send different types of messages
- Add motion sensors to enable other kinds of gestures
The Spark Core allows you to create all kinds of sensor-enabled applications — my next project may be a motion-sensor to allow my clothes dryer to email me when the dryer cycle is complete. That would be useful, right?
Credits
I was inspired to create the kid-summoner by the Letterbot (hackster.io/jay_uk/letterbot) and this example of circuitry hackster.io/maxeust/temperature-sensitive-led.
To create beautiful circuit diagrams, I recommend Fritzing, which has a great app: fritzing.org/home/.
Make Magazine (makezine.com/) is a great resource for inspiring projects.
You can buy parts for your devices at Adafruit: adafruit.com/.
Frequently Asked Questions (FAQs) about Creating a Kid-Summoning IoT Device
What is the Spark OS and how does it work in an IoT device?
Spark OS is an open-source operating system designed specifically for Internet of Things (IoT) devices. It provides a platform for developers to build and manage IoT applications. The OS is lightweight, secure, and supports a wide range of hardware. It allows devices to connect to the internet, receive commands, and send data. It also provides a cloud-based platform for managing and controlling these devices remotely.
How can I set up a Raspberry Pi as an IoT device?
Setting up a Raspberry Pi as an IoT device involves installing an IoT operating system like Spark OS or Raspbian, connecting the device to the internet, and configuring it to send and receive data. You’ll also need to install any necessary software for your specific IoT application. This could include software for data processing, device management, or user interface design.
How can I make my IoT device discoverable and configurable via a mobile app?
Making an IoT device discoverable and configurable via a mobile app involves creating a user interface that can communicate with the device. This can be done using a variety of programming languages and frameworks. The app will need to be able to send commands to the device and receive data from it. This could involve setting up a Bluetooth or Wi-Fi connection, or using a cloud-based platform to facilitate communication.
How can I connect my existing device to AWS IoT?
Connecting an existing device to AWS IoT involves configuring the device to communicate with the AWS IoT platform. This can be done by installing the AWS IoT SDK on the device, setting up a secure connection, and configuring the device to send and receive data via MQTT, HTTP, or WebSockets. You’ll also need to create an AWS IoT thing in the AWS IoT console to represent your device.
What are the security considerations when creating an IoT device?
Security is a crucial consideration when creating an IoT device. This includes ensuring that the device is secure from physical tampering, that data is encrypted during transmission, and that the device is protected from cyber attacks. It’s also important to consider privacy issues, such as ensuring that personal data is stored and used in a way that complies with relevant laws and regulations.
How can I troubleshoot my IoT device if it’s not working correctly?
Troubleshooting an IoT device can involve checking the device’s connectivity, ensuring that it’s correctly configured, and looking for any errors in the device’s software. It can also involve checking the device’s power supply and hardware components. If you’re using a cloud-based platform, you may also need to check that the device is correctly registered and that it’s able to communicate with the platform.
How can I update the software on my IoT device?
Updating the software on an IoT device can involve downloading and installing the latest version of the device’s operating system, as well as any necessary application software. This can often be done remotely, using a cloud-based platform. It’s important to ensure that updates are installed promptly, as they often include important security patches.
How can I optimize the power consumption of my IoT device?
Optimizing the power consumption of an IoT device can involve choosing energy-efficient hardware components, optimizing the device’s software to reduce unnecessary processing, and managing the device’s connectivity to reduce power usage. It can also involve using power-saving modes and adjusting the device’s settings to reduce power consumption when the device is not in use.
How can I ensure that my IoT device is reliable and robust?
Ensuring that an IoT device is reliable and robust involves choosing high-quality hardware components, designing the device to withstand the conditions in which it will be used, and thoroughly testing the device to identify and fix any issues. It also involves writing robust software that can handle errors and recover from failures.
How can I use data from my IoT device to improve its functionality?
Using data from an IoT device to improve its functionality can involve analyzing the data to identify patterns and trends, and using this information to optimize the device’s performance. This could involve adjusting the device’s settings, updating its software, or even redesigning the device. It’s also important to ensure that the data is collected and used in a way that respects user privacy.
 Jen Looper
Jen Looper is a Boston-based web and mobile developer, specializing in cross-platform educational and fitness apps for iOS, Android, Nook, Kindle and Windows phone. View her portfolio at www.ladeezfirstmedia.com.