This is the winning article from the recent competition we ran to promote Flex articles on sitepoint.com.
I remember the first time I saw the Mini Configurator on the Mini USA site. I was blown away — I loved just playing with the colors and the options — it was a truly immersive experience of the kind that only Flash applications can offer, and I’m sure it sold more than a few Minis.
Ever since then I’ve wanted to create one of my own, and in this article I’ll show you how to do just that. For this example, I’ll assume that you’re across the basics of working with Flex 3 — that you’re set up with an editor such as Flex Builder 3, are familiar with MXML and ActionScript 3, and can create basic applications. If you’re after a beginner’s tutorial, or need a refresher, try Rhys Tague’s beginner’s tutorial.
Getting Started
The idea of a “configurator” is pretty simple: provide a 3D model of some object, then allow the user to change the colors, or to hide and show various parts of the model.
To build your own configurator, you need three things.
- a 3D modeling tool
- a 3D model of an object (either something that you’ve downloaded or created yourself)
- a tool for displaying that model in a Flex application
As far as 3D modelling tools go, I’ve found that Google’s Sketchup is ideal. It’s free, which is always good, but the other bonus is the huge database of models in Sketchup format that are available in the Sketchup 3D Warehouse.
After downloading and installing Sketchup, I visited the 3D warehouse and selected a model to use in my application. For this article, I’ve chosen one of the light cycles from the Disney movie Tron. My decision to use this object was partly cultural (every true geek loves the movie) and partly because it’s a fairly simple shape, so allowing the user to alter it (for example, by changing its color) wouldn’t be too complicated.
The light cycle model I’ve used is displayed in the image below.
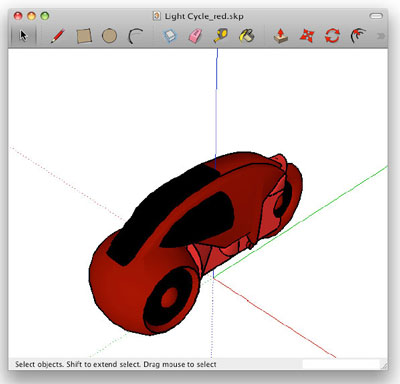
My model light cycle didn’t actually exist in the exact format pictured above. To begin with, there were a pair of light cycles — I deleted the second one, and tilted the remaining cycle a little, in order to begin with a shape that was perfectly vertical. I’d recommend you do the same for your own model.
You should also reposition your model so that it’s centred around the origin point (this point is represented by the intersection of the red, green, and blue lines in Sketchup). This step is really important, because when you load the model you want to know where it exists in your scene. If the model is floating off in space somewhere, it’s going to be difficult to find, so be sure it’s oriented around the point (0, 0, 0).
To import the light cycle into your Flex application, you need to save it in a standard file format. The format that seems to be the most popular for 3D tasks is Collada, but unfortunately the Export to Collada format functionality is only available in Sketchup Pro.
Luckily, I have a trick up my sleeve: if you export the model in Google Earth format, there’s a Collada file hidden in the Google Earth .kmz file. All you need to do is change the extension of the Google Earth file from .kmz to .zip, and unzip the file. Among the unzipped files you’ll find a directory named models that contains the Collada model. Voila! You’ve exported a Collada file from the free version of Sketchup!
Installing PaperVision 3D
With our Collada model in hand, it’s time for us to find a way import our light cycle into a Flex application. Our first task is to select a 3D rendering engine for Flash to display it with. There are two free 3D engines to choose from at the moment; PaperVision 3D and Away3D. For this example, I’ve chosen PaperVision because of its integration with the ASCollada library, which is a very comprehensive Collada parser for ActionScript.
To download the latest version of PaperVision 3D, perform an SVN checkout from the PaperVision Subversion repository. If you’re not comfortable working with Subversion, you can download the files that I’ve used to create this example from this article’s code archive.
Then create a new Flex application project (either using Flex Builder 3 or the Flex 3 SDK) and copy the com and org directories from the GreatWhite branch into your Flex application project.
Next, create a new assets folder, and copy the model file I exported from Sketchup into it; call that file cycle.dae. If your model contains texture files, then you’ll need to copy those files into your Flex project as well. You’ll also need to edit the .dae file (which is really just XML) to make sure that the texture objects point to the correct texture paths. Thankfully the little light cycle model that we’re using for this example doesn’t make use of any textures.
With everything in place, your project should look something like the image shown below.
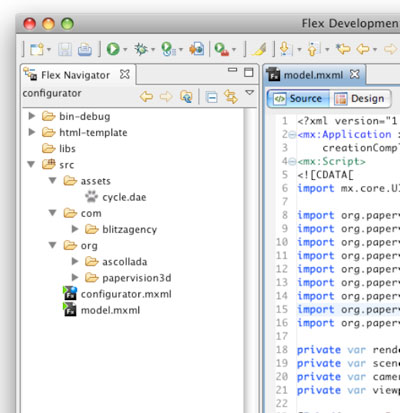
The assets directory holds the model and any textures it needs. And the com and org folders come from the PaperVision Great White code.
Viewing the Model
To get our feet wet, we’ll first try something very simple: viewing the model. The code for this Flex application, which I’ve called model.mxml, is shown below:
<?xml version="1.0" encoding="utf-8"?>

<mx:Application xmlns:mx="http://www.adobe.com/2006/mxml" layout="horizontal"

  creationComplete="onInit(event);">

<mx:Script>

<![CDATA[

import mx.core.UIComponent;


import org.papervision3d.cameras.FreeCamera3D;

import org.papervision3d.render.BasicRenderEngine;

import org.papervision3d.objects.parsers.DAE;

import org.papervision3d.objects.DisplayObject3D;

import org.papervision3d.scenes.Scene3D;

import org.papervision3d.view.Viewport3D;


private var renderer:BasicRenderEngine = new BasicRenderEngine();

private var scene:Scene3D = new Scene3D();

private var camera:FreeCamera3D = new FreeCamera3D();

private var viewport:Viewport3D = new Viewport3D( 200, 200, true, true );


[Embed(source="assets/cycle.dae", mimeType="application/octet-stream")] private var

MyModel:Class;

protected function onInit( event:Event ) : void {

  var flexComp:UIComponent = new UIComponent();

  cnvUnderneath.addChild( flexComp );

  flexComp.addChild( viewport );

  var modelCol:DAE = new DAE();

  modelCol.load( XML( new MyModel() ) );

  var model:DisplayObject3D = scene.addChild( modelCol );

  camera.y = -2000;

  camera.z = 2500;

  camera.lookAt( model );

  addEventListener(Event.ENTER_FRAME,onEnterFrame);

}


private function onEnterFrame( event : Event ):void

{

  renderer.renderScene(scene,camera,viewport);

}

]]>

</mx:Script>

<mx:Canvas id="cnvUnderneath" width="100%" height="100%" />

</mx:Application>
This is about as simple as 3D gets — which, admittedly, is not particularly simple. To render something in 3D, you need four pieces of information:
- The Scene: The layout of the model, or models, in space.
- The Viewport: The Flash sprite that will receive the rendered image.
- The Camera: This is the camera, or more specifically, the location and rotation of the camera within the scene.
- The Renderer: The engine which takes the scene and camera and renders the image for the viewport.
Without breaking down every line, our onInit method, which is called when the application starts up, does the following:
- Load the model.
- Add the model to the scene.
- Position the camera.
- Have the camera look at the model.
Since our model is located at position (0, 0, 0), the code above moves the camera back from the model by adjusting the y and z coordinates. The onEnterFrame method finishes the job by using the renderer to render the scene into the viewport.
Launch this application in Flex Builder 3, and you should see something like the view shown in Figure 3.
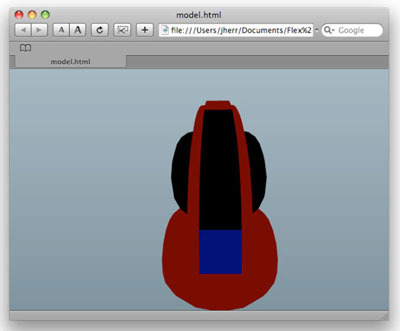
Not too shabby! In fact, what we’ve achieved here is quite significant — especially considering that Collada is actually a very complex XML standard. You may find that not all models exported from Sketchup will work with PaperVision — in fact, you’ll probably have to do some tweaking of both your Sketchup model (to simplify the shape) and your Flex application in order to produce something that works well.
One other important point to remember is that the more complicated your model, the longer it will take to load and render. You should therefore keep your model as simple as possible. For example, if your model is of a car, and you want to allow your users to choose the paint color of the chassis, then your model should not include any information about the car’s interior. All of that interior stuff represents unnecessary complexity that will result in lower performance and longer load times for your user.
Interacting With the Model
To keep things simple, we’ll restrict the changes that our configurator users can make to just one — the color of the light cycle. This means we’re going to change the color of the “material” used in the model. All 3D models are composed of polygons covered in a “material.” That material can be colored, shaded, textured, bump-mapped, and distorted in all manner of ways. In this case, we’re going to use a shaded color material.
The code for our light cycle color configurator is shown below:
<?xml version="1.0" encoding="utf-8"?>

<mx:Application xmlns:mx="http://www.adobe.com/2006/mxml" layout="horizontal"

creationComplete="onInit(event);">

<mx:Script>

<![CDATA[

import mx.utils.ColorUtil;

import mx.core.UIComponent;


import org.papervision3d.materials.utils.MaterialsList;

â‹®

import org.papervision3d.lights.PointLight3D;


private var renderer:BasicRenderEngine = new BasicRenderEngine();

private var scene:Scene3D = new Scene3D();

private var camera:FreeCamera3D = new FreeCamera3D();

private var viewport:Viewport3D = new Viewport3D( 200, 200, true, true );

private var model:DisplayObject3D = null;


[Embed(source="assets/cycle.dae", mimeType="application/octet-stream")] private var MyModel:Class;


protected function onInit( event:Event ) : void {

  var flexComp:UIComponent = new UIComponent();

  cnvUnderneath.addChild( flexComp );

  flexComp.addChild( viewport );


  loadModel();


  camera.y = -2700;

  camera.x = 0;

  camera.z = 2000;

  camera.lookAt( model );

  addEventListener(Event.ENTER_FRAME,onEnterFrame);

}

private function loadModel() : void {

  if ( model != null )

  scene.removeChild( model );

  var light:PointLight3D = new PointLight3D( true,true );

  light.z = -2000;

  light.x = 500;

  light.y = 500;

  var lightColor:uint = 0x111111;

  var modelCol:DAE = new DAE();

  modelCol.scale = 1.1;

  modelCol.load( XML( new MyModel() ), new MaterialsList( {

    material0:new FlatShadeMaterial( light, 0x000000, lightColor ),

    ForegroundColor:new FlatShadeMaterial( light, 0x000000, lightColor ),

    material1:new FlatShadeMaterial( light, clrPicker.selectedColor,

      lightColor ),

    material2:new FlatShadeMaterial( light,

    mx.utils.ColorUtil.adjustBrightness(clrPicker.selectedColor,-20), lightColor ),

    FrontColor:new FlatShadeMaterial( light, 0xFFFFFF, lightColor ),

    material3:new FlatShadeMaterial( light, 0x000099, lightColor ),

    material4:new FlatShadeMaterial( light,

    mx.utils.ColorUtil.adjustBrightness(clrPicker.selectedColor,-200), lightColor )

  } ) );

  modelCol.roll( 28 );


  model = scene.addChild( modelCol );


  light.lookAt(model);

}

private function onEnterFrame( event : Event ):void

{

  renderer.renderScene(scene,camera,viewport);

}

]]>

</mx:Script>

<mx:Panel title="Properties">

  <mx:Form>

    <mx:FormItem label="Color">

      <mx:ColorPicker id="clrPicker" selectedColor="#8888DD"

        change="loadModel();" />

    </mx:FormItem>

  </mx:Form>

</mx:Panel>

<mx:Canvas id="cnvUnderneath" width="100%" height="100%" />

</mx:Application>
As you can see, I’ve moved the code that loads the model into a new method called loadModel. This method is executed when the Flex application starts up, as well as any time our user chooses a new color.
Our code also provides a MaterialList object to the DAE parser that loads the Collada light cycle model. This list of material corresponds to the materials exported by Google Sketchup. I found the names by looking into the DAE file myself and experimenting with which materials changed which portions of the Cycle.
The material I chose for the color portions was a FlatShadedMaterial. This material takes:
- a light source
- a color for the material
- a color for the light
We’re using the color provided by the color picker, and adjusting it to make it darker or lighter using the ColorUtil Flex class.
Running our configurator application in Flex Builder produces the following result.
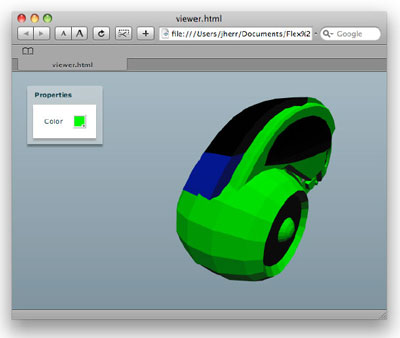
Our users can now select a color using the standard ColorPicker control, and the light cycle model will change accordingly.
Providing a light source really adds to our model some depth that wasn’t apparent in the first rendering. Also, the fact that our model is clearly constructed from polygons actually adds to the whole “Tron” look and feel.
Where to Go From Here
There are lots of directions in which you could take this example. For example, you could hide or show various parts of the model by adjusting the visible parameter on the DisplayObject3Delements property within the model; you could add some direct interaction with the model by allowing the user to alter the position of the camera using the mouse; you could even use Flex effects on the model to make it glow, fade or zoom away when the customer takes it for a spin!
Whichever direction you take, you can have lots of fun with this code (don’t forget to download it!). I look forward to seeing your creations in an online store window soon!
Frequently Asked Questions about Creating a 3D Product Viewer
How can I create a 3D product viewer using Flex 3?
Creating a 3D product viewer using Flex 3 involves several steps. First, you need to install Flex 3 and familiarize yourself with its interface. Then, you need to import your 3D model into the program. This can be done by clicking on the ‘Import’ button and selecting your 3D model file. Once the model is imported, you can adjust its position, rotation, and scale to fit your needs. You can also add lighting and materials to enhance the appearance of your model. Finally, you can export your 3D product viewer as a SWF file, which can be embedded into your website.
What are the advantages of using a 3D product viewer?
A 3D product viewer offers several advantages. It allows customers to view products from all angles, giving them a better understanding of the product’s features and details. This can lead to increased customer satisfaction and higher sales. Additionally, a 3D product viewer can make your website more interactive and engaging, which can help to attract more visitors and keep them on your site longer.
Can I use a 3D product viewer on my WordPress site?
Yes, you can use a 3D product viewer on your WordPress site. There are several plugins available that allow you to easily add a 3D product viewer to your site. These plugins typically offer a user-friendly interface and a variety of customization options, making it easy to create a 3D product viewer that fits your brand and product line.
How does a 3D product viewer compare to traditional product images?
A 3D product viewer offers a more immersive and interactive experience compared to traditional product images. Instead of viewing static images, customers can rotate and zoom in on the product, giving them a more detailed view. This can help to build trust and confidence in your products, leading to higher conversion rates.
What types of products can benefit from a 3D product viewer?
Almost any type of product can benefit from a 3D product viewer. However, it is particularly beneficial for products with complex designs or intricate details, as it allows customers to fully appreciate the product’s design and craftsmanship. Examples of products that can benefit from a 3D product viewer include furniture, electronics, jewelry, and clothing.
Do I need any special skills to create a 3D product viewer?
While creating a 3D product viewer does require some technical knowledge, it is not overly complex. If you are familiar with 3D modeling software and have a basic understanding of web development, you should be able to create a 3D product viewer. There are also many tutorials and resources available online to help you get started.
Can I customize the appearance of my 3D product viewer?
Yes, most 3D product viewer software allows you to customize the appearance of your viewer. This can include changing the background color, adding lighting effects, and adjusting the rotation speed. This allows you to create a viewer that matches your brand and enhances the visual appeal of your products.
How can I optimize my 3D product viewer for mobile devices?
To optimize your 3D product viewer for mobile devices, you should ensure that it is responsive. This means that it should automatically adjust to fit the screen size of the device it is being viewed on. Additionally, you should ensure that the viewer is touch-friendly, allowing users to easily rotate and zoom in on the product using their fingers.
Can I use a 3D product viewer for virtual reality (VR) applications?
Yes, some 3D product viewer software supports VR applications. This allows users to view your products in a fully immersive 3D environment, providing an even more engaging and interactive experience. However, creating a VR-compatible 3D product viewer may require additional technical skills and resources.
What are some common challenges when creating a 3D product viewer and how can I overcome them?
Some common challenges when creating a 3D product viewer include ensuring that the viewer is compatible with all major web browsers, optimizing the viewer for mobile devices, and creating high-quality 3D models. To overcome these challenges, you should thoroughly test your viewer on different browsers and devices, use responsive design techniques, and invest in high-quality 3D modeling software.
 Jack Herrington
Jack Herrington is an engineer, author, and presenter who lives and works in the San Francisco Bay Area. He lives with his wife, daughter and two adopted dogs. When he's not writing software, books, or articles you can find him cycling, running, or in the pool training for triathlons. You can keep up with Jack's work and his writing at http://jackherrington.com.