
Conquering Instagram with PHP and the Instagram API

Instagram’s API allows us to interact with data such as user info, media (photos and videos), likes, comments, and tags. For example, you can search for media around a specific location and filter the results by time. The API also allows us to post comments or like specific media. For now, only uploading media isn’t supported. You can always look at the API endpoints documentation if you want to know about the full functionality.
![]()
Key Takeaways
- Utilize the Instagram API to interact with user data, media content, and social interactions like comments and likes, though media uploads are currently unsupported.
- Understand the distinction between unauthenticated (client ID only) and authenticated (using OAuth 2.0) API calls, with a limit of 5000 calls per type per token.
- Register your application on the Instagram Developer platform to obtain necessary credentials like client ID and client secret, crucial for making API requests.
- Leverage PHP libraries such as Guzzle for making API calls and manage user authentication and data retrieval effectively through the OAuth 2.0 protocol.
- Explore advanced features such as pagination and error handling within the Instagram API to enhance application performance and user experience.
API Calls and Limits
There are two types of API calls you can perform with the Instagram API: Unauthenticated and Authenticated. Unauthenticated API calls only need the client ID, and authenticated API calls use OAuth, specifically OAuth 2.0. If you don’t know what OAuth is, check out this Introduction to OAuth 2 article on DigitalOcean.
Before we move on, it’s important to understand that there are limits to this API. At the moment of writing of this article, you can only perform 5000 authenticated calls per token and 5000 unauthenticated calls to the API. This is regardless of the endpoint that you use, though there are specific endpoints each of which has its own limits. You can check out the endpoint-specific rate limits section in the limits page if you want to learn more.
Registering an Application
Needless to say, you need to have your own Instagram account in order to work with the Instagram API. Then, sign up as a developer.
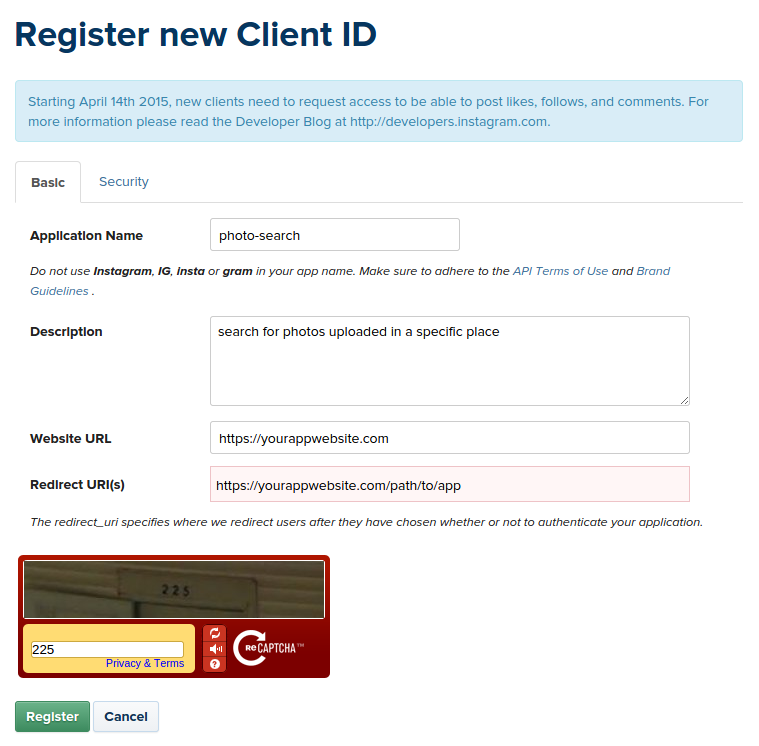
Next we have to register an application. We can do that by going to the Instagram Developer page and clicking on the ‘Register Your Application’ button. If you’ve never created an app before, you’ll be redirected to the app registration page which looks like this:
If you have already created an app previously, then it leads you to the app management page which lists all your existing apps. From there, all you have to do is to click on the ‘Register a New Client’ button which would lead you to the same page as above.
Once you’re on the app registration page, fill in all the fields. The website URL is the URL to your app’s website. The redirect URI is the URL where the user will be redirected after giving access permission to your app. This has to be an HTTPS URL. If you do not have an HTTPS server, you can use Apache and Ngrok. Download the ngrok version for your operating system, extract it and then execute the following command in your preferred install directory. Replace 80 with the port where your server is running:
ngrok http 80What this does is assign an HTTP and HTTPS URL to your Apache server running on localhost. You can then use the HTTPS URL for testing. Use this URL for the Website URL and Redirect URI fields in the app registration page.
Once that’s done, just click on the ‘Register’ button to finish the registration. If all went well, you will be greeted with a client ID and client secret. We will be using these later on to perform requests to the API.
API Console
You can use the API console to play around the requests which you can make with the Instagram API. To use the API console, expand the API method selection menu on the left side of the console. From there, you can select a method you want to use for your request. Most methods require authentication so you have to select OAuth 2 from the Authentication drop-down and then sign in with your existing Instagram account. Do note that any requests you perform are performed on your behalf. This means that any action you do, such as liking a photo or following a user will be performed by your account.
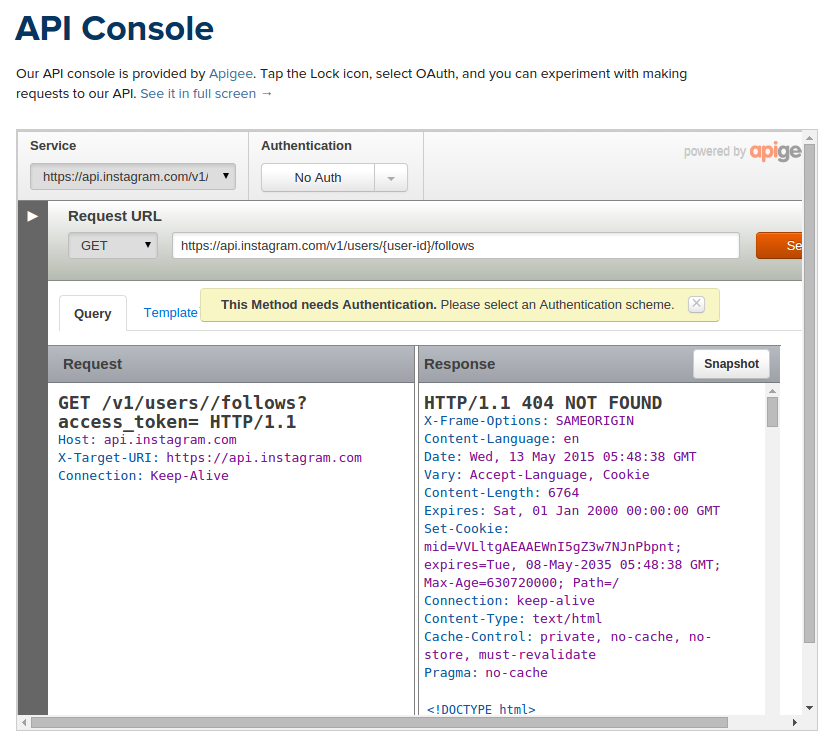
The API Console is pretty self-explanatory. You can select what type of HTTP request (GET, POST, DELETE, PUT) you want to use, enter the URL where the request will be submitted, and enter required query parameters. You can see the actual request and response that have been made after you click the ‘Send’ button.
Making API Calls with PHP
Now we’re ready to interact with the API using PHP. We can do that with Guzzle, an HTTP client for PHP. Install it with Composer:
composer require guzzlehttp/guzzle:~5.0Optionally, you can install the Slim PHP framework if you want to follow along with the demo project. Note that we’re using version 5 of Guzzle because version 6 is based on PSR-7 and thus lacking many of the practical features of past iterations.
composer require slim/slimIf you want to use Slim, you need to install Twig, as well as Slim Views, so you can use Twig from within Slim.
composer require twig/twig
composer require slim/views
Once that’s done, create a new PHP file and add the following code:
<?php
require 'vendor/autoload.php';

use GuzzleHttp\Client;

$client = new Client();
Next, add the client ID, client secret and redirect URL of your Instagram app.
define("CLIENT_ID", "YOUR CLIENT ID");
define("CLIENT_SECRET", "YOUR CLIENT SECRET");
define("REDIRECT_URL", "YOUR REDIRECT URL");
Set up Slim to make use of Twig for handling views. Also, enable error reporting and set the directory for caching the views:
app = new \Slim\Slim(array(
    'view' => new \Slim\Views\Twig() //use twig for handling views
));

$view = $app->view();
$view->parserOptions = array(
    'debug' => true, //enable error reporting in the view
    'cache' => dirname(__FILE__) . '/cache' //set directory for caching views
);
Getting the Access Token
To get an access token, we first need to construct the login URL. The login URL points to the page that asks the user to grant permission to the app. The base login URL is: https://api.instagram.com/oauth/authorize. And then we need to pass in the client_id, redirect_uri, scope and response_type as query parameters.
https://api.instagram.com/oauth/authorize?client_id={$client_id}&redirect_uri={$redirect_url}&scope=basic&response_type=codeYou already know what the client_id and redirect_url are, so let’s talk about the scope and the response_type.
-
scope– this is where you specify what your app can do. Currently, the scopes available arebasic,comments,relationships, andlikes.basicis provided by default. This gives you read access to all of the API endpoints. The other 3, however, require your app to be submitted for review, because they allow your app to like, comment, follow or unfollow a specific user. -
response_type– the type of response we will get once the user grants permission to the app. On the server-side, this should becodeand on the client-side this should betoken. We’re primarily working on the server so this should becode. This means that an authorization code is returned after permission has been granted.
Once the user has granted permission to the app, he will be redirected to the redirect URL that was specified. The authorization code is passed along with this URL as a query parameter. Next we need to make a POST request to the /oauth/access_token endpoint, additionally passing in the client ID, client secret, grant type, redirect URL and the code. The grant type is how the access token will be acquired after the user has granted permission to your app. In this case, we’re using authorization_code. This is the code that is passed as a query parameter in the redirect URL. Once the request is made, we convert the response from JSON to an array by calling the json method on the response. Finally, we render the view.
$app->get('/login', function () use ($app, $client) {

    $data = array();
    $login_url = '';

    if($app->request->get('code')){

        $code = $app->request->get('code');

        $response = $client->post('https://api.instagram.com/oauth/access_token', array('body' => array(
            'client_id' => CLIENT_ID,
            'client_secret' => CLIENT_SECRET,
            'grant_type' => 'authorization_code',
            'redirect_uri' => REDIRECT_URL,
            'code' => $code
        )));

        $data = $response->json();

    }else{

        $login_url = "https://api.instagram.com/oauth/authorize?client_id={$client_id}&redirect_uri={$redirect_url}&scope=basic&response_type=code";

    }


    $app->render('home.php', array('data' => $data, 'login_url' => $login_url));

});
Views in Slim are stored in the templates directory by default. Here are the contents of the home.php view.
{% if login_url %}
<a href="{{ login_url }}">login with instagram</a>
{% else %}
    <div>
        <img src="{{ data.user.profile_picture }}" alt="{{ data.user.username }}">
    </div>
    <ul>
        <li>username: {{ data.user.username }}</li>
        <li>bio: {{ data.user.bio }}</li>
        <li>website: {{ data.user.website }}</li>
        <li>id: {{ data.user.id }}</li>
        <li>access token: {{ data.access_token }}</li>
    </ul>
{% endif %}
At this point you can now extract the access token and store it somewhere safe. Instagram didn’t mention how long an access token will last. All the documentation says is that it will expire at a time in the future. Therefore, we need to handle the event where the access token expires. You can do that by checking the error_type under the meta item in the response. If the value is OAuthAccessTokenError, then it means your access token has expired. You will only need to check for this item if the code in the meta item has a value other than 200. 200 means OK, just like the HTTP status code. 400 means error.
Tags Search
Now we can make authenticated calls to the API. First, let’s try searching for recent photos taken in Niagara Falls via tag searching. Remember that tags don’t have spaces in them so we have to stick with camelCase:
$app->get('/tags/search', function() use($app, $client, $access_token) {

    $tag = 'niagaraFalls';
    $response = $client->get("https://api.instagram.com/v1/tags/{$tag}/media/recent?access_token={$access_token}");
    $results = $response->json();

    $app->render('images.php', array('results' => $results));

});
The images.php view just loops through all the results that are returned and extracts the low resolution image URL. We then use that as a source for the image tag.
{% for row in results.data %}
    <img src="{{ row.images.low_resolution.url }}">
{% endfor %}
By default, Instagram returns a maximum of 20 photos per request. You can, however, specify the count as one of the query parameters to increase or limit the number of photos returned.
If you’re not sure if the tag that you are using exists, you can first perform a tag search and then use the first result that comes out:
$app->get('/tags/search-with-tagvalidation', function() use($app, $client, $access_token) {

    $query = 'Niagara Falls';
    $response = $client->get("https://api.instagram.com/v1/tags/search?access_token={$access_token}&q={$query}");
    $result = $response->json();

    if(!empty($result['data'])){
        $tag = $result['data'][0]['name'];

        $response = $client->get("https://api.instagram.com/v1/tags/{$tag}/media/recent?access_token={$access_token}");
        $results = $response->json();
        $app->render('images.php', array('results' => $results));
    }else{
        echo 'no results';
    }

});
User Feed
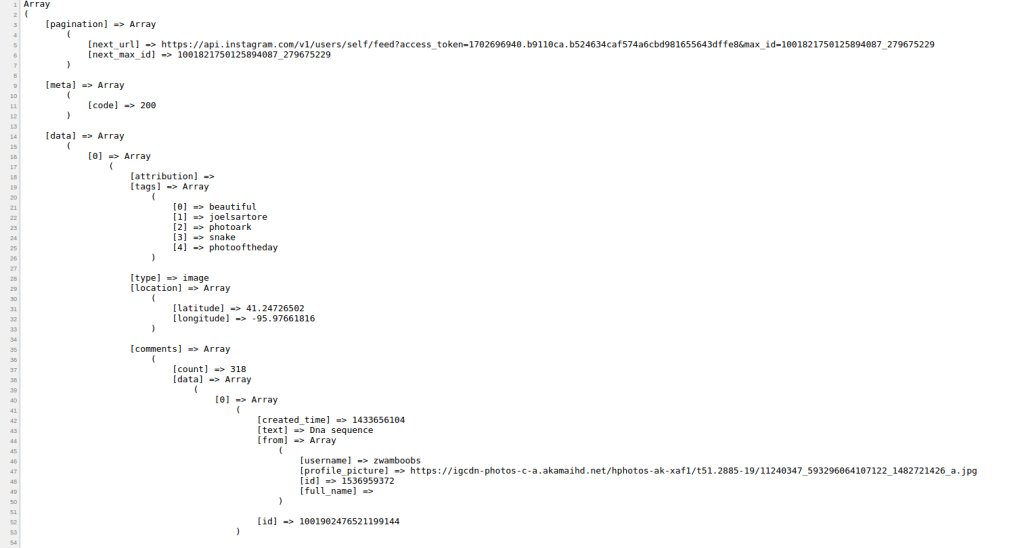
The user feed can be accessed by submitting a GET request to the /users/self/feed endpoint:
$app->get('/user/feed', function() use($app, $client, $access_token) {

    $response = $client->get("https://api.instagram.com/v1/users/self/feed?access_token={$access_token}");
    $results = $response->json();

});
Here’s a screenshot of a sample user feed response:
Searching for Users
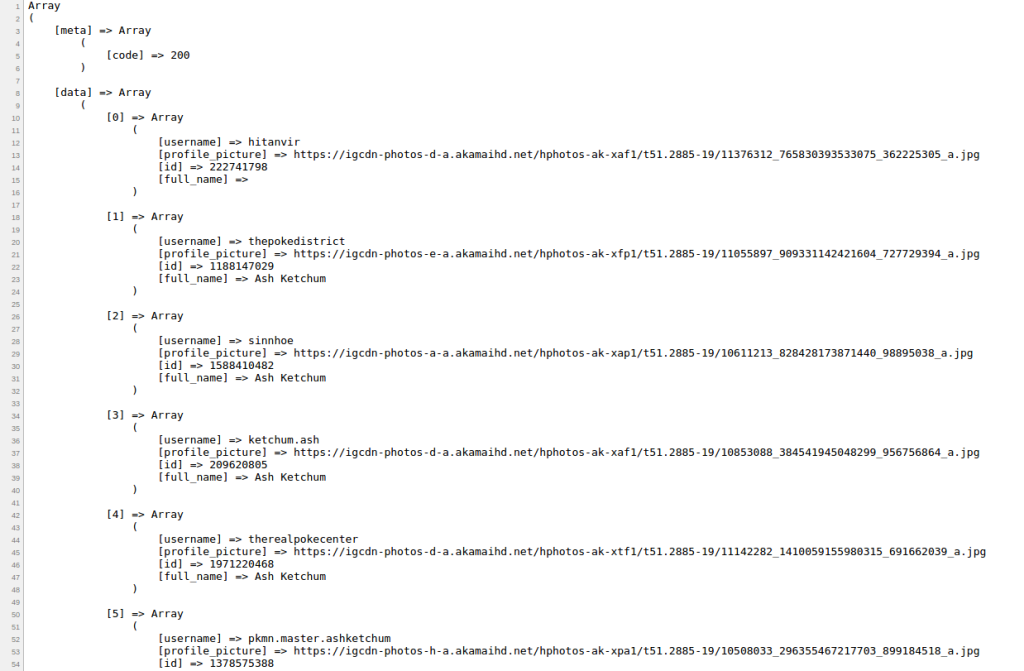
Let’s try searching for users who have ‘Ash Ketchum’ as their name:
$app->get('/user/search', function() use($app, $client, $access_token) {

    $query = 'Ash Ketchum';
    $response = $client->get("https://api.instagram.com/v1/users/search?q={$query}&access_token={$access_token}");
    $results = $response->json();

});
The call above returns the username, id, profile_picture, and full_name of the user. Not all of the results are exact matches though.
Here’s the screenshot of the response that I got:
Searching for Photos in a Specific Place
You can also search for photos or videos uploaded in a specific place by using the Google Geocoding API. We use the Google Geocoding API to convert our query to coordinates (latitude and longitude) which the Instagram API requires. Here’s an example:
$app->get('/geo/search', function() use($app, $client, $access_token) {

    $query = 'banaue rice terraces';

    //make a request to the Google Geocoding API
    $place_response = $client->get("http://maps.googleapis.com/maps/api/geocode/json?address={$query}&sensor=false");
    $place_result = $place_response->json();

    if($place_result['status'] == 'OK'){

        //extract the lat and lng values
        $lat = $place_result['results'][0]['geometry']['location']['lat'];
        $lng = $place_result['results'][0]['geometry']['location']['lng'];

        //make a request to the Instagram API using the lat and lng
        $response = $client->get("https://api.instagram.com/v1/media/search?access_token={$access_token}&lat={$lat}&lng={$lng}");

        $results = $response->json();

        if(!empty($results['data'])){

            $app->render('images.php', array('results' => $results));

        }else{
            echo 'no photos found';
        }

    }else{
        echo 'place not found';
    }

});
Note that you can also specify the distance, min_timestamp, and max_timestamp to this endpoint to further filter the results. The default distance is 1km and you can specify up to 5km. min_timestamp and max_timestamp are unix timestamps for limiting results to photos that were taken within a specific time period. You can use Carbon to easily generate timestamps based on user input such as ‘yesterday’, ‘5 days ago’, ‘1 week ago’.
Pagination
You may have noticed that the Instagram API already makes our life easy with pagination. If the results of a specific API call have a next page on it, you can just use the value of next_url under the pagination item as the URL to be used on the next request. This allows you to access the next page easily. Though do keep in mind that you need to store the id of the first item on the current page so that you can still access that page after you have navigated to the next page.
PHP Client
If you want to make your life even easier when working with the Instagram API, there’s a PHP library called Instagram-PHP-API which provides convenience methods. To install it, execute composer require cosenary/instagram.
Once that’s done, you can use it by adding the following code:
use MetzWeb\Instagram\Instagram;

$instagram = new Instagram(array(
    'apiKey' => CLIENT_ID,
    'apiSecret' => CLIENT_SECRET,
    'apiCallback' => REDIRECT_URL
));
Here are a few examples.
Getting the Login URL
$instagram->getLoginUrl(array('basic', 'relationships'));The array argument is optional. It contains the scopes that you want to use.
Getting the Access Token
Pretty much the same as what we did earlier using Guzzle, only this time, we’re calling methods and the data that we need becomes readily available.
$app->get('/login2', function () use ($app, $instagram) {

    $login_url = $instagram->getLoginUrl(array('basic', 'likes'));

    if(!empty($_GET['code'])){

        $code = $_GET['code'];
        $data = $instagram->getOAuthToken($code); //get access token using the authorization code

        $instagram->setAccessToken($data);

        $access_token = $instagram->getAccessToken();

        //do anything you want with the access token

    }else{
       $app->render('login.php', array('login_url' => $login_url));
    }

});
Getting User Info
You can get the user info by calling the getUser method. $user_id can be omitted if you only want to get the user info of the currently logged in user.
$user_data = $instagram->getUser($user_id);Laravel
If you use Laravel, someone has also created a Laravel Wrapper which uses this library. You can check it out here.
Conclusion
In this tutorial, we learned how to work with the Instagram API using the Guzzle HTTP Client and an Instagram client for PHP. The Instagram API is a really nice way to interact with an Instagram users’ data. With it, you can build some really interesting applications.
Have you built anything with the API? Do you prefer Guzzle or the Instagram PHP library? Why? Let us know in the comments!
Frequently Asked Questions (FAQs) about Instagram API with PHP
How Can I Get Started with Instagram API and PHP?
To get started with Instagram API and PHP, you first need to create an Instagram developer account and register a new application. After that, you will receive a client ID and client secret, which are essential for making API requests. You will also need to set a redirect URI, which is the URL that Instagram will redirect users to after they have authorized your application. Once you have these details, you can start making API requests using PHP.
What is the Instagram Graph API?
The Instagram Graph API is a way for apps to access and manage data in Instagram. This includes reading data about a user’s own profile, photos, videos, stories, and insights, as well as writing and modifying comments and likes. The Graph API is built on the Facebook Graph API and uses the same structure and principles.
How Can I Authenticate Users with the Instagram API?
To authenticate users with the Instagram API, you need to implement OAuth 2.0. This involves redirecting users to a specific Instagram URL where they can log in and authorize your application. After they have done this, Instagram will redirect them back to your application with an authorization code, which you can exchange for an access token.
How Can I Fetch User Data with the Instagram API?
To fetch user data with the Instagram API, you can make a GET request to the /users/self endpoint. This will return data about the authenticated user, including their username, bio, profile picture, and counts of their media, follows, and followers. You will need to include the user’s access token in the request.
How Can I Post Photos to Instagram with the API?
Unfortunately, the Instagram API does not currently support posting photos. This is a deliberate decision by Instagram to maintain control over the user experience and prevent spam. However, you can use the API to read, like, and comment on photos.
How Can I Handle Errors with the Instagram API?
The Instagram API returns standard HTTP status codes to indicate the success or failure of a request. If a request fails, the response will also include an error message explaining what went wrong. You can handle these errors in your PHP code by checking the status code and error message and taking appropriate action.
How Can I Rate Limit with the Instagram API?
The Instagram API imposes rate limits to prevent abuse and ensure fair usage. The exact limits depend on whether you are using the sandbox mode or the live mode. In sandbox mode, you can make up to 500 requests per hour. In live mode, you can make up to 5000 requests per hour.
How Can I Use Pagination with the Instagram API?
The Instagram API uses pagination to limit the number of items returned in a single response. Each response includes a pagination object, which contains a next_url field. You can use this URL to fetch the next set of items.
How Can I Fetch Comments with the Instagram API?
To fetch comments with the Instagram API, you can make a GET request to the /media/{media-id}/comments endpoint. This will return a list of comments on the specified media item. You will need to include the user’s access token in the request.
How Can I Fetch Likes with the Instagram API?
To fetch likes with the Instagram API, you can make a GET request to the /media/{media-id}/likes endpoint. This will return a list of users who have liked the specified media item. You will need to include the user’s access token in the request.
Wern is a web developer from the Philippines. He loves building things for the web and sharing the things he has learned by writing in his blog. When he's not coding or learning something new, he enjoys watching anime and playing video games.


Published in
·Canvas & SVG·Design·Design & UX·HTML & CSS·Illustration·Sketch·UI Design·Web·October 10, 2016


Published in
·Business·Computing·Email Marketing·Entrepreneur·Low Code·Marketing·Web·September 7, 2021