Do you know what is really, really comfortable?
Your comfort zone!
We all have one. Each of us has those four or five applications that we could almost use in our sleep. Those hundreds of hours of muscle memory, shortcuts and familiar quirks that make these apps feel like a cozy, old armchair. They also make switching to a new app feel so… clunky – at least for the first few weeks.
We all want to jump to that productive, intermediate level as quickly as possible.
So, today we’re here to fast-forward your Sketch App skills by giving 3 tips normally only seen amongst the more experienced Sketch gurus.
Tip #1: Be a keyboard shortcut ninja
Sketch’s keyboard shortcuts are as minimal as can be. Most of the time it’ll be command + something and sometimes it’ll be a singular-lettered key such as “A” for Artboard, but there’s one thing for sure and it’s that you’ll never have to engage in a game of finger-twister when designing in Sketch App.

Some of the shortcuts are fairly obvious or they’re exactly the same as the Photoshop shortcut, so for that reason some of them have been omitted – these are the most useful ones.
Single-key shortcuts
- A: Artboard
- T: Text
- V: Vector
- O: Oval
- R: Rectangle
- U: Rounded Rectangle
Multi-key shortcuts
- Z + click/drag-select: zooms into a specific region
- Enter: enables edit-mode for the layer currently selected
- Shift + Tab: reverse-cycles through layers (opposite of “tab”)
- Option + drag layer: duplicates a layer and moves it
- Option + hover layer: shows the distance between two layers
- Command + click: select layers inside groups
- Command + R: rename artboards and layers
- Command + Shift + H: Show/hide layers
- Command + directional arrow: Resize
- Command + Shift + E: Activates export mode
- Command + Option + C: Copy layer style
- Command + Option + V: Paste layer style
It’s not for me to say which shortcuts are the most important, because that really depends on your screen resolution and the type of work that you create, but if you’re interested to explore many more keyboard shortcuts, Jean-Marc Denis has curated a complete Sketch App keyboard shortcut list.
Tip #2: Organise pages and artboards carefully
If you’re using Sketch App to design user interfaces then it’s quite likely that you’ll be mocking up multiple versions of the same screen either to explain user interactions or to demonstrate mobile-optimisation. You could easily end up with anything between 2 and 10 artboards for each screen, depending on the amount of dynamic content that screen has.
When you create a new artboard (CMD + A, if you forgot) it will appear directly to the right of the last artboard that was created (even if it was moved); so essentially, they form in a row about 100px apart. You might not necessarily desire the artboards to be in that order, but like any other type of selection they can be moved on the X and Y axis.
A neat way to organise your screens is to display them from left-to-right/desktop-to-mobile (or the other way around if your approach is mobile-first!) and have each screen variation on a new line. What you should end up with is a highly organised horizontal and vertical display of artboards for each screen.
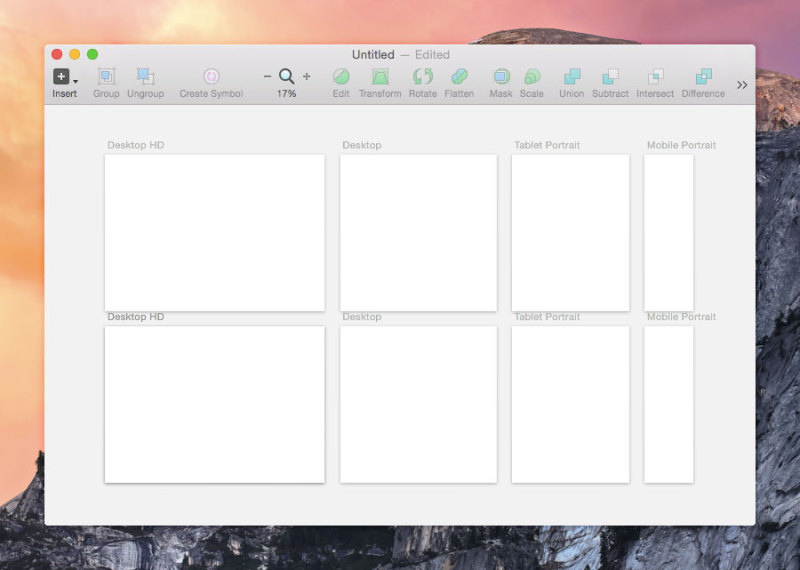
When you need to design an entirely new webpage you can create a new page in Sketch App, which can be done in the layers sidebar by clicking the “+” icon. You might find it especially time-saving by right-clicking and selecting “Duplicate Page”, allowing you to duplicate all of your artboard sizes and common elements. After than, simply delete what you don’t need.
Summary: a .sketch file should contain an entire website design, where each webpage is separated into “pages”, and inside those pages there are artboards containing the variations in screen resolutions displayed horizontally for each screen, where each dynamic view of those screens are displayed vertically.
Tip #3: Stay DRY – Use Styles and Symbols

No, this isn’t an advertisement for a new antiperspirant. When we use the term ‘DRY’ we mean the acronym for ‘Don’t Repeat Yourself‘. This idea of reducing the complexity of a system by removing any duplication is a long established idea in coding, but it makes equal sense inside a graphic layout tool.}
Nobody wants to be ‘Wet’ or ‘Write Everything Twice’?
Shared Styles, Text Styles and Symbols are all very similar, but are used in different scenarios. Shared Styles apply to shapes, Text Styles apply to…well…text, and Symbols apply to Groups of layers; and the aim of them is to save a set of styles under a certain name so that we can use them again. If you’re familiar with CSS, then I know you’re thinking about “classes” right now.
Shared Styles are independent of width and height, so a use-case for this would be to create a Rectangle that can be styled as a button, and call it “button”. We can apply this shared style onto an un-styled rectangle to turn it into a button, and then we can change the dimensions of it freely, without changing the size of all our other buttons. Shared styles can be applied and removed from The Inspector (on the right-hand side), and the exact same concept applies to text styles and symbols as well.

Symbols are a little different; they’re fully-scalable in size and they apply to whole groups of layers. Imagine a mass group of 20 layers, which consists of shapes and texts of all styles.
If you resize that group, all other groups with that symbol applied will resize too, including all of the layers inside it. If you change a layer in that symboled group, that layer in every other group of that symbol will change too. If you add a layer into the symbol, it will appear inside every group of that symbol. If you had a modular grid in your .sketch design and for the time being every module was an identical placeholder, symbols would be very handy for updating them all at once.
Sketch App fact: styles and symbols will synchronise across artboards, and even pages, in the same .sketch file!
Conclusion
It’s hard to understand the impact Sketch App can have on your workflow until you try it; so… try it! Like, now!
If you’re a logo or user interface designer, these three quick tips will help you become a Sketch Guru at lightening speed. Nobody likes to leave their comfort zone, but download a free trial and spend just a couple of hours away from your usual design application, and test drive it.
 Daniel Schwarz
Previously, design blog editor at Toptal and SitePoint. Now Daniel advocates for better UX design alongside industry leaders such as Adobe, InVision, Marvel, Wix, Net Magazine, LogRocket, CSS-Tricks, and more.