Designing for All: The Basic Principles of Web Accessibility


In this article, we’ll look at some of the most fundamental and important aspects of accessibility on the Web. We’ll also consider some of the tools available for ensuring that the content on our websites is accessible to all.
Key Takeaways
- Web accessibility is crucial in creating inclusive and user-friendly online experiences for all individuals, including those with physical or cognitive disabilities or those using different devices to browse the internet.
- Accessible web design includes ensuring perceivability, operability, understandability, robustness, inclusivity, and equal access. It’s not only a legal and ethical responsibility but also beneficial for businesses, reaching a broader audience and future-proofing content and services.
- Semantic HTML, best practices for typography, color, and layouts, and making multimedia accessible are some of the practical aspects of creating accessible and inclusive user interfaces. ARIA (Accessible Rich Internet Applications) roles can also be used to improve the accessibility of web content and applications.
- There are numerous accessibility testing tools and techniques available, including Lighthouse, axe, WAVE, Pa11y, HTML_CodeSniffer, and Tenon. These can be used in conjunction with manual testing techniques, such as keyboard testing and screen reader testing, to identify and address accessibility issues.
- Integrating accessibility testing into the development workflow is essential to catch and address issues early in the development process. This includes education and training, automated testing in CI/CD, manual testing, accessibility checklists, user testing, accessibility bug tracking, and accessibility review.
The Importance of Accessibility
If you can see this text and comfortably read it without squinting, or if you can access it adequately via some form of assistive technology, then it’s reasonably accessible.
The Internet has evolved into a critical source of information, services, and communication, and it should be open to everyone, regardless of their abilities or disabilities.
Web accessibility isn’t solely about meeting legal requirements. It’s also about delivering adequate (if not exceptional) user experiences. Inclusive design, the process of creating products and services with a broad range of users in mind from the outset, plays a pivotal role.
When websites and web applications are thoughtfully designed with accessibility as a central focus, they become inherently user-friendly for everyone. This extends beyond individuals with disabilities to encompass those facing situational challenges, such as using a mobile device in bright sunlight, and those with temporary impairments, such as a broken arm.
Defining Web Accessibility
Web accessibility — or a11y for short — isn’t just a buzzword or technical jargon. It’s a concept that has the power to transform the online experience for countless individuals.
What is web accessibility?
At its core, web accessibility involves crafting websites and web applications to make them usable and comprehensible by everyone, irrespective of their physical or cognitive capabilities, disabilities, or the devices they employ to browse the Internet.
This includes guaranteeing that every user, regardless of whether they have visual, auditory, motor, or cognitive limitations, can efficiently perceive, explore, and engage with online content.
Web accessibility encompasses various aspects, including:
- Perceivability. Information and user interface components must be presented in a way that users can perceive. This includes providing text alternatives for non-text content like images, audio, and video.
- Operability. Anyone should be able to navigate and interact with web content using different input methods, such as a keyboard or screen reader. Interactive elements should be easily accessible and operable.
- Understandability. Web content should be clear and straightforward, with a predictable and consistent layout. Users should not be left puzzled or confused while navigating a website.
- Robustness. Websites and applications should be built using technologies that can withstand the evolution of assistive technologies and user agents. In other words, they should work well with current and future assistive technologies.
- Inclusivity and equal access. Web accessibility is fundamentally about inclusivity. It ensures that everyone, regardless of their abilities, can access and benefit from the wealth of information, services, and opportunities available on the Internet.
- Legal and ethical responsibility. Many countries have recognized the importance of web accessibility and have implemented laws and regulations to enforce it. Violating these regulations can lead to legal consequences.
- Business benefits. Web accessibility is not just about compliance; it’s also a smart business move. Accessible websites can reach a broader audience, potentially increasing customer engagement and revenue.
- Future-proofing. The digital landscape is continually evolving, with new devices and technologies emerging. Web accessibility ensures that your content and services remain relevant and usable as these changes occur.
In essence, web accessibility is about making the Internet a place where everyone has an equal opportunity to participate, engage, and contribute.
Creating Accessible and Inclusive User Interfaces
When it comes to web accessibility, one of the key areas to focus on is creating accessible and inclusive user interfaces. In this section, we’ll showcase some practical aspects of accessibility.
Semantic HTML
Semantic HTML elements provide meaning and structure to web content. They are crucial for screen readers and assistive technologies to understand and interpret the content.
Header
The following HTML snippet shown non-semantic and semantic examples of standard markup:
<!-- Header - non-semantic  -->
<div class="title">About Us</div>
<div class="content">Our history, mission, and values.</div>

<!-- Header - semantic  -->
<h1>About Us</h1>
<p>Our history, mission, and values.</p>
In the second example above, the text is marked up using heading and paragraph tags. This allows screen readers to announce the heading as a meaningful section title and users can navigate directly to specific sections using keyboard shortcuts.
Navigation menu
Below, we see a non-semantic and a semantic way to mark up a navigation menu:
<!-- Navbars(non-semantic) Before-->
<div class="menu">
  <div class="item">Home</div>
  <div class="item">About</div>
  <div class="item">Contact</div>
</div>

<!-- Navbars (semantic) after-->
<nav>
  <ul>
    <li><a href="/">Home</a></li>
    <li><a href="/about">About</a></li>
    <li><a href="/contact">Contact</a></li>
  </ul>
</nav>
The benefits of this are that screen readers can announce the list as a navigation menu, helping users understand its purpose and easily navigate through the list of items.
Semantic HTML helps accessibility with improved screen reader support, enhanced keyboard navigation, and compatibility with assistive technologies.
Best practices for typography, color, and layouts
Let’s next cover some best practices for typography, color, and layout in web accessibility.
Typography
- Choose readable fonts (avoiding stylish or decorative fonts that are harder to read).
- Use relative font sizes according to different screen sizes.
- Optimize line spacing and length.
- Ensure the text contrasts with the background.
Color
- Maintain high color contrast.
- Don’t rely on color alone for information.
- Provide alternatives for color coding.
Layouts
- Create responsive designs.
- Ensure logical reading order.
- Test keyboard navigation.
- Implement clear focus styles on active elements.
These practices improve readability, accessibility for color-blind users, and usability for various devices and assistive technologies.
Making multimedia accessible
Accessible multimedia calls for inclusivity and ensuring that everyone can access your content. It’s not just about following set rules; it throws more light on creating a better experience for all your users.
Images
When using images, make sure to provide concise and descriptive alternative text (alt text) for images. Alt text conveys the image’s content and function to users who cannot see it. For example:
<img src="flower.jpg" alt="A red rose in full bloom">
In the example above, a non-visual user surfing this website with screen readers switched on can easily detect what the image conveys when the alt text is read out loud.
Decorative images
If an image is solely decorative and adds no meaningful content, use empty alt text to indicate its decorative purpose:
<img src="decorative-border.png" alt="">
Complex images
For complex images, charts, or diagrams, consider providing a longer description in the content near the image or link to a separate page with a detailed description.
Video
Videos are fantastic for sharing information, but not everyone can hear what’s being said. To help, consider these tips:
-
Add closed captions. These are like subtitles for spoken content, making videos accessible to people with hearing impairments and those in noisy environments.
-
Provide transcripts. These are text versions of what’s said in the video. They’re helpful for users who can’t watch the video or prefer reading.
-
Audio descriptions. For videos with visual content not mentioned in the audio, consider audio descriptions. These describe what’s happening visually.
Audio
For audio content like podcasts or interviews, think about these accessibility tips:
-
Offer transcripts. Just like with videos, transcripts allow users to read the content if they can’t listen to it.
-
Include audio controls. Make sure there are play, pause, and volume controls for audio players. This helps users who rely on screen readers or prefer using a keyboard.
Exploring ARIA roles
ARIA stands for “accessible rich internet applications”, and it comprises a set of attributes that can be incorporated into HTML elements to improve the accessibility of web content and web applications.
This framework was created by the Web Accessibility Initiative (WAI) under the umbrella of the World Wide Web Consortium (W3C). ARIA serves as a means to transmit valuable information to assistive technologies such as screen readers, thereby enhancing the usability of web applications and dynamic content for individuals with disabilities.
Let’s look at some common ARIA attributes, with examples.
aria-label
The aria-label attribute provides a text label to relay the element to assistive technologies. It’s particularly useful when an element doesn’t have visible text, like an icon or a button with just an image:
<button aria-label="Play video">
    <img src="play-button.png" alt="Play">
</button>
aria-labelledby
The aria-labelledby attribute references an element (usually a heading or label) that serves as the accessible name or label for another element. This helps provide context and ensure screen reader users understand the purpose of an element:
<div id="section-heading">Important Information</div>
<div aria-labelledby="section-heading">This is a critical update for all users.</div>
aria-describedby
The aria-describedby attribute points to an element that contains a longer description or additional information about the element, making it easier for screen reader users to access more details:
<input type="text" aria-describedby="username-hint">
<div id="username-hint">Please enter your username (minimum 8 characters).</div>
aria-expanded and aria-hidden
The aria-expanded and aria-hidden attributes are often used in conjunction with collapsible elements like accordions and menus to indicate whether the content is hidden or expanded. They help users understand and control interactive elements:
<button aria-expanded="false" aria-controls="menu-content">Show Menu</button>
<div id="menu-content" aria-hidden="true"> <!-- Hidden content here --> </div>
role
The role attribute defines the role or type of an element, helping assistive technologies understand its function. Common roles include button, menu dialog, alert, and more:
<div role="alert">This is a critical announcement.</div>
aria-live
The aria-live attribute informs screen readers that dynamic content is being updated without requiring user interaction. It can be used to announce changes such as new chat messages or live search results:
<div aria-live="polite" id="live-region">New message received.</div>
aria-activedescendant
The aria-activedescendant attribute is used in combination with auto-suggest or auto-complete components to indicate which item is currently selected or being interacted with:
<input aria-autocomplete="list" aria-activedescendant="suggestion-1">
<ul role="listbox">
  <li id="suggestion-1">Option 1</li>
  <li id="suggestion-2">Option 2</li>
  <!-- More options -->
</ul>
Using ARIA to create accessible forms and data tables
ARIA plays a vital role in enabling better performance and accessibility. Let’s look at some examples.
Accessible form
<form>
    <label for="name">Name:</label>
    <input type="text" id="name" aria-describedby="name-desc" required>
    <div id="name-desc">Enter your full name.</div>

    <label for="email">Email:</label>
    <input type="email" id="email" aria-describedby="email-desc" required>
    <div id="email-desc">Provide a valid email address.</div>

     <label for="username">Username:</label>
    <input type="text" id="username" aria-invalid="true" required>
    <div id="username-error" role="alert">Please enter a valid username.</div>

    <button type="submit">Submit</button>
</form>
In the example above, we’re using aria-describedby to associate descriptive information with form fields. The <label> elements provide clear text labels for each input and the required attribute indicates mandatory fields.
For signaling error states, we make use of the aria-invalid attribute and the role="alert" attribute to mark the error message for screen readers.
Data Tables
<!-- table1 -->
<table>
  <caption>
    Monthly Expenses
  </caption>
  <thead>
    <tr>
      <th scope="col">Month</th>
      <th scope="col">Expense</th>
      <th scope="col">Amount</th>
    </tr>
  </thead>
  <tbody>
    <tr>
      <th scope="row">January</th>
      <td>Rent</td>
      <td>$1,000</td>
    </tr>
    <tr>
      <th scope="row">February</th>
      <td>Utilities</td>
      <td>$200</td>
    </tr>
  </tbody>
</table>
From the simple table with headers above, the <caption> element provides a title for the table, the <th> elements with scope attributes define headers and <th scope="row"> indicates row headers.
<!-- table 2 -->
<table>
  <caption>
    Stock Prices
  </caption>
  <thead>
    <tr>
      <th id="symbol" scope="col">Symbol</th>
      <th id="price" scope="col">Price</th>
      <th id="change" scope="col">Change</th>
    </tr>
  </thead>
  <tbody>
    <tr>
      <th headers="symbol">AAPL</th>
      <td headers="price">$150.25</td>
      <td headers="change" aria-label="Positive change">+0.75%</td>
    </tr>
  </tbody>
</table>
In Table 2 above, ARIA attributes like headers link data cells to their corresponding headers, and the aria-label provides an accessible label for the change percentage, thereby improving accessibility for all users, including those who rely on screen readers or keyboard navigation, ensuring a more inclusive user experience.
Popular Accessibility Testing Tools and Techniques
Accessibility testing tools are invaluable resources for identifying and addressing accessibility issues in web applications and websites. These tools analyze the digital content and provide feedback on areas that need improvement. Some popular accessibility testing tools include those listed below.
Lighthouse
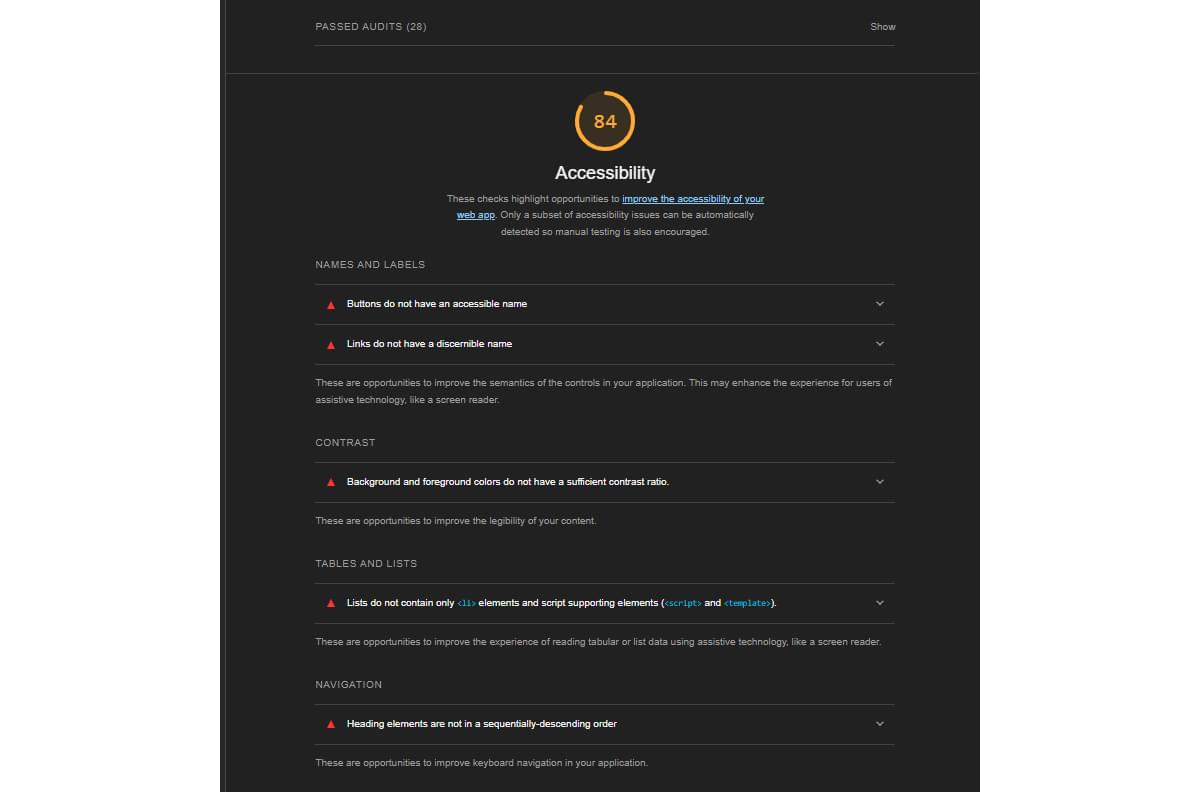
Part of Chrome DevTools, Lighthouse includes an accessibility audit that can help identify common accessibility issues.
The image below shows an accessibility test from the stables of Chrome’s Lighthouse dev tools. It clearly shows that the audited site has some accessibility issues.
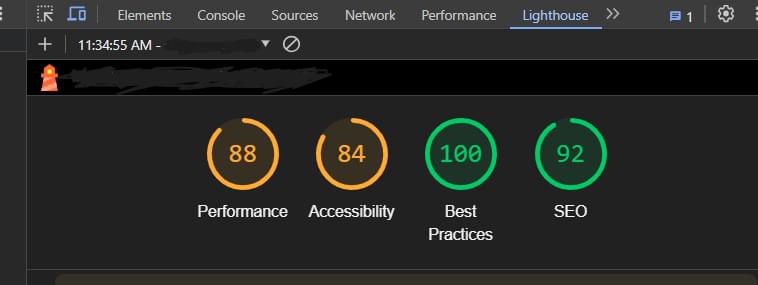
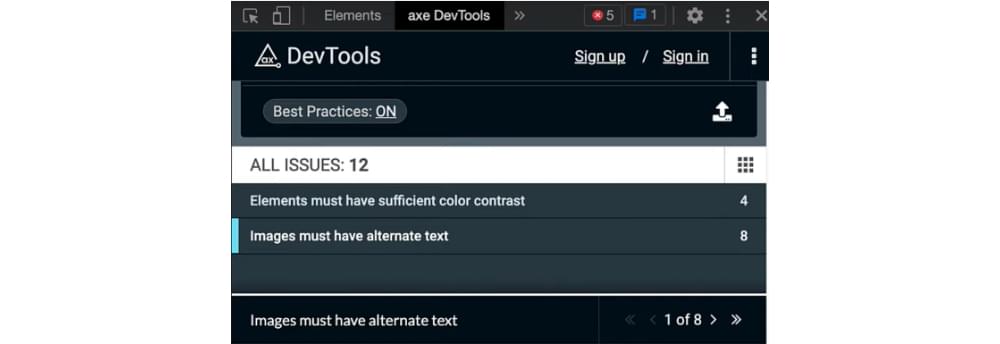
The image below shows these issues broken down for the developer to fix.
axe
axe is a JavaScript library and browser extension that helps developers identify and fix accessibility issues directly within their development environment.
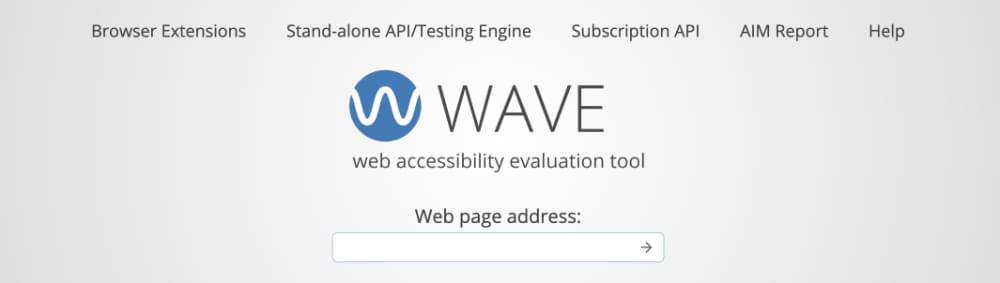
WAVE
WAVE is web accessibility evaluation tool that provides a visual representation of web page accessibility and generates detailed reports with actionable advice.
Pa11y
Pa11y is a command-line tool that allows automated accessibility testing and reporting for multiple pages. Pa11y can be integrated into continuous integration (CI) pipelines.
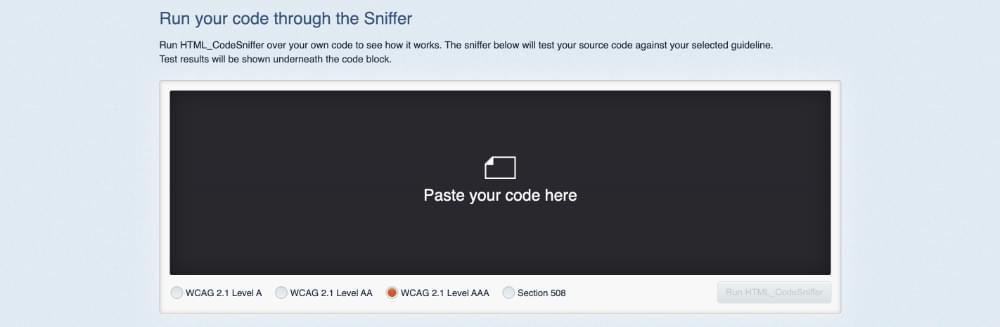
HTML_CodeSniffer
HTML_CodeSniffer is a bookmarklet and command-line tool that checks web pages for compliance with web accessibility standards and provides results in an easy-to-understand format.
Tenon
Tenon is a cloud-based accessibility testing tool that offers automated testing, reporting, and integration options with various development tools.
Accessibility techniques
To perform effective accessibility testing, it’s important to consider a combination of automated and manual testing techniques:
- Automated testing. Utilize accessibility testing tools like Axe, WAVE, and Pa11y to quickly identify common issues, such as missing alt text, low contrast, and improper heading structures.
- Manual testing. Manually review your web content with assistive technologies like screen readers, keyboard navigation, and voice recognition software to simulate the experiences of users with disabilities.
- Keyboard testing. Ensure that all interactive elements, including forms and buttons, are fully functional and accessible using only the keyboard.
- Screen reader testing. Test your web content with popular screen readers like JAWS, NVDA, or VoiceOver to evaluate the reading order, navigation, and alternative text.
- Color contrast testing. Use tools like the WebAIM Color Contrast Checker to verify that text and background colors meet accessibility standards.
Integrating accessibility testing into the development workflow
Integrating accessibility testing into your development workflow is essential to catch and address issues early in the development process. Here are steps to achieve this:
- Education and training. Ensure that your development team is educated about web accessibility standards and best practices.
- Automated testing in CI/CD. Incorporate automated accessibility tests into your continuous integration/continuous deployment (CI/CD) pipeline to catch issues as soon as code is committed.
- Manual testing. Designate specific team members or testers to perform manual accessibility testing at key stages of development.
- Accessibility checklists. Develop and maintain accessibility checklists or guidelines tailored to your project to ensure that all team members follow accessibility best practices.
- User testing. Conduct user testing with individuals who have disabilities to gather valuable feedback and identify real-world accessibility challenges.
- Accessibility bug tracking. Integrate accessibility bug tracking into your project management tools to prioritize and address issues effectively.
- Accessibility review. Include an accessibility review as part of your quality assurance (QA) process before each release.
By integrating accessibility testing into your development workflow, you not only ensure that your digital products are more inclusive but also reduce the time and cost associated with fixing accessibility issues late in the development cycle. It’s a proactive approach to creating a more accessible and user-friendly web experience for all users.
Conclusion
In this guide, we’ve explored the importance of web accessibility and its impact on user experiences. We’ve covered key aspects, from understanding web accessibility to practical techniques and testing tools.
You can find many of the code samples discussed above in this GitHub gist.
Remember that accessibility is an ongoing commitment, requiring continuous learning, collaboration, and user-centered design. Embrace web accessibility to ensure equal access and a better online experience for everyone.
FAQs on Accessibility
Web accessibility refers to the practice of designing and developing websites and web applications in a way that ensures they are usable by individuals with disabilities, including those with visual, auditory, motor, or cognitive impairments.
Web accessibility is essential to ensure equal access to information and services for everyone, regardless of their abilities. It also helps websites comply with legal requirements and provides a better user experience for all visitors.
Web accessibility addresses disabilities such as blindness, low vision, deafness, hearing impairments, motor disabilities, cognitive disabilities, and more.
Web accessibility is based on four core principles: perceivable, operable, understandable, and robust. These principles are defined by the Web Content Accessibility Guidelines (WCAG).
Common barriers include missing alt text for images, insufficient color contrast, lack of keyboard navigation, inaccessible forms, and inaccessible multimedia content.
Yes, you can test your website for accessibility using various evaluation tools and manual testing. Automated tools can help identify some issues, but manual testing is also crucial for a comprehensive evaluation.
Emmanuel is a passionate software developer who finds joy in both writing and problem-solving.

Published in
·Databases·Debugging & Deployment·Development Environment·PHP·Programming·Web·April 19, 2014
Published in
·Design·Design & UX·HTML & CSS·Photoshop·Prototypes & Mockups·Review·Sketch·Software·Technology·UI Design·UX·Web·March 11, 2019