
Key Takeaways
- Utilize Ruby and Sinatra to Build iOS Passbook Backend: The tutorial demonstrates how to use Ruby programming language alongside Sinatra framework to create a backend for handling iOS Passbook, which includes generating passes and managing push notifications.
- Certificate Requirements for Pass Creation: Essential certificates such as p12Certificate.pem, p12Key.pem, and WWDRCertificate.pem are necessary, all of which can be obtained through the iOS Developer access portal, to authenticate and facilitate secure interactions with Apple’s services.
- Database and ActiveRecord Setup: The backend involves setting up a PostgreSQL database with tables for passes, devices, registrations, and logs to store and manage data effectively using ActiveRecord ORM in Sinatra.
- Endpoints for Pass Management: Detailed instructions are provided for creating endpoints that handle pass generation, updates, and registration, alongside managing devices and logging errors or warnings, leveraging the Passbook gem for simplified operations.
- Comprehensive Guide on Using Ruby for iOS Passbook: The tutorial not only covers the technical setup but also provides insights into the practical implementation of a server capable of managing Passbook functionalities, which is beneficial for developers looking to integrate such features into their iOS applications.

Passbook (called “Wallet” starting in iOS 9) is an built-in iOS application that provides a way for users to store and access “passes”. Consider a pass as a digital token for something, such as event tickets, membership cards, discount coupons, boarding passes, etc. Passes can be added to passbook by mail, messages, an app, etc.
A pass has many benefits for the user. For example, say a user has added a pass for a movie ticket that starts at 10.00 A.M.. That pass will be displayed on the home screen when the even draws near the user to access it directly. If a membership pass with some discount for Store X has been added, it would be displayed whenever the user walks in to Store X.
Passes are also beneficial to pass providers. For one, a pass can be used as a means of notification whenever there is some change regarding the information. Examples are a movie is canceled or boarding pass is changed, or the providers wants to give an extra discount for pass holders. All of this is possible with the use of passes.
Today, we’re going to see how to build an iOS passbook backend that handles pass generation and push notifications. I am going to use Ruby and Sinatra for it. Let’s get started.
Note: This tutorial only covers the server part of the passbook. I’d suggest that you learn about the pass design and schema beforehand. There are many good tutorials out there, and I would recommend this two-part series.
Requirements
Before we start writing the code, there a few things that are essential for pass creation, all related to certificates. They are,
- p12Certficate.pem
- p12Key.pem
- p12Password – string
- WWDRCertificate.pem
- NotificationCert.pem (p12Certificate signed with p12Key)
The certificates can only be generated from the iOS Developer access portal. Information on how to generate this certificates are available here (Section – Get me the certificate!)
Creating the Application
Folder Structure
Let’s create the app. Start by creating a folder, folder structure, and files shown below. If you are using any other directory structure other than what is depicted below, make sure to correct it in the code as well.
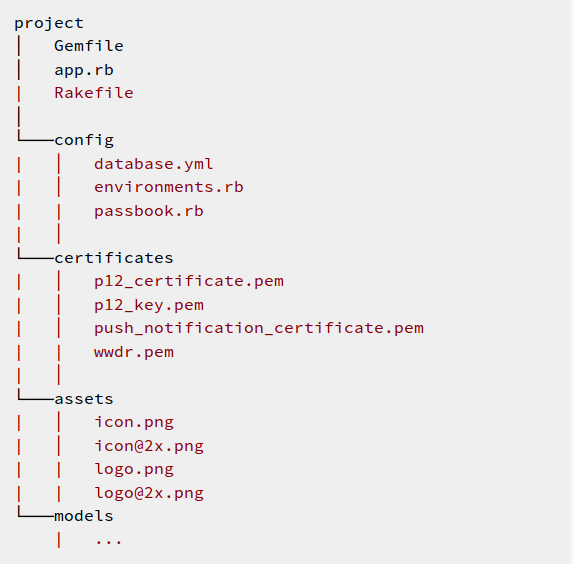
Be sure to place the files in assets folder in the same name as mentioned above, as this is the convention. Place the certificates you’ve generated previously inside certificates folder.
Required Files
Now that the folder structure is created, add the below contents to your Gemfile:
source 'https://rubygems.org'

gem 'sinatra'
gem 'passbook'
gem 'grocer'

gem 'activerecord'
gem 'sinatra-activerecord'
gem 'pg'
We’re using the Passbook gem for pass generation and the grocer gem for push notifications. On the Rails side, we’ll use ActiveRecord ORM and PostgreSQL.
Once the Gemfile is updated, run bundle install. All the required gems will now be installed.
Next up, add the following to app.rb:
 require 'sinatra'
 require 'bundler/setup'
 require 'passbook'
 require 'sinatra/activerecord'
These are the modules that we’re going to use in the application. Open the Rakefile and add:
 require './app'
 require 'sinatra/activerecord/rake'
 Dir.glob('lib/tasks/*.rake').each { |r| load r}
The Rakefile is required for the rake commands to work. We’ve required the main app file, and ActiveRecord’s Rake module. Finally, load all the rake files from lib/tasks just in case if we want to mak any custom Rake tasks.
Next up, fill in the configuration details. Open up the files we’ve created in the config/ folder and add the contents below.
Database Configuration
# database.yml
development:
  adapter: postgresql
  database: appname_development
  host: localhost

production:
  adapter: postgresql
  encoding: unicode
ActiveRecord Configuration
#environments.rb
require "sinatra/activerecord"

configure :production, :development do
  db = URI.parse(ENV['DATABASE_URL'] || 'postgres://localhost/appname_development')

  ActiveRecord::Base.establish_connection(
    :adapter => db.scheme == 'postgres' ? 'postgresql' : db.scheme,
    :host     => db.host,
    :username => db.user,
    :password => db.password,
    :database => db.path[1..-1],
    :encoding => 'utf8'
  )
end
Passbook Configuration
#passbook.rb
Passbook.configure do |passbook|
  passbook.p12_password = 'r@nd0mpa$sw0rd'
  passbook.p12_key = 'certificates/p12_key.pem'
  passbook.p12_certificate = 'certificates/p12_certificate.pem'
  passbook.wwdc_cert = 'certificates/wwdr.pem'
  passbook.notification_gateway = 'gateway.push.apple.com'
  passbook.notification_cert = 'certificates/push_notificfation_certificate.pem'
end
The database and ActiveRecord configuration are trivial. In the Passbook configuration, we’re providing the the certificates and credentials needed to generate passes. Require the config/environments and config/passbook in app.rb and we’re good.
Alright, we’ve successfully bootstrapped the directory structure and placed all the required files in it. Next up, let’s create the database schema.
Creating Database Schema
Migrations
First create the database by typing the following command in the console:
rake db:create
We’re going to need 4 tables for our app to handle pass registrations and notifications. Here is the schema:
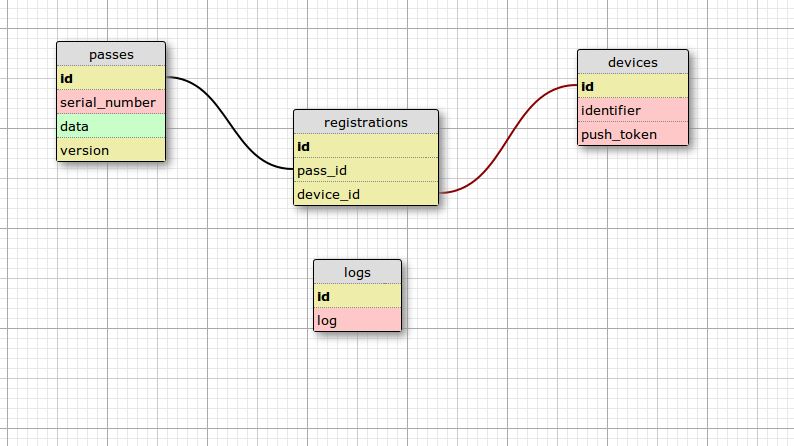
A quick run through of the tables:
1. passes – Holds the necessary information that goes into a pass.
2. devices – Device identifier and push token which Apple will send whenever our pass is added to a device. The information is used to send pass updates.
3. registrations – This facilitates the many-to-many relationship between passes and devices. A device can add many passes and a pass could be added to many devices, so we should send the pass updates to all the devices.
4. logs – Whenever something goes wrong, Apple posts a error/warning message to our server. This table will hold those logs and be used for troubleshooting.
Note: Apple explicitly states to have the registration table for the relation and to delete the row whenever a device unregisters a pass. If you want to keep the data, you can add a column to mark the registration
activeorinactive.
Let’s quickly create the four tables. Enter the following commands to create the migrations (mind the naming convention):
rake db:create_migration NAME=create_passes
rake db:create_migration NAME=create_devices
rake db:create_migration NAME=create_registrations
rake db:create_migration NAME=create_logs
In the migration files, add the following contents respectively to the respective files:
### create_passes
def change
  create_table :passes do |t|
    t.string :serial_number, null: false
    t.jsonb :data, null: false
    t.integer :version, default: 1
  end
end

### create_devices
def change
  create_table :devices do |t|
    t.string :identifier, null: false
    t.string :push_token, null: false
  end
end

### create_registrations
def change
  create_table :registrations do |t|
    t.integer :pass_id, null: false
    t.integer :device_id, null: false
  end
end

### create_logs
def change
  create_table :logs do |t|
    t.text :log
  end
end
As you can see, the passes table holds the JSON data of the pass, which will be different for each pass. Each pass will be identified by its serial number, which is unique. Also, version contains the version of the pass data. This is used when sending pass updates via push notification.
Run rake db:migrate to create the tables. db/ folder and db/schema.rb should exist now.
Models
The migrations are done and the tables are created. Let’s create ActiveRecord models for the schema. Inside the previously created /models folder, create the following files. Again, mind the naming convention.
### models/pass.rb
class Pass < ActiveRecord::Base
  validates_uniqueness_of :serial_number

  has_many :registrations
  has_many :devices, through: :registrations
end

### models/device.rb
class Device < ActiveRecord::Base
  validates_uniqueness_of :device_identifier
  validates_uniqueness_of :push_token

  has_many :registrations
  has_many :passes, through: :registrations
end

### models/registration.rb
class Registration < ActiveRecord::Base
  belongs_to :pass
  belongs_to :device
end

### models/log.rb
class Log < ActiveRecord::Base
end
Nothing fancy here, just establishing the relationship for ActiveRecord to identify and act accordingly. Again, be careful with the naming of the files and the class names. Then require the models we just created in app.rb:
### app.rb
require './models/pass'
require './models/device'
require './models/registration'
require './models/log'
Endpoints
Pass generation
Alright, we’re all set to write our first endpoint, which is going to be used for pass generation. The endpoint accepts JSON and the returns the .pkpass file. Open up your app.rb file and add the following after the requires:
post '/passbooks' do
  request.body.rewind
  data = JSON.parse request.body.read

  unless @pass = Pass.find_by(serial_number: data['serialNumber'])
    @pass = Pass.create(serial_number: data['serialNumber'], data: data)
  end
  passbook = Passbook::PKPass.new @pass.data.to_json.to_s
  passbook.addFiles ['assets/logo.png', 'assets/logo@2x.png', 'assets/icon.png', 'assets/icon@2x.png']
  gen_pass = passbook.file
  send_file(gen_pass.path, type: 'application/vnd.apple.pkpass', disposition: 'attachment', filename: "pass.pkpass")
end
We’ve just created a post endpoint to send the JSON data and to respond with .pkpass file. Notice, if the JSON includes the serial number of a previously generated pass, we ignore the posted data and defer to the existing pass. There are reasons for this:
- We shouldn’t allow duplicate serial numbers.
- We’re not updating the pass here because it simply isn’t an update endpoint. The schema includes a
versioncolumn and push notifications for pass updates on top of that. If we update the pass for every pass generation request without checking for data, we might send too many notifications to our users without an actual update.
It’s better to maintain a separate endpoints for pass updates, but if you still want to do it in a single endpoint, there are couple of ways. Compare the new data to the old data and update only if it has changed. This way it will be easy to maintain the pass version.
Let’s see how it works, I’m sending this JSON to the app and here is the response:
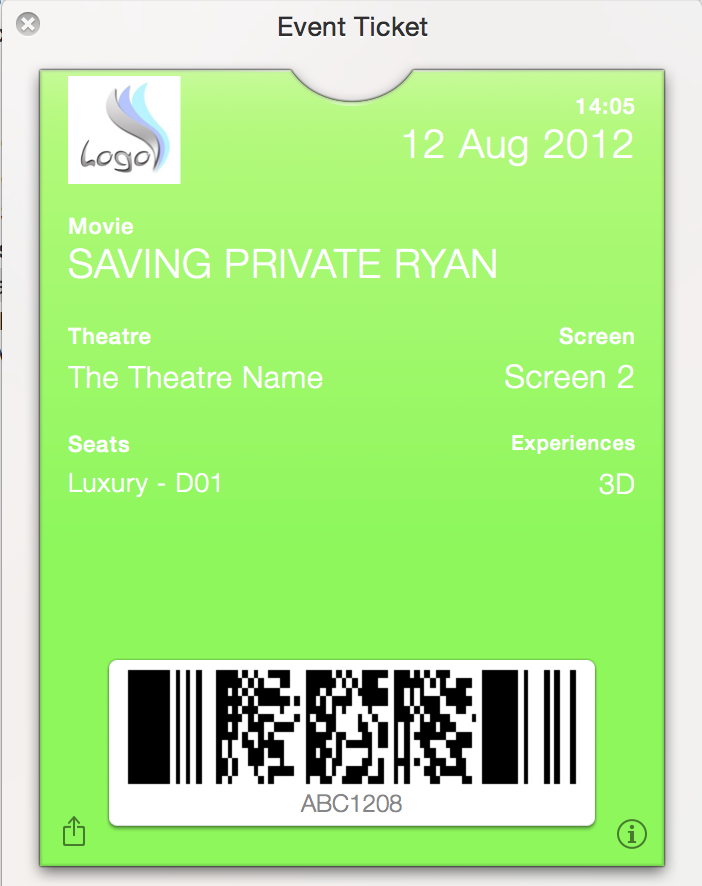
Cool, eh? The pass style is fully customizable. You can read more about that here – Pass files
We’re done with the pass generation part. Next, let’s add pass update endpoints.
Pass Updates Endpoint
There are in total 5 endpoints that are required for the full communication between our server, Apple’s servers, and the device. More details about them are here – iOS Passbook WebService Reference
Basically, whenever a device adds a pass it will call our server (URL will be mentioned in the pass JSON) to register itself. We have to record the push notification and the DeviceLibrary Identifier it sends. After that, once we have any pass updates, send a notification request to Apple servers (no data) using the device’s push token. Once the request is placed, Apple will call the endpoint to get the passes that need to be updated on a device (remember a device can have multiple passes). We’ll send the serial numbers that need to be updated. Apple then sends a call for each serial number asking for the latest version of the pass. Finally, Apple will send the update the user’s device. That’s it.
Other two endpoints apart from this flow are unregister and posting errors or warning logs.
Fortunately the passbook gem provides the endpoints out of the box, so we just have to extend it and write our logic. Open up app.rb and add this line after all the requires and before the pass generation endpoint:
use Rack::PassbookRack
Then, add the following lines after the pass generation endpoint:
module Passbook
  class PassbookNotification
    def self.register_pass(options)
      status = verify_pass_and_token options
      if status
        return status
      end

      @device = Device.where(identifier: options['deviceLibraryIdentifier'], push_token: options['pushToken']).first_or_create
      if Registration.find_by(pass_id: @pass.id, device_id: @device.id).present?
        return {:status => 200}
      else
        Registration.create(pass_id: @pass.id, device_id: @device.id)
        return {:status => 201}
      end
    end

    def self.passes_for_device(options)
      unless valid_device? options['deviceLibraryIdentifier']
        return
      end

      update_tag = options['passesUpdatedSince'] || 0
      passes = @device.passes.where('version > ?', update_tag.to_i)
      if passes.present?
        {'lastUpdated' => Time.now.utc.to_i.to_s, 'serialNumbers' => passes.map{|p| p.serial_number}}
      else
        return
      end
    end

    def self.unregister_pass(options)
      status = verify_pass_and_token options
      if status
        return status[:status] == 401 ? status : {:status => 200}
      end

      unless valid_device? options['deviceLibraryIdentifier']
        return {:status => 401}
      end

      registrations = @device.registrations.where(pass_id: @pass.id)
      if registrations.present?
        registrations.destroy_all
      end
      return {:status => 200}
    end

    def self.latest_pass(options)
      @pass = find_pass_with options['serialNumber']
      unless @pass
        return
      end

      passbook = Passbook::PKPass.new @pass.data.to_json.to_s
      passbook.addFiles ['assets/logo.png', 'assets/logo@2x.png', 'assets/icon.png', 'assets/icon@2x.png']
      {:status => 200, :latest_pass => passbook.stream.string, :last_modified => Time.now.utc.to_i.to_s}
    end

    def self.passbook_log(log)
      log.values.flatten.compact.each do |l|
        Log.create(log: l)
      end
    end
  end
end

def verify_pass_and_token options
  token = ENV['AUTH_TOKEN']
  @pass = find_pass_with options['serialNumber']
  if options['authToken'] != token
    return {:status => 401}
  elsif !@pass
    return {:status => 404}
  else
    return
  end
end

def find_pass_with serial
  Pass.find_by(serial_number: serial)
end

def valid_device? identifier
  @device = Device.find_by(identifier: identifier)
end
That’s it. The code is pretty self explanatory, but let’s just quickly go through what’s happening in each of the endpoint.
Register Pass
The first request is validated, at first. The token should be included in the pass JSON at the time of creation as it is used for validating the requests. Next, validate the serial number is indeed for an already created pass. We a valid request, fetch or create the device by the identifier and push token, then create the registration for the device and pass. The different response code is what Apple expects to be.
Passes for a Device
This is the endpoint called right after we send the push notification request.
In this endpoint, we’ll receive a identifier and a passesUpdatedSince flag. The passesUpdatedSince flag is quite important because it identifies the version of the pass. You can use any variant to mange the version, but using timestamps as integers is a good approach since it serves for other purposes, too. If there are many latest version of the pass, respond with the serial numbers as an array.
Latest Pass
This is the final endpoint that will be called as part of the push notification communication cycle. We’ll receive one request per serial number we sent in the previous response and can generate the pass just like the pass generation endpoint, responding with the .pkpass file.
Unregister Pass
This endpoint will receive pass details and device details. We are validating the pass and the device and, if both are present AND active, delete it.
Passbook Log
This endpoint takes the errors/warnings sent from Apple and just stores them in the logs table.
Sending a Push Notification
We’re all set to send push notifications. First, add an endpoint for pass updates. Open up app.rb, require grocer, and add the following after the pass creation endpoint:
get '/passbooks/update' do
  request.body.rewind
  data = JSON.parse request.body.read

  unless @pass = find_pass_with(data['serialNumber'])
    @pass = Pass.create(serial_number: data['serialNumber'], data: data)
    {:response => 'Pass newly created.'}.to_json
  else
    @pass.update(data: data, version: Time.now.utc.to_i)
    push_updates_for_pass
    {:response => 'Pass updated and sent push notifications.'}.to_json
  end
end

def push_updates_for_pass
  @pass.devices.each do |device|
    puts "Sending push notification for device - #{device.push_token}"
    Passbook::PushNotification.send_notification device.push_token
  end
end
We’re using the passbook gem PushNotification.send_notification method to send the push notification. Once this command is executed, the communication cycle starts and the pass updates will be delivered to the user’s device:
Conclusion
With that, we’ve come to the conclusion of this tutorial. All the code used in this tutorial is hosted in github, feel free to fork and poke around.
Frequently Asked Questions (FAQs) about Handling iOS Passbook with Ruby
What is the iOS Passbook and how does it work with Ruby?
The iOS Passbook, now known as Apple Wallet, is a mobile application included with the Apple iOS operating system. This app allows users to store coupons, boarding passes, event tickets, store cards, and more in one place. Ruby, on the other hand, is a dynamic, open-source programming language that focuses on simplicity and productivity. It has an elegant syntax that is natural to read and easy to write. When it comes to handling iOS Passbook with Ruby, developers use Ruby to create and manage .pkpass files, which are the file format used by Passbook. Ruby’s flexibility and simplicity make it an excellent choice for this task.
How can I create a .pkpass file using Ruby?
Creating a .pkpass file using Ruby involves several steps. First, you need to set up your pass by defining its type (coupon, event ticket, etc.), serial number, and team identifier. Then, you need to create a pass.json file, which contains the pass’s structure and visual appearance. After that, you need to create a manifest file, which is a JSON file that contains the SHA-1 hashes of all the files in the pass package. Finally, you need to sign the manifest file using a pass type identifier certificate and a WWDR certificate. Ruby’s libraries and gems, such as the ‘passbook’ gem, can simplify these tasks.
How can I update a .pkpass file using Ruby?
Updating a .pkpass file using Ruby involves modifying the pass.json file and then re-signing the manifest file. The pass.json file contains the pass’s structure and visual appearance, so any changes to the pass should be reflected in this file. After modifying the pass.json file, you need to update the manifest file with the new SHA-1 hashes of all the files in the pass package. Then, you need to re-sign the manifest file using a pass type identifier certificate and a WWDR certificate. Ruby’s libraries and gems can simplify these tasks.
How can I distribute a .pkpass file?
There are several ways to distribute a .pkpass file. You can send it via email or SMS, distribute it through a web page, or distribute it through an app. When the user receives the .pkpass file, their device will automatically recognize it and offer to add it to their Apple Wallet.
How can I view a .pkpass file on different devices?
On an iPhone or iPad, you can view a .pkpass file by opening it in Apple Wallet. On a Mac, you can view a .pkpass file by opening it in the Passbook app. On a Windows PC or Android device, you can view a .pkpass file using a third-party app or service, such as PassWallet or PassSource.
What are the benefits of using Ruby to handle iOS Passbook?
Ruby is a dynamic, open-source programming language that focuses on simplicity and productivity. Its elegant syntax is natural to read and easy to write, which makes it an excellent choice for handling iOS Passbook. With Ruby, you can easily create, update, and distribute .pkpass files. Plus, Ruby’s libraries and gems, such as the ‘passbook’ gem, can simplify these tasks and make your code more efficient.
What are the limitations of using Ruby to handle iOS Passbook?
While Ruby is a powerful and flexible programming language, it does have some limitations when it comes to handling iOS Passbook. For example, Ruby can’t directly interact with the Apple Wallet app, so you can’t use Ruby to add passes to the app or update passes in the app. Instead, you need to create, update, and distribute .pkpass files, which the user can then add to their Apple Wallet.
Can I use Ruby to handle other types of digital wallets?
Yes, you can use Ruby to handle other types of digital wallets. However, the process may be different depending on the digital wallet’s file format and API. For example, Google Pay uses .pkpass files, so you can use the same process as for iOS Passbook. But other digital wallets may use different file formats, in which case you would need to adjust your code accordingly.
How secure is it to use Ruby for handling iOS Passbook?
Using Ruby to handle iOS Passbook is secure as long as you follow best practices for secure coding. This includes using secure methods for handling data, validating input, and handling errors. In addition, when you create a .pkpass file, you sign it with a certificate, which ensures that only you can update the pass.
Where can I find more resources about handling iOS Passbook with Ruby?
There are many resources available online for learning more about handling iOS Passbook with Ruby. The Apple Developer Documentation is a great place to start, as it provides detailed information about the Passbook API. You can also find tutorials and guides on websites like Stack Overflow, GitHub, and RubyGems.
Vinoth is a Server Administrator turned Full stack web developer. He loves to try his hands on multiple programming languages but his primary programming language of choice is Ruby. He is currently a Software Engineer @ Intelllex building the server side of things. You can find more about him at avinoth.com.

