In iOS 7, Apple introduced classes to help developers in building user interfaces that would ‘feel real’ and behave with ‘realism’ to user interaction. The tools used to achieve this are mainly UIKit Dynamics and Motion Effects. Previously, to achieve such interaction, a developer had to be well versed in math, physics and the Core Animation library. With the new libraries, it is easier to set up and implement such realistic behaviours and animations. Motion Effects allows you to adjust the appearance of your app’s UI according to the phone’s orientation and how the user is holding and moving it. An example of this can be seen on the home screen which has parallax effects that respond to the phone being moved. This gives a sense of depth to the otherwise flat interface. UIKit Dynamics allows you to add real-life behaviours to your views so that when they are animated, the effect is what you have come to expect from real world objects. These behaviours include gravity, collision, attachment, etc. The classes that provide different behaviours for your UI elements are:
UIGravityBehavior– Provides gravitational behavior to your views.UICollisionBehavior– Provides collision detection.UISnapBehavior– Causes a view to move to and snap to a specific point on the interface as if connected to it.UIAttachmentBehavior– Specifies a dynamic connection between two dynamic items, or between a dynamic item and an anchor point.UIPushBehavior– Applies a continuous or instantaneous force to one or more dynamic items, causing those items to change position accordingly.
UIDynamicAnimator which provides a context for the various behaviours and animations that you define. The UIDynamicAnimator is initialized with a reference view which it uses to define its coordinate system and calculate the output of various behaviors.
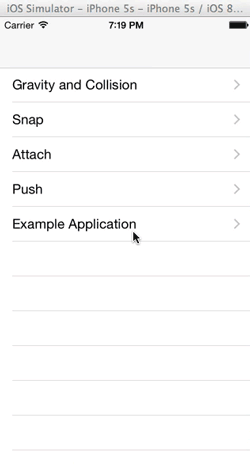
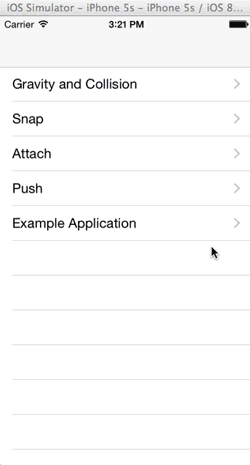
We will look at how to implement the 5 behaviours described above. I have set up a starter project that you can download and the final example here. It provides a simple master-view type of app where the master view shows a list of the behaviours we will look at and the detail view will show a demo of the behaviour in action. This is set up so we could concentrate on UIKit Dynamics and not have to go through explaining how to set up the project. We are going to use Swift for this example, so you will require Xcode 6 to follow along.
Gravity and Collision
We’ll start by adding gravity to a view. This is a common concept that we have come to expect of objects in our world. When something has no force holding it up, it falls to the ground. We can simulate this behaviour using theUIGravityBehavior class.
In the GravityAndCollisionViewController class of the project, we first add a view which the gravity behaviour will act on.
Add the following instance variable to the class.
var squareView: UIView!viewDidLoad() add the following at the end of the method.
squareView = UIView(frame: CGRect(x: 100, y: 100, width: 100, height: 100))
squareView.backgroundColor = UIColor.blueColor()
view.addSubview(squareView)var gravity: UIGravityBehavior!
var animator: UIDynamicAnimator!viewDidLoad()
animator = UIDynamicAnimator(referenceView: view)
gravity = UIGravityBehavior(items: [squareView])
animator.addBehavior(gravity)angle property of UIGravityBehavior. You can also change the speed by which the object falls by setting a different magnitude. Like with real gravity, the view is pulled down until it hits a boundary. Since we haven’t defined one, the view keeps on dropping and even goes out of view.
 We keep the square view within the bounds of our screen by setting a boundary. To set a boundary, you can either set the reference view’s boundaries to be the boundaries of your collision detection or you could define custom lines to be boundaries to your collisions.
To add a boundary, we have to create an instance of the
We keep the square view within the bounds of our screen by setting a boundary. To set a boundary, you can either set the reference view’s boundaries to be the boundaries of your collision detection or you could define custom lines to be boundaries to your collisions.
To add a boundary, we have to create an instance of the UICollisionBehavior class. Add the following instance variable to the class.
var collision: UICollisionBehavior!viewDidLoad() method.
collision = UICollisionBehavior(items: [squareView])
collision.translatesReferenceBoundsIntoBoundary = true
animator.addBehavior(collision)UICollisionBehavior object with an array of objects that we want to add collision behaviour to. This class as well as the other behaviour classes takes an array of objects that conform to the UIDynamicItem protocol. All instances of UIView conform to this protocol, so our square is a good fit.
We then set the translatesReferenceBoundsIntoBoundary property of the collision behaviour’s instance to true so that the boundaries of our reference view (which was set when initializing UIDynamicAnimator) are set as the boundaries of the collision detection behaviour.
On running the app, the square will fall and hit the bottom of the screen with a few bounces before settling.
 If you want to define your own boundaries, you can use the
 addBoundaryWithIdentifier method to set the bounds. For example having the bound defined as below, will set a barrier that will stop the square at the defined position.
collision.addBoundaryWithIdentifier("barrier", fromPoint: CGPointMake(self.view.frame.origin.x, 350), toPoint: CGPointMake(self.view.frame.origin.x + self.view.frame.width, 350)) The complete code for the
 GravityAndCollisionViewController class is shown below.
//
// GravityAndCollisionViewController.swift
// Dynamics Demo
//
// Created by Joyce Echessa on 8/26/14.
// Copyright (c) 2014 Joyce Echessa. All rights reserved.
//
import UIKit
class GravityAndCollisionViewController: UIViewController {
var squareView: UIView!
var gravity: UIGravityBehavior!
var animator: UIDynamicAnimator!
var collision: UICollisionBehavior!
override func viewDidLoad() {
super.viewDidLoad()
// Do any additional setup after loading the view.
squareView = UIView(frame: CGRect(x: 100, y: 100, width: 100, height: 100))
squareView.backgroundColor = UIColor.blueColor()
view.addSubview(squareView)
animator = UIDynamicAnimator(referenceView: view)
gravity = UIGravityBehavior(items: [squareView])
animator.addBehavior(gravity)
collision = UICollisionBehavior(items: [squareView])
collision.translatesReferenceBoundsIntoBoundary = true
// collision.addBoundaryWithIdentifier("barrier", fromPoint: CGPointMake(self.view.frame.origin.x, 350), toPoint: CGPointMake(self.view.frame.origin.x + self.view.frame.width, 350))
animator.addBehavior(collision)
}
override func didReceiveMemoryWarning() {
super.didReceiveMemoryWarning()
// Dispose of any resources that can be recreated.
}
}Snap
Next we will look at theUISnapBehavior class. This snaps a view to a specific point on the screen with the elasticity of a real-world snap effect. We will use a tap gesture recognizer on our view controller to enable us to detect when a user touches the screen and the point of contact so that we can snap the square view to that point.
Open the Main.storyboard file and locate the Snap view controller. Drag a Tap Gesture Recognizer from the Object library to the view controller. Next create an action for the gesture recognizer by Control-dragging from the recognizer to the SnapViewController.swift file. Name the action handleTap and choose the type of action as UITapGestureRecognizer instead of AnyObject.
Modify the SnapViewController.swift file as shown.
//
// SnapViewController.swift
// Dynamics Demo
//
// Created by Joyce Echessa on 8/26/14.
// Copyright (c) 2014 Joyce Echessa. All rights reserved.
//

import UIKit

class SnapViewController: UIViewController {

var squareView: UIView!
var snap: UISnapBehavior!
var animator: UIDynamicAnimator!

@IBAction func handleTap(sender: UITapGestureRecognizer) {

let tapPoint: CGPoint = sender.locationInView(view)

if (snap != nil) {
animator.removeBehavior(snap)
}

snap = UISnapBehavior(item: squareView, snapToPoint: tapPoint)
animator.addBehavior(snap)

}

override func viewDidLoad() {
super.viewDidLoad()

// Do any additional setup after loading the view.

squareView = UIView(frame: CGRect(x: 100, y: 100, width: 100, height: 100))
squareView.backgroundColor = UIColor.blueColor()
view.addSubview(squareView)

animator = UIDynamicAnimator(referenceView: view)

}

override func didReceiveMemoryWarning() {
super.didReceiveMemoryWarning()
// Dispose of any resources that can be recreated.
}

}UIView, UISnapBehavior and UIDynamicAnimator variables. In viewDidLoad() we instantiate the square view and add it to our main view. We also instantiate the animator. In the handleTap() action method we get the location that was tapped on and instantiate the snap behaviour to snap to that location. You can change the level of oscillations by modifying the snap behaviour’s damping property.
 You should note that we instantiate the
 UISnapBehavior instance each time a user touches the screen. We also remove any previous snap behaviour before adding a new one to the animator. An animator should have only one snap behaviour attached to a specific item. When multiple snap behaviours for the same item are added to the same animator, the snap behaviours will not be executed as it won’t know which to execute first. You can test this out by removing the if block that removes the snap behaviour from the animator. On running the program, the first tap will work as expected, the second tap will have little movement of the square (if any) and as you continue tapping the screen, and essentially adding snap behaviours to the animator, the square will not move at all.
Attach
TheUIAttachmentBehavior class can be used to create a connection between two items or between an item and a point. We are going to look at how to use it by attaching a view to an anchor point. We will then add a Pan gesture to recognise drags on the screen and we’ll update the attached view’s anchor point to where the user drags to.
Open the Main.storyboard file and locate the Attach view controller. Drag a Pan Gesture Recognizer from the Object library to the view controller. Next create an action for the gesture recognizer by Control-dragging from the recognizer to the AttachViewController.swift file. Name the action handlePan and choose the type of action as UIPanGestureRecognizer instead of AnyObject.
Then modify the SnapViewController.swift file as shown.
//
// AttachViewController.swift
// Dynamics Demo
//
// Created by Joyce Echessa on 8/26/14.
// Copyright (c) 2014 Joyce Echessa. All rights reserved.
//

import UIKit

class AttachViewController: UIViewController {

var squareView: UIView!
var anchorView: UIView!
var attachment: UIAttachmentBehavior!
var animator: UIDynamicAnimator!
var gravity: UIGravityBehavior!

@IBAction func handlePan(sender: UIPanGestureRecognizer) {

attachment.anchorPoint = sender.locationInView(view)
anchorView.center = sender.locationInView(view)

}

override func viewDidLoad() {
super.viewDidLoad()

// Do any additional setup after loading the view.

squareView = UIView(frame: CGRect(x: 100, y: 100, width: 100, height: 100))
squareView.backgroundColor = UIColor.blueColor()
view.addSubview(squareView)

anchorView = UIView(frame: CGRect(x: view.center.x, y: view.center.y, width: 20, height: 20))
anchorView.backgroundColor = UIColor.redColor()
view.addSubview(anchorView)

attachment = UIAttachmentBehavior(item: squareView, attachedToAnchor: CGPointMake(anchorView.center.x, anchorView.center.y))

animator = UIDynamicAnimator(referenceView: view)
animator.addBehavior(attachment)

gravity = UIGravityBehavior(items: [squareView])
animator.addBehavior(gravity)

}

override func didReceiveMemoryWarning() {
super.didReceiveMemoryWarning()
// Dispose of any resources that can be recreated.
}

}UIAttachmentBehavior instance with the squareView item and set its anchor point to be the location of the center of the red view. We then add the behaviour to the animator.
In the handlePan() function, we set the attachment behaviour’s anchor point to be the point of the user’s touch and then we update the red square’s position to that position so that we’ll be able to see the new location of the anchor point.
When you run the app, the blue square will fall downwards because of gravity but because of the attachment, it won’t fall completely off, instead it will start oscillating around the anchor point. On dragging on the screen the red square will move with the drag and so will the blue square’s anchor point.
Push
UIPushBehavior has two modes for creating push behaviours – continuous push behavior and an instantaneous push behavior.
Continuous push will apply a magnitude to the view for the duration of the push. This means that the view will accelerate because more energy is continually being added to it. With instantaneous push, the push happens only once, and so the view does not accelerate as it keeps on moving.
We are going to compare the behaviour of the two by creating two views and applying a different behaviour to each view.
Modify the PushViewController.swift file as shown.
//
// PushViewController.swift
// Dynamics Demo
//
// Created by Joyce Echessa on 8/26/14.
// Copyright (c) 2014 Joyce Echessa. All rights reserved.
//

import UIKit

class PushViewController: UIViewController {

var redSquareView: UIView!
var blueSquareView: UIView!
var animator: UIDynamicAnimator!

override func viewDidLoad() {
super.viewDidLoad()

// Do any additional setup after loading the view.

redSquareView = UIView(frame: CGRect(x: 40, y: 100, width: 50, height: 50))
redSquareView.backgroundColor = UIColor.redColor()
view.addSubview(redSquareView)

blueSquareView = UIView(frame: CGRect(x: 220, y: 100, width: 50, height: 50))
blueSquareView.backgroundColor = UIColor.blueColor()
view.addSubview(blueSquareView)

let continuousPush: UIPushBehavior = UIPushBehavior(items: [redSquareView], mode: UIPushBehaviorMode.Continuous)
let instantaneousPush: UIPushBehavior = UIPushBehavior(items: [blueSquareView], mode: UIPushBehaviorMode.Instantaneous)

continuousPush.setAngle( CGFloat(M_PI_2) , magnitude: 0.3);
instantaneousPush.setAngle( CGFloat(M_PI_2) , magnitude: 0.3);

animator = UIDynamicAnimator(referenceView: view)
animator.addBehavior(continuousPush)
animator.addBehavior(instantaneousPush)

}

override func didReceiveMemoryWarning() {
super.didReceiveMemoryWarning()
// Dispose of any resources that can be recreated.
}

}
Configuring your View’s Dynamic Behavior
The default physics built into the dynamic behaviors of UIKit might be okay with whatever effects you are trying to achieve on your views but you might also like to tweak this and change how an item reacts to these behaviours. Using theUIDynamicItemBehaviour class, you can assign various characteristics to your dynamic items that will affect how they react to the dynamic effects placed on them.
You do this by instantiating the UIDynamicItemBehaviour class and setting the properties of the instance that you want to change. You then add this to the animator just as you would any other behaviour.
The properties that you can set on the item’s behavior class are:
- friction – A float value of between 0 and 1 that specifies how much resistant to movement the item will be when it slides on other items or other items slide on it’s edges.
- elasticity – A float value of between 0 and 1 that specifies the item’s collision elasticity.
- density – This is used by the animator to calculate the item’s mass which affects how it reacts to the forces placed on it. It is a float value between 0 and 1 and its default value is 1.
- allowsRotation – A boolean value that determines whether the item will be able to be rotated by the animator.
- resistance – This is the resistance of the item to movement. It can be from 0 to
CGFLOAT_MAX. The higher you set the value, the more resistant the item becomes to forces applied to it. - angularResistance – This determines the item’s resistance to rotational movement.
GravityAndCollisionViewController class and add an item behaviour that will make the square view more elastic.
Add the following variable to the GravityAndCollisionViewController class.
var itemBehaviour: UIDynamicItemBehavior!viewDidLoad()
itemBehaviour = UIDynamicItemBehavior(items: [squareView])
itemBehaviour.elasticity = 0.7
animator.addBehavior(itemBehaviour)
An Example Application
We’ll now use the various behaviours we have looked at to create a view which snaps into view when launched and which the user can dismiss by either tapping a button or by grabbing the view and moving it off screen. The view will only be moved off screen if the user moves it too far south, otherwise, it just snaps back to its original place. In both cases, the view will fall off the screen. To start, add a button to the Example Application Scene inMain.storyboard. Then add an action by Control-dragging from the button to the ExampleApplicationViewController class. Name the action showAlertView. When done, you should have the below function in your ExampleApplicationViewController.swift file.
@IBAction func showAlertView(sender: UIButton) {
}ExampleApplicationViewController.swift file as shown below. I won’t go through an explanation of everything because we have already gone through the behaviours I am using in the previous examples. For what hasn’t been covered, I have included comments to explain the code.
//
// ExampleApplicationViewController.swift
// Dynamics Demo
//
// Created by Joyce Echessa on 8/26/14.
// Copyright (c) 2014 Joyce Echessa. All rights reserved.
//

import UIKit

class ExampleApplicationViewController: UIViewController {

var overlayView: UIView!
var alertView: UIView!
var animator: UIDynamicAnimator!
var attachmentBehavior : UIAttachmentBehavior!
var snapBehavior : UISnapBehavior!

override func viewDidLoad() {
super.viewDidLoad()

// Do any additional setup after loading the view.

// Initialize the animator
animator = UIDynamicAnimator(referenceView: view)

// Create the dark background view and the alert view
createOverlay()
createAlert()
}

func createOverlay() {
// Create a gray view and set its alpha to 0 so it isn't visible
overlayView = UIView(frame: view.bounds)
overlayView.backgroundColor = UIColor.grayColor()
overlayView.alpha = 0.0
view.addSubview(overlayView)
}

func createAlert() {
// Here the red alert view is created. It is created with rounded corners and given a shadow around it
let alertWidth: CGFloat = 250
let alertHeight: CGFloat = 150
let alertViewFrame: CGRect = CGRectMake(0, 0, alertWidth, alertHeight)
alertView = UIView(frame: alertViewFrame)
alertView.backgroundColor = UIColor.redColor()
alertView.alpha = 0.0
alertView.layer.cornerRadius = 10;
alertView.layer.shadowColor = UIColor.blackColor().CGColor;
alertView.layer.shadowOffset = CGSizeMake(0, 5);
alertView.layer.shadowOpacity = 0.3;
alertView.layer.shadowRadius = 10.0;

// Create a button and set a listener on it for when it is tapped. Then the button is added to the alert view
let button = UIButton.buttonWithType(UIButtonType.System) as UIButton
button.setTitle("Dismiss", forState: UIControlState.Normal)
button.backgroundColor = UIColor.whiteColor()
button.frame = CGRectMake(0, 0, alertWidth, 40.0)

button.addTarget(self, action: Selector("dismissAlert"), forControlEvents: UIControlEvents.TouchUpInside)

alertView.addSubview(button)
view.addSubview(alertView)
}

func showAlert() {
// When the alert view is dismissed, I destroy it, so I check for this condition here
// since if the Show Alert button is tapped again after dismissing, alertView will be nil
// and so should be created again
if (alertView == nil) {
createAlert()
}

// I create the pan gesture recognizer here and not in ViewDidLoad() to
// prevent the user moving the alert view on the screen before it is shown.
// Remember, on load, the alert view is created but invisible to user, so you
// don't want the user moving it around when they swipe or drag on the screen.
createGestureRecognizer()

animator.removeAllBehaviors()

// Animate in the overlay
UIView.animateWithDuration(0.4) {
self.overlayView.alpha = 1.0
}

// Animate the alert view using UIKit Dynamics.
alertView.alpha = 1.0

var snapBehaviour: UISnapBehavior = UISnapBehavior(item: alertView, snapToPoint: view.center)
animator.addBehavior(snapBehaviour)
}

func dismissAlert() {

animator.removeAllBehaviors()

var gravityBehaviour: UIGravityBehavior = UIGravityBehavior(items: [alertView])
gravityBehaviour.gravityDirection = CGVectorMake(0.0, 10.0);
animator.addBehavior(gravityBehaviour)

// This behaviour is included so that the alert view tilts when it falls, otherwise it will go straight down
var itemBehaviour: UIDynamicItemBehavior = UIDynamicItemBehavior(items: [alertView])
itemBehaviour.addAngularVelocity(CGFloat(-M_PI_2), forItem: alertView)
animator.addBehavior(itemBehaviour)

// Animate out the overlay, remove the alert view from its superview and set it to nil
// If you don't set it to nil, it keeps falling off the screen and when Show Alert button is
// tapped again, it will snap into view from below. It won't have the location settings we defined in createAlert()
// And the more it 'falls' off the screen, the longer it takes to come back into view, so when the Show Alert button
// is tapped again after a considerable time passes, the app seems unresponsive for a bit of time as the alert view
// comes back up to the screen
UIView.animateWithDuration(0.4, animations: {
self.overlayView.alpha = 0.0
}, completion: {
(value: Bool) in
self.alertView.removeFromSuperview()
self.alertView = nil
})

}

@IBAction func showAlertView(sender: UIButton) {
showAlert()
}

func createGestureRecognizer() {
let panGestureRecognizer: UIPanGestureRecognizer = UIPanGestureRecognizer(target: self, action: Selector("handlePan:"))
view.addGestureRecognizer(panGestureRecognizer)
}

// This gets called when a pan gesture is recognized. It was set as the selector for the UIPanGestureRecognizer in the
// createGestureRecognizer() function
// We check for different states of the pan and do something different in each state
// In Began, we create an attachment behaviour. We add an offset from the center to make the alert view twist in the
// the direction of the pan
// In Changed we set the attachment behaviour's anchor point to the location of the user's touch
// When the user stops dragging (In Ended), we snap the alert view back to the view's center (which is where it was originally located)
// When the user drags the view too far down, we dismiss the view
// I check whether the alert view is not nil before taking action. This ensures that when the user dismisses the alert view
// and drags on the screen, the app will not crash as it tries to move a view that hasn't been initialized.
func handlePan(sender: UIPanGestureRecognizer) {

if (alertView != nil) {
let panLocationInView = sender.locationInView(view)
let panLocationInAlertView = sender.locationInView(alertView)

if sender.state == UIGestureRecognizerState.Began {
animator.removeAllBehaviors()

let offset = UIOffsetMake(panLocationInAlertView.x - CGRectGetMidX(alertView.bounds), panLocationInAlertView.y - CGRectGetMidY(alertView.bounds));
attachmentBehavior = UIAttachmentBehavior(item: alertView, offsetFromCenter: offset, attachedToAnchor: panLocationInView)

animator.addBehavior(attachmentBehavior)
}
else if sender.state == UIGestureRecognizerState.Changed {
attachmentBehavior.anchorPoint = panLocationInView
}
else if sender.state == UIGestureRecognizerState.Ended {
animator.removeAllBehaviors()

snapBehavior = UISnapBehavior(item: alertView, snapToPoint: view.center)
animator.addBehavior(snapBehavior)

if sender.translationInView(view).y > 100 {
dismissAlert()
}
}
}

}

override func didReceiveMemoryWarning() {
super.didReceiveMemoryWarning()
// Dispose of any resources that can be recreated.
}

}
Conclusion
You have a lot of freedom with the UIKit Dynamics library creating views that act like real world objects. There are an infinite number of possibilities to how this can be applied to your app. You could, however, be tempted to add a lot of cool effects to your app, remember – just because you can, doesn’t mean you should. Whatever you chose to do with these tools, make sure you adhere to Apple’s iOS Human Interface Guidelines and you do not overwhelm your users with all the ‘cool eye candy’ on your app. One of the very first things you will read on the iOS HIG document is “Deference. The UI helps users understand and interact with the content, but never competes with it.”, so use your powers wisely.Frequently Asked Questions (FAQs) about Using UIKit Dynamics in Swift to Animate Apps
What are the basic components of UIKit Dynamics?
UIKit Dynamics is a physics-based animation framework that allows you to create realistic animations in your iOS applications. The basic components of UIKit Dynamics are behaviors, items, and the animator. Behaviors define how items should behave, items are the objects to which behaviors are applied, and the animator is the engine that applies behaviors to items.
How can I create a gravity behavior in UIKit Dynamics?
To create a gravity behavior in UIKit Dynamics, you first need to create an instance of UIGravityBehavior and add items to it. Here’s a simple example:let gravity = UIGravityBehavior(items: [myView])animator.addBehavior(gravity)
In this example, myView is a UIView instance that you want to apply gravity to.
How can I use collision behaviors in UIKit Dynamics?
Collision behaviors in UIKit Dynamics allow you to specify how items should interact when they collide. You can create a collision behavior by creating an instance of UICollisionBehavior and adding items to it. You can also specify the collision boundaries and whether items should rotate upon collision.
What is a dynamic item in UIKit Dynamics?
A dynamic item in UIKit Dynamics is an object that can have dynamic behaviors applied to it. In most cases, this will be a UIView or a UICollectionViewCell. The dynamic item protocol includes properties for the center point, bounds, transform, and allows the dynamic behavior to manipulate these properties.
How can I use attachment behaviors in UIKit Dynamics?
Attachment behaviors in UIKit Dynamics allow you to create a connection between two items or between an item and a specific anchor point. You can create an attachment behavior by creating an instance of UIAttachmentBehavior.
How can I use push behaviors in UIKit Dynamics?
Push behaviors in UIKit Dynamics allow you to apply a force to an item. You can create a push behavior by creating an instance of UIPushBehavior. You can specify the direction and magnitude of the force.
How can I use snap behaviors in UIKit Dynamics?
Snap behaviors in UIKit Dynamics allow you to make an item move to a specific point as if it’s connected to that point by a spring. You can create a snap behavior by creating an instance of UISnapBehavior.
How can I combine multiple behaviors in UIKit Dynamics?
You can combine multiple behaviors in UIKit Dynamics by adding them to the same animator. The animator will then apply all the behaviors to their respective items.
How can I control the timing of animations in UIKit Dynamics?
UIKit Dynamics doesn’t provide direct control over the timing of animations. However, you can indirectly control the timing by adjusting the properties of the behaviors. For example, you can make an animation slower by reducing the gravity constant of a gravity behavior.
How can I debug animations in UIKit Dynamics?
Debugging animations in UIKit Dynamics can be challenging because the animations are controlled by the physics engine. However, you can use the UIDynamicAnimatorDelegate protocol to get notified when the animator starts and stops, which can help you understand what’s happening. You can also use the UIDynamicBehavior.action property to execute a block of code every time the physics engine processes an animation step.
 Joyce Echessa
I am a web developer who dabbles in mobile development from time to time. You can find me on Twitter @joyceechessa to see what I’m up to.