HealthKit is a framework introduced in iOS 8 that provides a centralized, user coordinated and secure datastore for health and fitness related information. The HealthKit datastore is shared among apps so that they can access health and fitness related data.
In this tutorial I will show you how a Cordova app can read and update HealthKit data. I will create a simple app which will let users update height, weight and vitamin C consumption. To access the HealthKit framework I will use Telerik’s HealthKit Cordova Plugin.
HealthKit Datastore
The type of information that can be accessed is already specified by Apple. Apple has defined a list of identifiers for representing different types of information.
For example: HKQuantityTypeIdentifierHeight represents the height of a user.
Apple has predefined set of values for some types of information.
For example: The value of blood type needs to one of these identifiers.
Information doesn’t hold just a value, it also holds meta data like date, time and measurement unit.
For example: To update the weight of a user, we have to provide a time when the measurement was taken and the unit of measurement.
All the types of information are categorized into three categories: quantity, correlation and workout. Correlation groups quantity types.
A third-party app needs separate read and update permission for every information type.
Health App
iOS 8 and later comes with a preinstalled health app. This can be used by users to manage the complete HealthKit datastore and control permissions for third-party apps that want access to the HealthKit data store.
It tracks health and fitness related data using the motion sensor, pedometer and step counter activity tracker.
Cordova HealthKit Plugin
Let’s look at the APIs provided by Telerik’s HealthKit Cordova plugin:
Check Compatibility
To check if a operating system supports HealthKit, use the below code:
window.plugins.healthkit.available(
  function(isAvailable == true)
  {
      //supports
  }
  else
  {
      //doesn't support
  }
);
Permissions
Here is how to ask for read and write permissions for the information types:
window.plugins.healthkit.requestAuthorization({
        "readTypes"  : ["HKCharacteristicTypeIdentifierDateOfBirth", "HKQuantityTypeIdentifierActiveEnergyBurned"],
        "writeTypes" : ["HKQuantityTypeIdentifierActiveEnergyBurned", "HKQuantityTypeIdentifierHeight"]
    },
    function(){
        //accepted
    },
    function(){
        //rejected
    }
);
Users have the choice to select which types of information they want to grant access to. To check if access has been granted to a particular type, use this code:
window.plugins.healthkit.checkAuthStatus({
    "type"  : "HKQuantityTypeIdentifierHeight"
  },
  function(){
      //have permission
  },
  function(){
      //don't have permission
  }
);
Reading and Updating Quantity Type Information
To update quantity information, use the function below. Make sure to provide startDate and endDate along with sampleType.
window.plugins.healthkit.saveQuantitySample({
    "startDate": new Date(new Date().getTime() - 48 * 60 * 60 * 1000), // 2 days ago
    "endDate": new Date(), // now
    "sampleType": "HKQuantityTypeIdentifierStepCount",
    "unit": "count",
    "amount": 100
  },
  function(){
      //updated successfully
  },
  function(){
      //unsuccessfully
  }
);
To read quantity information, use the below:
window.plugins.healthkit.querySampleType({
    "startDate" : new Date(new Date().getTime() - 2*24*60*60*1000),
    "endDate"   : new Date(),
    "sampleType": "HKQuantityTypeIdentifierStepCount",
    "unit"      : "count"
  },
  function(value){
      //read successfully
  },
  function(){
      //unsuccessfully
  }
);
Reading and Updating Workout Type Information
To update workout information, use the below:
window.plugins.healthkit.saveWorkout({
    "activityType": "HKWorkoutActivityTypeCycling",
    "quantityType": "HKQuantityTypeIdentifierDistanceCycling",
    "requestReadPermission" : false, // set this if you don"t need to read workouts as well
    "startDate": new Date(), // mandatory
    "endDate": null,         // optional, use either this or duration
    "duration": 60 * 60,     // in seconds, optional, use either this or endDate
    "energy": 800,           // optional
    "energyUnit": "kcal",    // mandatory if energy is set, J | cal | kcal
    "distance": 25,          // optional
    "distanceUnit": "km"     // mandatory if distance is set, m / km / in / ft / mi
  },
  function(){
    //updated successfully
  },
  function(){
    //unsuccessfully
  }
);
To read workout information, use the below, it returns all workout types. :
window.plugins.healthkit.findWorkouts({
    // no params yet
  },
  function(value){
    //success
  },
  function(){
    //failure
  }
);
Reading and Updating Correlation Information
To update correlation information, use the below:
window.plugins.healthkit.saveCorrelation({
    "startDate": new Date(), // now
    "endDate": new Date(), // now
    "correlationType": "HKCorrelationTypeIdentifierFood", // don"t request write permission for this
    "samples": [
      {
        "startDate": Math.round(new Date().getTime()/1000), // make sure to pass these as timestamps
        "endDate": Math.round(new Date().getTime()/1000),
        "sampleType": "HKQuantityTypeIdentifierDietaryEnergyConsumed",
        "unit": "kcal",
        "amount": 500
      },
      {
        "startDate": Math.round(new Date().getTime()/1000),
        "endDate": Math.round(new Date().getTime()/1000),
        "sampleType": "HKQuantityTypeIdentifierDietaryFatTotal",
        "unit": "g",
        "amount": 25
      }
    ]
  },
  function(value){
    //success
  },
  function(){
    //failure
  }
);
To read correlation information, use the below:
window.plugins.healthkit.queryCorrelationType({
    "startDate": new Date(new Date().getTime() - 24 * 60 * 60 * 1000), // a day ago
    "endDate": new Date(), // now
    "correlationType": "HKCorrelationTypeIdentifierFood",
    "unit": "g"
  },
  function(value){
    //success
  },
  function(){
    //failure
  }
);
Creating a Health and Fitness App
Let’s get started with building a health and fitness app. This app will let users update height, weight and vitamin C for a specific date and quantity.
You can find the final code of this project on gitHub.
Starting
I won’t cover installing and creating a Cordova Application, if you haven’t done this before, read the getting started guide. Instructions to run and build the application are available on the same page.
Give the Application an appropriate name and add the platforms you want to support. I am using Cordova’s Notification plugin and Device plugin in this tutorial, find instructions on how to add these here.
As we’re using the HealthKit plugin, install it by running the command below in the cordova project directory:
cordova plugin add https://github.com/Telerik-Verified-Plugins/HealthKit
Inside the www/index.html file, add the following JavaScript and CSS files to the head tag:
<link rel="stylesheet" href="https://code.jquery.com/mobile/1.4.5/jquery.mobile-1.4.5.min.css">

<script src="https://code.jquery.com/jquery-2.1.4.min.js"></script>
<script src="https://code.jquery.com/mobile/1.4.5/jquery.mobile-1.4.5.min.js"></script>

<script type="text/javascript" src="cordova.js"></script>
Here I added jQuery and jQuery Mobile from CDNs. You can embed these files locally so that the app works without an Internet connection.
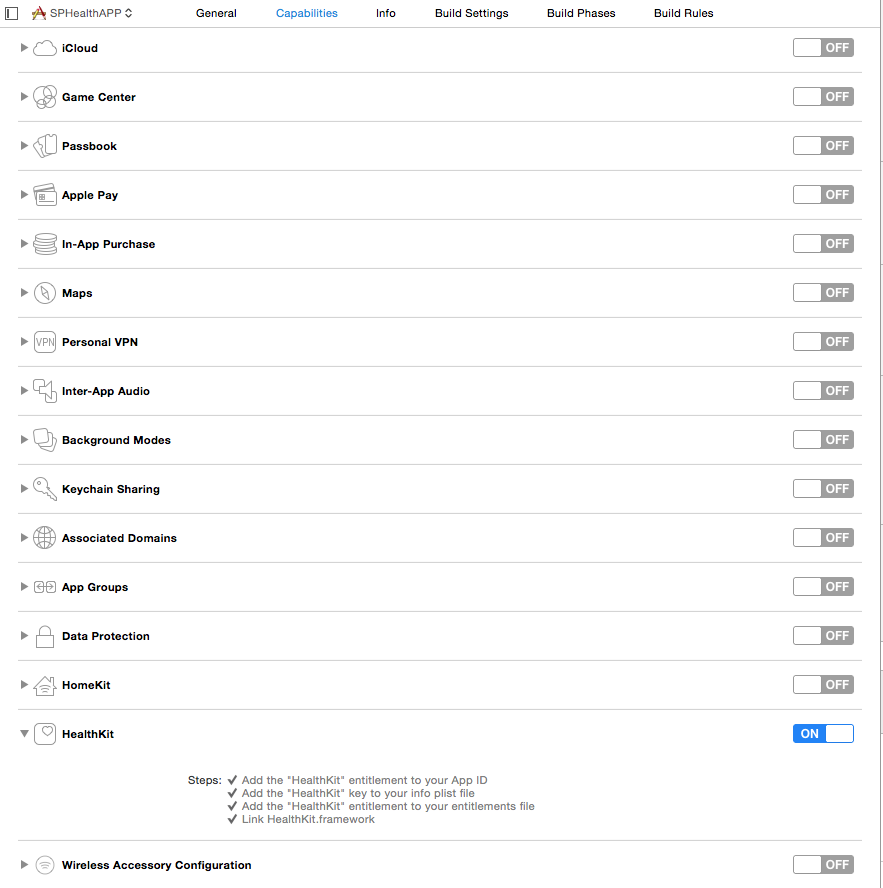
Note: While testing the app on emulator or device, make sure you have enabled HealthKit capabilities in XCode. Open the XCode project file in platforms/ios/appname.xcodeproj and switch to the capabilities tab:
Note: All JavaScript code should be place before the closing body tag.
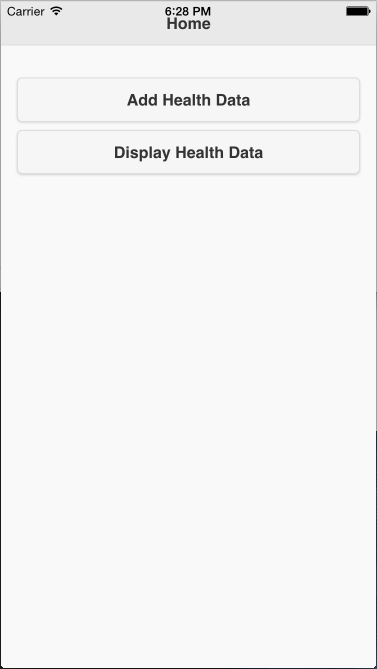
Creating the Home Screen
Let’s create a home screen which will display when the app loads.
On the home screen are two buttons. These are for updating and displaying data.
Place this code in the body tag of the index.html page (Replace the divs that are there):
<div data-role="page" id="home">
  <div data-role="header">
    <h1>Home</h1>
  </div>

  <div data-role="main" class="ui-content">
    <p>
        <a target="_blank" href="#add" style="text-decoration: none"><button>Add Health Data</button></a>
        <a target="_blank" href="#display" style="text-decoration: none"><button>Display Health Data</button></a>
    </p>
  </div>
</div>
Here is how the page looks:
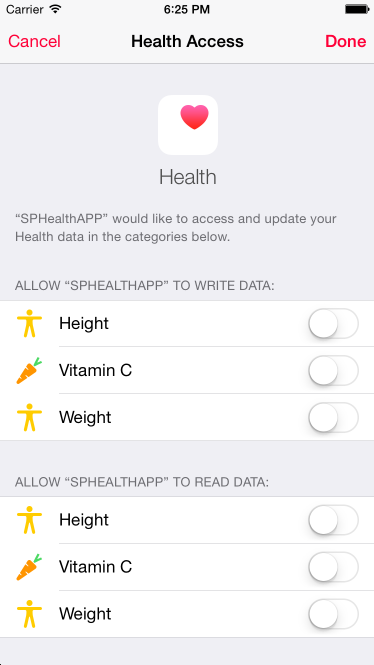
Asking Permission and Checking Compatibility
As soon as the app loads the app needs to ask permission and if user doesn’t grant it, display another page indicating that the app doesn’t have sufficient permission. Similarly, after the app loads it needs to check HealthKit compatibility.
Place this code in the index.html file underneath the main div just created:
<div data-role="page" id="not-supported">
  <div data-role="header">
    <h1>Error</h1>
  </div>

  <div data-role="main" class="ui-content">
    <p>
        <h4 id="error-info"></h4>
    </p>
  </div>
</div>
Here is the JavaScript code to check compatibility and ask for permissions. Place this in a script tag:
document.addEventListener("deviceready", function(){
    window.plugins.healthkit.available(function(isAvailable){
        if(isAvailable == false)
        {
            document.getElementById("error-info").innerHTML = "Unfortunately HealthKit is not available in this device.";
            $.mobile.changePage("#not-supported");
        }
      }
    );

    window.plugins.healthkit.requestAuthorization({
            "readTypes"  : ["HKQuantityTypeIdentifierHeight", "HKQuantityTypeIdentifierBodyMass", "HKQuantityTypeIdentifierDietaryVitaminC"],
            "writeTypes" : ["HKQuantityTypeIdentifierHeight", "HKQuantityTypeIdentifierBodyMass", "HKQuantityTypeIdentifierDietaryVitaminC"]
        },
        null,
        function(){
            document.getElementById("error-info").innerHTML = "APP doesn't have sufficient permission";
            $.mobile.changePage("#not-supported");
        }
    );

}, false);
This is how the permissions screen looks when the app asks permission:
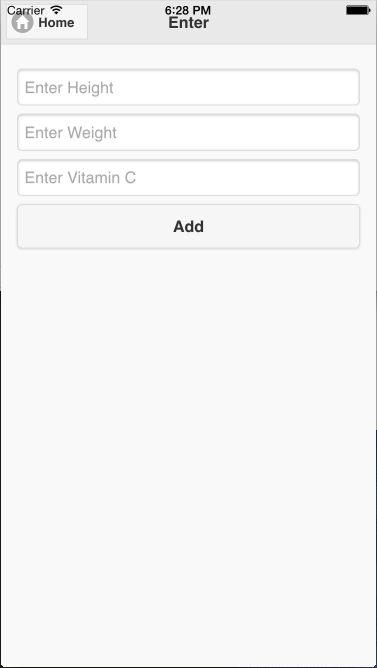
Creating the Page to Update Data
When a user clicks on the Add health Data button on the homepage a new page displays where a user can update data.
Display three text boxes (height, weight and vitamin c) and a button to update the data. Place the code in the body tag of the index.html file:
<div data-role="page" id="add">
  <div data-role="header">
    <a target="_blank" href="#home" class="ui-btn ui-icon-home ui-btn-icon-left">Home</a>
    <h1>Enter</h1>
  </div>

  <div data-role="main" class="ui-content">
    <input type="number" id="height" placeholder="Enter Height" />
    <input type="number" id="weight" placeholder="Enter Weight" />
    <input type="number" id="vitaminc" placeholder="Enter Vitamin C" />
    <a target="_blank" href="javascript:add_data()" style="text-decoration: none"><button>Add</button></a>
  </div>
</div>
Here is the code to update the information in the HealthKit datastore. Place this JavaScript code in a script tag:
function add_data()
{
  window.plugins.healthkit.checkAuthStatus({
      "type"  : "HKQuantityTypeIdentifierHeight"
    },
    function(){
      var height = document.getElementById("height").value;
      if(height != "")
      {
        window.plugins.healthkit.saveQuantitySample({
              "sampleType": "HKQuantityTypeIdentifierHeight",
              "startDate": new Date(),
              "endDate": new Date(),
              "unit": "in",
              "amount": height
          }
        );
      }
    }
  );

  window.plugins.healthkit.checkAuthStatus({
      "type"  : "HKQuantityTypeIdentifierBodyMass"
    },
    function(){
      var weight = document.getElementById("weight").value;
      if(weight != "")
      {
        window.plugins.healthkit.saveQuantitySample({
              "sampleType": "HKQuantityTypeIdentifierBodyMass",
              "startDate": new Date(),
              "endDate": new Date(),
              "unit": "kg",
              "amount": weight
          }
        );
      }
    }
  );

  window.plugins.healthkit.checkAuthStatus({
      "type"  : "HKQuantityTypeIdentifierDietaryVitaminC"
    },
    function(){
      var vitaminc = document.getElementById("vitaminc").value;
      if(vitaminc != "")
      {
        window.plugins.healthkit.saveCorrelation({
          "startDate": new Date(),
          "endDate": new Date(),
          "correlationType": "HKCorrelationTypeIdentifierFood",
          "samples": [
            {
              "startDate": Math.round(new Date().getTime()/1000),
              "endDate": Math.round(new Date().getTime()/1000),
              "sampleType": "HKQuantityTypeIdentifierDietaryVitaminC",
              "unit": "g",
              "amount": vitaminc
            }]
          }
        );
      }
    }
  );

  navigator.notification.alert("Updated Successfully");
}
Height, weight and Vitamin C are updated using the window.plugins.healthkit.saveQuantitySample function. window.plugins.healthkit.saveCorrelation demonstrates correlation and HKCorrelationTypeIdentifierFood groups nutritions.
Before updating each information type, we check if permission is granted.
Here is how the page looks:
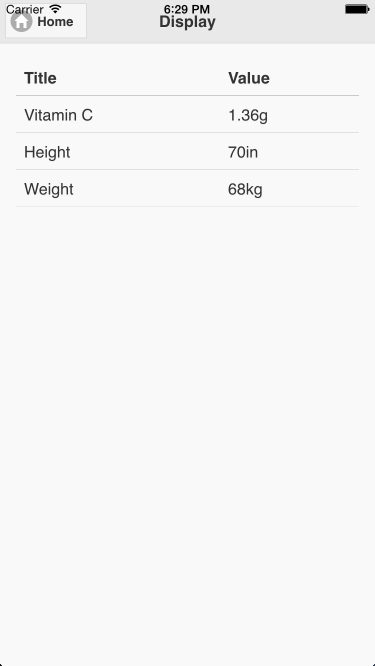
Creating a Page to Display Data
When a user clicks the Display health Data button, a new page shows the user a table of their data. Place this code in the body tag of the index.html file:
<div data-role="page" id="display">
  <div data-role="header">
    <a target="_blank" href="#home" class="ui-btn ui-icon-home ui-btn-icon-left">Home</a>
    <h1>Display</h1>
  </div>

  <div data-role="main" class="ui-content">
    <table data-role="table" data-mode="column" id="allTable" class="ui-responsive table-stroke">
      <thead>
        <tr>
          <th>Title</th>
          <th>Value</th>
        </tr>
      </thead>
      <tbody>
      </tbody>
    </table>
  </div>
</div>
Next retrieve data from HealthKit and display it. Place this code in a script tag:
$(document).on("pagebeforeshow", "#display", function() {

    $("table#allTable tbody").empty();

    window.plugins.healthkit.checkAuthStatus({
            "type": "HKQuantityTypeIdentifierHeight"
        },
        function() {
            window.plugins.healthkit.querySampleType({
                    "sampleType": "HKQuantityTypeIdentifierHeight",
                    "startDate": new Date(new Date().getTime() - 90 * 24 * 60 * 60 * 1000),
                    "endDate": new Date(),
                    "unit": "in"
                },
                function(value) {
                    if (value[0] != undefined) {
                        var html = "";
                        html = html + "<tr><td>" + "Height" + "</td><td>" + value[0].quantity + "in</td></tr>";
                        $("table#allTable tbody").append(html).closest("table#allTable").table("refresh").trigger("create");
                    }
                }
            );
        }
    );

    window.plugins.healthkit.checkAuthStatus({
            "type": "HKQuantityTypeIdentifierBodyMass"
        },
        function() {
            window.plugins.healthkit.querySampleType({
                    "sampleType": "HKQuantityTypeIdentifierBodyMass",
                    "startDate": new Date(new Date().getTime() - 90 * 24 * 60 * 60 * 1000),
                    "endDate": new Date(),
                    "unit": "kg"
                },
                function(value) {
                    if (value[0] != undefined) {
                        var html = "";
                        html = html + "<tr><td>" + "Weight" + "</td><td>" + value[0].quantity + "kg</td></tr>";
                        $("table#allTable tbody").append(html).closest("table#allTable").table("refresh").trigger("create");
                    }
                }
            );
        }
    );

    window.plugins.healthkit.checkAuthStatus({
            "type": "HKQuantityTypeIdentifierDietaryVitaminC"
        },
        function() {

            window.plugins.healthkit.queryCorrelationType({
                    "correlationType": "HKCorrelationTypeIdentifierFood",
                    "startDate": new Date(new Date().getTime() - 90 * 24 * 60 * 60 * 1000),
                    "endDate": new Date(),
                    "unit": "g"
                },
                function(value) {
                    if (value[0].samples != undefined) {
                        for (var count = 0; count < value[0].samples.length; count++) {
                            if (value[0].samples[count].sampleType == "HKQuantityTypeIdentifierDietaryVitaminC") {
                                var html = "";
                                html = html + "<tr><td>" + "Vitamin C" + "</td><td>" + value[0].samples[count].value + "g</td></tr>";
                                $("table#allTable tbody").append(html).closest("table#allTable").table("refresh").trigger("create");
                                break;
                            }
                        }
                    }
                });
        }
    );
});
The window.plugins.healthkit.querySampleType function displays height and weight. Vitamin C could be displayed using window.plugins.healthkit.querySampleType but instead I am using window.plugins.healthkit.queryCorrelationType to demonstrate correlation.
Before querying each type of information, we check if permission is granted or not.
Here is how the display page looks:
Conclusion
The app is functional and can be deployed to iOS8 or later, but is basic. The next steps to create a full app would be letting users update workouts.
Let me know your experiences trying this tutorial and ideas for expanding it.
Frequently Asked Questions (FAQs) about Using HealthKit with a Cordova App
How do I install the Cordova HealthKit plugin?
To install the Cordova HealthKit plugin, you need to have Node.js and npm installed on your system. Once you have these, you can install the Cordova command-line interface (CLI) using npm. After installing the CLI, create a new Cordova project and navigate into the project directory. Then, you can install the HealthKit plugin using the command cordova plugin add cordova-plugin-health. This command will add the HealthKit plugin to your Cordova project.
How do I request authorization to access HealthKit data?
To request authorization to access HealthKit data, you need to use the requestAuthorization method provided by the HealthKit plugin. This method takes an array of read and write permissions that you want to request. The permissions are specified as strings, such as ‘steps’, ‘heart_rate’, ‘weight’, etc. The requestAuthorization method returns a promise that resolves if the user grants the requested permissions and rejects if the user denies any of the requested permissions.
How do I read data from HealthKit?
To read data from HealthKit, you can use the query method provided by the HealthKit plugin. This method takes an object that specifies the type of data you want to read and the time range for the data. The query method returns a promise that resolves with the queried data.
How do I write data to HealthKit?
To write data to HealthKit, you can use the store method provided by the HealthKit plugin. This method takes an object that specifies the type of data you want to write and the data value. The store method returns a promise that resolves if the data is successfully written to HealthKit.
How do I monitor changes in HealthKit data?
To monitor changes in HealthKit data, you can use the monitorSampleType method provided by the HealthKit plugin. This method takes a string that specifies the type of data you want to monitor and a callback function that is called whenever the data changes. The callback function receives the new data as its argument.
How do I handle errors when using the HealthKit plugin?
When using the HealthKit plugin, errors can occur when requesting authorization, reading data, writing data, or monitoring data. These errors are returned as rejected promises. You can handle these errors by adding a catch clause to your promises. The catch clause receives an error object that contains information about the error.
How do I check if HealthKit is available on the device?
To check if HealthKit is available on the device, you can use the isAvailable method provided by the HealthKit plugin. This method returns a promise that resolves with a boolean value indicating whether HealthKit is available.
How do I use the HealthKit plugin with Angular?
To use the HealthKit plugin with Angular, you need to install the @ionic-native/health-kit package using npm. Then, you can import the HealthKit class from this package and inject it into your Angular components or services. You can then call the methods of the HealthKit class to interact with HealthKit.
How do I use the HealthKit plugin with React?
To use the HealthKit plugin with React, you need to install the react-native-health package using npm. Then, you can import the HealthKit class from this package and use it in your React components. You can then call the methods of the HealthKit class to interact with HealthKit.
How do I uninstall the HealthKit plugin?
To uninstall the HealthKit plugin, navigate to your Cordova project directory and run the command cordova plugin rm cordova-plugin-health. This command will remove the HealthKit plugin from your Cordova project.
 Narayan Prusty
Narayan is a web astronaut. He is the founder of QNimate. He loves teaching. He loves to share ideas. When not coding he enjoys playing football. You will often find him at QScutter classes.


