It may not be something you do very often but most Linux users would agree that being able to control the partitions on your storage devices is probably one of the most important aspects of mastering your operating system. So whether you want more space for your media files or you would simply like to reformat a pen drive in this article I will be introducing you to the power and simplicity of GParted in order to get the most out of Ubuntu 12.04 LTS Precise Pangolin. So let’s begin …
Using GParted
GParted is one of the most popular partitioning tools available for Linux today. It is a very powerful and easy to use graphical tool and its strength lies in the fact that it not only avoids over-complication but it can be used by both new-comers and long standing professionals to full effect. It is common to all Linux distributions and you can even use it as a Live CD. If it is not already installed, simply open Terminal and type:sudo apt-get install gpartedThe tool will require ‘root’ permissions to operate but from this point and onwards you can treat it like any other piece of software and launch GParted from the Dash. The main interface will look something like this:
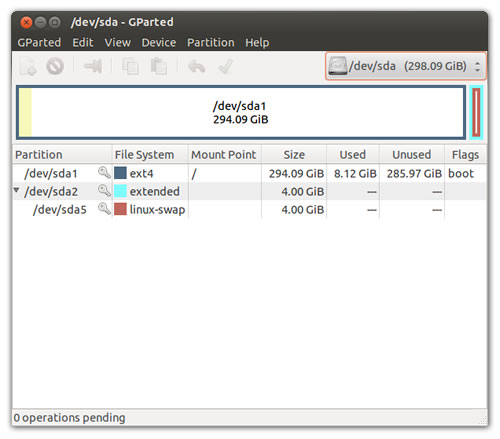 Typically the first disk GParted will read is your primary hard-disk, and from the example above you will notice that the primary hard disk shown:
- Has a total of usable storage space of up to 298.09GB (or 320GB as per the hard disk specification).
- Uses a 4.00GB Swap Partition
- Uses a 294.09GB ‘root’ partition formatted as EXT4. Identified as /dev/sda/ the root partition is flagged/marked as ‘bootable’ and is only using a mere 8.12GB of space.
Step 1. Choose the correct device
GParted will work with all types of storage devices but before doing anything it is vital that you select the correct device.Remember, simply deleting partitions indiscriminately will cause the loss of important data.In the top right-hand corner of the GParted interface use the drop-down list to select the relevant storage device:
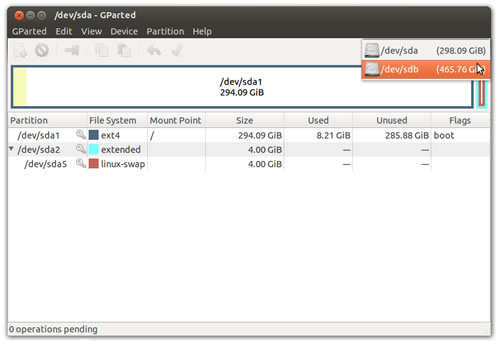 Having already installed my new 500GB internal SATA-based hard disk (as you can see from the example above) it is identified as /dev/sdb and by changing to this device, the GParted interface may now report:
 In GParted the typical notation for any hard disk is as follows:
- IDE-based drives are generally marked hdX, where X is one of the four letters a-d and hda is the primary master, hdb is the primary slave, hdc is the secondary master, and hdd is the secondary slave etc …
- SATA/SCSI based drives are marked by sdX. Where X is a letter of the alphabet and sda is typically recognised to be the primary system disk.
Step 2. Initialise the device
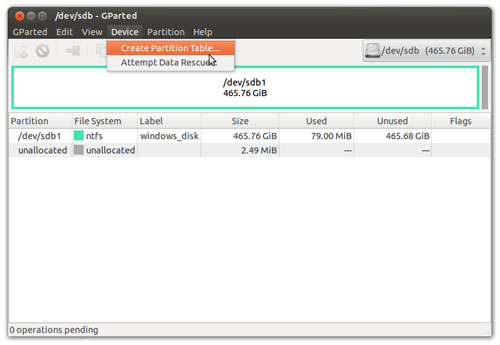
The ‘partition table’ is located at the first sector of each hard disk. It’s purpose is to memorise information about the size and location of each partition on any hard disk and typically it is limited to a maximum of four entries (or four partitions) although many more can be created in the extended partition.A recently purchased hard disks will not contain a partition table, whereas an older hard disks may contain an unwanted partition table that was used on a different system and is no longer required, so which ever way you look at it — we need to create a new partition table and by doing this we will be destroying any existing data and ‘wiping the entire drive clean’.So to mix things-up a little, let’s say my internal drive was taken from an old Windows-based machine and for this reason it will contain existing NTFS partitions that are no longer useful to me. To re-initialise the disk and wipe it clean, you would choose DEVICE > CREATE PARTITION TABLE like so:
 You will be asked to confirm this action:
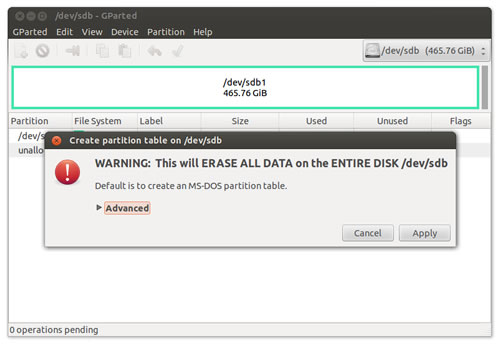 And when ready, choose APPLY to proceed.
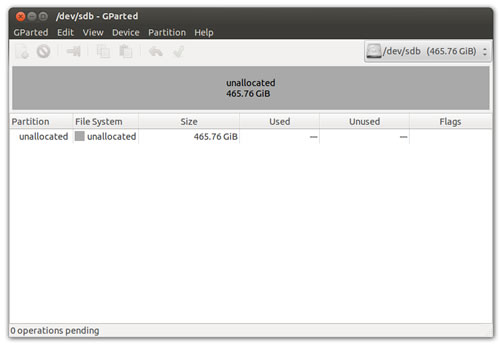
GParted will now complete the disk initialisation process and when finished it will report on the amount of unallocated (or unformatted) space at your disposal:
And when ready, choose APPLY to proceed.
GParted will now complete the disk initialisation process and when finished it will report on the amount of unallocated (or unformatted) space at your disposal:
Step 3. Format your device
As we have already mentioned, your hard disk can maintain a number of different partitions, but for the purpose of this article I will only need one — a single partition to hold my data. To do this, simply right-click on the ‘unallocated space’ and choose NEW like so: In the resulting ‘Create new Partition‘ dialogue box you will now be invited to define the relevant settings for the new partition:
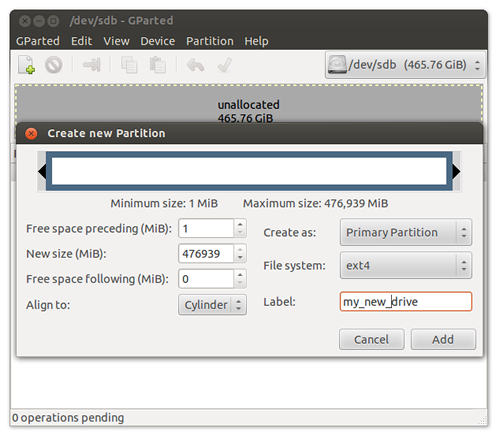 In the example shown above GParted is showing that a maximum size of 476,939 MB (nearly 477GB) is available for use and as I am intending to make a single partition for data only I will want to make the following changes:
- Create as: Primary Partition.
- File system: EXT4.
- Label: (choose an appropriate name – i.e. my_new_drive, my_data, data-disk etc…)
 GParted will not perform any actions until authorised. Therefore in order to proceed you should click the green ‘Tick’ icon to ‘Apply All Operations’.
Having done this GParted will now ask you to confirm the action like so:
GParted will not perform any actions until authorised. Therefore in order to proceed you should click the green ‘Tick’ icon to ‘Apply All Operations’.
Having done this GParted will now ask you to confirm the action like so:
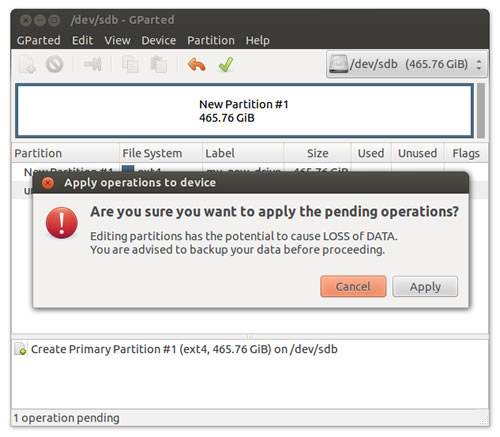 Click Apply to proceed and GParted will now perform the operation to format your device:
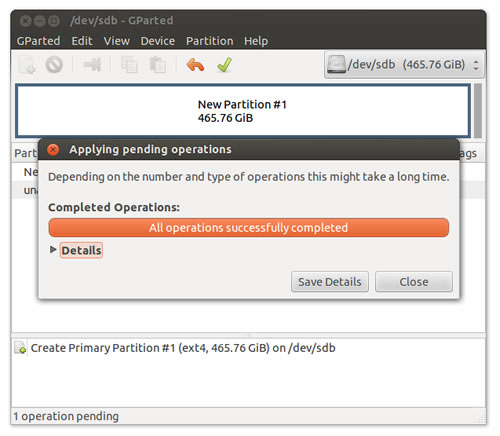 When GParted has finished, simply choose CLOSE and the tool will report on the new partition layout:
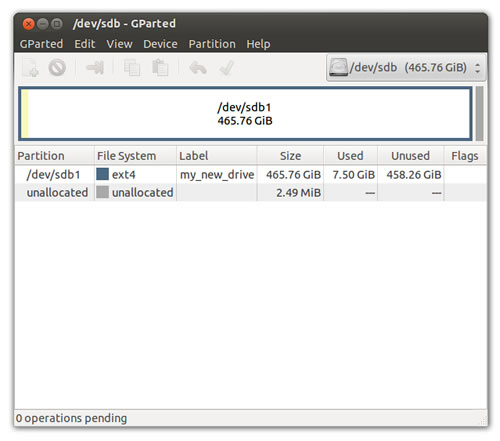 Unlike a partition table, individual partitions are marked by a number after any three letter combination. For example, in this article I have just created ‘sdb1’ which is the first partition on the second SATA/SCSI drive. Where ‘SD’ indicates the disk is a SATA/SCSI device, the letter ‘B’ implies that it is the second drive of the system and ‘1’ confirms that it is the first partition.
And that’s it. My new 500GB hard disk is ready for action, but before I go, you should be aware that you can apply the same technique to any type of storage device (pen drives, external hard drives etc …) and for those of you who prefer to use graphical tools, I am sure GParted will quickly become an invaluable friend :-)
So have fun and until next time I hope that you continue to enjoy using Ubuntu 12.04 LTS Precise Pangolin.
If you enjoyed reading this post, you’ll love Learnable; the place to learn fresh skills and techniques from the masters. Members get instant access to all of SitePoint’s ebooks and interactive online courses, like Ubuntu Linux.
Unlike a partition table, individual partitions are marked by a number after any three letter combination. For example, in this article I have just created ‘sdb1’ which is the first partition on the second SATA/SCSI drive. Where ‘SD’ indicates the disk is a SATA/SCSI device, the letter ‘B’ implies that it is the second drive of the system and ‘1’ confirms that it is the first partition.
And that’s it. My new 500GB hard disk is ready for action, but before I go, you should be aware that you can apply the same technique to any type of storage device (pen drives, external hard drives etc …) and for those of you who prefer to use graphical tools, I am sure GParted will quickly become an invaluable friend :-)
So have fun and until next time I hope that you continue to enjoy using Ubuntu 12.04 LTS Precise Pangolin.
If you enjoyed reading this post, you’ll love Learnable; the place to learn fresh skills and techniques from the masters. Members get instant access to all of SitePoint’s ebooks and interactive online courses, like Ubuntu Linux.
Frequently Asked Questions (FAQs) about Using GParted to Partition a Hard Disk
What is GParted and why should I use it for partitioning my hard disk?
GParted is a free and open-source disk partition editor for graphically managing your disk partitions. It allows you to resize, copy, and move partitions without data loss, enabling you to grow or shrink your C: drive, create space for new operating systems, or attempt data rescue from lost partitions. It supports multiple file system formats, including ext2, ext3, ext4, fat16, fat32, ntfs, and others. It’s a powerful tool that gives you full control over your disk partitions, making it a preferred choice for many users.
How do I install GParted on Ubuntu?
You can install GParted on Ubuntu by using the terminal. First, open the terminal by pressing Ctrl+Alt+T. Then, type the command ‘sudo apt-get install gparted’ and press Enter. You’ll be asked for your password. Type it in and press Enter again. The installation process will begin. Once it’s done, you can open GParted from your applications menu.
How do I create a new partition using GParted?
To create a new partition, first open GParted and select the hard disk you want to partition from the drop-down menu. Right-click on the unallocated space and select ‘New’. In the ‘Create New Partition’ dialog box, specify the size of the partition, the file system type, and the label. Click on ‘Add’ and then ‘Apply’ to create the partition.
Can I resize an existing partition using GParted?
Yes, you can resize an existing partition using GParted. To do this, select the partition you want to resize, right-click on it and select ‘Resize/Move’. In the ‘Resize/Move’ dialog box, adjust the size of the partition as needed. Click on ‘Resize/Move’ and then ‘Apply’ to save the changes.
Is it safe to use GParted? Can I lose my data?
While GParted is a reliable tool, there’s always a risk of data loss when dealing with disk partitions. It’s highly recommended to backup your data before making any changes to your partitions. Also, make sure to follow the instructions carefully and double-check everything before applying the changes.
Can I use GParted to format my hard disk?
Yes, you can use GParted to format your hard disk. To do this, select the partition you want to format, right-click on it and select ‘Format to’. Choose the desired file system type and click on ‘Apply’.
Can I use GParted on other operating systems?
GParted is primarily designed for Linux distributions, but it can also be used on other operating systems by using a Live CD or Live USB. This allows you to boot into GParted directly from the bootable media, without needing to install anything on your computer.
How do I uninstall GParted from Ubuntu?
To uninstall GParted from Ubuntu, open the terminal and type the command ‘sudo apt-get remove gparted’ and press Enter. You’ll be asked for your password. Type it in and press Enter. The uninstallation process will begin.
Can I use GParted to clone my hard disk?
While GParted itself doesn’t have a cloning feature, it can be used in conjunction with other tools like dd or Clonezilla to clone your hard disk. You can create an exact copy of your partitions or entire disk for backup or migration purposes.
What should I do if I encounter problems while using GParted?
If you encounter any problems while using GParted, you can refer to the official GParted documentation or seek help from the GParted community. You can also post your question on various Linux forums or communities, where experienced users and experts may be able to help you.
 Jonathan Hobson
Jonathan is an independent web developer, server administrator and application programmer and for nearly 20 years he has been working behind the scenes to support companies, organisations and individuals from all over the world to realise their digital ambitions. As a practitioner of many the computer languages Jonathan enjoys all things Linux, writing code, building computers, playing the XBOX, history and getting 'out and about' in the big outdoors. He thrives on new challenges, works around the clock and prides himself on being friendly, honest, reliable and ultimately, the complete professional.