In the previous part of this tutorial, we used Diffbot to set up a crawljob which would eventually harvest SitePoint’s content into a data collection, fully searchable by Diffbot’s Search API. We also demonstrated those searching capabilities by applying some common filters and listing the results.
![]()
In this part, we’ll build a GUI simple enough for the average Joe to use it, in order to have a relatively pretty, functional, and lightweight but detailed SitePoint search engine. What’s more, we won’t be using a framework, but a mere total of three libraries to build the entire application.
You can see the demo application here.
This tutorial is completely standalone, and as such if you choose to follow along, you can start with a fresh Homestead Improved instance. Note that in order to actually fully use what we build, you need a Diffbot account with Crawljob and Search API functionality.
Bootstrapping
Moving on, I’ll assume you’re using a Vagrant machine. If not, find out why you should, then come back.
On a fresh Homestead Improved VM, the bootstrapping procedure is as follows:
composer global require beelab/bowerphp:dev-master
mkdir sp_search
cd sp_search
mkdir public cache template template/twig app
composer require swader/diffbot-php-client
composer require twig/twig
composer require symfony/var-dumper --dev
In order, this:
- installs BowerPHP globally, so we can use it on the entire VM.
- creates the project’s root folder and several subfolders.
- installs the Diffbot PHP client, which we’ll use to make all calls to the API and to iterate through the results.
- installs the Twig templating engine, so we’re not echoing out HTML in PHP like peasants :)
- installs VarDumper in dev mode, so we can easily debug while developing.
To bootstrap the “front end” part of our app, we do the following:
cd public
mkdir assets assets/{css,js,img}
bowerphp install bootstrap
bowerphp install normalize.css
touch assets/css/main.css assets/js/main.js index.php token.php
I also used iconifier to generate some icons, and grabbed a big SitePoint logo image to use as the site’s background, but that’s all entirely optional.
The above commands make some folders and blank files and install Bootstrap. They also create the front controller (index.php) of our little search app. We can set up this file like so:
<?php

use SitePoint\Helpers\SearchHelper;
use Swader\Diffbot\Diffbot;

require_once '../vendor/autoload.php';
require_once '../token.php';

$loader = new Twig_Loader_Filesystem(__DIR__ . '/../template/twig');
$twig = new Twig_Environment($loader
   , array('cache' => false, 'debug' => true)
);
$vars = [];

// Get query params from request
parse_str($_SERVER['QUERY_STRING'], $queryParams);

// Check if the search form was submitted
if (isset($queryParams['search'])) {

    $diffbot = new Diffbot(DIFFBOT_TOKEN);

    // Building the search string
    $string = '';

    // Basics
    $search = $diffbot
        ->search($string)
        ->setCol('sp_search');

    // Pagination
    // ...
}

echo $twig->render('home.twig', $vars);
Essentially, we set up Twig, grab the $_GET contents, and initialize a Diffbot search call (but never execute it). Finally, we make the template file template/twig/home.twig:
Hello!If you try to run this “app” now, you should see “Hello”. You should also see a cached version of the template appear in the cache folder. Be sure to set up the token.php file first – it needs the contents:
<?php

define('DIFFBOT_TOKEN', 'my_token');
Then, we add this file to the project’s .gitignore file. Feel free to use this one and update it as needed. This is so we don’t accidentally commit our Diffbot token to Github – a stolen token can become very expensive.
Bootstrapping done, let’s get to the meat of things now.
Front end
The idea (at this point) is to have one main search field, like Google, accepting almost raw Search API queries, and three plain old text fields into which users can enter comma separated values:
- “Author(s)” will support authors. Entering several will do an “OR” search – as in, articles written either by author 1, or author 2, or author 3, etc…
- “Keywords (any)” will search for any of the given keywords in any of the Diffbot-extracted fields. This includes body, title, meta, even author, etc.
- “Keywords (all)” searches for keywords, too, but those must all appear across any of the Diffbot extracted fields.
Let’s update our home.twig file, inspired by HTML5 boilerplate.
<!doctype html>
<html lang="en">
<head>
    <meta charset="utf-8">
    <meta http-equiv="x-ua-compatible" content="ie=edge">
    <title>SitePoint Search</title>
    <meta name="description" content="Diffbot-powered SitePoint Search Engine">
    <meta name="viewport" content="width=device-width, initial-scale=1">

    <link rel="apple-touch-icon" href="/apple-touch-icon.png">

    <link rel="stylesheet" href="/bower_components/normalize.css/normalize.css">
    <link rel="stylesheet"
          href="/bower_components/bootstrap/dist/css/bootstrap.min.css"/>
    <link rel="stylesheet" href="/assets/css/main.css">

</head>
<body>
<img src="/assets/img/sp_square.png" alt="" class="bg"/>
<header>
    <h3>SitePoint
        <small>search</small>
    </h3>
</header>
<div class="content">
    <!--[if lt IE 8]>
    <p class="browserupgrade">You are using an <strong>outdated</strong>
        browser.
        Please <a href="http://browsehappy.com/">upgrade your browser</a> to
        improve
        your experience.</p>
    <![endif]-->


    <div class="search-form">
        <form id="main-form" class="submit-once">

            <div class="main-search form-group">
                <div class="input-group">
                    <input class="form-control" type="text" name="q" id="q"
                           placeholder="Full search query"/>
                <span class="input-group-btn">
                    <button class="btn btn-default" type="button"
                            data-toggle="modal"
                            data-target="#examples-table">?
                    </button>
                </span>
                </div>
                <a href="#" class="small detailed-search">>> Toggle Detailed
                    searching</a>
            </div>

            <div class="detailed-search-group" style="display: none;">
                <div class="form-group">
                    <label for="authorinput">Author(s): </label><input
                            class="form-control"
                            id="authorinput"
                            name="authors"
                            type="text"
                            placeholder="Bruno Skvorc"/>
                </div>
                <div class="form-group">
                    <label for="kanyinput">Keywords (any): </label><input
                            class="form-control"
                            id="kanyinput"
                            name="keywords_any"
                            type="text"
                            placeholder="sitepoint, diffbot, whatever"/>
                </div>
                <div class="form-group">
                    <label for="kallinput">Keywords (all): </label><input
                            class="form-control"
                            id="kallinput"
                            name="keywords_all"
                            type="text"
                            placeholder="sitepoint, diffbot, whatever"/>
                    <a href="#" class="small detailed-search">>> Toggle Detailed
                        searching</a>
                </div>

            </div>

            <div class="form-group">
                <input id="submit" class="btn btn-default" type="submit"
                       value="Search" name="search"/>
            </div>

        </form>
        {% include 'results.twig' %}
    </div>


    <script src="/bower_components/jquery/dist/jquery.min.js"></script>
    <script src="/bower_components/bootstrap/dist/js/bootstrap.min.js"></script>
    <script src="/assets/js/main.js"></script>

    {% include 'google-analytics.twig' %}

</div>
<footer>
    <a href="what.html">What's this all about?</a>
    <br>-<br>
    Built by <a href="https://twitter.com/bitfalls">@bitfalls</a> for <a
            href="https://www.sitepoint.com">SitePoint</a>. Hosted on <a
            href="http://bit.ly/do-ref">DigitalOcean</a>.
</footer>

{% include "modal-examples.twig" %}


</body>
</html>
Note that I also extracted some tedious bits of HTML into sub-templates that get included. Those include the Google Analytics snippet, the modal with search query examples, and most importantly, the results template which we’ll use to output results later. Only the results one is important, so make the file template/twig/results.twig, even if it’s empty or just has the contents “Test”. The others can be removed from the home.twig template altogether, or you can grab them from the Github repo.
Let’s now add to the whole thing a little bit of CSS flexbox magic, background imagery, and basic jQuery-isms to make the elements get along nicely. For example, we use a form class to prevent double submits, and we also use localStorage to remember if the user prefers detailed or regular searching:
// main.js

$(document).ready(function () {

    $('form.submit-once').submit(function(e){
        if( $(this).hasClass('form-submitted') ){
            e.preventDefault();
            return;
        }
        $(this).addClass('form-submitted');
        $('#submit').addClass('disabled');
    });

    var dsg = $('.detailed-search-group');
    var ms = $('.main-search');

    if (localStorage.getItem('detailed-on') == "true") {
        dsg.show();
        ms.hide();
    } else {
        dsg.hide();
        ms.show();
    }

    $(".detailed-search").click(function (e) {
        ms.toggle();
        dsg.toggle();
        localStorage.setItem('detailed-on', dsg.is(':visible'));
    });
});
/* main.css */
body {
display: flex;
min-height: 100vh;
flex-direction: column;
font-family: arial,sans-serif;
}
div.content {
display: flex;
flex: 1;
align-items: center;
justify-content: center;
}
div.content.what {
max-width: 500px;
margin: auto;
}
div.hidden {
display: none;
}
div.search-form {
width: 80%;
}
.results {
max-width: 600px;
font-size: small;
}
footer {
padding: 1.5rem;
background: #404040;
color: #999;
font-size: .85em;
text-align: center;
z-index: 1;
}
header {
text-align: center;
}
img.bg {
/* Set rules to fill background */
min-height: 100%;
min-width: 1024px;
/* Set up proportionate scaling */
width: 100%;
height: auto;
/* Set up positioning */
position: fixed;
top: -60px;
left: 0;
z-index: -1000;
opacity: 0.05;
filter: alpha(opacity=5);
}
@media screen and (max-width: 1024px) { /* Specific to this particular image */
img.bg {
left: 50%;
margin-left: -512px; /* 50% */
}
}and we have our basic interface (with the “Test” from a mocked results.twig):
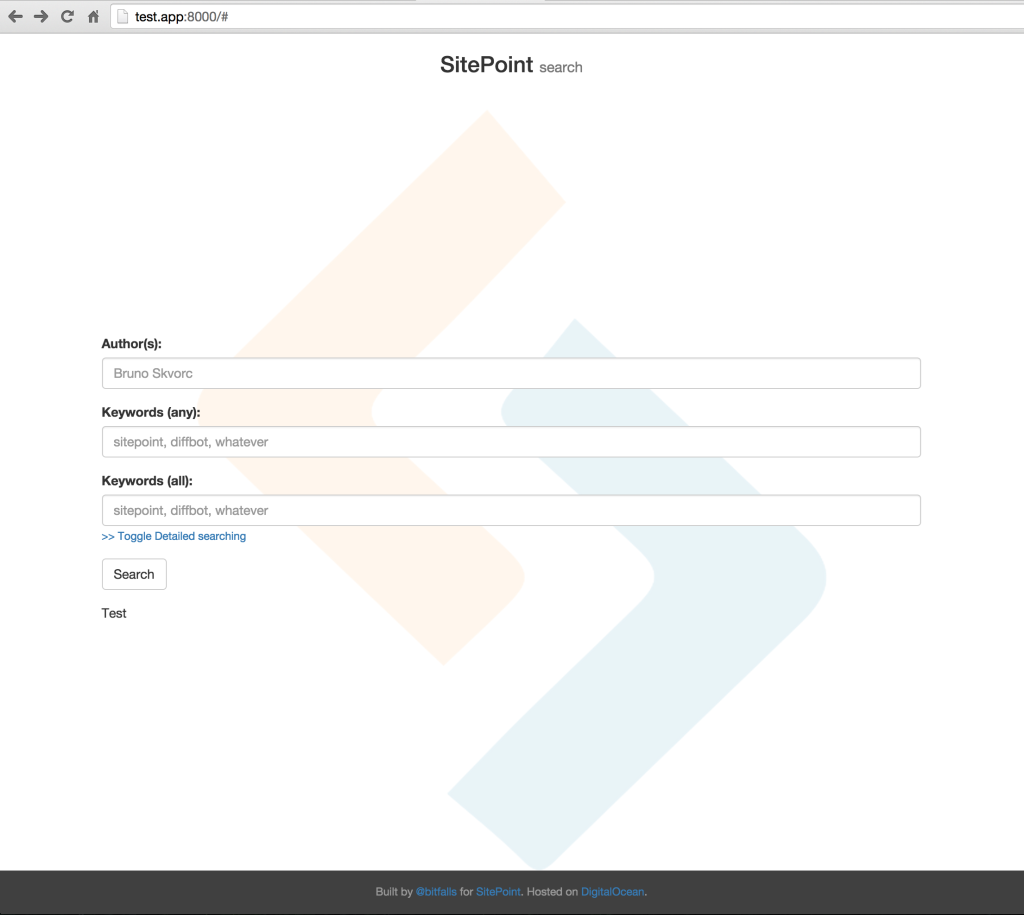
There is one main search field, similar to Google, which accepts any keyword or phrase constructed in a Search API friendly way. Think of it like direct access to the Search API. See the examples modal for what it’s about.
By clicking on “Toggle Detailed”, however, the situation changes and we have our individual search fields with which we can get more precise results. Let’s wire these fields up now.
Back end
Let’s change the Building the search string part of index.php to the following:
// Building the search string
    $searchHelper = new \SitePoint\Helpers\SearchHelper();
    $string = (isset($queryParams['q']) && !empty($queryParams['q']))
        ? $queryParams['q']
        : $searchHelper->stringFromParams($queryParams);
For the purpose of cleaner code, we abstract the query building mechanics into a brute-force SearchHelper class.
// [root]/app/helpers/SearchHelper.php

<?php

namespace SitePoint\Helpers;

class SearchHelper
{
    protected $strings = [];

    public function stringFromParams(array $queryParams)
    {
        $this->authorCheck($queryParams);
        $this->keywordCheck($queryParams);

        if (empty($this->strings)) {
            die("Please provide at least *some* search values!");
        }

        return (count($this->strings) > 1) ? implode(' AND ',
            $this->strings) : $this->strings[0];
    }

    protected function authorCheck(array $queryParams)
    {
        if (isset($queryParams['authors']) && !empty($queryParams['authors'])) {

            $authors = array_map(function ($item) {
                return 'author:"' . trim($item) . '"';
            }, explode(',', $queryParams['authors']));

            $this->strings[] = '(' . ((count($authors) > 1)
                    ? implode(' OR ', $authors)
                    : $authors[0]) . ')';
        }
    }

    protected function keywordCheck(array $queryParams)
    {
        $kany = [];
        if (isset($queryParams['keywords_any']) && !empty($queryParams['keywords_any'])) {
            $kany = array_map(function ($item) {
                return trim($item);
            }, explode(',', $queryParams['keywords_any']));
        }

        $kall = [];
        if (isset($queryParams['keywords_all']) && !empty($queryParams['keywords_all'])) {
            $kall = array_map(function ($item) {
                return trim($item);
            }, explode(',', $queryParams['keywords_all']));
        }

        $string = '';
        if (!empty($kany)) {
            $string .= (count($kany) > 1) ? '(' . implode(' OR ',
                    $kany) . ')' : $kany[0];
        }

        if (!empty($kall)) {
            $string .= ' AND ';
            $string .= (count($kall) > 1) ? implode(' AND ', $kall) : $kall[0];
        }

        if (!empty($string)) {
            $this->strings[] = '(' . $string . ')';
        }
    }
}
The method stringFromParams calls some sub-methods which look for some predefined array keys in the array of params passed in, and use them to build a Search API compliant query string. For simplicity’s sake, I included only an author and keyword check in this tutorial.
Naturally, we’ll need to add the SitePoint\Helpers namespace to Composer for autoloading:
"autoload": {
    "psr-4": {
      "SitePoint\\Helpers\\": "app/Helpers/"
    }
  }
After editing an autoload block, we need to update the autoloader with composer dump-autoload.
So far, we have query-building functionality and the search form.
Let’s test and see if we get some results back.
At the end of index.php’s if (isset($queryParams['search'])) { block, put the following:
dump($search->call());
dump($search->call(true));
Entering diffbot into the main search field, I do indeed get 13 SitePoint posts back:
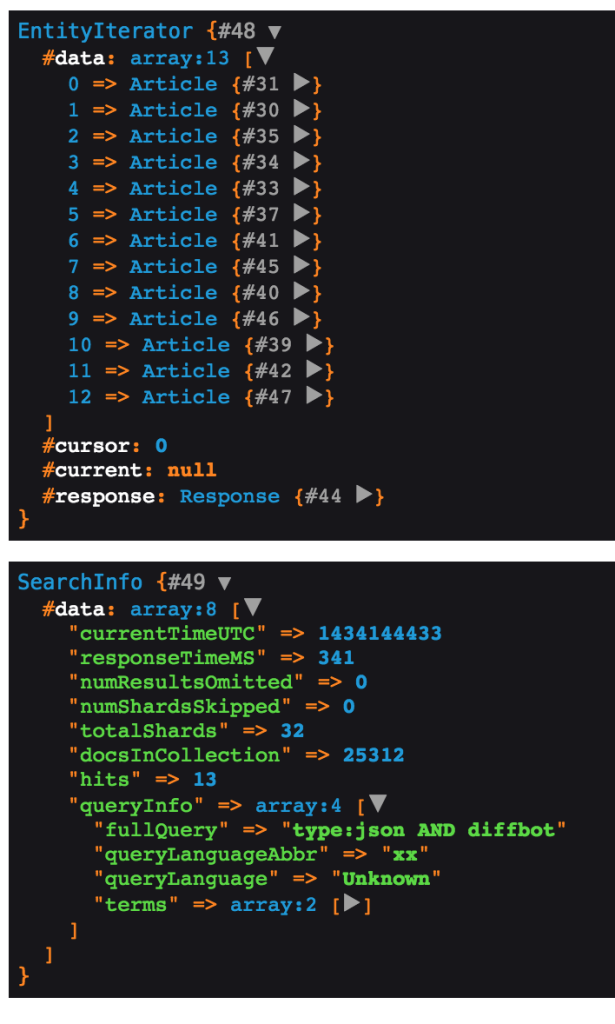
Two aspects of our app still remain:
- getting this data printed nicely in the template.
- letting users navigate through pages, in case more than 20 results are returned.
Output
To get proper output, the first thing we should do is assign the data to template variables:
// index.php modification - instead of the two `dumps`

    // Add to template for rendering
    $vars = [
        'results' => $search->call(),
        'info' => $search->call(true)
    ];
Then, we edit the results.twig template.
<hr>
<div class="results">
    {% for article in results %}

        <div class="Media post">
                <img class="Media-figure"
                     src="{{ attribute(article.meta.og, 'og:image') is defined ? attribute(article.meta.og, 'og:image') : '/apple-touch-icon.png'}}" alt="">


            <div class="Media-body">
                <h3><a target="_blank"
                       href="{{ article.pageUrl }}">{{ article.title }}</a></h3>

                <p class="author">Written by {{ article.author }}, published on {{ article.date|date("jS F, Y") }}</p>

                <p class="description">{{ article.meta.description }}</p>
            </div>
        </div>

    {% else %}
        <p>No results :(</p>

    {% endfor %}
</div>
We also need to add the media object styles to our CSS.
.Media h3 {
    font-size: 18px;
    margin-top: 0;
}

.Media h3 a {
    text-decoration: none;
    color: #1a0dab;
}

.Media h3 a:visited {
    color: #609;
}

.Media h3 a:hover {
    text-decoration: underline;
}

.Media {
    display: flex;
    align-items: flex-start;
    width: 530px;
}

.Media.post {
    margin-bottom: 23px;
}

.Media-figure {
    margin-right: 1em;
    width: 50px;
}

.Media-body {
    flex: 1;
}

.Media .description {
    line-height: 1.4;
    word-wrap: break-word;
    color: #545454;
}
Voilà. We have a basic Google-like results page:
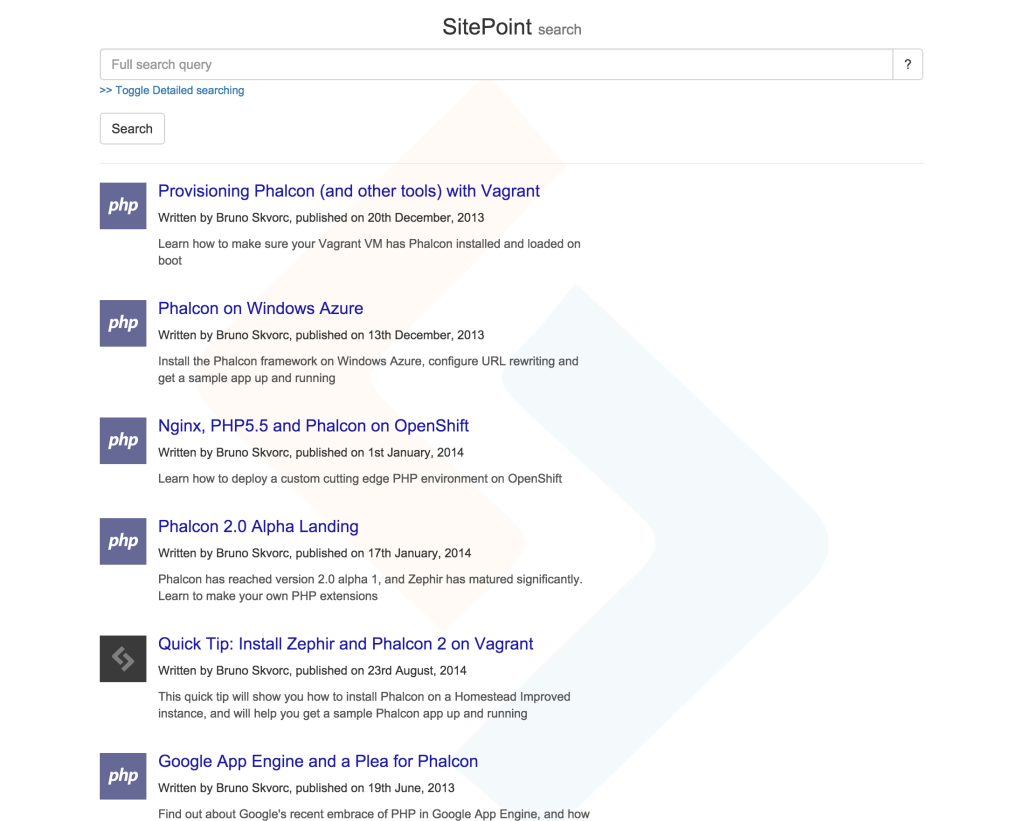
Note: Some of the results are duplicated due to different live links leading to the same resources (redirects). This is a temporary Search API limitation, and can be resolved by manually cleaning dupes out until Diffbot’s development team adds a fix.
Pagination
To add pagination, we need the total number of hits, and the number of results per page. If we know the current page, we can then easily calculate everything else. To implement pagination, we do the following.
First, we edit home.twig by adding the following code snippet under the results.twig include tag:
{% include 'pagination.twig' %}and then create that template:
{% if paginationData.pageCount > 1 %}
<nav>
<ul class="pagination">
{% if paginationData.currentPage != 1 %}
<li><a href="/{{ qprw({ 'page': 1 }) }}">« First</a></li>
{% else %}
<li class="disabled">
<span>« {{ 'First' }}</span>
</li>
{% endif %}
{% if paginationData.previousPage %}
<li><a href="/{{ qprw({ 'page': paginationData.currentPage - 1 }) }}">‹ Previous</a></li>
{% else %}
<li class="disabled">
<span>‹ {{ 'Previous' }}</span>
</li>
{% endif %}
{% for page in paginationData.pagesInRange %}
{% if page != paginationData.currentPage %}
<li>
<a href="/{{ qprw({ 'page': page }) }}">{{ page }}</a>
</li>
{% else %}
<li class="active">
<span>{{ page }}</span>
</li>
{% endif %}
{% endfor %}
{% if paginationData.nextPage %}
<li><a href="/{{ qprw({ 'page': paginationData.currentPage + 1 }) }}">Next ›</a></li>
{% else %}
<li class="disabled">
<span>{{ 'Next' }} ›</span>
</li>
{% endif %}
{% if paginationData.currentPage != paginationData.pageCount %}
<li><a href="/{{ qprw({ 'page': paginationData.pageCount }) }}">Last ({{ paginationData.pageCount }}) »</a></li>
{% else %}
<li class="disabled">
<span>{{ 'Last' }} »</span>
</li>
{% endif %}
</ul>
</nav>
{% endif %}The first two IF blocks render the first and last page links, or show them as disabled if the user is already on the first page. The loop in the middle goes through a range of pages and renders them – several before the current page, and several after, also known as “sliding pagination”. The last two blocks render the “next page” and “last page” links, respectively.
To get the paginationData values this template uses, we’ll create another helper class:
// app/Helpers/PaginationHelper.php

<?php

namespace SitePoint\Helpers;

use Swader\Diffbot\Entity\EntityIterator;
use Swader\Diffbot\Entity\SearchInfo;

class PaginationHelper
{
    public function getPaginationData(
        $currentPage,
        $itemsPerPage,
        $pageRange,
        EntityIterator $res,
        SearchInfo $searchInfo
    ) {

        $paginationData = [];

        $paginationData['pageCount'] = !count($res)
            ? 0
            : ceil($searchInfo->getHits() / $itemsPerPage);

        $paginationData['currentPage'] = ($paginationData['pageCount'] < $currentPage)
            ? $paginationData['pageCount']
            : $currentPage;

        $paginationData['pageRange'] = ($pageRange > $paginationData['pageCount'])
            ? $paginationData['pageCount']
            : $pageRange;

        $delta = ceil($paginationData['pageRange'] / 2);

        if ($paginationData['currentPage'] - $delta > $paginationData['pageCount'] - $paginationData['pageRange']) {
            $pages = range($paginationData['pageCount'] - $paginationData['pageRange'] + 1,
                $paginationData['pageCount']);
        } else {
            if ($paginationData['currentPage'] - $delta < 0) {
                $delta = $paginationData['currentPage'];
            }
            $offset = $paginationData['currentPage'] - $delta;
            $pages = range($offset + 1, $offset + $paginationData['pageRange']);
        }

        $paginationData['pagesInRange'] = $pages;

        $proximity = floor($paginationData['pageRange'] / 2);

        $paginationData['startPage'] = $paginationData['currentPage'] - $proximity;
        $paginationData['endPage'] = $paginationData['currentPage'] + $proximity;

        if ($paginationData['startPage'] < 1) {
            $paginationData['endPage'] = min($paginationData['endPage'] + (1 - $paginationData['startPage']),
                $paginationData['pageCount']);
            $paginationData['startPage'] = 1;
        }

        if ($paginationData['endPage'] > $paginationData['pageCount']) {
            $paginationData['startPage'] = max($paginationData['startPage'] - ($paginationData['endPage'] - $paginationData['pageCount']),
                1);
            $paginationData['endPage'] = $paginationData['pageCount'];
        }

        $paginationData['previousPage'] = $paginationData['currentPage'] > 1;
        $paginationData['nextPage'] = $paginationData['currentPage'] < $paginationData['pageCount'];

        return $paginationData;

    }
}
Largely inspired by a similar implementation from KnpLabs, this class assembles the array of paginationData required to make the pagination controls work. Go through it if you’re interested in what it does – it’s quite straightforward, but if not, let me know and I’ll try to explain.
Finally, we need to implement this in index.php. The final version of the file looks like this:
<?php

use SitePoint\Helpers\PaginationHelper;
use SitePoint\Helpers\SearchHelper;
use Swader\Diffbot\Diffbot;

require_once '../vendor/autoload.php';
require_once '../token.php';

$loader = new Twig_Loader_Filesystem(__DIR__ . '/../template/twig');
$twig = new Twig_Environment($loader
   , array('cache' => false, 'debug' => true)
);

$function = new Twig_SimpleFunction('qprw', function (array $replacements) {
    parse_str($_SERVER['QUERY_STRING'], $qp);
    foreach ($replacements as $k => $v) {
        $qp[$k] = $v;
    }
    return '?'.http_build_query($qp);
});
$twig->addFunction($function);

$vars = [];

// Get query params from request
parse_str($_SERVER['QUERY_STRING'], $queryParams);

$resultsPerPage = 20;
$pageRange = 9;

if (!isset($queryParams['page'])) {
    $queryParams['page'] = 1;
}

// Check if the search form was submitted
if (isset($queryParams['search'])) {

    $diffbot = new Diffbot(DIFFBOT_TOKEN);

    // Building the search string
    $searchHelper = new SearchHelper();
    $string = (isset($queryParams['q']) && !empty($queryParams['q']))
        ? $queryParams['q']
        : $searchHelper->stringFromParams($queryParams);

    // Basics
    $search = $diffbot
        ->search($string)
        ->setCol('sp_search')
        ->setStart(($queryParams['page'] - 1) * $resultsPerPage)
        ->setNum($resultsPerPage)
    ;

    // Add to template for rendering
    $results = $search->call();
    $info = $search->call(true);

    $ph = new PaginationHelper();
    $vars = [
        'results' => $results,
        'info' => $info,
        'paginationData' => $ph->getPaginationData(
            $queryParams['page'], $resultsPerPage, $pageRange, $results, $info
        )
    ];

}

echo $twig->render('home.twig', $vars);
We added a custom Twig function which we’ll use in the template to replace a query parameter with another (e.g. the page value in URLs – see qprw in the template code above). We also added variables for the number of results per page, and for the page range – the number of pages to show in the pagination control. We initialize the first page if no page param is passed in, and then modify the Search API call to accommodate this. Finally, we pass the required values into the template, and we have a working SitePoint search engine:

Autosort by date
Last but not least, we can and should work on autosorting by date of publication – right now, the Search API returns the URLs by order of processing, which can be completely random. We can accomplish this by improving our SearchHelper class:
protected function sortCheck(array $queryParams)
    {
        if (isset($queryParams['sort']) && !empty($queryParams['sort'])) {
            $operator = (isset($queryParams['dir']) && $queryParams['dir'] == 'asc') ? "revsortby:" : "sortby:";
            $this->appendStrings[] = $operator . $queryParams['sort'];
        } else {
            $this->appendStrings[] = "sortby:date";
        }
    }
We also needed to put in a new protected property:
protected $appendStrings = [];This is because the misc non-conditional query values like sortby (see documentation) can’t be boolean-linked, ergo, cannot have AND before them, else results become unpredictable. They must be separated from the query string via whitespace.
Conclusion
In this standalone part 2 of our SitePoint Search Engine tutorial, we built a simple search GUI for crawled SitePoint article data, making the entire site’s library instantly searchable across many fields. We learned how easy it is to quickly start new projects, and seen how effective tools like Twig and BowerPHP make us – all without the need to pull in whole frameworks.
I’ll be making gradual improvements (including the above) to the app in the near future as I partially integrate it into another application, so stay tuned and keep checking in! We’ll even deal with some of these upgrades in future tutorials, so if the app doesn’t look like it does in the screenshots of this tutorial when you access it here, it simply evolved. There’s always the original 0.1 version you can clone to get this exact copy.
If you have any questions or comments, please leave them below!
Frequently Asked Questions (FAQs) about Building a Search Engine with PHP
How can I optimize my PHP search engine for better performance?
Optimizing your PHP search engine involves several steps. First, ensure your database is well-structured and indexed. This will speed up the search process. Second, use efficient search algorithms. For instance, the Levenshtein distance algorithm can be used to find the closest matching string in the database. Third, consider implementing caching. This stores the results of common searches, reducing the load on your database. Lastly, use pagination to limit the number of results returned per page. This will improve the user experience by reducing load times.
How can I implement a live search feature in my PHP search engine?
A live search feature can be implemented using AJAX (Asynchronous JavaScript and XML). AJAX allows you to update a web page without reloading it. When a user types in the search box, an AJAX request is sent to the server. The server then returns the search results, which are displayed on the web page. This creates a seamless user experience.
How can I make my PHP search engine crawl multiple websites?
To make your PHP search engine crawl multiple websites, you need to create a list of URLs to crawl. This list can be stored in a database or a file. Your crawler script should then loop through this list, fetching and indexing the content of each URL. Be sure to respect the robots.txt file of each website to avoid crawling pages that are not allowed.
How can I add a spell check feature to my PHP search engine?
A spell check feature can be added using a PHP spell check library such as Pspell. This library allows you to check the spelling of a word and suggest corrections. When a user enters a search query, you can check the spelling of each word and suggest corrections if necessary. This can improve the accuracy of the search results.
How can I make my PHP search engine index PDF and Word documents?
To index PDF and Word documents, you need to extract the text content from these documents. This can be done using a PHP library such as Smalot’s PDFParser for PDF documents and PhpOffice’s PhpWord for Word documents. Once the text content is extracted, it can be indexed just like any other text content.
How can I secure my PHP search engine against SQL injection attacks?
To secure your PHP search engine against SQL injection attacks, you should use prepared statements or parameterized queries. These techniques ensure that user input is properly escaped before it is included in a SQL query. This prevents malicious SQL code from being executed.
How can I make my PHP search engine support multiple languages?
To support multiple languages, you need to implement a language detection feature. This can be done using a PHP language detection library such as Text_LanguageDetect. Once the language of a text is detected, it can be indexed under that language. You can also provide a language selection option for users to specify their preferred language.
How can I add a voice search feature to my PHP search engine?
A voice search feature can be added using a speech-to-text API such as Google’s Speech-to-Text API. This API allows you to convert spoken language into written text. When a user speaks into the microphone, the spoken language is sent to the API, which returns the written text. This text can then be used as the search query.
How can I make my PHP search engine return more relevant results?
To return more relevant results, you can implement a ranking algorithm. This algorithm assigns a score to each search result based on various factors such as the frequency of the search term in the document, the location of the search term in the document, and the overall relevance of the document. The search results are then sorted by score, with the highest scoring results appearing first.
How can I make my PHP search engine more user-friendly?
To make your PHP search engine more user-friendly, consider implementing features such as autocomplete, spell check, and pagination. Autocomplete suggests possible search terms as the user types, making it easier for them to find what they’re looking for. Spell check corrects spelling errors in the search query, improving the accuracy of the search results. Pagination limits the number of results displayed per page, making the results easier to navigate.
 Bruno Skvorc
Bruno is a blockchain developer and technical educator at the Web3 Foundation, the foundation that's building the next generation of the free people's internet. He runs two newsletters you should subscribe to if you're interested in Web3.0: Dot Leap covers ecosystem and tech development of Web3, and NFT Review covers the evolution of the non-fungible token (digital collectibles) ecosystem inside this emerging new web. His current passion project is RMRK.app, the most advanced NFT system in the world, which allows NFTs to own other NFTs, NFTs to react to emotion, NFTs to be governed democratically, and NFTs to be multiple things at once.