Released as an alternative to iOS, the first public version of Android was in 2008. It was Java based and supported Java 6, which at the time was the latest version. Two years passed and Java 8 arrived which brought cool new features including the Stream API, interfaces and the ability to use lambdas instead of SAM (Single Abstract Method).
Java 9 is on the horizon and Android developers are stuck using older versions of Java, meaning a lot of new features will be unavailable to them.
For Android developers there is now an alternative, Kotlin, a JVM language developed by JetBrains (the company behind IntelliJ and Android Studio). Like other JVM languages including Scala or Groovy, Kotlin is not officially supported by Android, but we can use it as a plugin. Building an application with a different JVM language will let you use new and different features than those available in Java 6.
Last year I wrote a tutorial on developing a simple ToDo application in Android and another on adding Content Providers to the same application. In this tutorial we are going to develop a similar application, but instead of Java we’ll use Kotlin.
Your First Kotlin File
To get started, install the latest version of Android Studio, the Kotlin and Kotlin Extensions For Android plugins.
Note: Make sure you have the latest version of Android Studio. While it’s not important for Kotlin, it has some features we are going to use in this application, such as using Vector assets as drawables.
You can find the final code for this tutorial on GitHub.
Create a new project called ToDo:
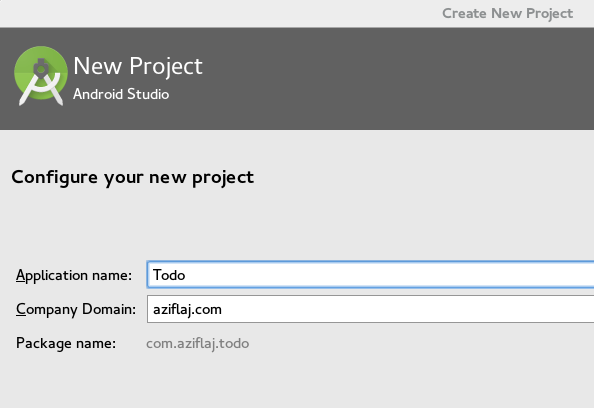
Kotlin supports all Android versions, so select whichever you prefer, leave every other option as default.
Now we’ll add Kotlin to our project. To be able to compile Kotlin files in your application, we need to add to the beginning of the app/build.gradle file (I have it set for the latest build at time of writing, 0.14.449):
buildscript {
    repositories {
        mavenCentral()
    }

    dependencies {
        classpath 'org.jetbrains.kotlin:kotlin-gradle-plugin:0.14.449'
    }
}

apply plugin: 'kotlin-android'
Add this dependency to the same file:
compile 'org.jetbrains.kotlin:kotlin-stdlib:0.14.449'Now, we can use Kotlin files instead of Java files in our application.
We’ll start by converting the MainActivity.java file into a Kotlin file. Open the MainActivity file and select the Code -> Convert Java File to Kotlin File menu item. Or you can double-press Shift and search for ‘Java to Kotlin’ for the same result. The MainActivity.java will be converted into MainActivity.kt and the resulting syntax Kotlin, similar but simpler than Java:
package com.aziflaj.todo

import android.os.Bundle
import android.support.design.widget.FloatingActionButton
import android.support.design.widget.Snackbar
import android.support.v7.app.AppCompatActivity
import android.support.v7.widget.Toolbar
import android.view.Menu
import android.view.MenuItem
import android.view.View

class MainActivity : AppCompatActivity() {

    override fun onCreate(savedInstanceState: Bundle?) {
        super.onCreate(savedInstanceState)
        setContentView(R.layout.activity_main)
        val toolbar = findViewById(R.id.toolbar) as Toolbar
        setSupportActionBar(toolbar)

        val fab = findViewById(R.id.fab) as FloatingActionButton
        fab.setOnClickListener(object : View.OnClickListener {
            override fun onClick(view: View) {
                Snackbar.make(view, "Replace with your own action", Snackbar.LENGTH_LONG)
                        .setAction("Action", null)
                        .show()
            }
        })
    }

    override fun onCreateOptionsMenu(menu: Menu): Boolean {
        // Inflate the menu; this adds items to the action bar if it is present.
        menuInflater.inflate(R.menu.menu_main, menu)
        return true
    }

    override fun onOptionsItemSelected(item: MenuItem): Boolean {
        val id = item.itemId

        if (id == R.id.action_settings) {
            return true
        }

        return super.onOptionsItemSelected(item)
    }
}
If you run the app now, it will look no different from before. You may need to clean and rebuild if you experience any issues running the app.
Designing the UI
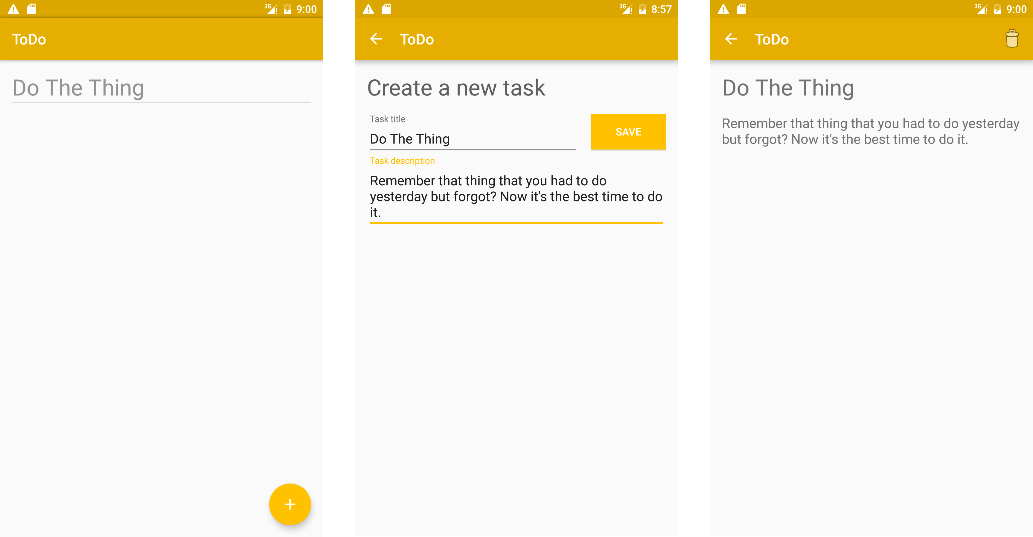
This application will have three views. The first will show the list of all tasks added by the user in a ListView. The second shows when a user clicks the FAB and will be the view where a new task is created. The third will be the detailed task view, where it can be deleted.
You can see the three finished views below:
Let’s put some default colors in the colors.xml file:
<color name="colorPrimary">#E5AE00</color>
<color name="colorPrimaryDark">#DBA600</color>
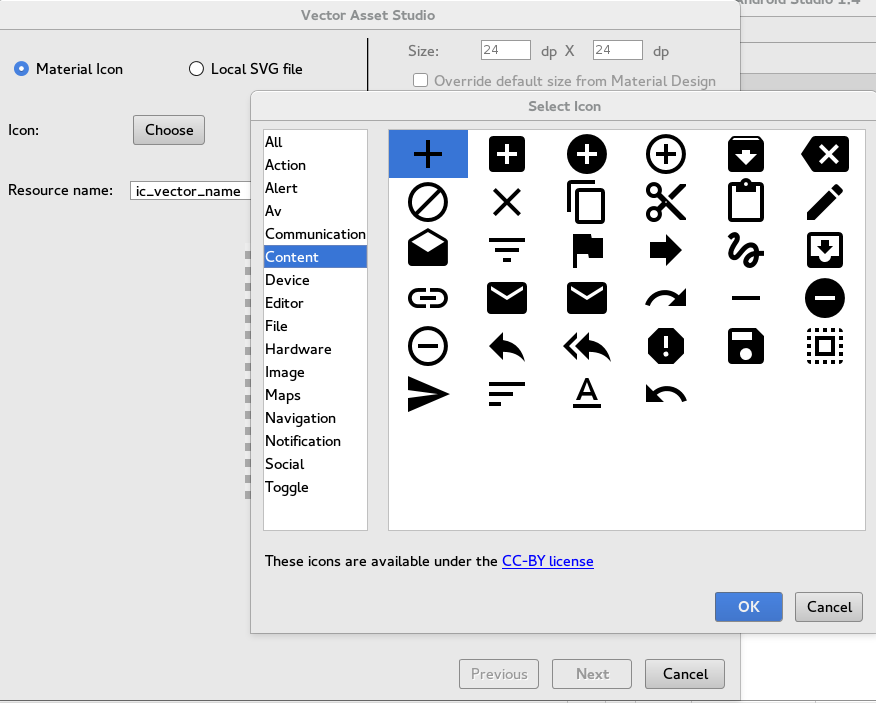
<color name="colorAccent">#FFC100</color>For the FAB, I want to show a white plus sign instead of the default mail icon. This will make the function of the FAB clearer to the user. Since Android Studio 1.4, you can use vector assets as drawables.
To create the plus sign, open the File -> New -> Vector Asset menu item. Choose the plus sign from the pre-made material icons. Save it as icadd24dp.xml and then open the file from the res/drawable folder. Set the path android:fillColor property to #FFFF.
In activitymain.xml_, set the android:src property of the FAB to @drawable/ic_add_24dp and the button now has the plus sign instead of the default mail sign.
Creating the Content Provider
Note: If you are not familiar with Content Providers, please continue reading this tutorial after my original tutorial or this tutorial, both show how to create content providers in Android.
Add a package (File -> New -> Package) called com.aziflaj.todo.data (changing the identifier accordingly) and create a file called TaskContract.kt. Put this code inside that file:
package com.aziflaj.todo.data

import android.content.ContentResolver
import android.content.ContentUris
import android.net.Uri
import android.provider.BaseColumns

object TaskContract {
    val CONTENT_AUTHORITY = "com.aziflaj.todo"
    val BASE_CONTENT_URI: Uri = Uri.parse("content://${CONTENT_AUTHORITY}")
    val TASK_PATH = TaskEntry.TABLE_NAME

    object TaskEntry {
        val CONTENT_URI: Uri = BASE_CONTENT_URI.buildUpon().appendPath(TASK_PATH).build()
        val CONTENT_TYPE = "${ContentResolver.CURSOR_DIR_BASE_TYPE}/${CONTENT_AUTHORITY}/${TASK_PATH}"
        val CONTENT_ITEM_TYPE = "${ContentResolver.CURSOR_ITEM_BASE_TYPE}/${CONTENT_AUTHORITY}/${TASK_PATH}"

        val TABLE_NAME = "tasks"

        val _ID = BaseColumns._ID
        val _COUNT = BaseColumns._COUNT
        val COL_TITLE = "title"
        val COL_DESCRIPTION = "description"

        fun buildWithId(id: Long): Uri {
            return ContentUris.withAppendedId(CONTENT_URI, id)
        }

        fun getIdFromUri(uri: Uri): Long {
            return ContentUris.parseId(uri)
        }
    }
}- The
packageandimportstatements work in the same way as Java code - Using
objectis the Kotlin way of creating a Singleton. Usually, you don’t need objects of theTaskContract, so we wrap it into a Singleton and create one instance of that. val CONTENT_AUTHORITY = "com.aziflaj.todo"is a constant, just like afinalvariable. In Kotlin, constants are created using thevalkeyword and variables using thevarkeyword. You don’t see the type of the constant because Kotlin issmart
enough to figure that out.val CONTENT_URI: Uri = ...is afinal Uriobject. In Kotlin, you specify the data type after the variable name."content://${CONTENT_AUTHORITY}": This is the Kotlin way of concatenating strings. Everything after the$sign and between brackets is an expression, and its value used instead.
The Kotlin method for creating methods is:
fun getIdFromUri(uri: Uri): Long {
    return ContentUris.parseId(uri)
}
It starts with the fun keyword, followed by the method name, with the variables in parentheses and then the return type, which in this case is Long.
It might seem a little strange in the beginning, but it’s faster to write and easier to read than Java long signature methods. By default, all methods in Kotlin are public.
In the same package, create a class called TaskDbHelper:
package com.aziflaj.todo.data

import android.content.Context
import android.database.sqlite.SQLiteDatabase
import android.database.sqlite.SQLiteOpenHelper

class TaskDbHelper(context: Context?) : SQLiteOpenHelper(context, TaskDbHelper.DATABASE_NAME, null, TaskDbHelper.DATABASE_VERSION) {

    companion object {
        val DATABASE_NAME = "task.db"
        val DATABASE_VERSION = 1
    }

    override fun onCreate(db: SQLiteDatabase?) {
        val createTaskTable = "CREATE TABLE ${TaskContract.TaskEntry.TABLE_NAME} (" +
                "${TaskContract.TaskEntry._ID} INTEGER PRIMARY KEY, " +
                "${TaskContract.TaskEntry.COL_TITLE} TEXT NOT NULL, " +
                "${TaskContract.TaskEntry.COL_DESCRIPTION} TEXT NOT NULL, " +
                " UNIQUE (${TaskContract.TaskEntry.COL_TITLE}) ON CONFLICT REPLACE" +
                ");"

        db?.execSQL(createTaskTable)
    }

    override fun onUpgrade(db: SQLiteDatabase?, oldVersion: Int, newVersion: Int) {
        db?.execSQL("DROP TABLE IF EXISTS ${TaskContract.TaskEntry.TABLE_NAME}")
        onCreate(db)
    }
}
The first line of the class may be strange. Kotlin includes the default class constructor into the class signature. So when we write
class TaskDbHelper(context: Context?) : SQLiteOpenHelper(context, TaskDbHelper.DATABASE_NAME, null, TaskDbHelper.DATABASE_VERSION)We are creating a default constructor for the TaskDbHelper class that gets a context parameter, and calls its parent constructor, which in Java would be:
super(context, TaskDbHelper.DATABASE_NAME, null, TaskDbHelper.DATABASE_VERSION);The companion object is similar to the object keyword introduced into the TaskContract. It creates what in Java are known as ‘static fields’, which belong to the class itself rather than the objects created. You can access those fields just like in Java with static fields, TaskDbHelper.DATABASE_NAME.
Instead of the @Override annotation, in Kotlin you can use override as a keyword, like in the case of override fun onCreate(db: SQLiteDatabase?). That’s obvious, but what’s with the question mark? That question mark, appended to the object type means that the object added to the method might be null. This is to prevent defensive programming and manually check if that object is null. When you access that object as db?.execSQL(createTaskTable) (note the question mark) and that object is null, instead of throwing a NullPointerException, Kotlin bypasses the call and doesn’t execute it at all.
Finally, the Content Provider itself. Create a class called TaskProvider. I will start implementing the provider by creating a companion object:
package com.aziflaj.todo.data

class TaskProvider : ContentProvider() {
    companion object {
        val TASK = 100
        val TASK_WITH_ID = 101

        fun createUriMatcher(): UriMatcher {
            var matcher: UriMatcher = UriMatcher(UriMatcher.NO_MATCH)
            val authority = TaskContract.CONTENT_AUTHORITY

            matcher.addURI(authority, TaskContract.TASK_PATH, TASK)
            matcher.addURI(authority, "${TaskContract.TASK_PATH}/#", TASK_WITH_ID)

            return matcher
        }

        val sUriMatcher: UriMatcher = createUriMatcher()
        var mOpenHelper: SQLiteOpenHelper? = null
    }
}
This creates a UriMatcher to tell if the Uri given by the user is pointing to a record in a table, or to the table itself.
The onCreate() method is simple, so we can start implementing it:
override fun onCreate(): Boolean {
    mOpenHelper = TaskDbHelper(context)
    return true
}
It creates a SQLiteOpenHelper using the TaskDbHelper we created before. You can notice here another feature of Kotlin. Instead of using the getContext() method, we are accessing the context as context.
The other method we are implementing is the query() method, probably the most complex method of a content provider:
override fun query(uri: Uri?, projection: Array<out String>?,
                   selection: String?, selectionArgs: Array<out String>?,
                   sortOrder: String?): Cursor? {
    val db: SQLiteDatabase = mOpenHelper?.readableDatabase as SQLiteDatabase
    val match: Int = sUriMatcher.match(uri)
    var cursor: Cursor?

    when (match) {
        TASK -> {
            cursor = db.query(TaskContract.TaskEntry.TABLE_NAME, projection,
                    selection, selectionArgs, null, null, sortOrder)
        }
        TASK_WITH_ID -> {
            val id: Long = TaskContract.TaskEntry.getIdFromUri(uri as Uri)
            cursor = db.query(TaskContract.TaskEntry.TABLE_NAME, projection,
                    "${TaskContract.TaskEntry._ID} = ?", arrayOf(id.toString()), null, null, sortOrder)
        }
        else -> throw UnsupportedOperationException("Unknown uri: $uri")
    }

    cursor?.setNotificationUri(context.contentResolver, uri)
    return cursor
}
The 4th line of code might seem strange, expecially the as SQLiteDatabase. This is the Kotlin way of casting. Casting might be familiar to you when using the findViewById method. Check the MainActivity.kt and you’ll see the same casting method when finding the FAB by id.
The when block is the equivalent of a switch block.
The arrayOf(id.toString()) contains three interesting things about Kotlin. The arrayOf method is a built in method of Kotlin that generates an array from a comma-separated list of arguments. The toString method is called directly into a Long variable. This means that toString is an extension method. You can create new methods (as extension methods) to a class, and in this case, call them like 10.toString(). Kotlin takes care of autoboxing as needed, so an integer variable can be an int or an Integer, depending on the situation.
We’ll be implementing the other methods of the content provider in the same way. For the insert() method:
override fun insert(uri: Uri?, values: ContentValues?): Uri? {
    val db = mOpenHelper?.writableDatabase
    val match: Int = sUriMatcher.match(uri)
    var insertionUri: Uri?
    var insertedId: Long

    when (match) {
        TASK -> {
            insertedId = db!!.insert(TaskContract.TaskEntry.TABLE_NAME, null, values)

            insertionUri = if (insertedId > 0) {
                TaskContract.TaskEntry.buildWithId(insertedId)
            } else {
                throw SQLException("Failed to insert row into $uri")
            }
        }
        else -> throw UnsupportedOperationException("Unknown uri: $uri")
    }

    context.contentResolver.notifyChange(uri, null)
    return insertionUri
}
New here is the db!!.insert(...) method call. !! means that you are sure that the instance won’t be null, so call the insert method anyway. Also new here is that we’ve assigned an if block to the insertionUri variable. In Kotlin, most blocks return a value which means that you can assign a block to a variable. Above, insertionUri will be TaskContract.TaskEntry.buildWithId(insertedId) if the insertedId is bigger than 0, or throw a SQLException.
The delete() method:
override fun delete(uri: Uri?, selection: String?, selectionArgs: Array<out String>?): Int {
    val db = mOpenHelper?.writableDatabase
    val match = sUriMatcher.match(uri)
    var deleted: Int

    var customSelection = selection ?: "1"

    when (match) {
        TASK -> deleted = db!!.delete(TaskContract.TaskEntry.TABLE_NAME, customSelection, selectionArgs)
        else -> throw UnsupportedOperationException("Unknown uri: $uri")
    }

    if (deleted > 0) {
        context.contentResolver.notifyChange(uri, null)
    }

    return deleted
}
New here is the ?: operator (A.K.A Elvis operator), which says that if selection is not null, customSelection will get its value, otherwise, it will become "1".
I’m not going to show the other methods of the content provider, because they don’t introduce any new Kotlin syntax. You can find the other methods of the content provider on GitHub
Add the content provider to the AndroidManifest.xml file just before the closing application tag.
<provider
    android:authorities="com.aziflaj.todo"
    android:name=".data.TaskProvider" />
Now the content provider is ready to use.
Finishing the UI
We will create a ListView for the MainActivity. Inside the contentmain.xml_ file and this code:
<?xml version="1.0" encoding="utf-8"?>
<FrameLayout xmlns:android="http://schemas.android.com/apk/res/android"
    xmlns:app="http://schemas.android.com/apk/res-auto"
    xmlns:tools="http://schemas.android.com/tools"
    android:layout_width="match_parent"
    android:layout_height="match_parent"
    android:paddingBottom="@dimen/activity_vertical_margin"
    android:paddingLeft="@dimen/activity_horizontal_margin"
    android:paddingRight="@dimen/activity_horizontal_margin"
    android:paddingTop="@dimen/activity_vertical_margin"
    app:layout_behavior="@string/appbar_scrolling_view_behavior"
    tools:context=".MainActivity"
    tools:showIn="@layout/activity_main">

    <ListView
        android:id="@+id/task_listview"
        android:layout_width="match_parent"
        android:layout_height="match_parent" />

</FrameLayout>
Create an empty activity called CreateTaskActivity. This will create a CreateTaskActivity.java file (which you should convert to Kotlin) and an activitycreatetask.xml file which we’ll edit now. This is the layout file that shows when the user clicks the FAB. We will create a form for a new task:
<?xml version="1.0" encoding="utf-8"?>
<LinearLayout xmlns:android="http://schemas.android.com/apk/res/android"
    xmlns:tools="http://schemas.android.com/tools"
    android:layout_width="match_parent"
    android:layout_height="match_parent"
    android:orientation="vertical"
    android:paddingBottom="@dimen/activity_vertical_margin"
    android:paddingLeft="@dimen/activity_horizontal_margin"
    android:paddingRight="@dimen/activity_horizontal_margin"
    android:paddingTop="@dimen/activity_vertical_margin"
    tools:context="com.aziflaj.todo.CreateTaskActivity">

    <TextView
        android:layout_width="match_parent"
        android:layout_height="wrap_content"
        android:text="@string/task.create.title"
        android:textColor="@color/gray_dark"
        android:paddingBottom="@dimen/activity_horizontal_margin"
        android:textSize="@dimen/text_large" />

    <LinearLayout
        android:layout_width="match_parent"
        android:layout_height="wrap_content"
        android:orientation="horizontal">

        <android.support.design.widget.TextInputLayout
            android:layout_width="0dp"
            android:layout_height="wrap_content"
            android:layout_weight="3"
            android:paddingRight="@dimen/activity_horizontal_margin">

            <EditText
                android:id="@+id/task_title"
                android:layout_width="match_parent"
                android:layout_height="wrap_content"
                android:capitalize="words"
                android:enabled="true"
                android:hint="@string/task.title.placeholder" />
        </android.support.design.widget.TextInputLayout>

        <Button
            android:id="@+id/save_task_btn"
            android:layout_width="0dp"
            android:layout_height="wrap_content"
            android:layout_weight="1"
            android:background="@color/colorAccent"
            android:text="@string/task.button.save"
            android:textColor="@color/white" />
    </LinearLayout>

    <android.support.design.widget.TextInputLayout
        android:layout_width="match_parent"
        android:layout_height="wrap_content">

        <EditText
            android:id="@+id/task_description"
            android:layout_width="match_parent"
            android:layout_height="wrap_content"
            android:capitalize="sentences"
            android:hint="@string/task.description.placeholder"
            android:inputType="textMultiLine" />
    </android.support.design.widget.TextInputLayout>
</LinearLayout>
Add these values to string.xml:
<string name="task.create.title">Create a new task</string>
<string name="task.title.placeholder">Task title</string>
<string name="task.description.placeholder">Task description</string>
<string name="task.button.save">Save</string>
And to colors.xml`
<!-- grayscale -->
<color name="white">#FFF</color>
<color name="gray_light">#DBDBDB</color>
<color name="gray">#939393</color>
<color name="gray_dark">#5F5F5F</color>
<color name="black">#323232</color>
And to dimens.xml:
<dimen name="text_large">30sp</dimen>Create a new activity called TaskDetailsActivity and convert it to Kotlin. Add this code to activitytaskdetails.xml:
<?xml version="1.0" encoding="utf-8"?>
<LinearLayout xmlns:android="http://schemas.android.com/apk/res/android"
    xmlns:tools="http://schemas.android.com/tools"
    android:layout_width="match_parent"
    android:layout_height="match_parent"
    android:orientation="vertical"
    android:paddingBottom="@dimen/activity_vertical_margin"
    android:paddingLeft="@dimen/activity_horizontal_margin"
    android:paddingRight="@dimen/activity_horizontal_margin"
    android:paddingTop="@dimen/activity_vertical_margin"
    tools:context="com.aziflaj.todo.TaskDetailsActivity">

    <TextView
        android:id="@+id/detail_task_title"
        android:layout_width="match_parent"
        android:layout_height="wrap_content"
        android:paddingBottom="@dimen/activity_vertical_margin"
        android:textSize="@dimen/text_large" />

    <TextView
        android:id="@+id/detail_task_description"
        android:layout_width="match_parent"
        android:layout_height="wrap_content"
        android:textSize="@dimen/text_medium" />

</LinearLayout>
Add this in the dimens.xml:
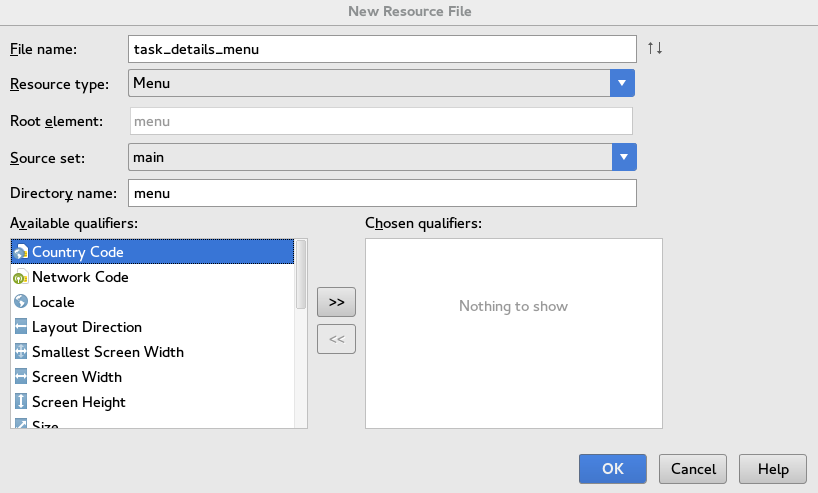
<dimen name="text_medium">18sp</dimen>Next we will create a menu for this view. Remove the menumain.xml_ file. Remove onCreateOptionsMenu and onOptionsItemSelected from MainActivity.kt. Create a new menu resource file:
<?xml version="1.0" encoding="utf-8"?>
<menu xmlns:android="http://schemas.android.com/apk/res/android"
    xmlns:app="http://schemas.android.com/apk/res-auto">

    <item
        android:id="@+id/action_delete"
        android:icon="@android:drawable/ic_menu_delete"
        android:title="@string/task.details.menu.delete"
        app:showAsAction="always" />
</menu>
Add this to strings.xml:
<string name="task.details.menu.delete">Delete</string>In TaskDetailsActivity.kt, override the necessary methods:
override fun onCreateOptionsMenu(menu: Menu?): Boolean {
    menuInflater.inflate(R.menu.task_details_menu, menu)
    return true
}

override fun onOptionsItemSelected(item: MenuItem?): Boolean {
    val id = item?.itemId

    when (id) {
        R.id.action_delete -> {
            //delete task
            return true
        }
    }

    return super.onOptionsItemSelected(item)
}
Here we expand the menu and make it ready to handle user events clicking the delete button on the menu.
Finally, we have the UI ready to handle data.
Storing New Tasks
We use the CreateTaskActivity class to insert new tasks, but the user needs a way to switch to that view. Open the MainActivity.kt file and set this listener to the FAB:
val newTaskFab = findViewById(R.id.fab) as FloatingActionButton

newTaskFab.setOnClickListener({ view ->
    val newTaskIntent = Intent(applicationContext, CreateTaskActivity::class.java)
    startActivity(newTaskIntent)
})
We’re now ready to store new tasks into the embedded SQLite database. We have the Content Provider and the UI, now we read from the EditText fields and store the data into the database. Inside the onCreate method of the CreateTaskActivity.kt file, after setting the view layout (setContentView(R.layout.activity_create_task)), add this code:
val saveBtn = findViewById(R.id.save_task_btn) as Button

saveBtn.setOnClickListener({ view ->
    val taskTitleEditText = findViewById(R.id.task_title) as EditText
    val taskTitle = taskTitleEditText.text.toString()

    val taskDescriptionEditText = findViewById(R.id.task_description) as EditText
    val taskDescription: String = taskDescriptionEditText.text.toString()

    if (taskTitle.isEmpty() or taskDescription.isEmpty()) {
        val inputEmpty = getString(R.string.error_input_empty)

        Toast.makeText(applicationContext, inputEmpty, Toast.LENGTH_LONG).show()
    } else {
        val values = ContentValues()
        values.put(TaskEntry.COL_TITLE, taskTitle)
        values.put(TaskEntry.COL_DESCRIPTION, taskDescription)

        var inserted = contentResolver.insert(TaskEntry.CONTENT_URI, values)

        startActivity(Intent(this, MainActivity::class.java))

        Log.d("New Task", "inserted: $inserted")
    }
})
Here we are using a lambda instead of a SAM interface. This is the Kotlin way of writing lambda methods, where view is the argument, and what comes after -> is the lambda body. With this code, we’re reading from the fields and storing data in the database using the insert() method of the Content Provider. If the task title or description is empty, we show an error as a Toast. Add the error message into the strings.xml file:
<string name="error.input.empty">Title or description is empty</string>When you add a new record to the database, you can see in LogCat if it’s added or not.
List ALL the Tasks
To list tasks, we’ll use a CursorLoader that queries the database and creates a Cursor object. This Cursor object is used by a CursorAdapter to populate the ListView in the MainActivity class.
Seems like a lot to do, so let’s start by creating the view of a single item of the list.
Create a layout file called tasklistviewitem.xml:
<?xml version="1.0" encoding="utf-8"?>
<LinearLayout xmlns:android="http://schemas.android.com/apk/res/android"
    android:layout_width="match_parent"
    android:layout_height="match_parent"
    android:orientation="vertical">

    <TextView
        android:id="@+id/list_item_title"
        android:layout_width="wrap_content"
        android:layout_height="wrap_content"
        android:textColor="@color/gray"
        android:textSize="@dimen/text_large" />

</LinearLayout>
We will expand this in the CursorAdapter. So create a Kotlin class, called TaskAdapter and add this code:
package com.aziflaj.todo

import android.content.Context
import android.database.Cursor
import android.view.LayoutInflater
import android.view.View
import android.view.ViewGroup
import android.widget.CursorAdapter
import android.widget.TextView
import com.aziflaj.todo.data.TaskContract


class TaskAdapter(context: Context, cursor: Cursor?, flags: Int) : CursorAdapter(context, cursor, flags) {
    override fun newView(context: Context?, cursor: Cursor?, parent: ViewGroup?): View? {
        return LayoutInflater.from(context).inflate(R.layout.task_listview_item, parent, false)
    }

    override fun bindView(view: View?, context: Context?, cursor: Cursor?) {
        var titleTextView = view?.findViewById(R.id.list_item_title) as TextView

        val TITLE_COL_INDEX = cursor?.getColumnIndex(TaskContract.TaskEntry.COL_TITLE) as Int
        val taskTitle = cursor?.getString(TITLE_COL_INDEX)
        titleTextView.text = taskTitle
    }
}
Open MainActivity.kt and make it implement android.app.LoaderManager.LoaderCallbacks<Cursor>:
class MainActivity : AppCompatActivity(), android.app.LoaderManager.LoaderCallbacks<Cursor> {

    override fun onCreateLoader(id: Int, args: Bundle?): android.content.Loader<Cursor>? {
        return CursorLoader(applicationContext,
                TaskContract.TaskEntry.CONTENT_URI,
                null, null, null, null)
    }

    override fun onLoadFinished(loader: android.content.Loader<Cursor>?, data: Cursor?) {
        taskAdapter?.swapCursor(data)
    }

    override fun onLoaderReset(loader: android.content.Loader<Cursor>?) {
        taskAdapter?.swapCursor(null)
    }

    companion object {
        val TASK_LOADER = 0 //the loader id
        var taskAdapter: TaskAdapter? = null
        var listView: ListView? = null
    }

    override fun onCreate(savedInstanceState: Bundle?) {
        super.onCreate(savedInstanceState)
        setContentView(R.layout.activity_main)
        val toolbar = findViewById(R.id.toolbar) as Toolbar
        setSupportActionBar(toolbar)

        loaderManager.initLoader(TASK_LOADER, null, this)

        listView = findViewById(R.id.task_listview) as ListView
        taskAdapter = TaskAdapter(applicationContext, null, 0)

        listView?.adapter = taskAdapter

        listView?.setOnItemClickListener({ parent, view, position, id ->
            val currentTask: Cursor? = parent.getItemAtPosition(position) as Cursor

            var detailsIntent = Intent(this, TaskDetailsActivity::class.java)
            val TASK_ID_COL = currentTask?.getColumnIndex(TaskContract.TaskEntry._ID) as Int
            val _id = currentTask?.getLong(TASK_ID_COL) as Long
            val taskUri = TaskContract.TaskEntry.buildWithId(_id)

            detailsIntent.setData(taskUri)
            startActivity(detailsIntent)
        })

        val newTaskFab = findViewById(R.id.fab) as FloatingActionButton

        newTaskFab.setOnClickListener({ view ->
            val newTaskIntent = Intent(applicationContext, CreateTaskActivity::class.java)
            startActivity(newTaskIntent)
        })
    }
}
Link the adapter to the ListView, adding this code to the onCreate method:
listView = findViewById(R.id.task_listview) as ListView
taskAdapter = TaskAdapter(applicationContext, null, 0)

listView?.adapter = taskAdapter
Detailed View for Tasks
If you click a task, nothing happens. We want to redirect the user to the detailed view of the task. Add this snippet after setting the adapter of the list view:
listView?.setOnItemClickListener({ parent, view, position, id ->
    val currentTask: Cursor? = parent.getItemAtPosition(position) as Cursor

    var detailsIntent = Intent(this, TaskDetailsActivity::class.java)
    val TASK_ID_COL = currentTask?.getColumnIndex(TaskContract.TaskEntry._ID) as Int
    val _id = currentTask?.getLong(TASK_ID_COL) as Long
    val taskUri = TaskContract.TaskEntry.buildWithId(_id)

    detailsIntent.setData(taskUri)
    startActivity(detailsIntent)
})
Open TaskDetailsActivity.kt and replace the code with this:
package com.aziflaj.todo

import android.content.Intent
import android.net.Uri
import android.support.v7.app.AppCompatActivity
import android.os.Bundle
import android.view.Menu
import android.view.MenuItem
import android.widget.TextView
import com.aziflaj.todo.data.TaskContract

class TaskDetailsActivity : AppCompatActivity() {

    companion object {
        var taskId = 0L
    }

    override fun onCreate(savedInstanceState: Bundle?) {
        super.onCreate(savedInstanceState)
        setContentView(R.layout.activity_task_details)

        val taskUri = intent?.data as Uri
        taskId = TaskContract.TaskEntry.getIdFromUri(taskUri)

        val cursor = contentResolver.query(taskUri, null, null, null,null)
        cursor.moveToFirst()
        val taskTitle = cursor.getString(cursor.getColumnIndex(TaskContract.TaskEntry.COL_TITLE))
        val taskDescr = cursor.getString(cursor.getColumnIndex(TaskContract.TaskEntry.COL_DESCRIPTION))

        var titleTextView = findViewById(R.id.detail_task_title) as TextView
        var descrTextView = findViewById(R.id.detail_task_description) as TextView

        titleTextView.text = taskTitle
        descrTextView.text = taskDescr
    }

    override fun onCreateOptionsMenu(menu: Menu?): Boolean {
        menuInflater.inflate(R.menu.task_details_menu, menu)
        return true
    }

    override fun onOptionsItemSelected(item: MenuItem?): Boolean {
        val id = item?.itemId

        when (id) {
            R.id.action_delete -> {
                val deleted = contentResolver.delete(
                        TaskContract.TaskEntry.CONTENT_URI,
                        "${TaskContract.TaskEntry._ID} = ?",
                        arrayOf(taskId.toString()))

                if (deleted == 1) {
                    startActivity(Intent(this, MainActivity::class.java))
                }

                return true
            }
        }

        return super.onOptionsItemSelected(item)
    }
}
Here we:
- Get the Uri passed with the Intent
- Query the database based on the Uri, and fetch the task title and description
- Update the UI with the values queried.
- Add functionality to the delete button in the menu
Wrapping Up

And that’s how you build an Android application in Kotlin. While Kotlin is not yet stable, it has features which I feel will appeal to existing Android developers.
Kotin is not called Swift for Android
for no reason, it speeds up and simplifies the development process, truly making it ‘swift’. To conclude, what are the advantages and disadvantages?
Advantages of Kotlin
- Faster to develop
- Easier to maintain
- No
NullPointerExceptions and defensive programming
Disadvantages of Kotlin
- Large APK size (5.2MB for the app we developed)
- Slower compilation process
I feel these disadvantages might not exist for long after the release of the stable version. For further information on Kotlin read the language reference guide.
What are your thoughts on Kotlin? Would you use it?
Frequently Asked Questions (FAQs) about Streamlining Android Java Code with Kotlin
What are the key differences between Kotlin and Java in Android development?
Kotlin and Java are both powerful languages used in Android development. However, Kotlin offers more concise syntax, null safety, and full interoperability with Java. It also supports functional programming, which Java does not. Kotlin’s syntax is more expressive, making the code easier to read and write. On the other hand, Java has a larger community and more resources available, which can be beneficial for beginners.
How can I convert my existing Java code to Kotlin?
Android Studio provides a built-in tool for converting Java code to Kotlin. You can access this tool by navigating to “Code” > “Convert Java File to Kotlin File” or by using the shortcut Ctrl + Alt + Shift + K. The tool will automatically convert your Java code to Kotlin, but it’s important to review the converted code as the tool may not always produce the most idiomatic Kotlin code.
What are the benefits of using Kotlin over Java for Android development?
Kotlin offers several benefits over Java for Android development. It has a more concise and expressive syntax, which can reduce the amount of boilerplate code you need to write. Kotlin also includes several modern features such as lambda expressions, extension functions, and null safety, which can make your code safer and more readable. Additionally, Kotlin is fully interoperable with Java, so you can use existing Java libraries and frameworks in your Kotlin code.
Is it necessary to rewrite my entire app in Kotlin if I want to start using it?
No, it’s not necessary to rewrite your entire app in Kotlin if you want to start using it. Kotlin is fully interoperable with Java, which means you can have both Kotlin and Java code in the same project. You can start by writing new features in Kotlin, or by gradually converting existing Java code to Kotlin.
How does Kotlin handle null safety and how is it different from Java?
Kotlin includes built-in null safety, which can help prevent null pointer exceptions, a common source of bugs in Java. In Kotlin, types are non-nullable by default. If you want to allow a variable to hold a null value, you must explicitly declare it as nullable. This is different from Java, where any variable can hold a null value, leading to potential null pointer exceptions.
What are extension functions in Kotlin and how can they be used?
Extension functions in Kotlin allow you to add new functions to existing classes without modifying their source code. This can make your code more readable and expressive. For example, you could add a function to the String class that reverses the characters in the string. You can then call this function on any string object, just like any other method of the String class.
How does Kotlin support functional programming and how is it different from Java?
Kotlin supports functional programming through features such as lambda expressions, higher-order functions, and collection operators like map and filter. These features can make your code more concise and expressive. Java also supports some functional programming features, but not to the same extent as Kotlin.
What are coroutines in Kotlin and how can they be used in Android development?
Coroutines are a feature of Kotlin that allow you to write asynchronous code in a sequential style, making it easier to read and understand. They can be used in Android development to handle tasks that need to run in the background, such as network requests or database operations. Coroutines can help you avoid callback hell and make your code more efficient by allowing you to run multiple tasks concurrently.
How can I start learning Kotlin for Android development?
There are many resources available to help you start learning Kotlin for Android development. The official Kotlin website provides a comprehensive guide to the language, including tutorials and examples. Android’s official documentation also includes a guide to using Kotlin in Android development. Additionally, there are many online courses and tutorials available on platforms like Udacity, Coursera, and YouTube.
Can I use Java libraries and frameworks in my Kotlin code?
Yes, you can use Java libraries and frameworks in your Kotlin code. Kotlin is fully interoperable with Java, which means you can use existing Java code and libraries in your Kotlin projects. This allows you to take advantage of the vast ecosystem of Java libraries and frameworks while enjoying the benefits of Kotlin’s modern features and concise syntax.
 Aldo Ziflaj
Aldo is a Code-Lover and a student of Computer Engineering from Albania. His short-term goal is that of becoming a full-stack developer, focusing on Android, Ruby technologies and DevOps techniques.